Photosites on image sensors come in different sizes. The size of a photosite on a sensor is based on the size of the sensor, and number of photosites on the sensor. Some sensor sizes have differing sizes of photosites, because more have been crammed onto the sensor. However different sensor sizes can also have the same sized photosites. For example the Olympus E-M5(II) (16.1MP) has a photosite size of 13.99 µm², and a Fujifilm X-T3 sporting 26.1MP has the same photosite size.
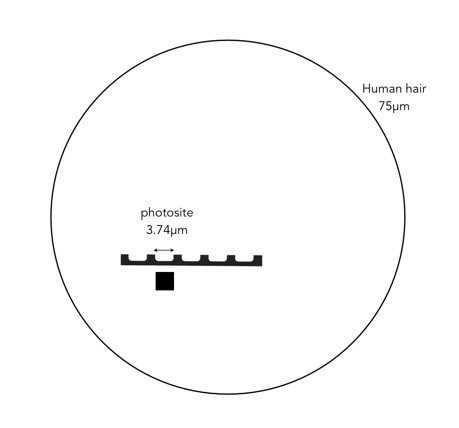
The size of a photosite, is often termed pixel pitch, and is measured in micrometres (or in old terms microns). A micrometre, represented by the symbol µm, is a unit of measure equivalent to one millionth of a metre. It is equivalent to 0.001mm. To put this into context, the nominal diameter of a human hair is 75µm. The area of a photosite is represented by µm². For example, the Olympus E-M5(II) has a pitch of 3.74µm, or 0.00374mm, which is 20 times smaller than a human hair.
Comparison the size of a photosite with a human hair
In order to increase the number of photosites a sensor has, their size has to decrease. Consider an example using a Micro-Four-Thirds (MFT) sensor. An Olympus OM-D E-M5 Mark II fits 16.1 million photosites onto the sensor, whereas an Olympus OM-D E-M1 Mark II fits 20.4 million. This means the pixels on the E-M1(II) will be smaller. This works out to a pixel area of roughly 13.99 µm² versus 11.02µm². This may seem trivial, but even a small difference in size may impact how a photosite functions.
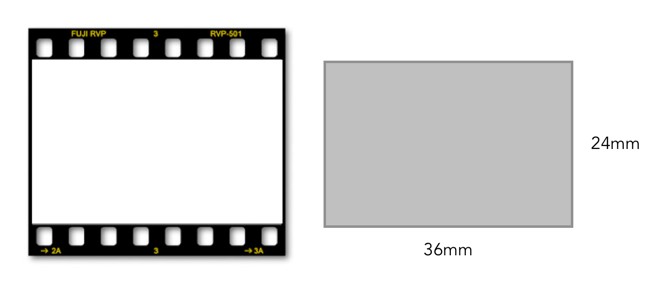
Now that we have looked at the origin of 35mm film cameras, let’s turn our attention to full-frame sensors. A full-frame sensor is so named because the sensor is 24mm×36mm in size, equivalent in size to a film frame in a film camera. Why are we basing new technology on old concepts? Mostly for posterity’s sake, because why fix something that isn’t broken? The 24mm×36mm size first appeared in the early 20th century, and eventually became the standard film “frame size”. When the transition to digital occurred, keeping the image size the same meant that photographers could easily transition the use of legacy lenses onto digital bodies. The 35mm format became the reference format. Full frame is now the largest consumer sensor format before medium format (like the Fujifilm GFX100).
An analog film frame versus a digital full-frame
The size of a full-frame sensor has a significant impact on image quality. The large surface area means that more light can be gathered by the sensor, which is particularly beneficial in low-light conditions. The photosites often have a large pitch (more commonly referred to by manufacturers as the pixel pitch), it provides a broad dynamic range, and good low-light/high ISO performance. For example, the Leica SL2 (47.3MP) has a pixel pitch of 4.3μm, whereas the Olympus E-M1 (MII) with a MFT sensor has a pixel pitch of 3.32μm. When the area of a photosite is calculated, a photosite on the SL2 is 68% larger than one on the E-M1.
Pixel pitch differences: MFT vs. FF
The downside of a full-frame sensor is that camera’s must be larger to accommodate the large sensor.Larger cameras mean heavier cameras.
Yesterday I was out int he backyard, cleaning out a sled that had tipped over and filled up with snow in the last snowstorm. Since then the snow had melted, and then refroze when it got cold again. Today there was a ½” (1cm) thick coating of ice, and about 4″ of water underneath. As I poured it out, it shattered. But then I picked up a piece and looked at it. It was consistently thick, and very clear. I put this down to the relative purity of the snow falling, and the process of refreezing. Then I thought, what would happen if I used a piece of this as a filter, through which I would take a photo?
Fig 1: A piece of the ice filter
There are likely very few organic substances which can be used to make camera (lens) filters. Water has to be pure enough so as to create somewhat transparent ice filters. Most water is not 100% pure, due to dissolved gases like oxygen, and impurities like suspended sediments, dust particles or flecks of minerals like calcium. When the water freezes, these internal impurities become concentrated, impeding light, and making the ice seem cloudy. Clear ice is almost entirely free of impurities. Also, when ice freezes quickly, ice crystals are small and numerous making the ice appear whiter. Transparent ice usually has larger and fewer crystals, a result of slow freezing. This ice was transparent because water freezing outside freezes from the top down. As a layer of water freezes, it pushes any air below it down, then the next layer freezes, etc.
Fig 2: A close-up of the the ice surface (the camera focused on the surface of the ice)
These pieces of ice reminded me of vintage pieces of glass that are imperfect, with bubbles, albeit melting. The image above shows a photograph of the ice surface, showing a few air trails (the white dots). I took some photographs using my Leica D-LUX 6, largely because I could easily take photos singe-handed while holding the piece of ice in the other hand.
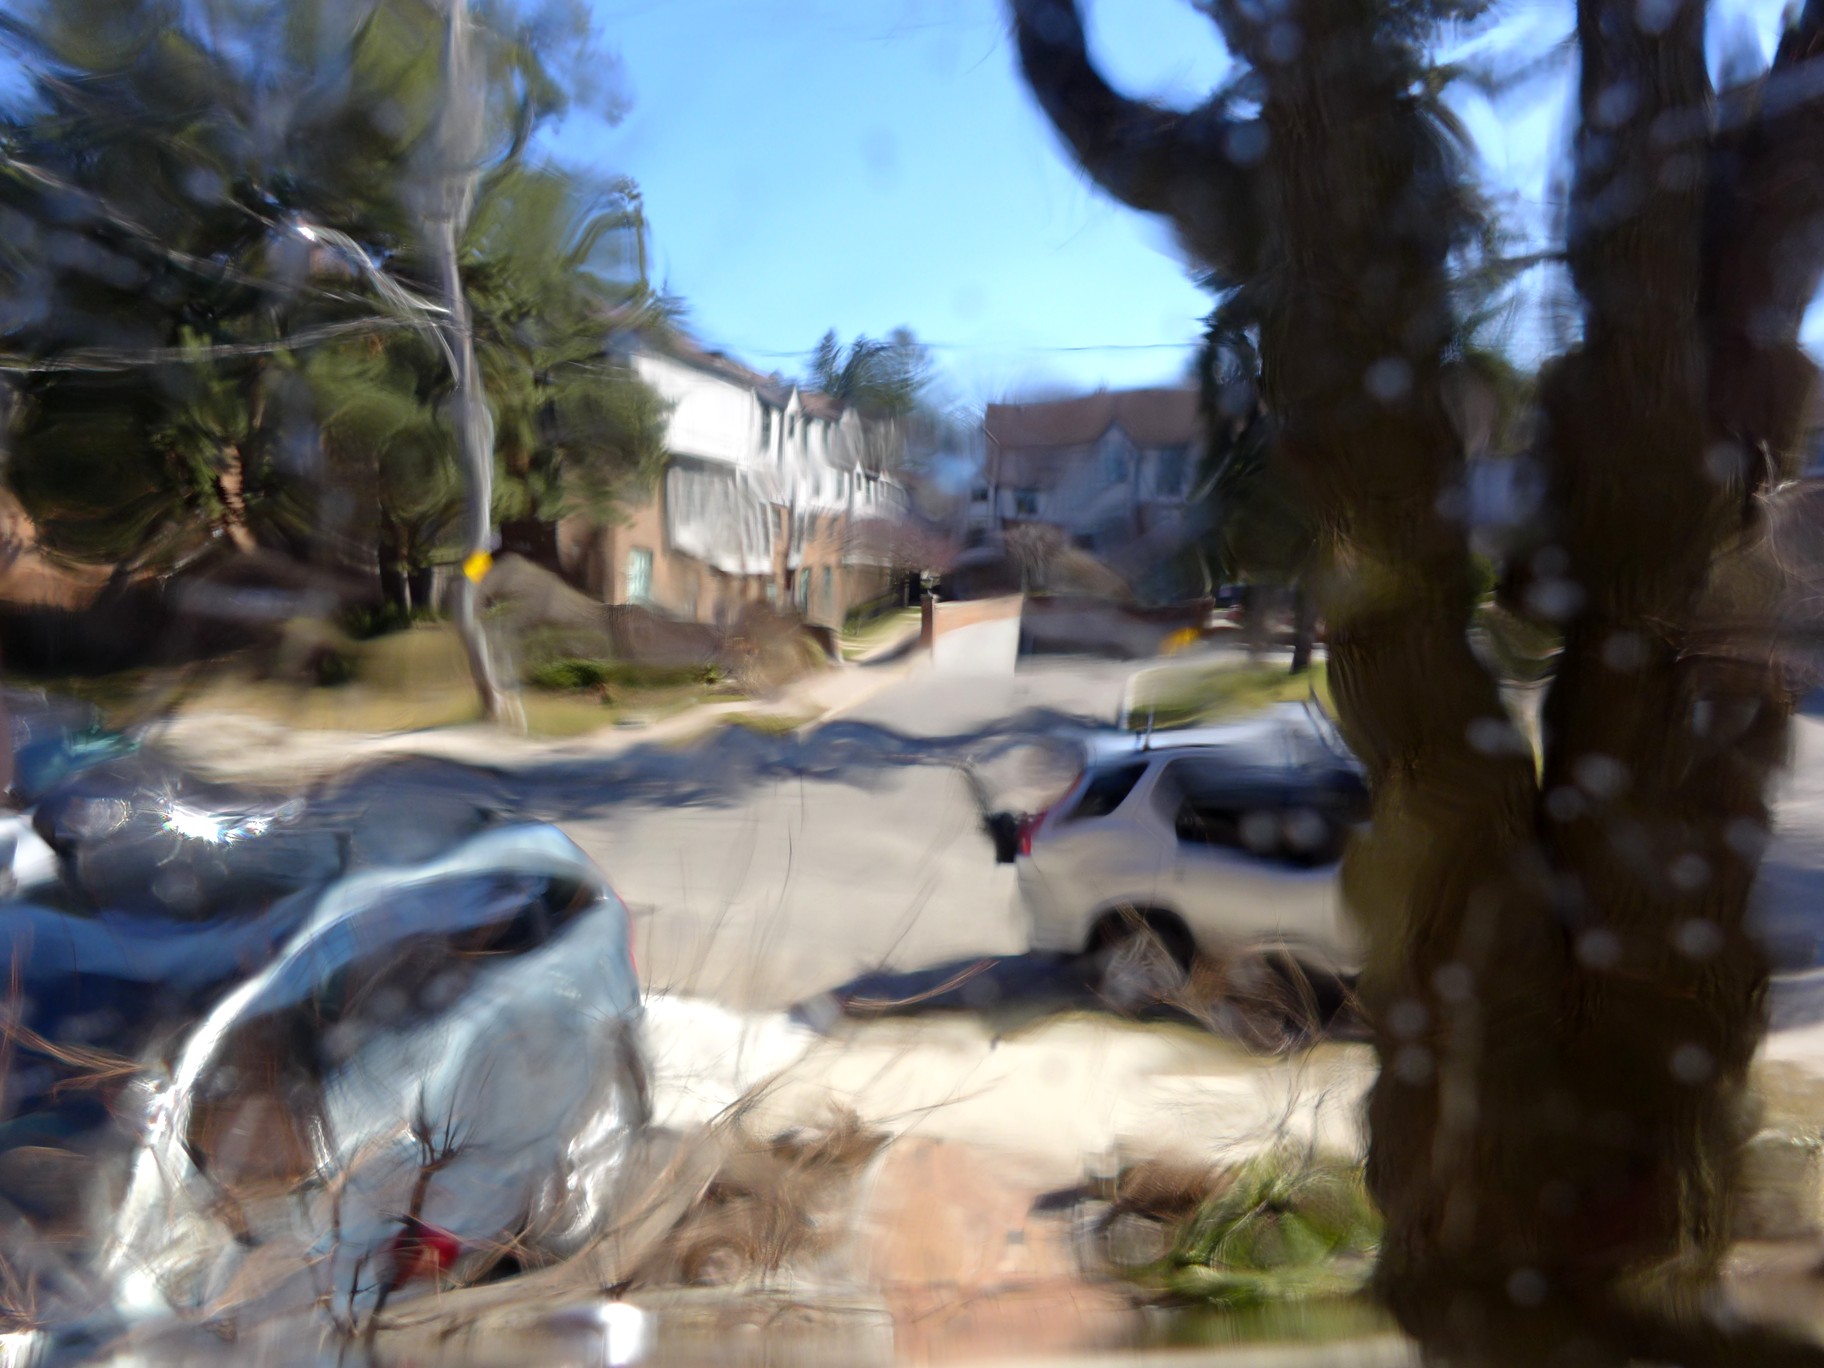
Fig 3: A woozy, warped sense of the world
What are the results? Well, firstly these ice filters are not perfect – they are organic in natural, and therefore the effect may be dependent on how the layers of ice froze to create the slab. In Fig. 2, the image becomes quite defocused without any inherent warping. In Fig.3, objects are both organically warped, and blurred. The blur may be caused in part by the fact that the filter actually melts as it is being used, causing melt water to move down the filter.
Fig 4: Another show, showing ice bokeh.
In Fig.4, things are again warped, but what is special here is that due to the angle of sunlight, the air trails through the ice have formed circular, bokeh type effects, something we will term ice-bokeh. These images are very organic, and no two will be the same. This is made even more evident by the fact that the filter melts.
These filters are more for fun than anything else, adding a surreal art-like effect to a photograph. As each piece of ice is unique, each photograph taken again becomes a unique entity. It would be fun to experiment with different thicknesses, and different shapes. The one caveat is that these filters are cold and wet.
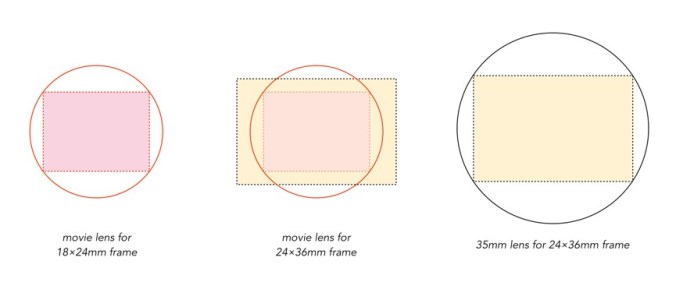
With the advent of 35mm film cameras came the need to design 35mm lenses. The first still cameras designed to use 35mm film inevitably used lenses modified from use on motion-picture cameras, or microscopes. This made sense when the 35mm cine-film used the 18×24mm frame format, however these lenses only covered part of a 24×36mm frame. The figure below shows frame coverage of a cine (movie) lens versus a 35mm lens.
Frame coverage of pre-35mm lenses
For instance the Tourist Multiple used a Bausch & Lomb Zeiss 4-element Tessar (50mm f / 3.5 lens), which was used on motion picture cameras.
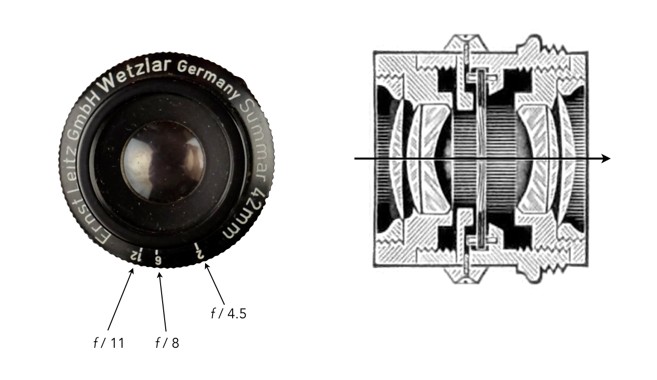
Leitz, founded in 1869, began as a company focused on the manufacture of microscopes, and other optical instruments. When work began on the Ur-Leica, Barnack and Berek tried a number of lenses. The simplest option was the 5cm f / 3.5 Zeiss Kino-Tessar movie camera lens. The problem is that the lens could not provide a light spot able to cover the 24×36mm frame format, as it was designed for a 18×24mm format. In addition it produced vignetting not suitable for a camera. The lens they ended up using was the 6-element 42mm f / 4.5 Leitz Mikro-Summar, in a classic double-Gauss formula. This lens had a number of shortcomings, including edge blurring, and a lack of contrast.
The Leitz Mikro-Summar (from 1907 catalog)
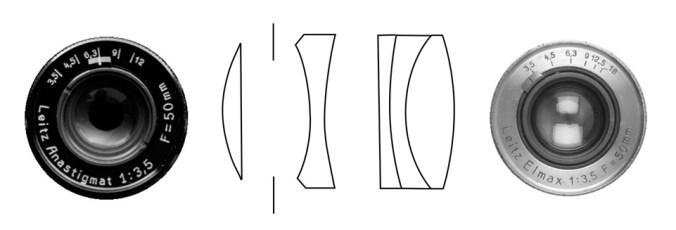
The design of a new 35mm lens was the responsibility of German physicist and mathematician, Max Berek (1886-1949). The first 35mm lens developed at Leica was a 50mm f/3.5 Anastigmat. Based on the “Cooke Triplet” lens design, it had 5 elements in 3 groups. The lens was later marginally redesigned, still containing 5 elements in 3 groups, and was given the name Elmax (The name is derived from Ernst Leitz and Max Berek.). These lenses were used on the pre-production Leica-0, of which 31 were manufactured from 1920-1925.
The Anastigmat / Elmax lenses
At that time, the calculation of such a lens was still very complex. Light beam paths from points near or away from the optical axis had to be calculated for three wavelengths and seven refractive surfaces, all by hand using logarithmic tables. Leitz was granted patent No. 343086 for the Anastigmat in 1920.
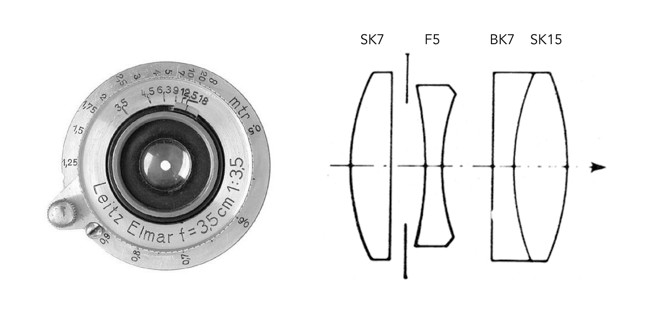
The first lens formula was difficult to build, so Berek changed the design to a triplet with the last element a cemented doublet, i.e., 4 elements in 3 groups. This lens was renamed Elmar, and was subsequently manufactured for decades (1925-1961). The lens was similar to a Tessar, except for the location of the diaphragm. On the Elmar the diaphragm was located between the first and second elements, rather than the rear two elements.
The Elmar lens
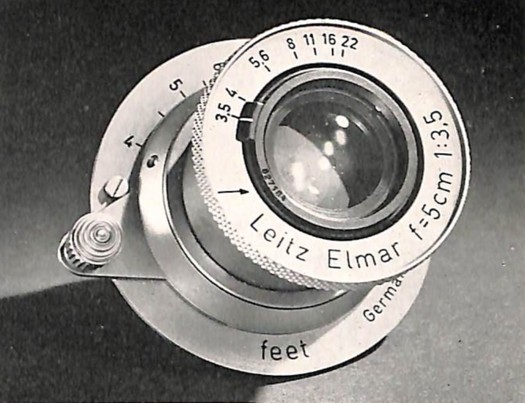
The first lenses which appeared were of the fixed type used on the Leica I. From 1930-1959, the Elmar was made in a screw mount, and an M (bayonet) mount from 1954-1961. From 1930-1932 the lenses were matched with one body, after which they became interchangeable (M39 mount). The lens would evolve to have a maximum aperture of f/2.8, and a minimum aperture of f/22. .
The Leica Elmar 50mm, with screw mount
Specifications: (Original) 50mm f / 3.5 Elmar lens Angle of view: 45° No. of elements: 4 Minimum focusing distance: 1.0m Minimum aperture: 16 Aperture range: 3.5, 4.5, 6.3, 9, 12.5, 16 Weight: 92g
Here are some links to extra info on early Leica lenses:
Full-frame sensors take their dimensions from traditional 35mm film, but where did the ubiquitous 35mm come from?
The second half of the 19th Century spirited the development of many photographic materials and processes. Kodak’s first roll-film camera, the No.1 was introduced in 1888. By 1901, the use of roll-film had become quite common, with Kodak releasing the 120 film format, which was approximately 60mm wide and allowed for various frame sizes. Thomas Edison invented¹ the Kinetoscope in 1893, a device for showing basic film loops, and which used 35mm (1⅜”) gauge cine-film, half the size used in Eastman Kodak cameras. In March 1895, The Lumière Brothers introduced their Cinématographe, the first motion picture film camera, using the same width as Edison, 35mm. By 1909, 35mm had become the standard motion picture film.
Why is it called 35mm film? The 35mm represents the width of the film, irrespective of the size of the frame on the film.
A number of manufacturers started using 35mm cine-film for still photography between 1905 and 1913. The first patent for a 35mm camera was issued to Leo, Audobard and Baradat in England in 1908. It represented one of many patents and prototypes, few of which were produced commercially or even built. The first publicly available 35mm cameras were that used 35mm cine-film were the Tourist Multiple, and the Simplex. The TouristMultiple, built by US company Herbert & Huesgen, was released in 1913. It was a half-frame camera, taking (750) 18×24mm exposures on 35mm cine-film. The Simplex, invented by Alfred Huger Moses, and was released in 1914. It existed in a number of different models, many of which allowed convertible full/half-frame exposures. The Simplex Model B was the only one to use standard 35mm format (it was only produced from 1914-1918).
The Simplex Model B.
It was Oskar Barnack (1879-1936), who produced the first commercially successful 35mm camera, at the Ernst Leitz Optische Werke in Wetzlar. In 1912, Barnack began work on a new motion picture camera, yet he struggled to get shutter timings right, largely because film emulsions were quite inconsistent. Proper exposure in the early days of motion picture was challenging because of the lack of devices such as photoelectric meters. In response to this, Barnack created a film tester to determine correct exposure settings. Barnack’s device would allow small test exposures to be processed, and exposure issues adjusted accordingly. This prototype device became known as the Ur-Leica, where the prefix “Ur” in German means prime, or original. It was equipped with a Mikro-Summar f / 4.5, 6-element, 42mm lens.
Barnack’s design allowed the camera to move the film horizontally, increasing the frame size to increase to 24×36mm, instead of the 18×24mm exposures of cameras that carried film vertically. This essentially created “double-sized” images. The aspect ratio also changed from 3:4 to 2:3. With the onset of WW1, it was not until 1924 that Leica decided to produce the 35mm camera, with the 35mm Leica I (A) making its first appearance as the Leipzig Spring Fair in 1925. The Leica I had an all-metal housing, a collapsible lens, and a focal-plane shutter. The Leica succeeded because it was compact, and the quality of the exposures was as good as the more commonly used roll film.
So why did 35mm film become so successful? It was partially to do with cost. Due to its use in the cinematic industry, 35mm motion picture film was widely available, and inexpensive. The number of exposures which could be loaded into a camera was 40. Initially the film had to be loaded in the dark, however Barnack soon realized this was a problem and developed a reloadable cassette which could easily be inserted into the camera, and could accommodate 36 exposures. By 1932, Leica’s competitor Zeiss had introduced the 35mm Contax, and Kodak entered the market in 1934 with the Retina I.
¹ It is widely believed that the Kinetoscope was actually designed by one of Eastman’s employees, William Dickson.
For more information on early 35mm cameras check out Max Bertacchi’s page dedicated to early 35mm cameras, or early Leica’s.
In every photograph the moment is fixed forever. In some it is the very moment that we prize, because it is such vivid history. In a few the moment magically becomes forever.
Beaumont Newhall in The History of Photography, the Museum of Modern Art, New York, 1949.
Sometimes the best fauna related photographs are taken when you least expect it. We were having lunch at a picnic table in The Hermitage (Scotland) a couple of summers ago when an inquisitive Robin started jumping along the nearby fence. A few shots got one good one. The picture is cropped from the original, and only some minor histogram stretching was performed.
British Robin: Olympus E-M5(II) + M.12-40mm F2.8, picture taken at 40mm, f/3,2, 1/125 sec.
Pixels actually help define image resolution. Image resolution is the level of visual detail in an image, and is usually represented as the number of pixels in an image. An image with a high density of pixels will have a higher resolution, providing both better definition, and more details. An image with low resolution will have less pixels and consequently less details and definition. Resolution is the difference between a 24MP image, and a 4MP image. Consider the example below which shows four different resolutions of the same image, shown as they would appear on a screen.
Various image resolutions
Each image is ¼ the size of the previous image, meaning it has 75% less detail. However it is hard to determine how much detail has been lost. In some cases the human visual system will compensate for details lost by filling in information. To understand how resolution impacts the quality of an image, it is best to look the images using the same image dimensions. This means zooming in the images with less resolution so they appear the same size as the 100% image.
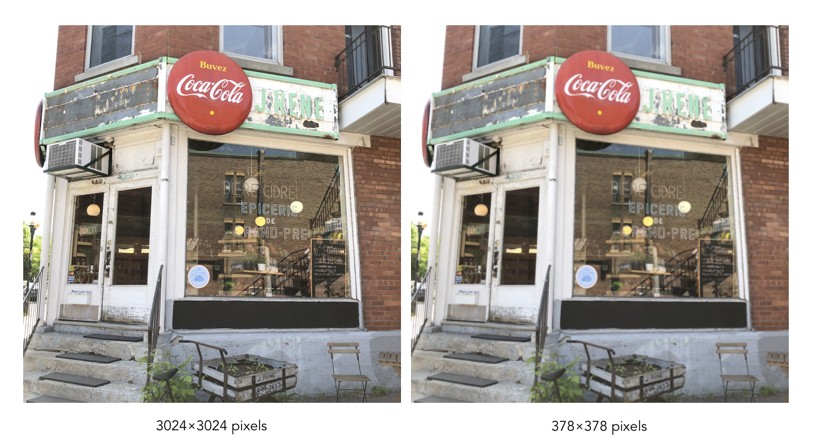
You can clearly see that when the resolution of an image decreases, the finer details tend to get washed out. This is especially prevalent in regions of this image which have text. Low resolution essentially means details become pixelated or blobby. These examples are quite extreme of course. With the size of modern camera sensors, taking a 24MP (6000×4000) image, and reducing it 25% would still result in an image 1500×1000 pixels in size. The quality of these lower resolution images is actually perceived to be quite good, because of the limited resolution of screens. Below is an example of a high resolution image and the same image in low resolution at 1/8th the size.
They are perceptually quite similar. It is not until one enlarges a region that the degradation becomes clear. These artifacts are particularly prevalent in fine details, such as text.
An example of an enlarged region showing high versus low resolution images.
Colour pixels are different from grayscale pixels. Colour pixels are RGB, meaning they have three pieces of information associated with them, namely the Red, Green and Blue components. Grayscale pixels have one component, a gray tone derived from a graduate scale from black to white. A colour pixel is generally 24-bit (3 × 8-bit), and a gray pixel is just 8-bit. This basically means that a colour pixel has a triplet value comprised of 0..255 for each of red, green and blue components, whereas a grayscale pixel has a single values 0..255. The figure below compares a colour and grayscale pixel. The colour pixel has the R-G-B value 61-80-136.The grayscale pixel has the value 92.
It is easy to convert a pixel from colour to grayscale (like applying a monochrome filter in a digital camera). The easiest method is simply averaging the three values of R, G, and B. In the sample above, the grayscale pixel is actually the converted RGB: (61+80+136)/3 = 92.
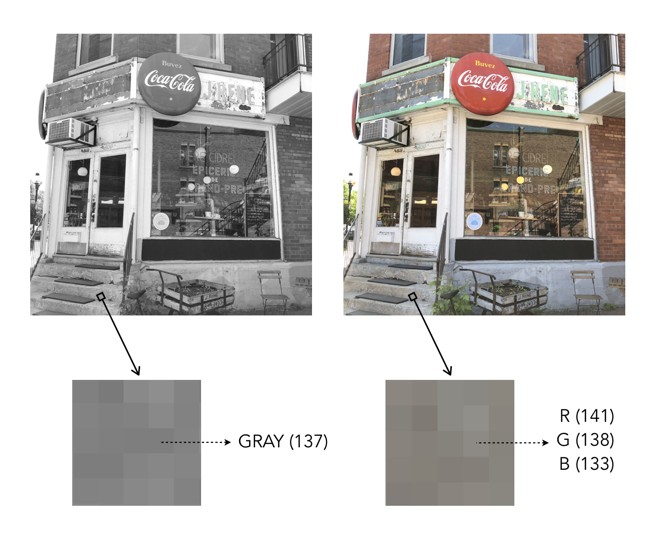
Now colour images also contain regions that are gray in colour – these are 24-bit “gray” pixels, as opposed to 8-bit grayscale pixels. The example below shows a pixel in a grayscale image, and the corresponding “gray” pixel in the colour image. Grayscale pixels are pure shades of gray. Pure shades of gray in colour images are often represented with RGB all having the same value, e.g. R=137, G=137, B=137.
A pixel is an abstract, size-less thing. A pixels size is relative to the resolution of the physical device on which it is being viewed. The photosites on a camera sensor do have a set dimension, but once an image is acquired, and the signal are digitized, image pixels are size-less.
For example, let’s consider TVs, and in particular 4K Ultra HD TVs. A 43″ version of this TV might have a resolution of 3840×2160 pixels (w×h). The 75″ version of this TV has *exactly* the same number of pixels – about 8 million of them. What changes is the pixel size, but then so does the distance you should view the TV from. The iPhone 11 in comparison has a screen size of 1792×828. For example, the 43″ 4K TV has dimensions of roughly 37″×20.8″, which means that the size of a pixel is 0.24mm. A 75″ 4K TV would have a pixel size of 0.41mm. An Apple Macbook Air with a 13.3″ screen (2560×1600 pixels) has a pixel size of 0.11mm.
As an example consider the image below. Two sizes of pixels are shown, to represent different resolutions on two different physical devices. The content of the pixel doesn’t change, it just adapts to fill the physical pixels on the device.
Pixel sizes on different screens
Likely more important than the size of pixels is how many of them there are, so a better measure is PPI, or pixels-per-inch. The iPhone 11 has 326ppi, a typical 43″ TV has 102ppi, and the 75″ TV has 59ppi.