Fixing photographs (e.g. travel snaps) (i)

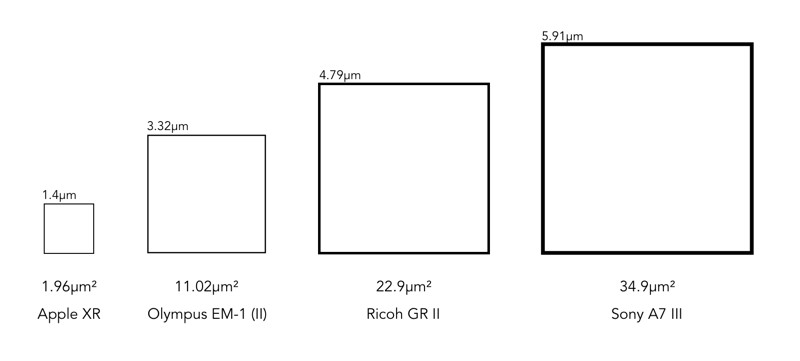
When travelling, it is not always possible to get a perfect photograph. You can’t control the weather – sometimes it is too sunny, and other times there is not enough light. So the option of course is to modify the photographs in some way, fixing what is considered “unaesthetic”. The problem lies in the fact that cameras, as good as they are, don’t always capture a scene the way human eyes do. Your eyes, and brain correct for many things that aren’t possible with a camera. Besides which we are all tempted to make photographs look brighter – a legacy of the filters in apps like Instagram. Should we fix photographs? It’s one of the reasons the RAW file format exists, so we can easily modify an images characteristics. At the end of the day, we fix photographs to make them more aesthetically pleasing. I don’t own a copy of Photoshop, so I don’t spend copious hours editing my photographs, it’s usually a matter of adjusting the contrast, or performing some sharpening.

There is of course the adage that photographs shouldn’t be modified too much. I think performing hundreds of tweaks on a photograph results in an over-processed image that may not really represent what the scene actually looked like. A couple of fixes to improve the aesthetic appeal?

So what sort of fixes can be done?

1︎⃣ Fixing for contrast issues

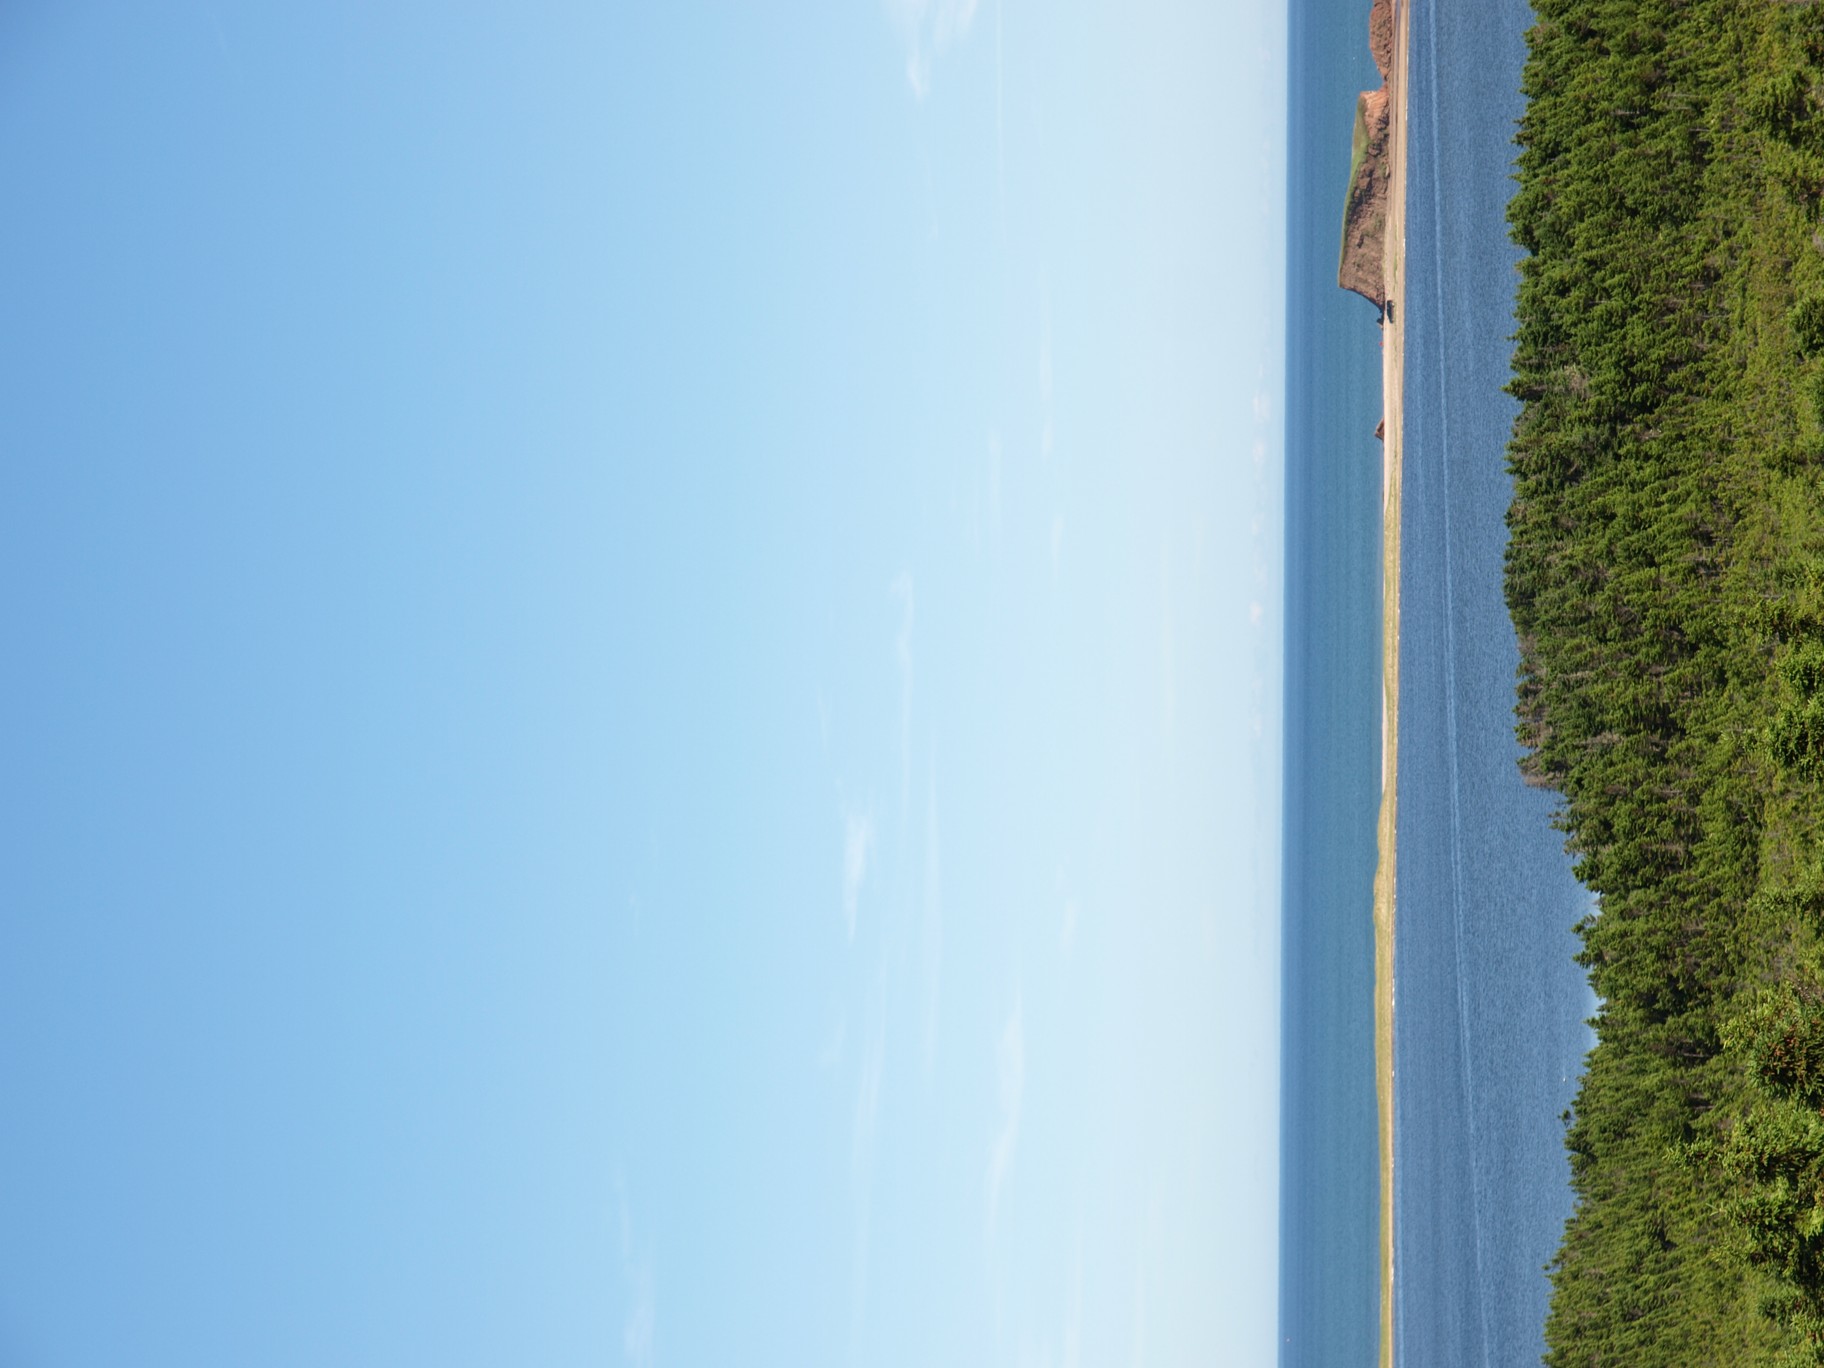
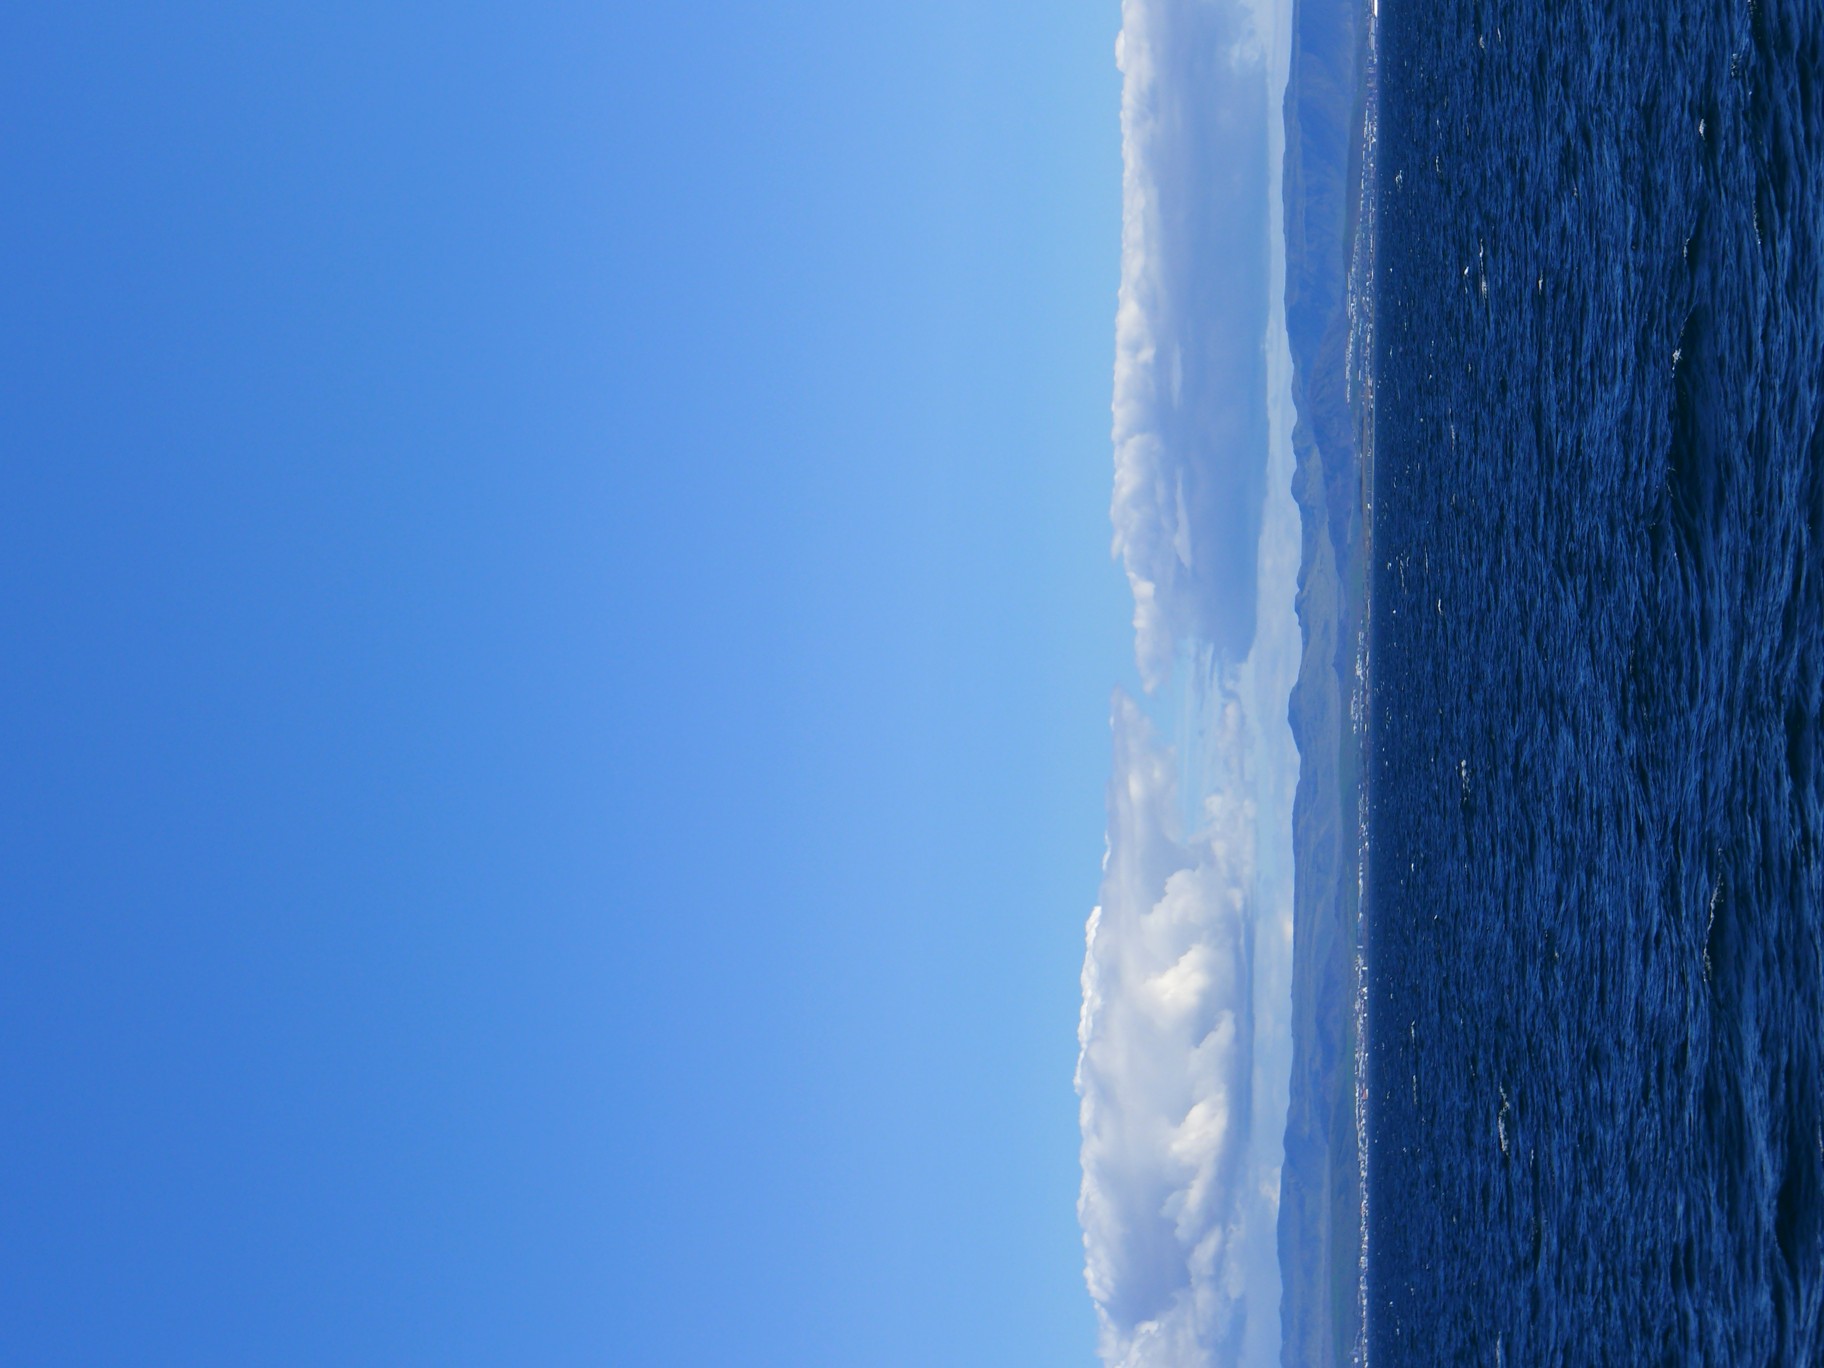
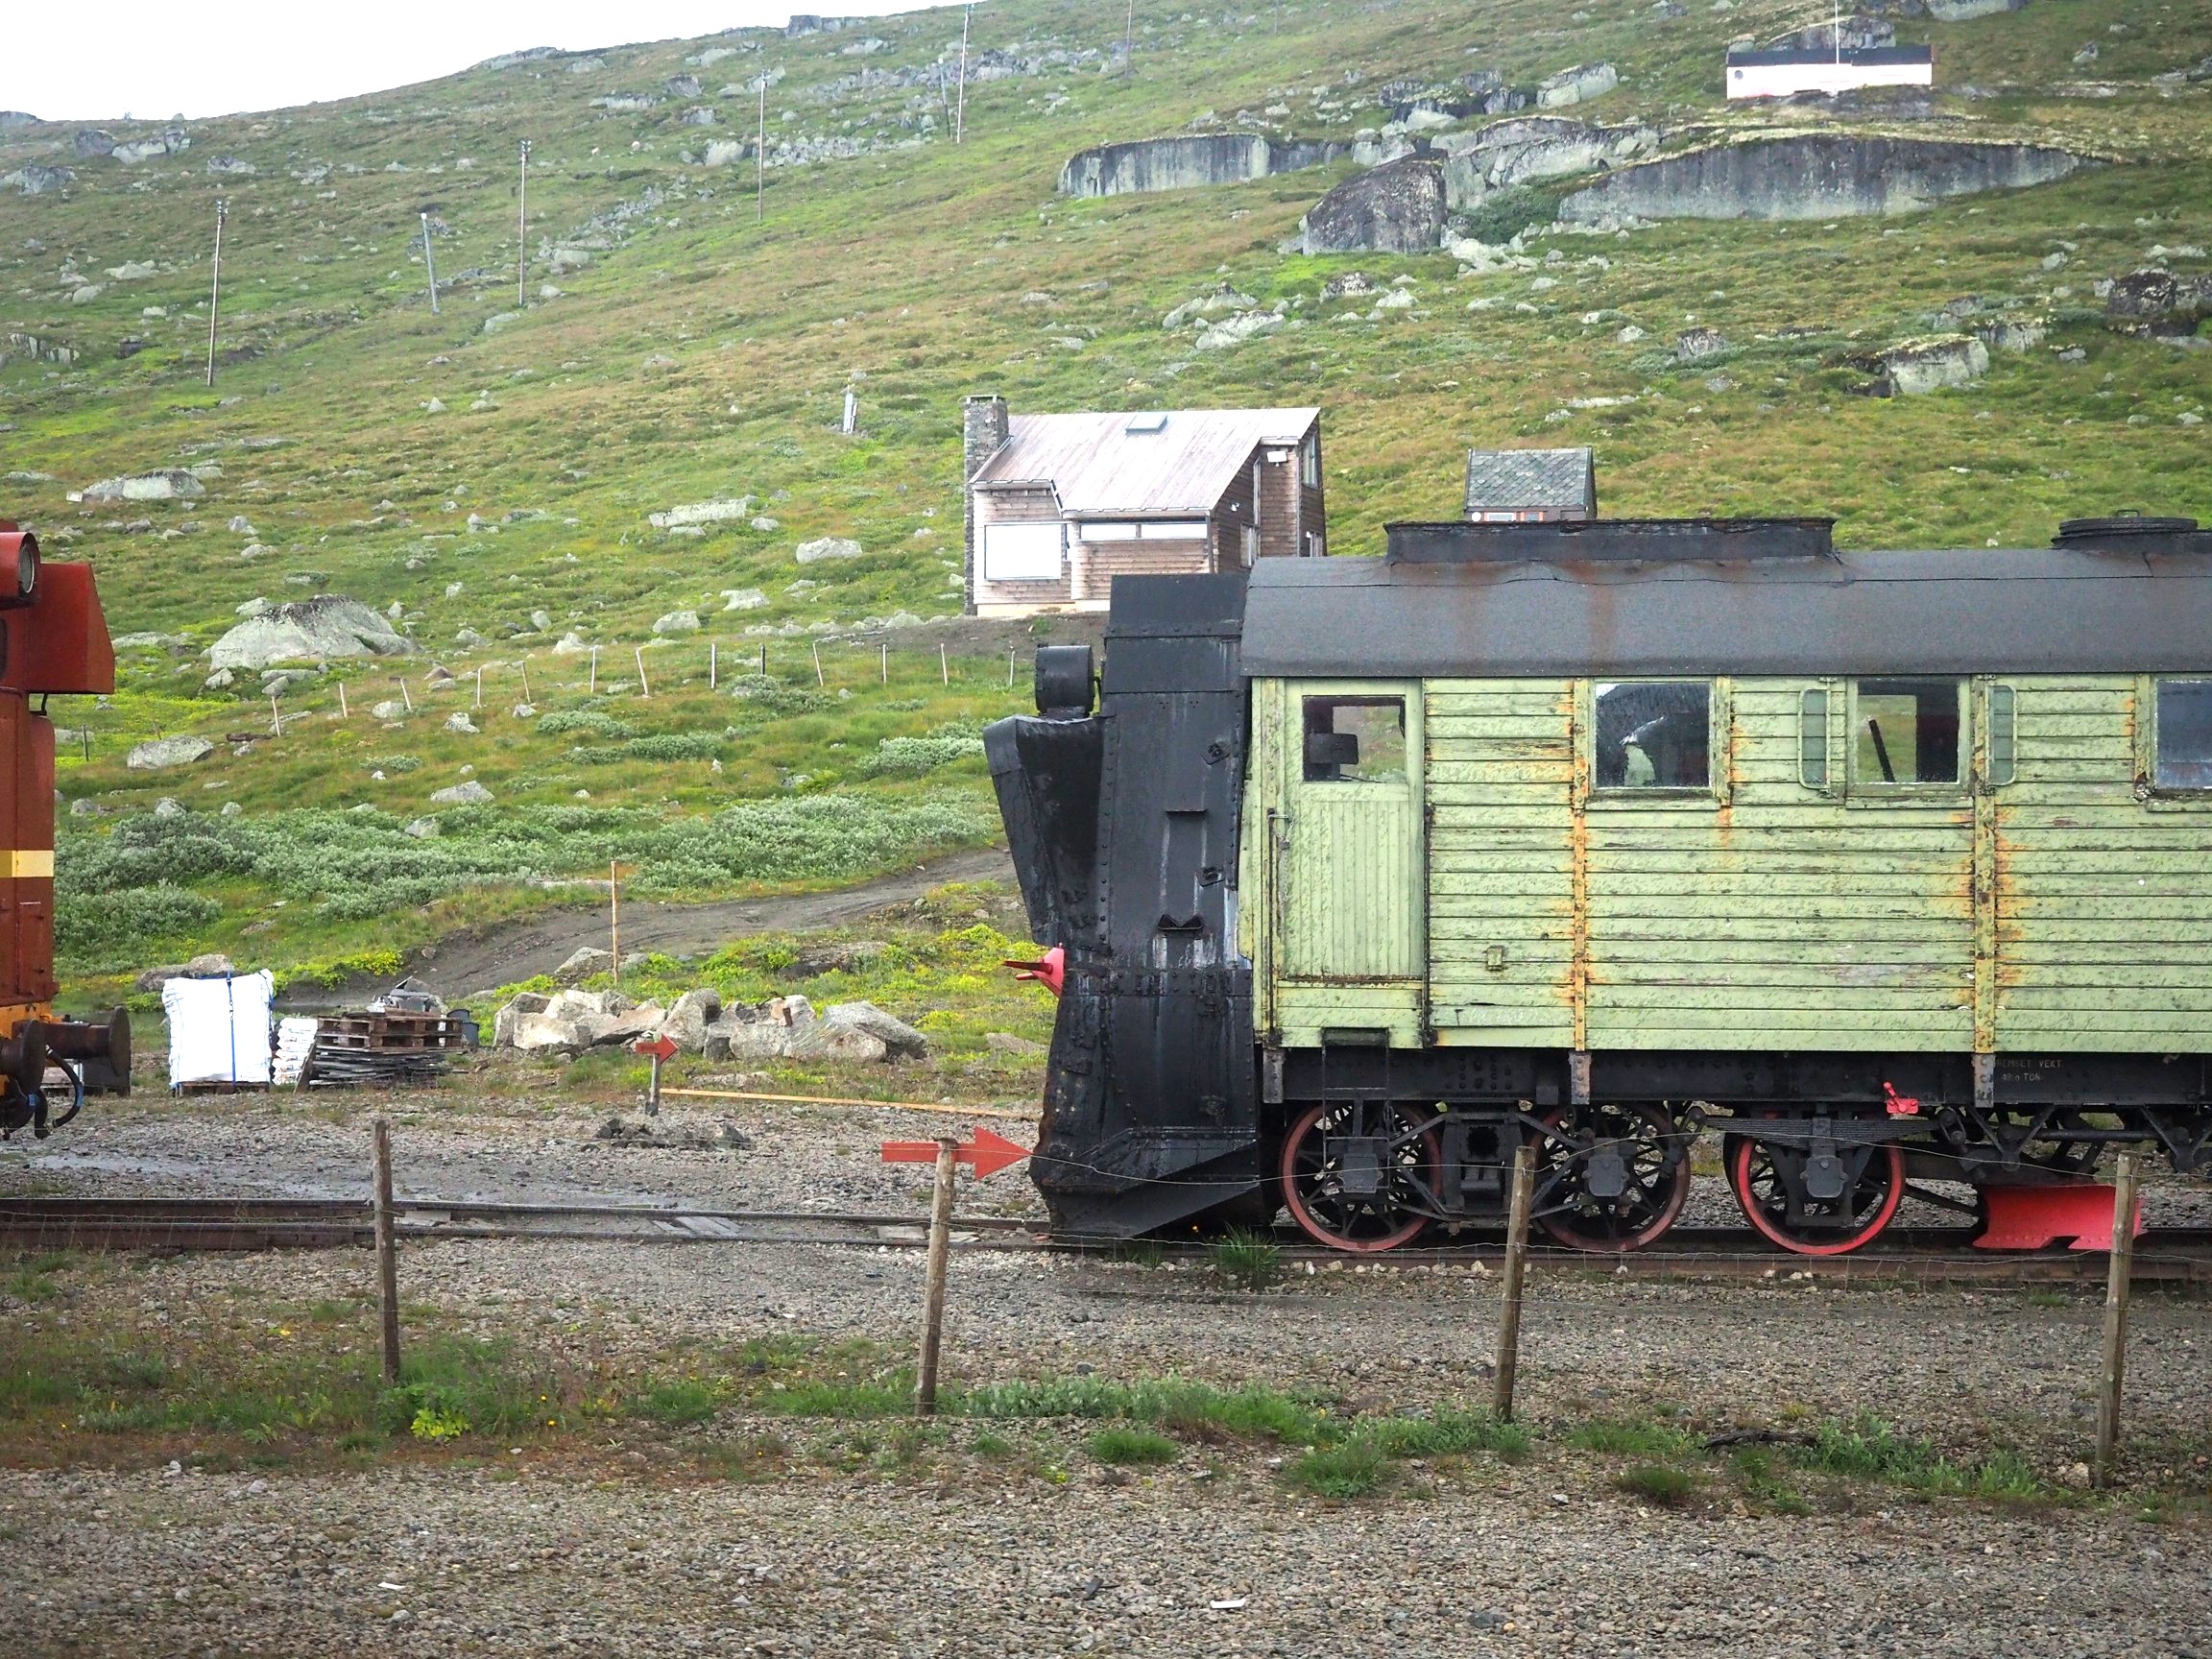
Sometimes its not possible to take a photograph with the right amount of contrast. In an ideal world, the histogram of a “good” photograph should be uniformly distributed. Sometimes, there are things like the sky being overcast that get in the way. Consider the following photo, which I took from a moving train using shutter-priority with an overcast sky.

A lack of contrast

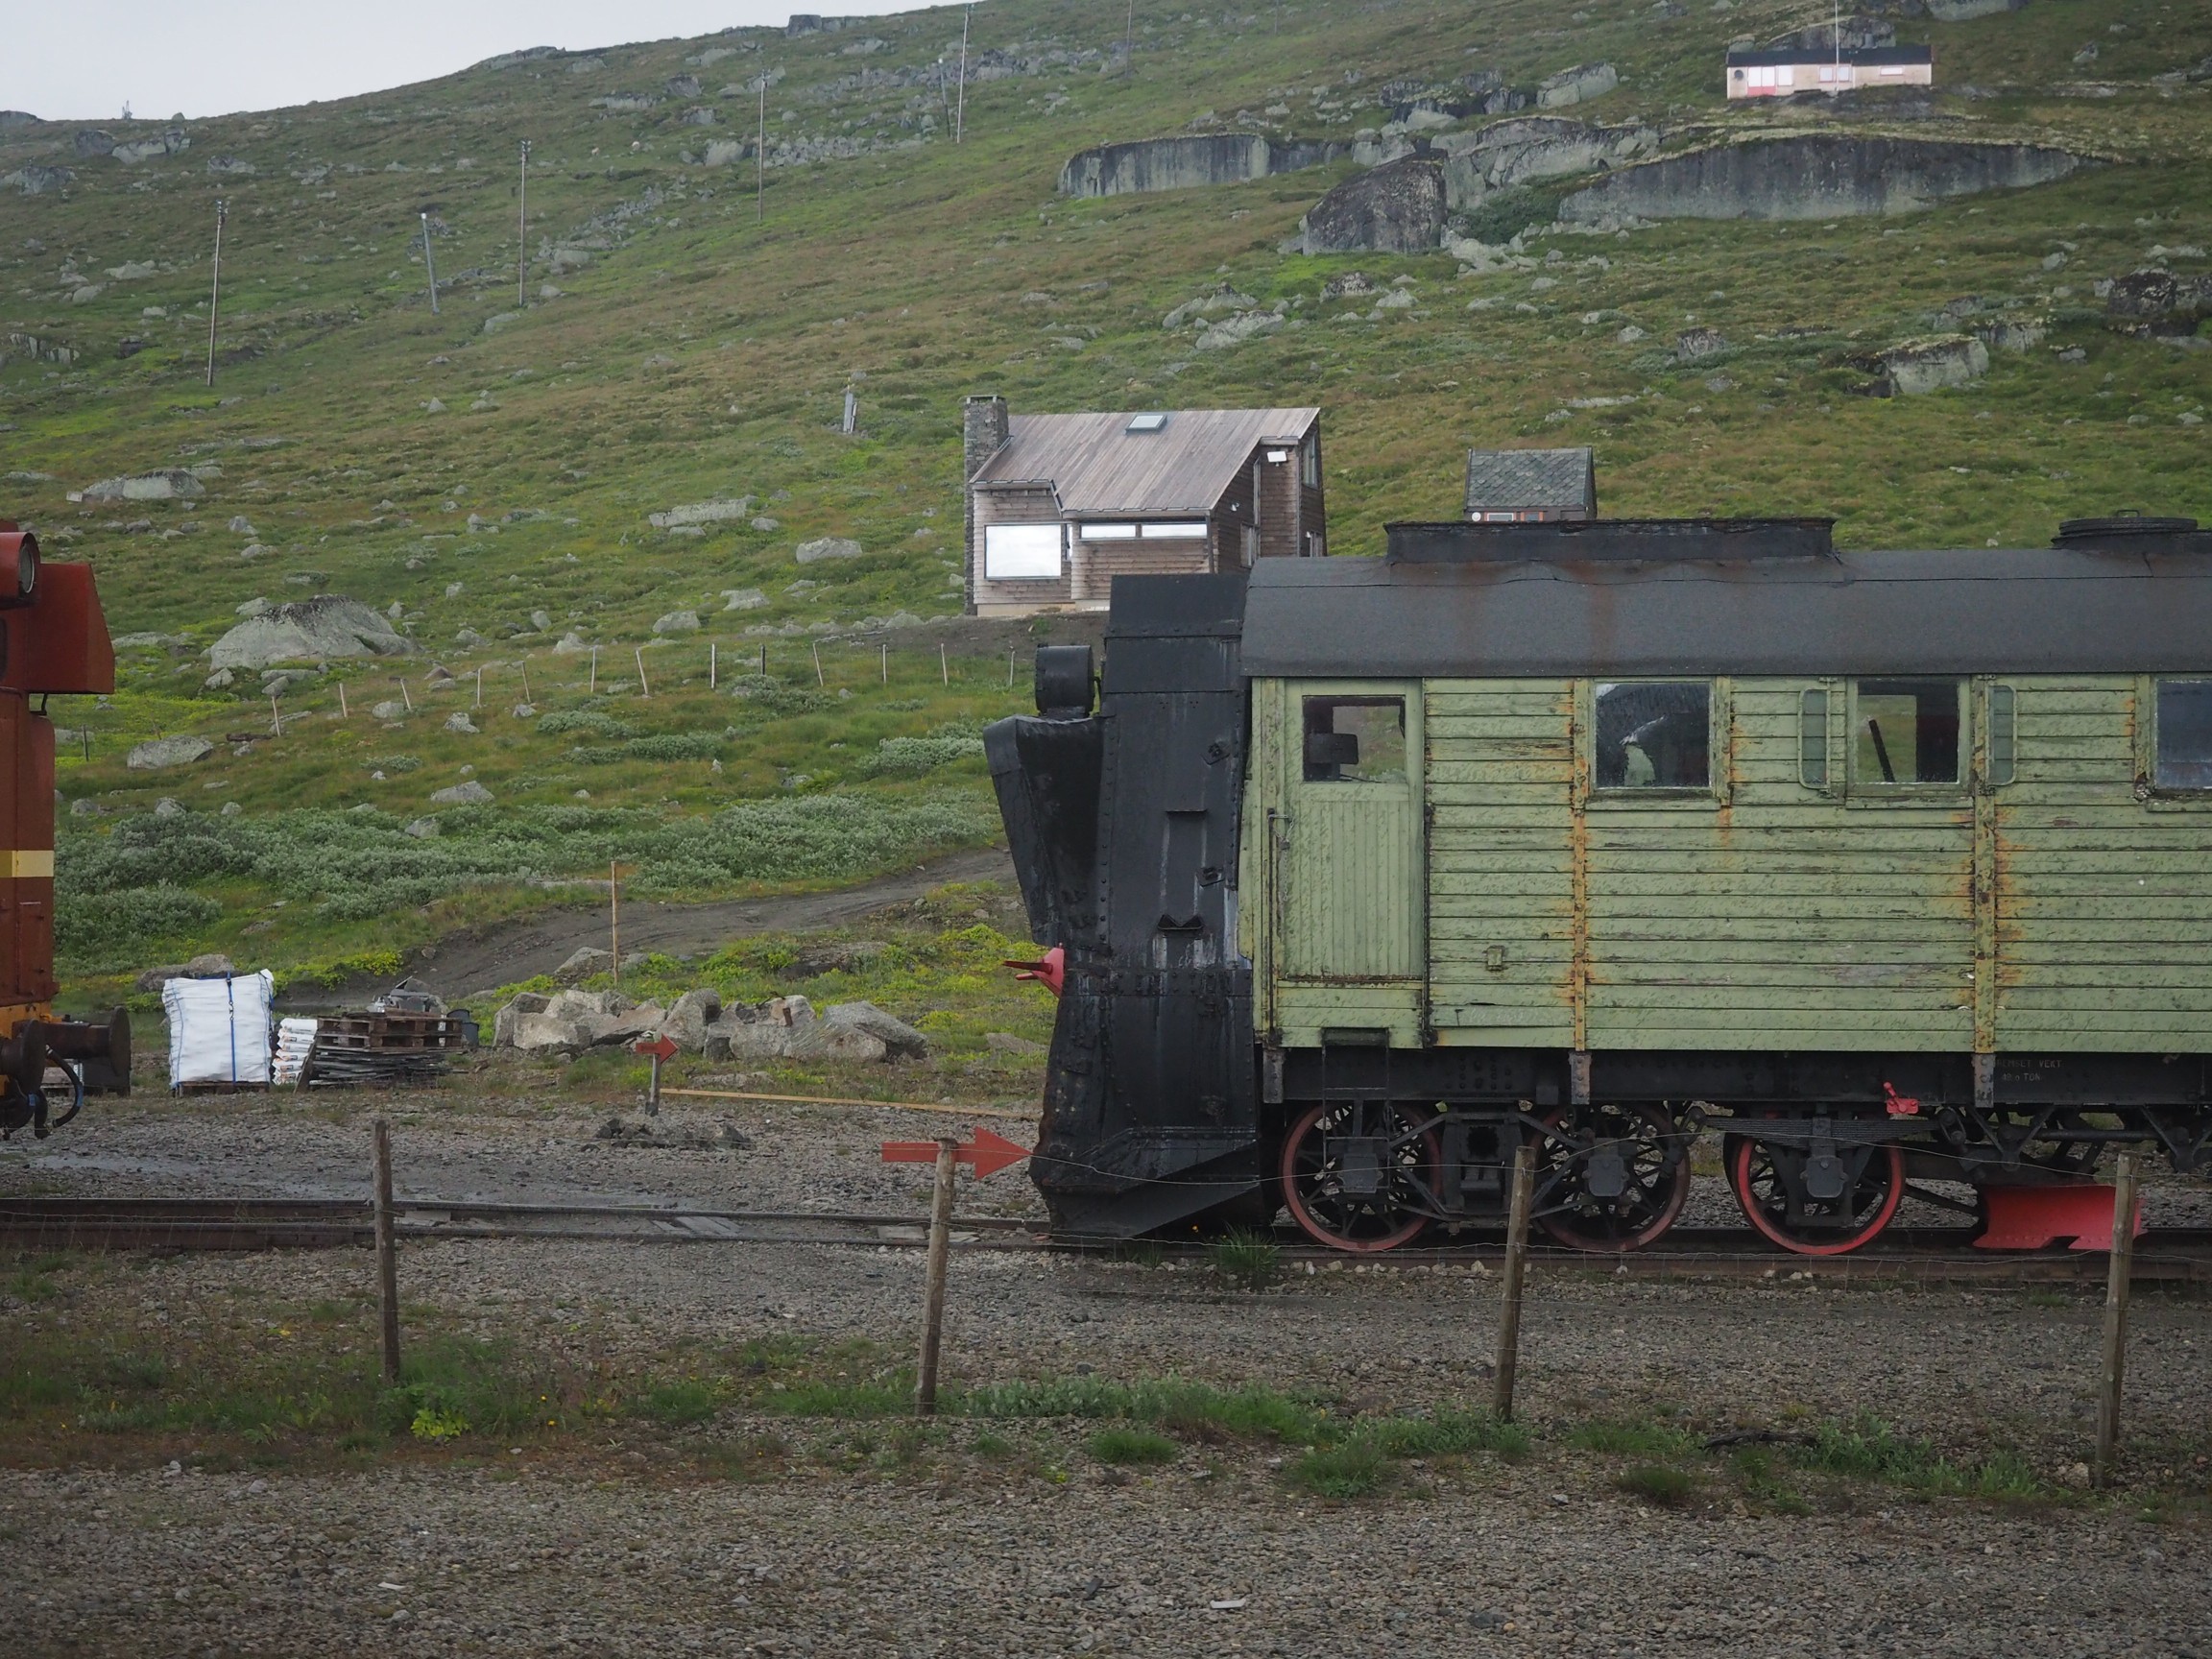
The photograph seems quite nice right? Does it truly reflect the scene I encountered? Likely not quite. If we investigate the histogram (the intensity histogram), we notice that there is one large peak towards the low end of the spectrum. There is also a small spike near the higher intensity regions, most likely related to the light regions such as the sky.

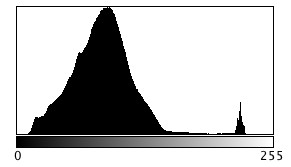
So now if we stretch the histogram, the contrast in the image will improve, and the photograph becomes more aesthetically pleasing, with much brighter tones.

Improving contrast

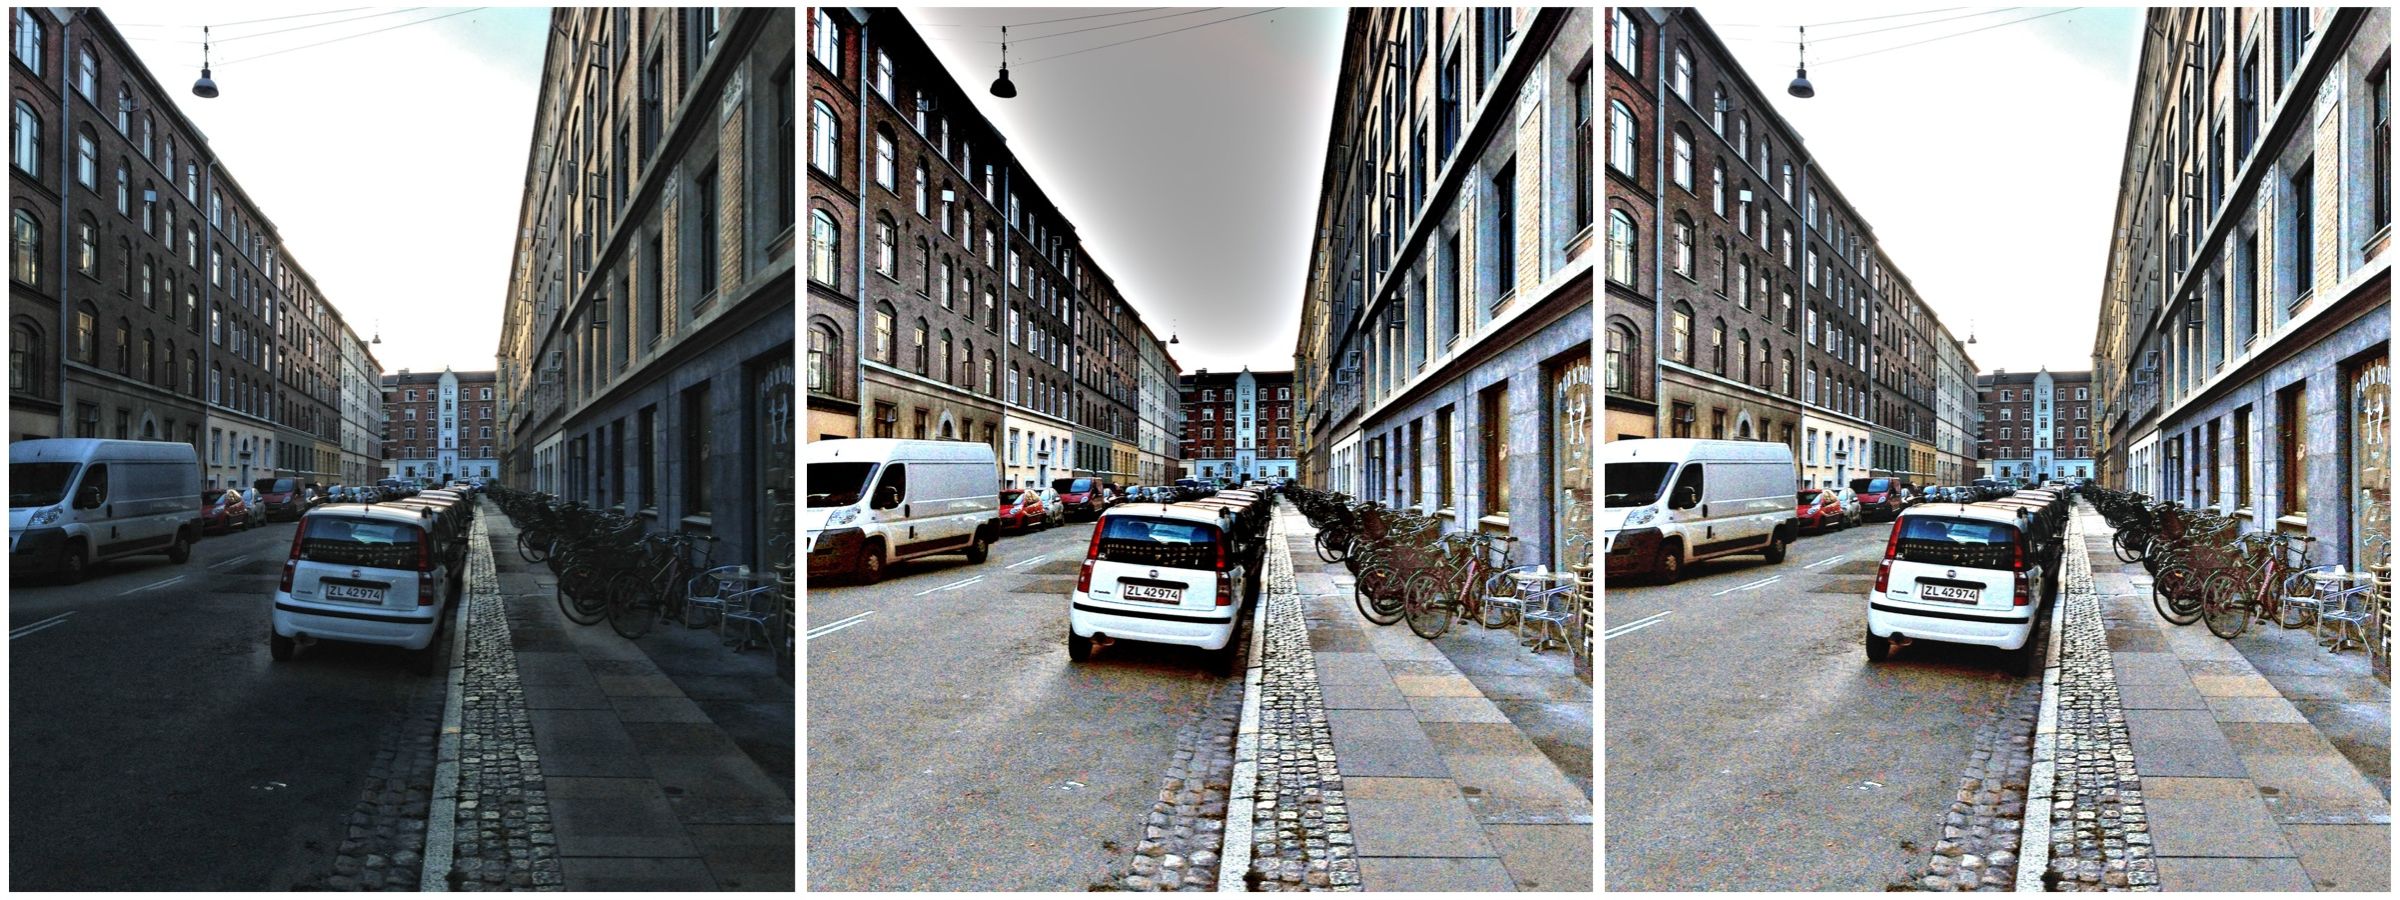
2︎⃣ Fixing for straight lines

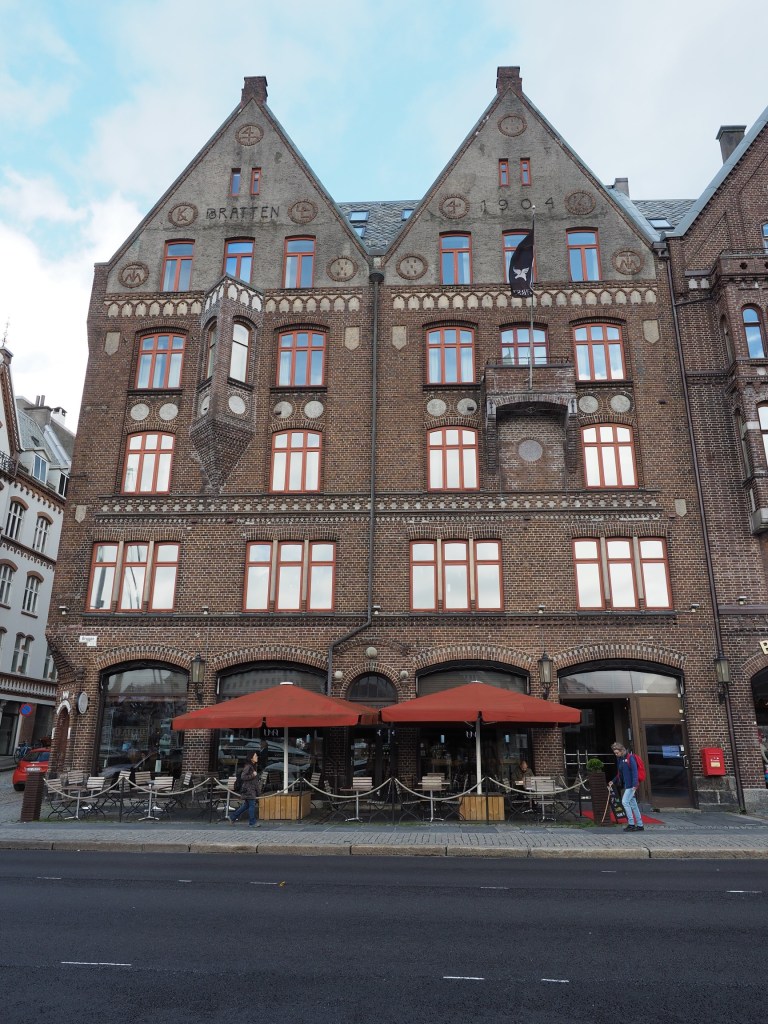
In the real world, the lines of buildings are most often straight. The problem with lenses is that they are curved, and sometimes this impacts the form of photograph being acquired. The wider the lens, the more straight lines converse to the centre of the image. The worse case scenario are fish-eye lenses, which can have a field of view of up to 180°, and result in a barrel distortion. Take a photograph of a building, and the building will appear distorted. Human eyes compensate for this with the knowledge that it is a building, and its sides should be parallel – they do not consciously notice converging vertical lines. However when you view a photograph, things are perceived differently – it often appears as though a building is leaning backwards. Here is an photograph of a building in Bergen, Norway.

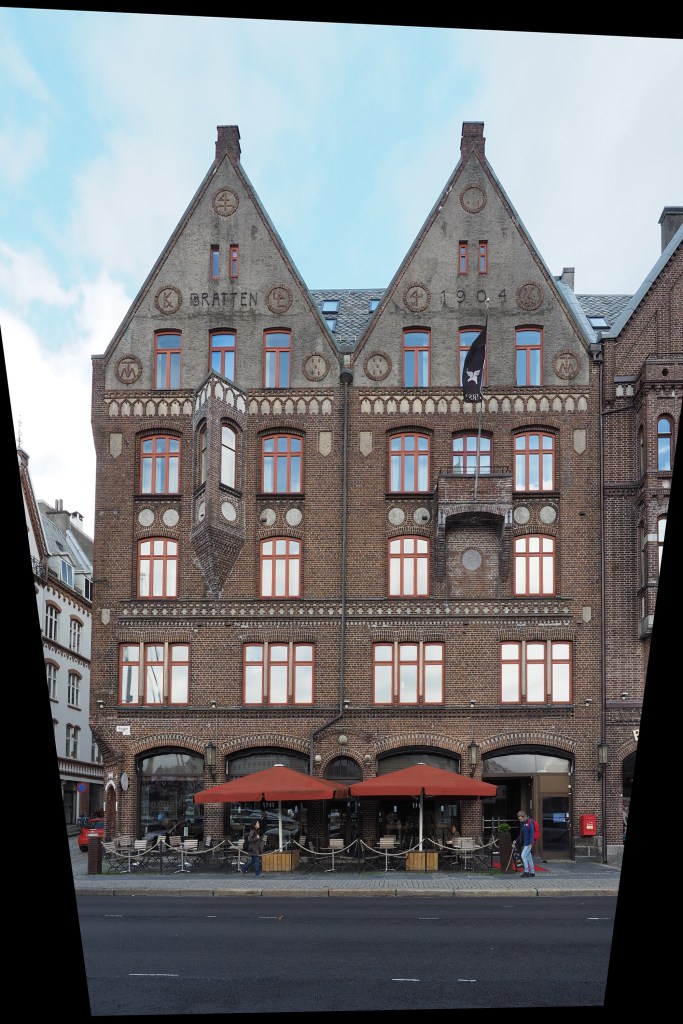
Performing a perspective correction creates an image where the vertical lines of the building are truly vertical. The downside is of course that the lower portion of the image has been compressed, so if the plan is to remove distortion in this manner, make sure to allow enough foreground in the image. Obviously it would be better to avoid these problems when photographing buildings.

Could blur be the new cool thing in photography?

For many years the concept of crisp, sharp images was paramount. It lead to the development of a variety of image sharpening algorithms to suppress the effect of blurring in an image. Then tilt-shift appeared, and was in vogue for a while (it’s still a very cool effect). Here blur was actually being introduced into an image. But what about actually taking blurry images?

I have been experimenting with adding blur to an image, either through the process of  manually defocusing the lens, or by taking a picture of a moving object. The results? I think they are just as good, if not better than if I had “stopped the motion”, or created a crisp photograph. We worry far too much about defining every single feature in an image, and too little on a bit of creativity. Sometimes it would be nice to leave something in an image that inspires thought.

Here’s an example of motion-blur, a Montreal Metro subway car coming into a platform. It is almost the inverse of tilt-shift. Here the object of interest is blurred, and the surround area is kept crisp. Special equipment needed? Zip.

What if we interpret photographs differently?

Have you ever taken a photo in portrait mode, and viewed it in landscape mode like this?

Îles de la Madeleine

Yes, this is how I meant to view it. A normal photograph doesn’t give any perspective of how large and wonderful this planet truly is. Viewing a photograph in this manner one sees earth on the right, and the vastness of the sky and the space beyond on the left. It provides an abrupt edge of the world perspective. We should do more to protect our home. Here is a second one, taking the opposite view from the sea to land.

Iceland near Reykjavik

One may now look at this as one piece of a jigsaw puzzle of millions of photographs, each showing the limits of our existence.

Why image processing is an art

There are lots of blogs that extol some piece of code that does some type of “image processing”. Classically this is some type of image enhancement – an attempt to improve the aesthetics of an image. But the problem with image processing is that there are aspects of if that are not really a science. Image processing is an art fundamentally because the quality of the outcome is often intrinsically linked to an individuals visual preferences. Some will say the operations used in image processing are inherently scientific because they are derived using mathematical formula. But so are paint colours. Paint is made from chemical substances, and deriving a particular colour is nothing more than a mathematical formula for combining different paint colours. We’re really talking about processing here, and not analysis (operations like segmentation). So what forms of processing are artistic?

  1. Anything that is termed a “filter”. The Instagram-type filters that make an ordinary photo look like a Polaroid. 
  2. Anything with the word enhancement in it. This is an extremely loose term – for it literally means “an increase in quality” – what does this mean to different people? This could involve improving the contrast in an image, removing blur through sharpening, or maybe suppressing noise artifacts.

These processes are partially artistic because there is no tried-and-true method of determining whether the processing has resulted in an improvement in the quality of the image. Take an image, improve its contrast. Does it have a greater aesthetic appeal? Are the colours more vibrant? Do vibrant colours contribute to aesthetic appeal? Are the blues really blue?

Contrast enhancement: (a) original, (b) Retinex-processed, (c) MAXimum of (a) and (b)

Consider the photograph above. To some, the image on the left suffers from being somewhat underexposed, i.e. dark. The image in the middle is the same image processed using a filter called Retinex. Retinex helps remove unfavourable illumination conditions – the result is not perfect, however the filter can help recover detail from an image in which it is enveloped in darkness. Whilst a good portion of the image has been “lightened”, the overcast sky has darkened through the process. There is no exact science for “automagically” making an image have greater aesthetic appeal. The art of image processing often requires tweaking settings, and adjusting the image until it appears to have improved visually. In the final image of the sequence below, the original and Retinex processed images are used to create a composite by retaining only the maximum value at each pixel location. The result is a brighter, contrasty, more visually appealing image.

What happens to “extra” photosites on a sensor?

So in a previous post we talked about effective pixels versus total photosites, i.e. the effective number of pixels in a image (active photosites on a sensor) is usually smaller than the total number of photosites on a sensor. That leaves a small number of photosites that don’t contribute to forming an image. These “extra” photosites sit beyond the camera’s image mask, and so are shielded from receiving light. But they are still useful.

These extra photosites receive a signal that tells the sensor how much dark current (unwanted free electrons generated in the CCD due to thermal energy) has built up during an exposure, essentially establishing a reference dark current level. The camera can then use this information to compensate for how the dark current contributes to the effective (active) photosites by adjusting their values (through subtraction). Light leakage may occur at the edge of this band of “extra” photosites, and these are called “isolation” photosites. The figure below shows the establishment of the dark current level.

Creation of dark current reference pixels

Photosite size and noise

Photosites have a definitive amount of noise that occurs when the sensor is read (electronic/readout noise), and a definitive amount of noise per exposure (photon/shot noise). Collecting more light in photosites allows for a higher signal-to-noise ratio (SNR), meaning more signal, less noise. The lower amount of noise has to do with the accuracy of the light photons measured – a photosite that collects 10 photons will be less accurate than one that collects 50 photons. Consider the figure below. The larger photosite on the left is able to collect many four times as many light photons as the smaller photosite on the right. However the photon “shot” noise acquired by the larger photosite is not four times that of the smaller photosite, and as a consequence, the larger photosite has a much better SNR.

Large versus small photosites

A larger photosite size has less noise fundamentally because the accuracy of the measurement from a sensor is proportional to the amount of light it collects. Photon or shot noise can be approximately described as the square root of signal (photons). So as the number of photons being collected by a photosite (signal) increases, the shot noise increases more slowly, as the square root of the signal.

Two different photosite sizes from differing sensors

Consider the following example, using two differing size photosites from differing sensors. The first is from a Sony A7 III, a full frame (FF) sensor, with a photosite area of 34.9μm²; the second is from an Olympus EM-1(ii) Micro-Four-Thirds (MFT) sensor with a photosite area of 11.02μm². Let’s assume that for the signal, one photon strikes every square micron of the photosite (a single exposure at 1/250s), and calculated photon noise is √signal. Then the Olympus photosite will receive 11 photons for every 3 electrons of noise, a SNR of 11:3. The Sony will receive 35 photons for every 6 electrons of noise, a SNR of 35:6. If both are normalized, we get rations of 3.7:1 versus 5.8:1, so the Sony has the better SNR (for photon noise).

Photon (signal) versus noise

If the amount of light is reduced, by stopping down the aperture, or decreasing the exposure time, then larger photosites will still receive more photons than smaller ones. For example, stopping down the aperture from f/2 to f/2.8 means the amount of light passing through the lens is halved. Larger pixels are also often situated better when long exposures are required, for example low-light scenes such as astrophotography. For example, if we were to increase the shutter speed from 1/250s to 1/125s, then the number of photons collected by a photosite would double. The shot noise SNR in the Sony would increase from 5.8:1 to 8.8:1, that of the Olympus would only increase from 3.7:1 to 4.7:1.

Photosite size and light

It doesn’t really matter what the overall size of a sensor is, it is the size of the photosites that matter. The area of the photosite affects how much light can be gathered. The larger the area, the more light that can be collected, resulting in a greater dynamic range, and potentially a better signal quality. Conversely, smaller photosites can provide more detail for a given sensor size. Let’s compare a series of sensors: a smartphone (Apple XR), a MFT sensor (Olympus E-M1(II)), an APS-C sensor (Ricoh GRII) and a full frame sensor (Sony A7 III).

A comparison of different photosite sizes (both photosize pitch and area are shown)

The surface area of the photosites on the Sony sensor is 34.93µm², meaning there are roughly 3× more photons hitting the full-frame photosite than the MFT photosite (11.02µm²), and nearly 18× more than the photosite on the smartphone. So how does this affect the images created?

The size of a photosite relates directly to the amount of light that can be captured. Large photosites are able to perform well in low-light situations, whereas small photosites struggle to capture light, leading to an increase in noise. Being able to capture more light means a higher signal output from a photosite. This means it will require less amplification (a lower ISO), than a sensor with smaller photosites. Collecting more light with the same exposure time and, therefore, respond with higher sensitivity. An exaggerated example is shown in the figure below.

Small vs. large photosites, normal vs. low light

Larger photosites are usually associated with larger sensors, and that’s the reason why many full-frame cameras are good in low-light situations. Photosites do not exist in isolation, and there are other factors which contribute to the light capturing abilities of photosites, e.g. the microlenses that help to gather more light for a photosite, and the small non-functional gaps between each photosite.

Megapixels and sensor resolution

A megapixel is 1 million pixels, and when used in terms of digital cameras, represents the maximum number of pixels which can be acquired by a camera’s sensor. In reality it conveys a sense of the image size which is produced, i.e. the image resolution. When looking at digital cameras, this can be somewhat confusing because there are different types of terms used to describe resolution.

For example the Fuji X-H1 has 24.3 megapixels. The maximum image resolution is is 6000×4000 or 24MP. This is sometimes known as the number of effective pixels (or photosites), and represents those pixels within the actual image area. However if we delve deeper into the specifications (e.g. Digital Camera Database), and you will find a term called sensor resolution. This is the total number of pixels, or rather photosites¹, on the sensor. For the X-H1 this is 6058×4012 pixels, which is where the 24.3MP comes from. The sensor resolution is calculated from sensor size and effective megapixels in the following manner:

  • Calculate the aspect ratio (r) between width and height of the sensor. The X-H1 has a sensor size of 23.5mm×15.6mm so r=23.5/15.6 = 1.51.
  • Calculate the √(no. pixels / r), so √(24300000/1.51) = 4012. This is the vertical sensor resolution.
  • Multiply 4012×1.51=6058, to determine the horizontal sensor resolution.

The Fuji X-H1 is said to have a sensor resolution of 24,304,696 (total) pixels, and a maximum image resolution of 24,000,000 (effective) pixels. So effectively 304,696 photosites on the sensor are not recorded as pixels, representing approximately 1%. These remaining pixels form a border to the image on the sensor.

Total versus effective pixels.

So to sum up there are four terms worth knowing:

  • effective pixels/megapixels – the number of pixels/megapixels in an image, or “active” photosites on a sensor.
  • maximum image resolution – another way to describe the effective pixels.
  • total photosites/pixels – the total number of photosites on a sensor.
  • sensor resolution – another way to describe the total photosites on a sensor.

¹ Remember, camera sensors have photosites, not pixels. Camera manufacturers use the term pixels because it is easier for people to understand.

Camera companies – what’s in a name?

Ever wonder where some of the camera/photographic companies got their names? Many are named for their founders: Hasselblad, Mamiya, Schneider, Voigtlander, Zeiss etc. Sometimes names are hard to pronounce, so acronyms are better: Chinon (from Chino), Cokin (from Coquin), Konica (from Konishi), Tamron (from Tamura). Leica is one of the oldest, using “Lei” from the name of the company founder, and “ca” from camera. Here are how some of the other leaders in the photograhic industry got their names…

AGFA – The name is built on the initials of the firms original German name – Actien-Gesellschaft für Anilin-Fabrikation, founded in 1867. 

CANON – Originally called Seikikogaku Kenkyujo (Precision Optical Industry Co. Ltd.), founded in 1934. The first 35mm camera produced were named, Kwanon, after the Buddhist deity of mercy. The initial Kwanon logo included an image of the goddess with 1,000 arms and flames. In 1935 they registered the name “CANON”, which seems like an Anglicization of Kwanon.

CONTAX – The first four letters derive from Contessa, a German maker of sheet-film cameras taken over by Zeiss-Ikon in 1926. The “AX” is a suffix common to German camera names, although some suggest is comes from another of Zeiss’s cameras the Tenax.

COSINA – Possibly an Anglicized version of the company’s Japanese name Kabushiki-gaisha Koshina, founded in 1959. The first part of the name is a reference to the Koshi area within Nakano, where the founder came from; while the “NA” represents Nakano.

ILFORD – Initially founded in 1879 in Ilford, UK, the Britannia Works Company, it was changed in 1902 to take on the name of the town.

KODAK – The name came from the first simple roll film cameras produced by Eastman Dry Plate Company in 1888. It had no real meaning. 

MINOLTA – The name is derived from the Japanese phrase describing the time of the rice harvest. Minoru refers to rice in its harvestable state, and ta is a rice field. The name also has a Western meaning, as an acronym for Machinery and Instruments Optical by Tashima. Minolta’s ROKKOR lenses are named for the mountains Rokko, near the company’s Osaka headquarters. 

NIKON – When founded in 1917, the company was called Nippon Kōgaku Kōgyō Kabushikigaisha. The name Nikon dates from 1946. Originally the suggestion was Nikko, an acronym made from Nippon Kogaku (Japan Optical Co.). However it was believed the name sounded too weak, so an N was added to the end.

OLYMPUS – The company was originally called Takachiho Manufacturing. Takachiho is a mountain in southwest Japan where the gods are believed to have lived and is analogous to Olympus, home to the gods in Greek mythology. Zuiko translates as “light of god”. 

PENTAX – Founded in 1919 as Asahi Kogaku Goshi Kaisha. Marketed as the Asahi Optical Co., Asahi means “rising sun”. Pentax is a combination of “PENTA” from Pentaprism, and “X” from Contax. It was originally a registered trademark of the East German VEB Zeiss Ikon and acquired by the Asahi Optical company in 1957.

POLAROID – Originally called Land-Wheelwright Laboratories, the company was renamed Polaroid after its first product (1937), a polarizing material used in military instruments and sunglasses. 

RICOH – An Anglicized acronym formed from the original Japanese name for the company, RIKagaku KOgyo, setup by the Institute for Physical and Chemical Research in 1936. Ricoh is also a homonym of the Japanese word for smart, rikoh

ROLLEI – Originally called the Werkstatt für Feinmechanik und Optik Franke & Heidecke when it was founded in 1920, the name Rollei was derived from the Roll-film Heidoscop, a stereo camera. 

TOKINA – Established in 1950 as Tokyo Optical Equipment Manufacturing. In the 1970s, the company began manufacturing lenses under its own brand Tokina. The prefix “TO” refers to Tokyo, the suffix “kina” is a Germanization of the Italian word for cinema, cine. 

VIVITAR – Named originally for its founders Ponder & Best, this US company imported a variety of camera brands, including Olympus, and Mamiya. When it started sourcing its own equipment a new name was created, based on the Latin vivere (to live), and the ar/tar suffix common to many of the prominent lenses such as Ektar, and Tessar. 

YASHICA – Originally called Yashima Optical Industries, when founded in 1949. Yashica is a combination of “YASHI” from Yashima, and “CA” for camera, similar to Leica.