Websites come and go. Some we don’t miss at all, and others we lament the microsecond we see the “Forbidden” page, access denied. Sometimes people pass away, sometimes they loose interest, there are many reasons. Perhaps the most oft missed ones are those that hold together some sort of comprehensive knowledge database of sorts, compiling info that isn’t readily available anywhere. lens-db.com was one such site. It contained information and pictures on thousands of lenses, and more recently cameras.
The original site was geo-blocked in April (I only just noticed as I have been too busy with other things). Now I had noticed over the past couple of years that some attempt had been made by the owner to sell the site. The problem was that no context was really provided. Now it turns out that the site in located in Russia (which few people knew), and due to international sanctions it became impossible to continue running the site, because he couldn’t receive payments from outside of Russia. I’m sure if an explanation had been provided, somebody would have offered a better solution than shutting down the site.
Note: The owner of lens-db, Evgenii Artemov, has provided a comment below, which better describes his predicament. Please take the time to read it.
It’s a pity because I imagine if it were located elsewhere, many people would have signed up for a [reasonably priced] yearly subscription. Now an attempt is being made to resurrect the concept of the site in the guise of the community driven website thelensdb.com. It has a lot of basic data, but currently lacks the pictures and info from catalogues/brochures, and honestly will take a lot of effort to replace. Ideally people will contribute information on cameras and lenses overtime, including catalog/brochure scans and the photographs. Of course there is nothing inherently proprietary about historic data, so I imagine over time it could be rebuilt. Will it succeed? I have strong doubts, because such community driven databases have a legacy of not being successful. With one source, it is easier to maintain a consistency in the data, something not possible with multiple sources, and people editing things.
P.S. What data there was on archive.org is now also gone, for one reason or another… becuase a search there on WaybackMachine finds 0 links to saved pages. I imagine the owner requested the data be removed. Pity.
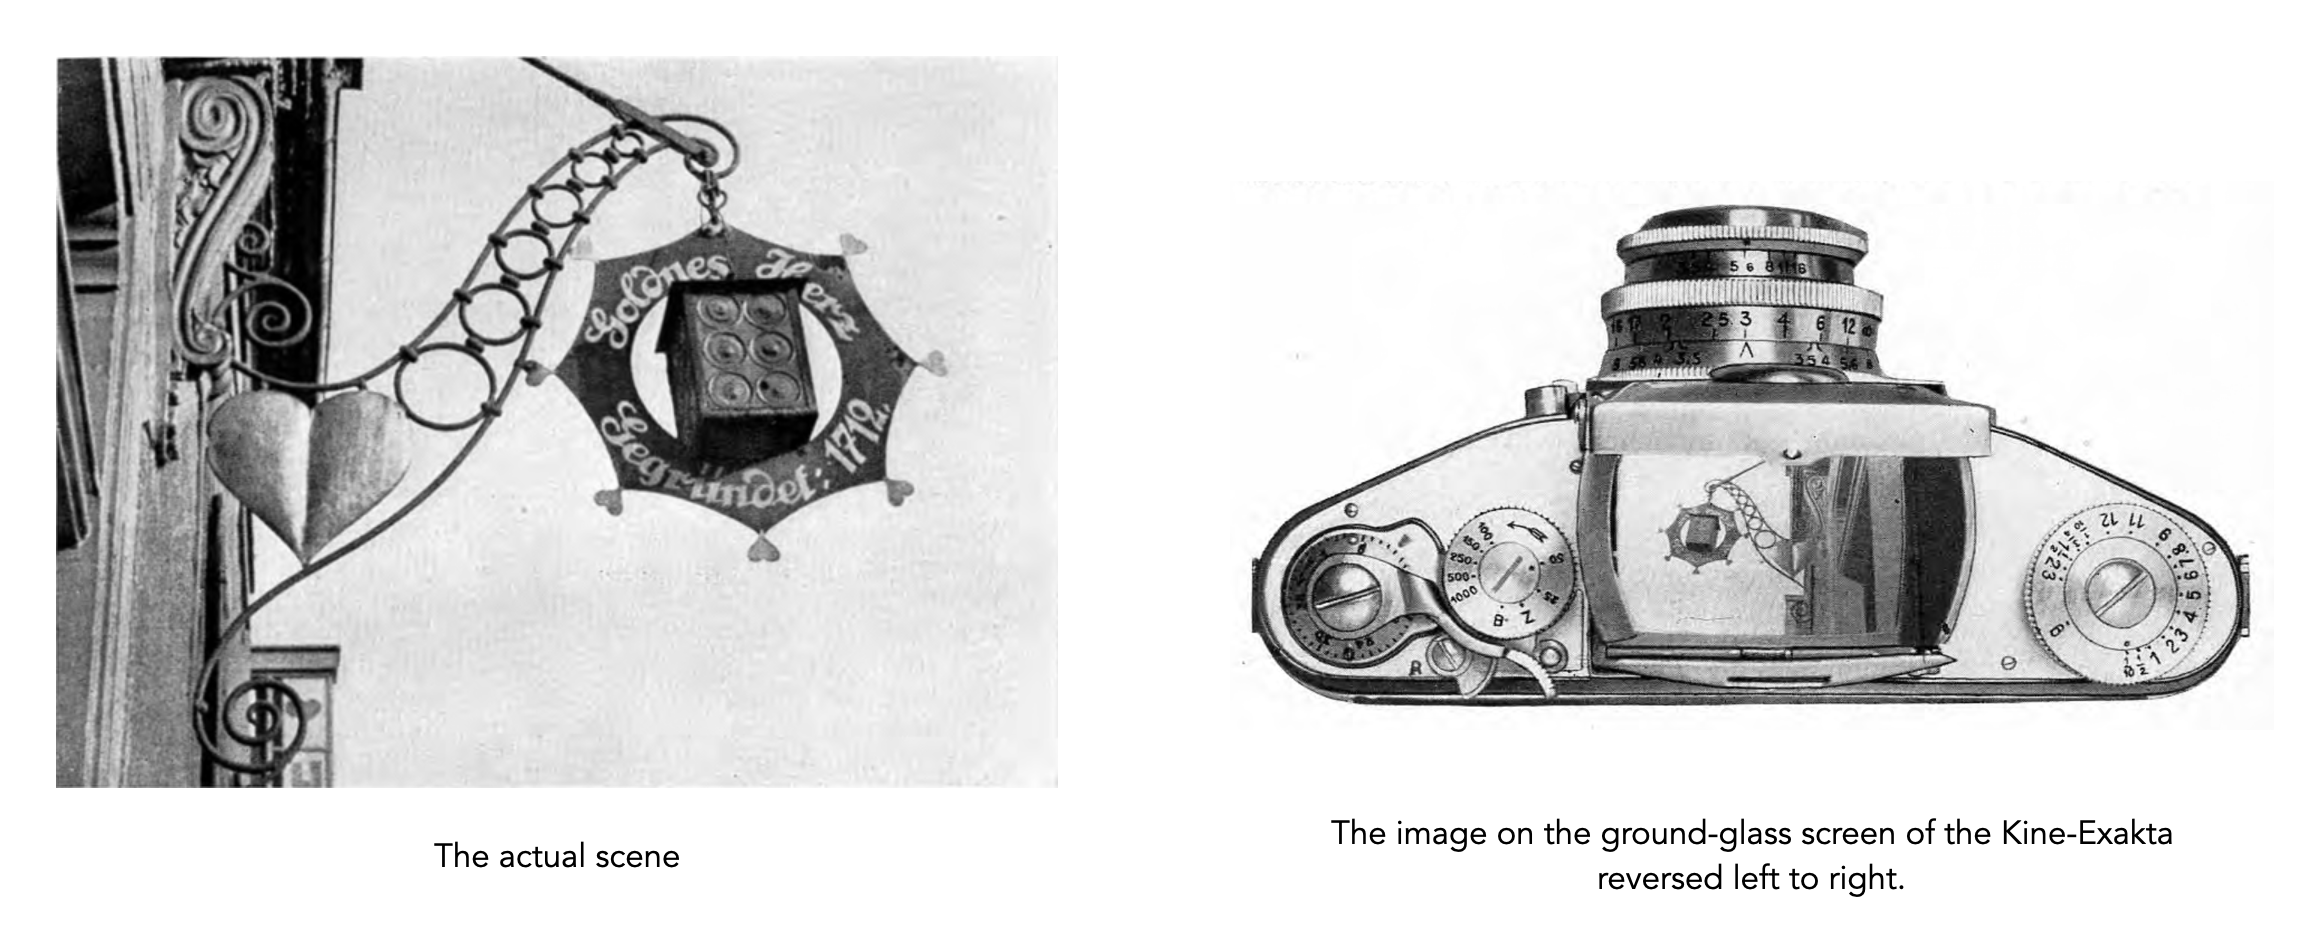
Large format plate cameras offered a simple ground-glass screen, which offered many advantages, when speed of focusing and viewing aren’t really essential (and a tripod was being used). The viewfinder is large, and accurate and completely free of parallax. However there were also disadvantages: the image shown is inverted and laterally reversed, and the process of taking a photo was slow. When the Leica I rangefinder appeared in 1926, there was a new way of looking at things. But it too was not perfect, mainly because it suffered from parallax. Why? Part of the reason is that rangefinder cameras does not actually view the scene through the lens, but rather they use two “viewports” in order to get the split image to aid in focusing.
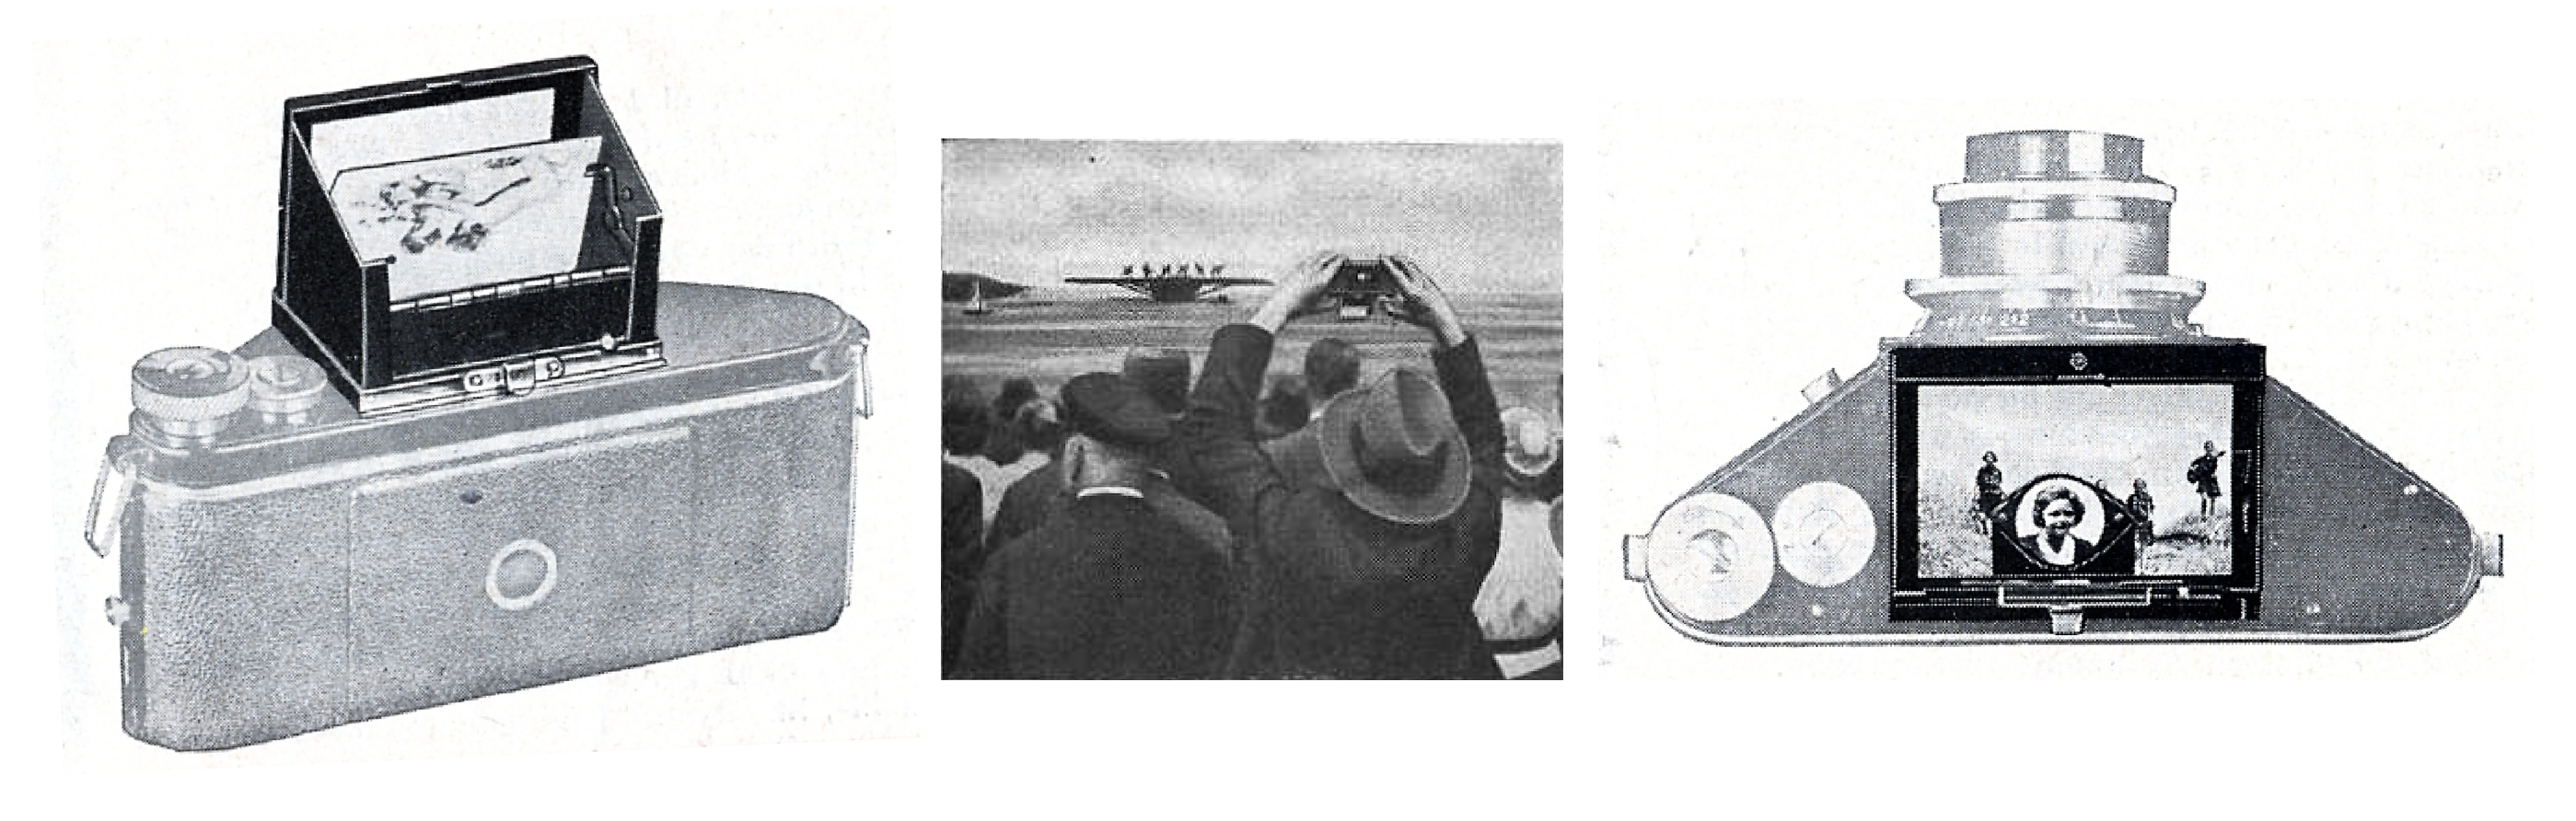
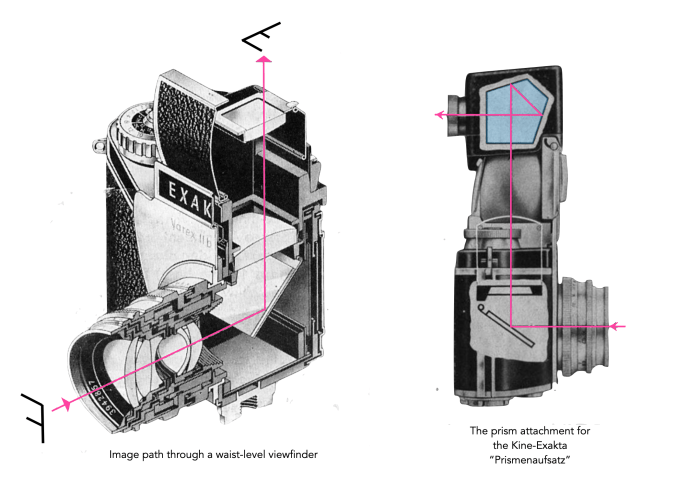
Fig.1: The waist-level viewfinder on the VP Exakta
Now when the first 35mm SLR, the Exakta Kine, appeared a decade later, it sported a waist-level finder/viewfinder (WLF/WLV). Instead of being parallel to the lens axis, a WLV is perpendicular to the lens axis. These were standard on the Twin-Lens-Reflex cameras, such as the popular Rolleiflex, introduced in 1929 by Franke & Heidecke in Germany. The WLV naturally became standard with the appearance of the first small-format SLR, the VP Exakta a 127 roll film (4×6.5cm), in 1933. The camera viewed the scene through the lens, by means of a mirror which redirected the image 90°, vertically, the so-called “reflex-finder”. There was at that point, no prism to view the scene at eye-level. However there was also no issue with parallaxis. Indeed the VP Exakta was sold on the pretext that “Only a mirror reflected image as produced by the ‘Exakta’ lens is always reliable and absolutely identical with the final picture.”.
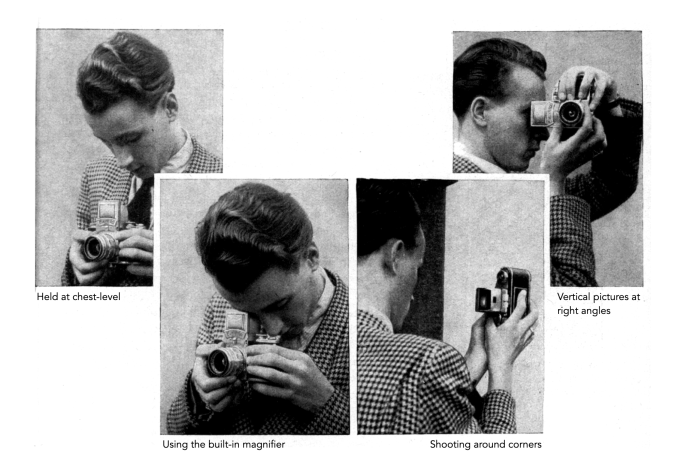
Fig.2: Different methods of shooting with an Exakta with a WLV
Many early SLRs came with a waist-level viewfinder, examples typically include cameras from Ihagee such as the Exakta. They had some benefits over previous systems. Firstly, the image is now the right way up, although still laterally reversed (so not ‘absolutely’ identical) (Fig.2). This allowed the camera to be used quite quickly − after focusing, the only real delay came from the time it takes to stop down the lens and swing the mirror out of the way. The WLF is often appreciated by street photographers, because it involves looking down to frame and focus, to bystanders it looks like a photographer is fooling about with the camera rather than preparing to shoot. It was also useful because the camera could be use upside down to allow shots to be taken over crowds.
Fig.3: An example of the view from a Kine Exakta viewfinder
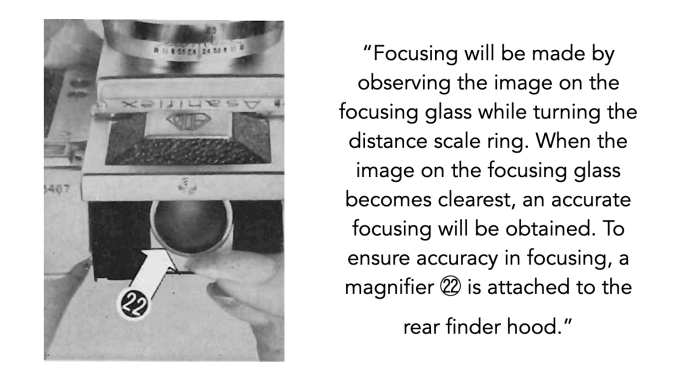
However, for many, the positioning of the waist-level viewfinder was considered to be quite inconvenient, with the image on the screen still inverted when the camera is held to take portrait-framed pictures. This can be awkward in practice, and is likely why medium format cameras of the 1960s which typically used waist-level viewfinders, e.g. Bronica, Hasselblad, Praktisix adopted a 60mm (2¼-inch) square format. Focusing on a WLF was often harder as well. Cameras like the AsahiFlex II required focusing to be done by deciding when an image became clearest. To this end, may WLF often provided a magnifier attached to the rear finder hood. This is less of an issue with medium format cameras because it is easier to see the viewfinder just because of its larger size (the 24×36mm viewfinder is 24% of a 6×6 format camera).
Fig.4: Focusing the waist-level viewfinder on the Asahiflex II
The WLV was by no means ever meant to be the finale of viewfinders. Efforts were being made to provide an alternative ‘normal’ view through the lens. For Exakta cameras this was provided by means of a “Prismenaufsatz“, basically an auxiliary prism that was placed above the WLV. This appeared in 1949, and a new system of interchangeable viewfinders was designed by Willy Teubner, so that the existing viewfinder, including its housing could be removed and replaced with an insert with a prism [1]. This heralded the arrival of the Exakta Varex.
The waist-level viewfinder had incredible longevity. Some camera manufacturers included a WLV in their repertoire of interchangeable viewfinders right up until the early1960s, most notably German manufacturers such as Exakta (not surprisingly). Others like Kamera-Werkstätten moved to a fixed prism with the Praktica IV in 1959. Most Japanese companies abandoned the WLV quite quickly. Some, such as Asahi, went to a fixed pentaprism, with the introduction of the Pentax (1957), but in 1980 Pentax released the professional grade Pentax LX with interchangeable viewfinders, two of which were WLV’s. Miranda still supplied WLVs as an optional viewfinder until the 1970s, e.g. Miranda Sensorex II (1972).
Fig.5: The Exakta waist-level viewfinder, and the Prismenaufsatz
Composing an image through a viewfinder certainly offers a different perspective on the scene being shot, and it does allow for a more discrete experience when undertaking street photography. However many of its advocates shoot TLR on medium format cameras, where the camera itself was better designed in order to shoot from the waist (both the shutter release and film advance are designed to be used at waist level). There has been recent interest in novelty optical waist-level finders for use on “any” camera. But the problem is that these sit on the top of a camera, and are by no means linked to the optical path of the lens. This is fine when the lens is auto-focus, or zone-focusing is used, but makes the entire process more tedious if the lens must be manually focused (because this requires framing and focusing through the lens viewfinder). The other problem is that they generally only work with 50mm or perhaps 35mm lenses, and are practically useless for others (because they don’t see through the lens).
Further reading:
Teubner, W. (Ihagee Kamerawerk), DDR Nr.5410, “Viewfinder arrangement on SLR cameras with removable waist-level viewfinder” (Sub. 25 Apr. 1950)
“It’s sort of an obvious point but, if you think about it, the photographs that are used on postcards are all excellent images. So it’s not a term that you should use to slag off a photograph. Most photocard shots are taken from a position slightly more elevated than the subject. Whoever first figured that out was a real genius, in my opinion.”
Nakamoto, Moriyama, How I Take Photographs (p.109, 2019)
Well mostly it has to do with with aesthetics and simplicity, but also authenticity, and nostalgia.
From the dawn of the 35mm SLR in 1936 up until the mid 1960s, most cameras were manufactured using traditional engineering methods, with the materials once associated with precision – brass, steel, aluminum, and an abundance of glass. These cameras were often overwhelmingly heavy, and crammed full of mechanical things. As the 1970s evolved, so too did the revolution in materials and technology that was to seal the fate of the German camera industry, and elevate the Japanese camera industry. There was little room for the hand-crafted camera in the world of the mass-market SLR. In some ways it also lead to an interest in “classic” cameras from the 1950s and 60s. As the 1970s progressed, camera designers used increasing amounts of plastic to build cameras, from camera casings to film-transport gearings. These cameras were also chock full of electronics − electronically timed shutters allowed for increased accuracy and a greater range of shutter speeds, replacing mechanically systems derived from the watch industry. There were also electronic exposure-measurement systems to replace the electro-mechanical galvanometer systems of old. All these new enhancements made cameras lighter, offered more functionality, and probably most significantly reduced their cost.
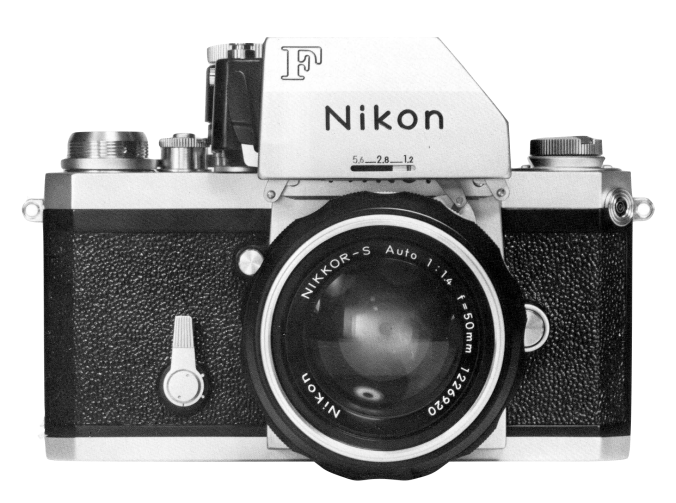
Some say the Nikon F was named after the first letter of its chief engineer’s name Masahiko Fuketa. First appearing in 1959 it became the gold standard for professional cameras. The “F” ventured with expeditions to Everest, was dragged through war-torn Vietnam, and went to space with the Apollo 15 mission.
Especially grievous may be cameras from the mid-1980s to the 1990s. There is a darker side to these purely electronic cameras − they need a power source, and electronics sometimes age poorly. It may be possible, albeit costly, to fix a manual camera but electronic components are almost impossible to fix. Some of these cameras were also left on the shelf with batteries in them, which leak over time, causing further issues. However the changes of the electronic age came at a cost. In the case of cameras, that loss was expressed in a lack of aesthetic appeal, engineering quality, “toughness”, and hand-crafted precision. The industry had swapped the engineer and craftsman for the scientist and technician. The chrome top-plate, so common amongst SLRs had been replaced by plastic. Even lenses would become encased in plastic, maybe as a means of making them lighter and more resilient. That’s not to say the cameras were bad, just that they had lost something in the translation to the modern era.
In many respects these pre-1970s cameras are what some may term “classic” cameras. What this means is somewhat subjective − to some it might mean meticulously engineered, and aesthetically pleasing. To others it might be a somewhat mechanical odd-ball, or a camera that was the first to have some sort of new camera feature or innovation. Sometimes though it is pure nostalgia − the ability to take pictures with a classic camera, made by a classic camera company before many went the way of the dodo. Vintage cameras help capture the true aesthetic of film, before things became too automated. Of course the camera itself is only part of the story, a vessel per se, because the real character comes from the character infused in individual lenses of the period, and the distinct characteristics of the film being used (grain, colour rendition, etc.).
Some people long for an analog past, for cameras where you can experience the craftsmanship that went into building these cameras. They may not be perfect anymore, but many have stood the test of time much better than their contemporary brethren.
Yes, it’s 2026 and we are still discussing megapixels.
In the early years of digital photography, the leap from 3 to 5 megapixels (MP) was a monumental change, manifesting in the Olympus E-1 in 2003. A few years later, 7-8 megapixels seemed to be more than adequate for a digital camera. But like many things, the number of photosites on digital sensors crept up as the years slipped by − from 10-12 to 16, then 20, and 24, 40. We are now living the actuality of peak-pixel.
Megapixels were, for a long time, a good way to help market a camera. They helped quantify why one camera was better than another in the most basic terms. The problem was that beyond the pure number of pixels, there was never really any explanation as to why “more” was better. Would 24MP truly produce a better postcard sized image than 16MP? Oh but there would be more detail wouldn’t there? Well not that the human eye could perceive. Those cameras producing images with 60 or 100 megapixels − they are for people that print big, and by that I mean feet, not inches. For example a camera producing a 60MP print at 200dpi would allow for a maximum size of 48×32 inches (1210×804 mm), but one with only 26MP still provides a 31×20 inch poster.
The problem with megapixels is that having 26MP is pointless if the image appears disjointed, poorly exposed or out of focus. Is there some point to spending a large amount of time digitally altering a photograph to make it seem more aesthetically pleasing? And you know what would be worse, having an image with 40 or 60 million pixels that has the same issues − needing what amounts to cosmetic surgery to look better. But some people still seem to think that more pixels will solve their problem with mediocre photographs. However it has never been about pixel quantity, but rather about pixel quality.
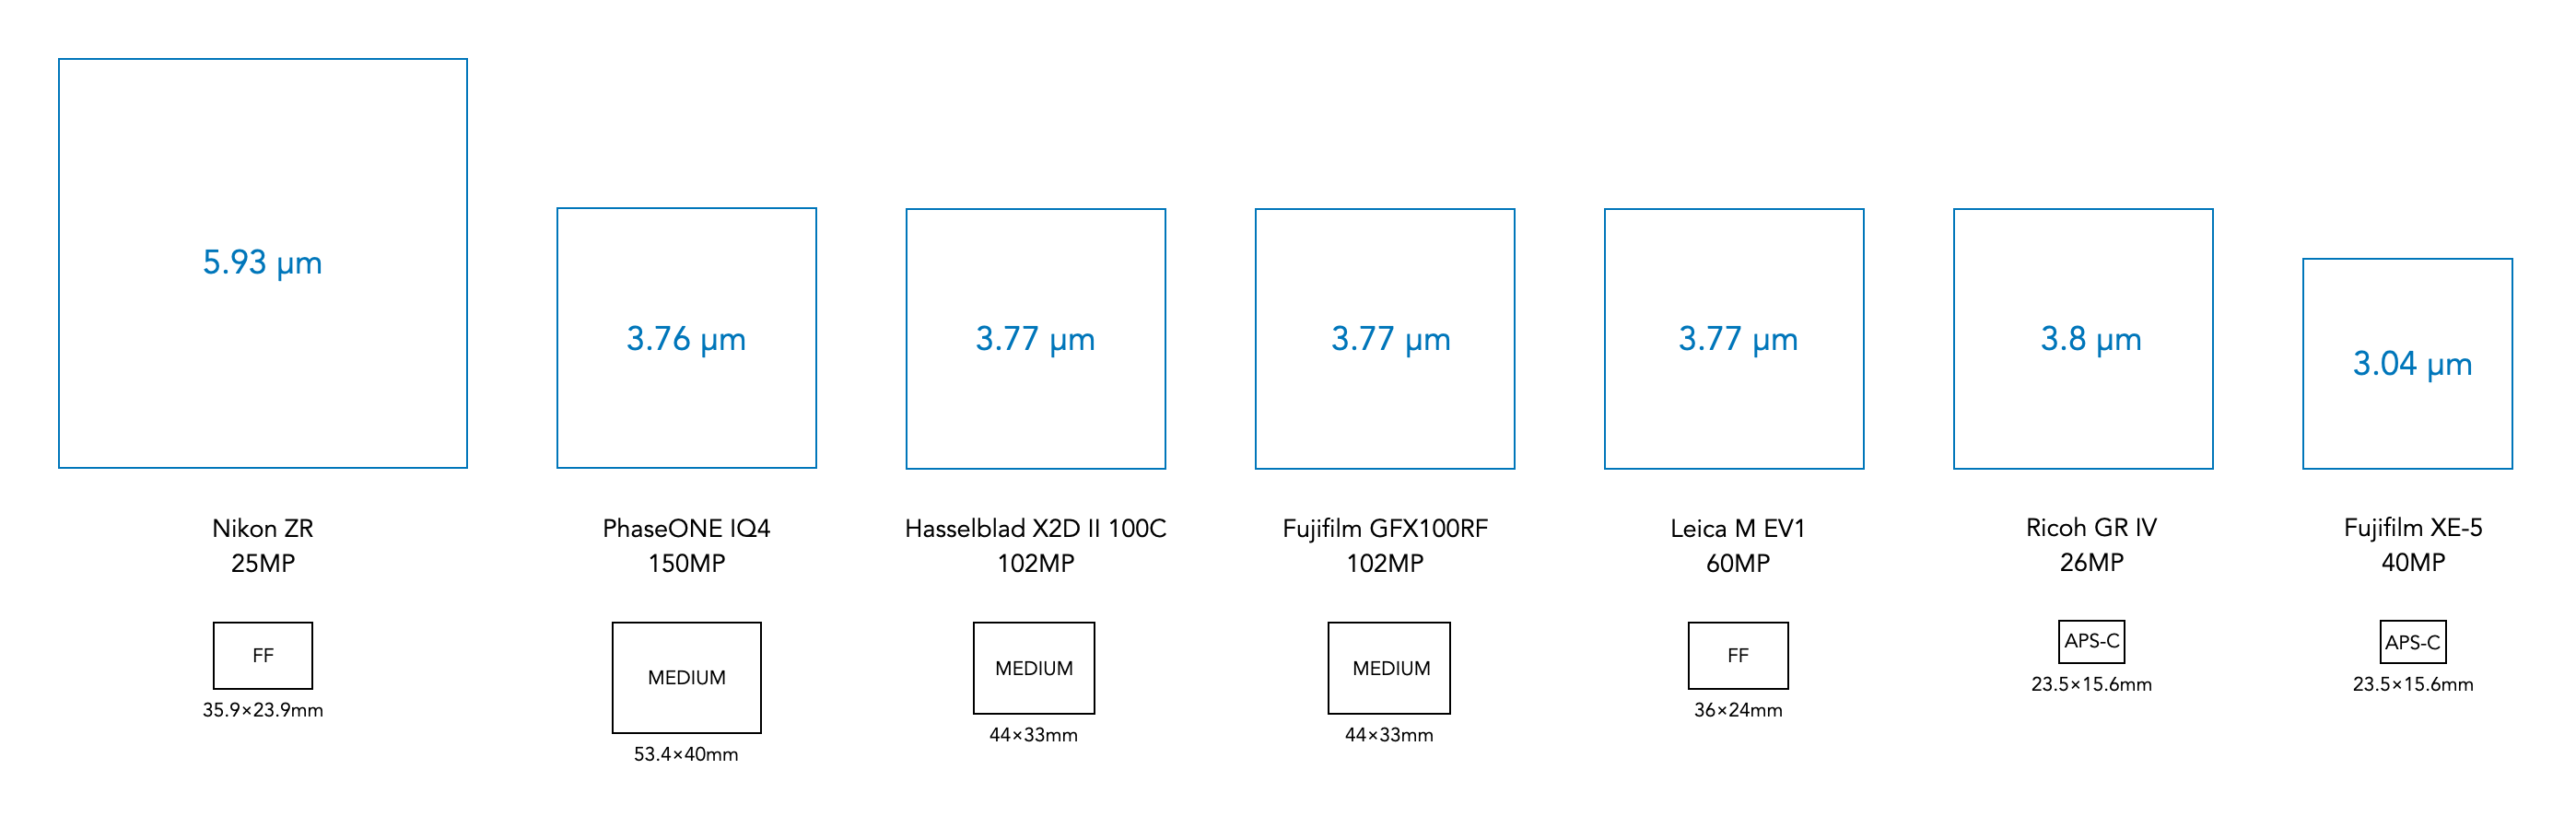
Fig.1: Various photosite sizes from modern sensors. Notice that many are around 3.77 microns in size, from sensors ranging from APS-C to medium format. This means that the only real quantifiable differences between these sensors is the quantity of photosites in the sensor.
There seems to be this adage that more photosites equals a better sensor, but that is simply not true. The quality of an image is intrinsically tied to how much light a photosite can receive, interpret, and ultimately record as a pixel. Bigger photosites mean less noise, and a higher dynamic range. Try and squeeze more photosites in a sensor, and the image quality will start to drop off. A better scenario might be bigger photosites = better sensors.
Advertising has never made mention of the fact that as more photosites were squeezed into a sensor, they get smaller. There are also intrinsic limits to how small photosites can get. APS-C sensors seem to have maxed out at roughly 40MP, with photosites approximately 3.0×3.0µm in size, the same size as the diameter of spiders silk (to put that into context the average human hair is 70µm in diameter). Manufacturers could push APS-C sensors toward 60MP, but this faces significant engineering challenges. There would be issues with diffraction at wider apertures leading to image softening, higher noise at high ISO values, and limitations of lenses being able to resolve details. Some might even argue that 26 million photosites is too many for an APS-C sensor.
As it stands, most people don’t need a camera with any more than 24-26MPs, especially when some cameras are now incorporating pixel-shift high resolution modes to facilitate high resolution images. For example the Fujifilm X-T5 features a Pixel Shift Multi-Shot mode that produces 160MP-images by combining 20 RAW frames, using IBIS to shift the 40.2MP sensor. Improvements in the quality of pixels will only come about with innovative new sensor technologies, e.g. stacked sensors.
Note: Sensors have photosites (which have dimensions), while images have pixels (which are dimensionless).
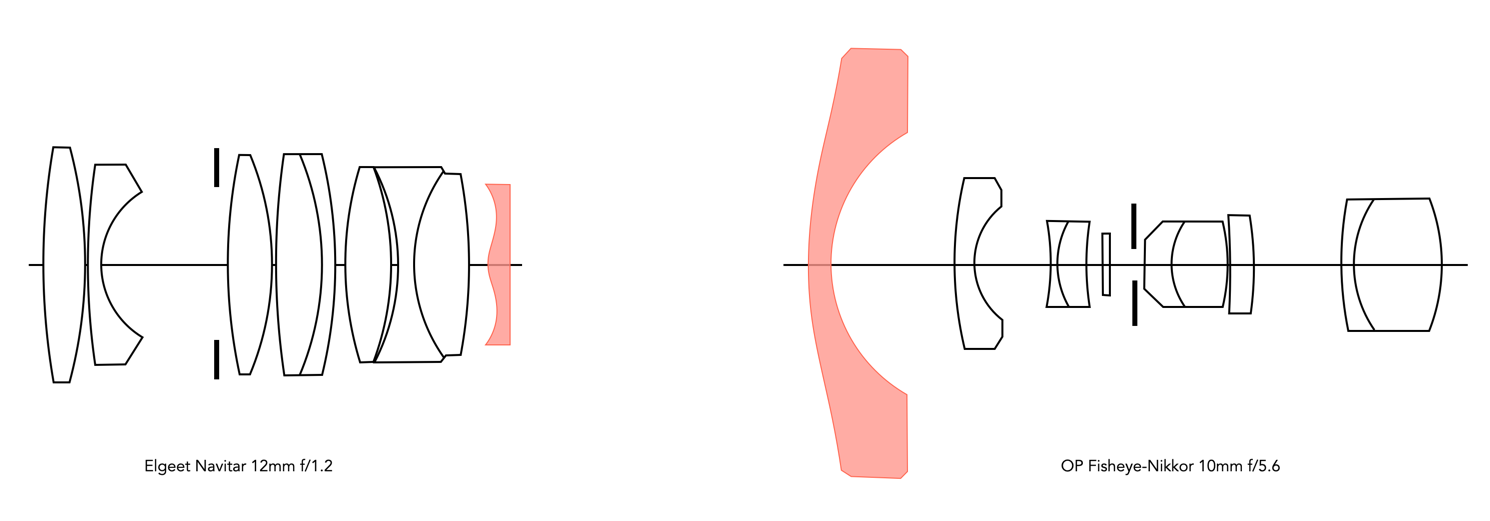
When super-speed movie films started to appear in the 1950s, the industry began to yearn for super-speed lenses to match the advanced film speeds. The worlds first aspherical lens appeared in 1955, developed by a small American company, the Elgeet Optical Company of Rochester NY. The lens was the Elgeet Golden Navitar 12mm f/1.2 wide angle lens for 16mm movie cameras. It was a 9-element lens which incorporated aspheric lens elements in addition to using rare-earth elements. Its claim to fame may have been the fact that it was 66% faster than an f/1.5 lens (which were quite common in the cine industry), covered 4.5 times the area of a normal one-inch lens and delivered sharp images over a 60° AOV. If only spherical lenses had been used in the design extra element would have been required.
Fig.1: The first of two very different aspherical lenses (aspheric lenses are shown coloured).
Now the honour of being the first aspherical lens for an SLR goes to OP Fisheye-Nikkor 10mm f/5.6. Introduced in 1968, it created a 180° circular field of view. This was a fisheye lens offering the first orthographic projection, which in simple terms means the lens has a larger central image and the image at the periphery is smaller. It is difficult to create this sort of a lens using spherical lenses, and so a aspheric lens is used in the front to provide an accurate projection.
Notes:
The Elgeet Optical Company was founded in March 1946, and made interesting lenses for a long while. In 1962 they briefly acquired German company Steinheil (Munich), selling it on after two years to Lear Siegler. In 1972 the company was reorganized into Navitar, which still operates today. The name is an acronym for the founders: London, Goldstein, and Terbuska.
Further reading:
Ginsberg, R.H., “Aspherics Promise Faster Cine Lenses”, American Cinematographer, 37(4), pp.246-249 (Apr. 1946)
“A photographer’s duty is to improve and increase his techniques! For knowledge of technique is the only tool for ensuring that the camera may be used to its maximum capability. So many photographers overestimate the function of the camera by itself – but I’m afraid a cook who relies on nothing but a sharp knife has no guarantee of producing excellent dishes.”
When you look at modern lens literature there is often one thing that is often hyped up – the use of aspherical lenses. Or put another way, lenses that contain elements that are aspherical. But what are they, and why do they matter?
Due to its radius of curvature, a lens forms a real image on a certain plane. In the early days of photography, all lenses had a shape which was spherical. Spherical lens are the easiest shape to make, but they tend to disperse the rays of light passing through them so that they do not focus at the same point. This can lead to a lack of sharpness and clarity, particularly at the edges of an image, and with wider apertures. The use of spherical lenses can cause a deficiency known as spherical aberration. It was discovered that an aspherical lens shape would eliminate this type of aberration, owing to the fact that the curvature of the lens could be used to converge light rays to a single point.
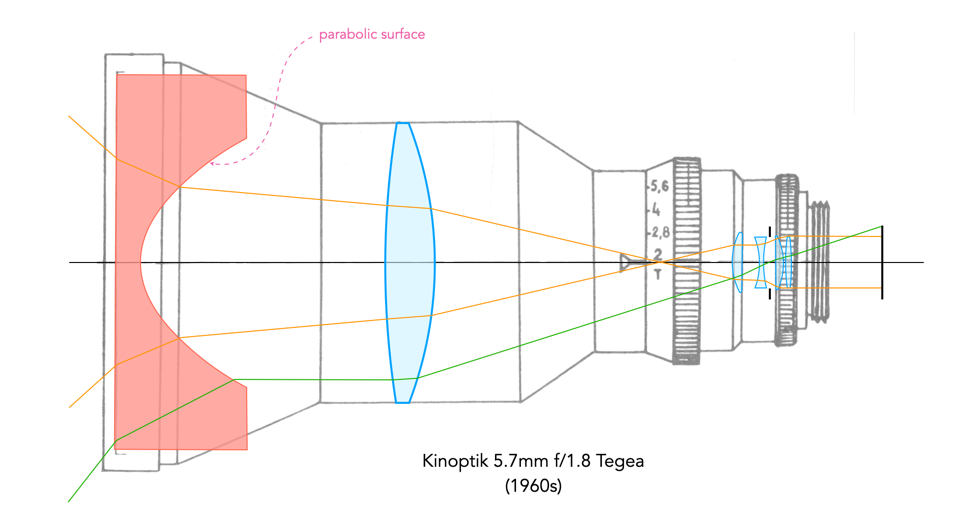
Fig.1: The Kinoptik 5.7mm f/1.8 Tegea – the inverted telephoto system of this lens for 16mm cameras uses a front component with a parabolic surface. Here an aspheric surface is used to control the higher order effects of astigmatism and distortion.
An aspherical lens is simply a lens that doesn’t have a spherical surface shape. Most standard lenses are composed of spherical elements, many of which aren’t really able to direct the light reaching the edges of the lens elements to the same focal point as the light reaching its centre. They were all the rage in the 1950s : “Aspheric lens elements are lenses of non-round shapes. Their non-spherical form allows them to reshape light rays which are normally distorted as they pass through a spherical lens system.” [1]. Essentially aspherical elements are used to help correct misalignment’s in the path of light as it traverses through the lens. They help compensate for spherical aberration and distortion which cannot be completely eliminated using conventional spherical elements alone.
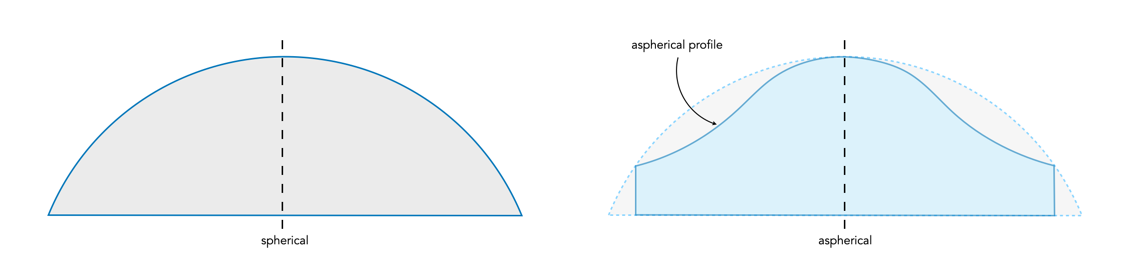
In an aspherical lens, the subtle curvature of the lens can be used to converge the rays of light and bring them to a sharp focus. The degree of asphericity is greatly exaggerated in the illustration (in Fig.2) – it is not visible to the naked eye in an actual aspherical lens element.
Fig.2: The difference between a spherical and aspherical lens
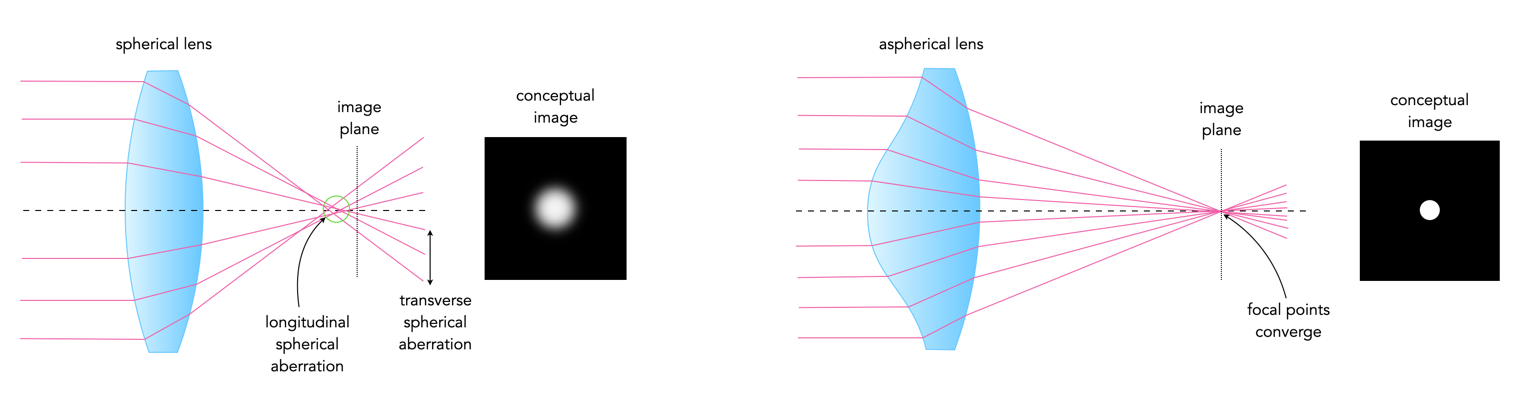
Aspherical lens elements help to compensate for distortion in wide-angle lenses, and reduce or even eliminate spherical aberrations in fast lenses (those with large maximum apertures). Aspherical lenses offer greater design latitude, raise performance, permit the use of fewer lens elements, and allow a more compact size. This is because traditional lens design involves complicated arrangements of different types of lenses to minimize optical deficiencies, but sometimes an aspherical lens can replace multiple lenses resulting in a lighter, more compact design (which is good for things like zoom lenses).
Fig.3: The effect of light rays passing through a spherical and an aspherical lens
However designing and manufacturing aspherical lenses is much more difficult than spherical ones. It’s one of the things that makes lenses containing aspherical elements more expensive than others. The problem is that the degree of asphericity is often super small, and so manufacturing tolerances can be within 0.1 microns. There are four core processes by which modern aspherical lenses are manufactured:
Ground − Individual lenses are ground and polished, typically for elements with large diameters. The most expensive manufacturing process, but also the most precise.
Plastic moulded − Formed by injecting optical-grade resin into an aspherical surface mould. They are light weight, and can be mass produced at a low cost. Good for improving the image quality of entry-level lenses.
Glass moulded − Formed by softening optical glass using high temperatures and then shaping it in an aspherical metal mould. More precise than plastic-moulded lenses, they are still less expensive than ground elements, making them optimal for consumer lenses.
Moulded polymers − A standard glass spherical lens is used onto which is moulded a thin layer of a photopolymer using an aspheric mould. Used for high-volume precision applications.
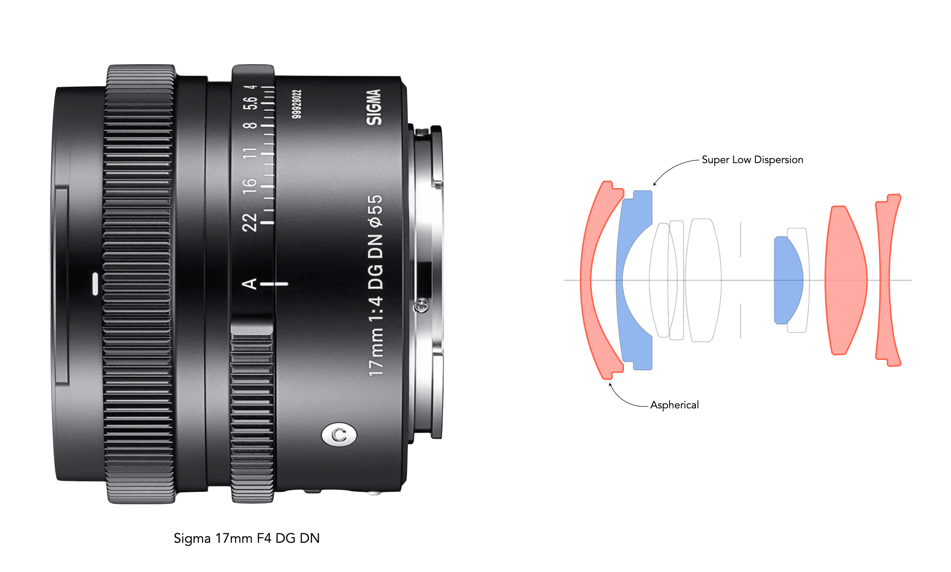
Fig.4: An example of a modern wide-angle lens with aspherical elements (Sigma 17mm F4 DG DN).
What are the downsides of aspherical lenses? One issue is that sometimes it can lead to non-uniform rendering of out-of-focus highlights. This effect usually manifests itself as an ‘onion-like’ texture of concentric rings, or a ‘wooly-like’ texture, and is caused by very slight defects in the surface of aspherical element. It is difficult to predict such effect, but usually it occurs when the highlights are small enough and far enough out of focus.
The first mass produced aspheric lens was introduced in 1955 by the Elgeet Optical Company, the Golden Navitar 12mm f/1.2 lens for 16mm film. The first interchangeable SLR lens to incorporate an aspherical lens element was the Nikon Fisheye-Nikkor 10mm f/5.6 (1968). The first Canon lens with an aspherical element was the FD 55mm f/1.2AL (1971).
Further reading:
Ginsberg, R.H., “Aspherics Promise Faster Cine Lenses”, American Cinematographer, 37(4), pp.246-249 (Apr. 1956)
“The only way you can ensure that a shot will ever be at all meaningful is if you take it. Don’t think too hard about it beforehand, don’t be too self-conscious or rational − just press the shutter button. There’ll be all the time in the world for other people to come along later and attach whatever implications or ‘meaning’ they like to it.”
Daido Moriyama How I Take Photographs, Takeshi Nakamoto (2019)
With SLRs becoming more common in the 1950s, so too was the idea of interchangeable lenses. It was possible to but one camera, and a myriad of lenses with different focal lengths to use with it. But the idea of interchangeable likely confused some people, as it turns out that in many cases interchangeable did not really mean interchangeable at all. Interchangeable in the SLR context of the word really just meant not fixed, i.e. the lens could be changed on a camera. But to some interchangeable might have meant the ability to use any lens on any camera.
The problem was one of standardization, or rather a lack there-of. When 35mm cameras first evolved, camera mounts evolved quite organically. Rangefinder cameras started with the 39mm screw mount of the Leica and bayonet mount of the Contax. In 1936 Ihagee released the Kine-Exakta the world’s first 35mm SLR, and also the first with a bayonet-mount, perhaps in deference to Leica’s screw mount. There were definite benefits to a bayonet-mount – they were quick and easy to change. But they were also more expensive to manufacture. In 1939 Kamera-Werkstätten would introduce the Praktiflex, which had an M40 screw mount. There was nothing to really stop any manufacturer from introducing a new SLR with a unique mount. From an economical viewpoint, a unique mount makes complete sense, because it guarantees users can only purchase system lenses, and not be able to venture into third-party lenses. It also makes life a little simpler, and there may be some benefit to lenses tailored specifically to a camera. The Praktina from Kamera Werkstätten was such a camera, debuting a new breech-lock lens mount, which meant that the lens environment was very restricted, and lenses used on previous KW systems could not be used, forcing the photographer to buy new lenses. There is also the caveat of the manufacturer actually having to provide an assortment of lenses − SLRs which are released with a limited ecosystem of lenses have historically not been very successful.
Interestingly, mounts that were patented, such as the Exakta mount could not be used by unlicensed lens manufacturers, whereas those who used screw lenses were uninhibited because it would almost be impossible to obtain a patent for what is essentially a screw thread (which is why Leica-copies all used the same screw mount). The Leica M39 mount was based on the Whitworth thread form, and while it may have been possible to obtain a utility patent on some novel use of a thread mount on a camera using 35mm film, the thread itself was not patentable, perhaps because different diameter mounts were already being used on microscopes. The concept of interchangeable lenses resonated well with manufacturers of SLR cameras with focal-plane shutters. Those who designed leaf-shutters were another thing altogether. SLR cameras like Agfaflex, Bessamatic, Contaflex, and the Retina Reflex could only use the interchangeable lenses specifically made for their cameras, because having a behind-the-lens shutters meant that the interchangeable lenses weren’t ‘complete’ lenses as a common portion of the lens system was integral to the system.
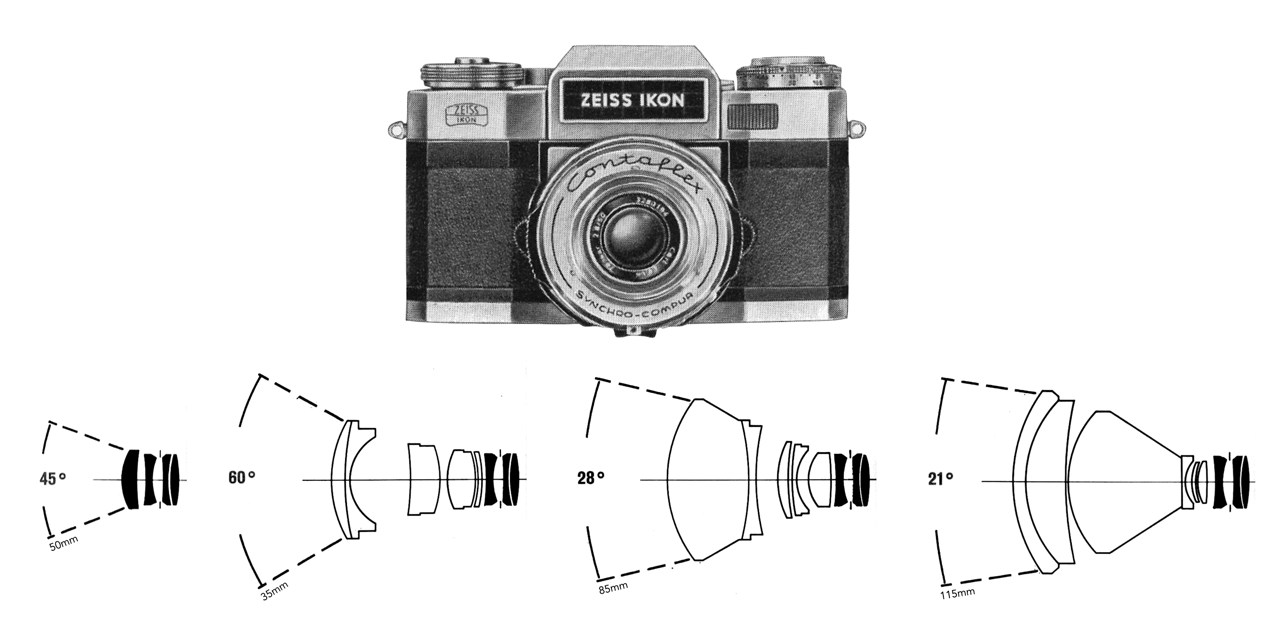
Fig.1: The Contaflex had a very limited ecosystem of lenses, i.e. some four basic lenses. In addition the fastest lens was the Tessar f/2.8 50mm.
In 1949 both Praktiflex and Contax cameras had adopted yet another mount, the M42 screw mount. For some reason there was something about the M42 that became popular, perhaps because it was not patented, and a little larger than the previous screw mounts. By the mid-1950s then, two SLR camera mounts seemed to have risen to the top: Exakta and M42. As a lot of SLRs from this period originated from East Germany, the use of common lens mounts likely made sense considering the state-owned lens manufacturers. For example lens manufacturer Meyer Optik would produce lenses for both the M42 and Exakta mounts. Of course adopting a “standard” mount did not always result in plain sailing. A M42 lens from one company did not always exactly fit the M42 camera mount of another, and those that did coupled to the camera body effectively. A good example is again the Kamera-Werkstätten Praktina. Produced from 1953 to 1960, the lenses for the system had five different diaphragm control mechanisms: manual, preset, preset with trigger release, semi-automatic, and automatic. Preset and manual lenses in Praktina mounts fit all Praktina cameras [1]. However the semi-automatic lenses made for the Praktina FX would fit, but not work on the Praktina IIa, and the fully automatic lenses for the Praktina IIa, would fit, but not work on the older Praktina FX. The reason is that on the Praktina FX the actuating pin moves forward, and on the IIa it moves backwards.
The M42 mount may have been the only truly interchangeable lens ecosystem which evolved. The mount was in production for decades, and a slew of camera manufacturers adopted the mount: Praktica, Zenit-E, Asahi Pentax, Chinon, Cosina, Mamiya, Fuji, Yashica, and even Olympus. To support these cameras, over fifty different manufacturers made lenses for the M42 mount, amounting to probably thousands of different lens models (a precise estimate is somewhat difficult). By the mid-1960s, many camera manufacturers had decided to move towards proprietary mounts. In many cases this was away from screw-mounts to bayonet-style mounts which allowed for: (i) larger diameter mounts; (ii) securer mechanisms for fast and reliable lens change and (iii) mechanisms to allow with aperture coupling with light meters. This might have been considered by some to be purely based on non-conformity, but likely had some underpinnings in the competitive nature of camera manufacturing. To this end, independent lens manufacturers produced single lenses with a series of adapters, which could be changed for those with multiple camera systems. Good examples of this were Kilfitt (they produced more adapters than lenses), Tamron (Adaptall) [2], and Novoflex.
Fig.2: The Tamron Adaptall/Adaptall-2 system was perhaps the personification of interchangeability. It allowed their lenses to be couples with some 25 different camera mounts
So lenses were only really interchangeable in the largest of systems, i.e. Exakta, and M42 the latter of which may have been the most successful. There was a small window of interchangeability, but only in so much that it relates to the existence of adapters, and a cameras ability to use other lenses. For example ALPA cameras had a flange-focal-distance (FFD) of 37.8mm, which means it could provide adapters for mounting systems with a FFD greater than 37.8mm (of which there were many). Many systems had a large FFD, meaning their ability to use interchangeable lenses from other systems was limited.
There has never been one all-encompassing, ubiquitous means of attaching a lens to a camera. The closest we came was the screw-mount M42, its reign yielded to that of the bayonet mount, a victim of its own limitations. At this juncture, many manufacturers went with their own proprietary mounts in part to facilitate automatic apertures and other the inclusion of electronics in lenses. True interchangeability may actually exist in the guise of specific brand biomes. A good example here is the Leica M-mount, which was introduced in 1954 and is still used on Leica cameras today, allowing even older analog lenses to be used on a modern digital camera.
NB: What is interesting is that in the rangefinder realm, so many of the clones produced just copied the L39 mount of the Leica (although in reality there were some issues with 39mm standardization as well). The lack of interest here may have had less to do with any lofty ideas of standardization, but rather providing access to a cheaper Leica, and easy access to a slew of existing lenses.