A lens that has been stored in an inappropriate environment, i.e. one that is dark and humid, may provide the perfect conditions for the growth of fungus. Fungus takes the form of tendril or web-like structures on the surface of the lens. The fungus secretes an acid that etches a lenses’ multicoating. This sort of damage can be permanent, and hard to remove. Too much fungus will lower contrast, and way too much will give darker, fuzzier images as it blocks light. Fungus is bad news – avoid lenses with it, however small the “infection”.
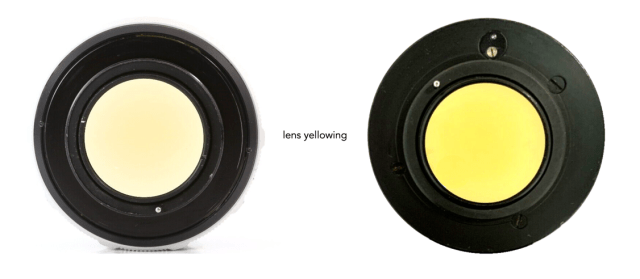
⑥ Yellowing
Coatings on lenses often yellow in time. Glass in general does not yellow, but lens coatings, or at least older ones do. This is also true of glass made with radioactive elements, e.g. Thorium, to reduce refraction.
⑦ Bubbles
Some lenses pre-1970 had defects caused by the optical glass manufacturing process which left a few pin-prick sized air bubbles inside the glass. These bubbles may come from different sources, but in most cases the source is imperfect refining. They look like tiny dust specks when viewed with the naked eye, but if magnified, they are indeed bubbles.
⑧ Separation
Lens groups are most often held together with some type of glue. In modern lenses this is usually a UV-cured epoxy. Vintage lenses typically use epoxy, polyester, and urethane-based adhesives, and some pre-WW2 lenses use Canada balsam (basically a resin from balsam fir trees). The balsam was used because it has a refractive index that is similar to crown glass and is invisible when dry. Unfortunately, Canada balsam is not resistant to temperature extremes or solvents. A degradation of the adhesive will result in the lens delamination. This usually manifests itself as a multicoloured band or blobs around the edge of a lens with coatings, or a white band/blobs on lenses with few or no coatings (but it can also occur in the centre of a lens). A small amount of separation on the edges of a lens will likely have little effect on image quality. A large amount may cause a decrease in contrast, flare and ghosting, softer edges, loss of sharpness, and a difficulty in focusing.
Fixing anomalies
Is it possible to rectify these optical defects? The table below provides a quick guide, and later posts will explore some of these defects in more detail.
Defect
Repairable?
Lens disassembly required?
Notes
scratches
maybe
no
It is hard to remove scratches, especially deep scratches, although fine scratches might be able to be buffed or polished out (some people suggest toothpaste).
haze/fog
yes
yes
It might be possible to use a cleaning solution to reduce or suppress the haze.
dust
yes
yes/no
Dust on external lens surfaces is easy to clean. Internal dust is harder because it requires lens disassembly.
blemishes
no
no
Multicoating damage cannot be repaired.
fungus
maybe
yes
It is possible to repair low levels of fungal infections, but it does require lens disassembly. Heavy fungal infections are not repairable.
yellowing
yes
no
Yellowing caused by the presence of Thorium can be reduced using UV lights.
bubbles
no
no
Intrinsic to the lens glass, consider it a feature of certain older lenses.
separation
no
yes
Separated lens groups are basically not fixable. Fixing these requires lens separation, re-centering and re-cementing.
There are a number of physical anomalies that can be found on the optics of vintage lenses. Regardless of the abnormalities of the lens body, the critical part is the optics. Sometimes people classify lenses as “a little rough”, or “needs some attention”. These can be red flags. Note that when shopping for vintage lenses in person, take an LED flashlight along as it will help peer inside the lens to determine if it is fit for use.
① Scratches
Glass doesn’t scratch that easily, but coatings do. Scratches are easy to detect, because they usually occur on the visible, exposed glass elements. Scratches usually occur on the front or rear element of a lens. They signify obvious signs of wear, or possibly damage. Small scratches will have little effect on an image, but deep scratches will. A few small scratches on the front element will not impair performance significantly – the reason is the depth of field generally works to negate their impact. The exceptions are macro lenses and wide-angle lenses. A large number of tiny scratches may also reduce the contrast of a lens. Scratches on the rear lens will be more problematic (it is best to avoid lenses with scratched rear elements). Because there is less distance between the element and the sensor/film, most scratches will appear on the resulting picture. Deep scratches can be a sign of severe trauma. Also check for pitting. Sometimes lenses have light scratches which are caused by poor lens cleaning/polishing techniques.
② Haze or fog
Haze can be anything that settles out of the air inside the lens onto the inner surfaces of the glass. The lubricants on the aperture mechanism and in the focus threads can vaporize over time and then resettle onto the glass, and with enough time other things (dust, salt-air, fungus) can get in and collect on the glass, to the point that they are dense enough to refract the light themselves and spread it around as a “foggy” look to pictures. Haze actually gets worse with age. This may be an indication that the lens was poorly constructed, or poorly stored.
A smoky haze diffuses light equally over the entire image. This is generally caused by trillions of particles much smaller then the wavelengths of light, smearing the light over all areas equally, simply making blacks gray and reducing the overall contrast. Oily haze on the other hand has tiny droplets larger than the wavelengths of light. Because the oily haze diverts light, the haloes are much stronger and more visible.
③ Dust
Dust particles somehow get into lenses. A small bit of dust will make little or no difference to image quality. Larger specks or clumps of dust should be avoided. Check for dust by shining a light through the lens. Dust may be especially prevalent in vintage zoom lenses where the increased movement can result in dust infiltrating the inner components of the lens. So how does dust get inside the lens? Vintage lenses are not air sealed, i.e. weather sealed, meaning that air moves in and out, and of course it carries dust with it. Zoom lenses with barrels that extend out essentially “pump” air/dust into the core of the lens. In reality, small amounts of dust will impede very little of the light passing through a lens, and its impact on the image quality is minimal. Inexpensive and simple lenses can be easily disassembled and cleaned, however re-assembling the lens may again introduce dust (unless you have a clean room). Large amounts of dust may be indicative of poor long-term storage.
④ Blemishes
Many vintage lenses have lens elements that are coated with layers of some non-reflective optical material. These multicoatings minimize light reflection and the resulting lens flare and ghosting. Blemishes are regions on a lens where material has been smeared or removed by physical damage, a manufacturing defect, use of an incorrect solvent, or even being eaten away by fungus. A small blemish likely won’t affect image quality.
A lens with a super-deep scratch. Being on the rear element, this will effect the image.
The state of a lens can tell a lot about how it was previously treated. There are many different aspects to choosing a vintage lens. One important aspect is physical condition. There are a number of things that cause a lens to lack perfection, some you can overlook, while others could indicate a lens should be avoided. Don’t forget these vintage lenses are anywhere from 30-75 years old, and they will not be in pristine condition (or if they are you will pay a premium). A lens may be pristine from an external viewpoint, but have issues with the aperture or focusing mechanism. Or it may be completely functional, yet be aesthetically distraught.
There are several different levels of lens examination. Obviously in an ideal world you could slot the lens on a camera and take some pictures, however that isn’t always feasible, and deep testing isn’t really an option in a store. Sometimes lenses are only available in online stores, so you have to rely on the quality of the stores vetting processes. The tests described below look at the physical properties of a lens, and does not test the optical characteristics by shooting test pictures. Please note that obviously if you are buying online, you cannot physically check the lens. And therefore must rely on the lenses quality being properly described. If buying online, purchase from a reputable shop. Note the 🕸️ symbol used below refers to hints for online purchasing.
① Lens body defects – scratches and dents
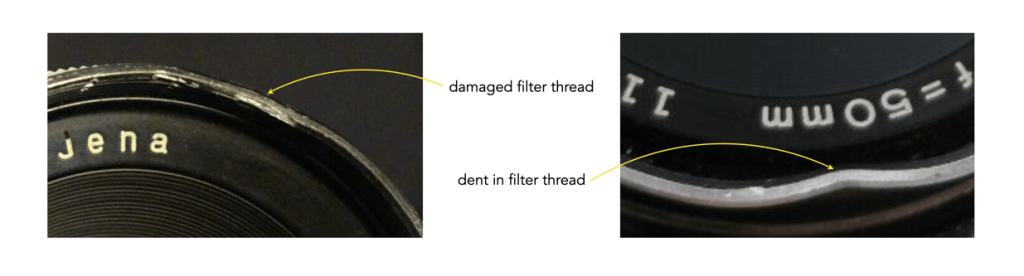
No vintage lens will be in perfect condition, unless it has sat in its box stored away somewhere and never been used (the so-called “new old-stock”). The first thing to check is what the lens looks like externally. Many vintage lens bodies are largely constructed of metal which has a tendency to scratch and dent. Scratches on the lens body are usually not that big a deal, dents are another matter altogether. Usually a dent will typically occur at either end of the lens, and can signify that the lens has been dropped. Some lenses are of course built like tanks, and can withstand a drop better than others. Damage to the lens mount will make it almost impossible to mount the lens. Conversely damage at the thread end will mean an inability to mount a filter (it means either replacing the front component, or for a minor issue using a lens vise to restore the thread).
Fig.1: Various types of physical damage to a lens
A dented filter ring is usually the result of a lens falling and landing on the front edge which could mean the lens elements have been knocked out of alignment. Lens bodies made of plastic will also scratch, however dropping them will likely cause more damage. It is also possible that a lens can lose coating, through abrasion or chipping. This is common in old chrome-plated lenses, as shown in the sample photograph in Figure 2.
Fig.2: More types of physical damage including the loss of coating on a lens body.
🕸️ A series of photos covering all aspects of the camera will help determine the shape it’s in.
② Movement of lens parts
Vintage lenses are composed of several different cylinders that move when the aperture or focus ring is activated. The first thing to do when testing a lens is to check it by gently moving the components, extending the segments, and rocking the whole lens. Basically this helps determine if any of the sections are loose, or if there are any loose components rattling around inside the lens. Next look to see if all the external screws are present, and if the front ring accepts a filter. Visible markings such as stripped screws might be indicative of disassembly/reassembly and internal issues in the past. Loss of some paint or wearing of rubber parts isn’t usually a problem.
③ Lens mount
The mount should be checked, firstly for compatibility, but also for damage. The mount can be checked by mounting it on an appropriate mount converter. It should go on easily, yet firmly, without any looseness. Does the locking pin catch properly? Check that a mount actually exists for converting the lens to a digital camera. For example some lenses such as the E. Ludwig Meritar 50mm f/2.9 were made for Altix cameras which have a breech-lock type mount, which is hard to find adapters for.
🕸️ A snapshot of the rear of the lens helps document the lens mount, which is especially important for less common lens mounts.
④ Aperture mechanism, i.e. diaphragm
Testing the aperture is a necessity, if the aperture on a lens is not performing well, it will feel loose and not well connected. An aperture that is slow to open or close may signify issues with the aperture mechanism. If the aperture mechanism does not move the aperture blades at all, there are serious issues. The number one thing to check is to make sure the aperture actually opens and closes smoothly (sometimes the aperture ring moves, but the diaphragm blades do not). Other things to check depend on the type of mechanism:
Manualmechanism – The simplest mechanism involves the aperture ring turning from the fully open position (smallest f-number) to the closed position (largest f-number).
Aperture pre-set mechanism – The pre-set ring should be set to the closed position, and then the second ring which closes the aperture should be rotated. Also make sure the pre-set ring rotates freely.
Auto-aperture mechanism – This mechanism uses a device that leaves the lens aperture open for as long as possible, and closes the aperture to a set f-stop simultaneously with shooting. In order to check the aperture, depress the pin of the mechanism, then rotate the aperture ring from open wide to closed. The diaphragm should open-close without issue.
⑤ Aperture – iris blades
Apart from the free movement of the diaphragm (iris) blades, the other thing to check for is whether they are dry or oily. Iris blades should be clean and dry – they do not require lubrication. Some aperture blades may appear oily which means it will be hard for them to open and close in a smooth manner. When oil is present on the aperture blades, there is friction from the oil’s viscosity and this impedes the quick closing action during exposure. The aperture takes too long to stop down, and as a result the shutter has already activated, and the photo can become overexposed. Where does the oil come from? An oily aperture is typically caused by exposure to heat. The focus mechanism of a lens uses lubricants, and heat can causes these lubricants break down, and to leak.
Fig.3: Oily iris blades in a Kilfitt Tele-Kilar 300mm
The best way to determine the state of the blades is to view them from the front by flashing an LED flashlight into the lens and look down on the blades. Oil will appear as a circle, or small triangular “wings”. A patterned discolouration is a sure sign of oily blades. Play with the aperture ring to check its “snappiness” – it should open and close easily without resistance or a feel of “sticking”. Dry blades are certainly better, but there are certain lenses (e.g. Helios) that are not greatly impacted by the presence of a small amount of oil. Some aperture blades may also have rust on them, this could be indicative of the lens being stored in a sub-optimal environment, e.g. one that is humid.
⑥ Lens focus mechanism
Rotate the focus ring back and forth a few times from the minimum focusing distance (MDF) position to the opposite (infinity) position. The focusing ring by itself should rotate smoothly, without hesitation or any sticking. A focus that is overly tight can lead to improper focus, whereas a loose focus means the focus can shift with the slightest move. What we are looking for here is whether or not the lens moves smoothly and doesn’t catch or have a gritty sensation. A stiff movement may be indicative of issues with the grease used to lubricate the focusing mechanism. Are there any dull spots where the focus mechanism doesn’t feel as smooth or gets slightly stuck? This might mean degrading grease and could need to be repaired. Make sure the focus doesn’t stick slightly at either extreme. If the focus ring doesn’t move at all, then it is likely the grease lubrication has solidified to the point where it is stopping movement.
⑦ Lens markings
It may seem trivial, but lens markings are important in identifying a lens. This information includes manufacturer, trademark, focal length, maximum aperture, coatings (e.g. multi-coating). See the post on lens markings. 🕸️ A snapshot of the front of the lens often means a serious reseller. A poor or unreadable picture suggests that reseller does not know how to sell the lenses and most likely an amateur.
⑧ Lens body defects – dirt, grime and corrosion
If a lens seems dirty and grimy, it may be indicative of how well the lens wasn’t cared for. Dirt and grime usually appear in textured surfaces which are subject to being hand-manipulated, such as the focus ring. Oil and sweat (from the skin) are deposited when these regions are touched and subsequently attract dirt. Failure to clean a lens will mean a built-up of grime over time. This dirt may eventually migrated to the interior of the lens by means of nearby lens openings. Sometimes vintage chrome-plated lenses appear green, and this is something commonly known as “green corrosion”. This can be the result of corrosion of the brass/copper underneath the chrome (chrome surfaces typically have a underlay). As brass contains copper, the copper reacts with oxygen, forming the greenish-blue layer, copper-oxide.
Fig.4: Dirt, grime and corrosion
If the outside of the lens looks and feels okay, then it is time to investigate the optics.