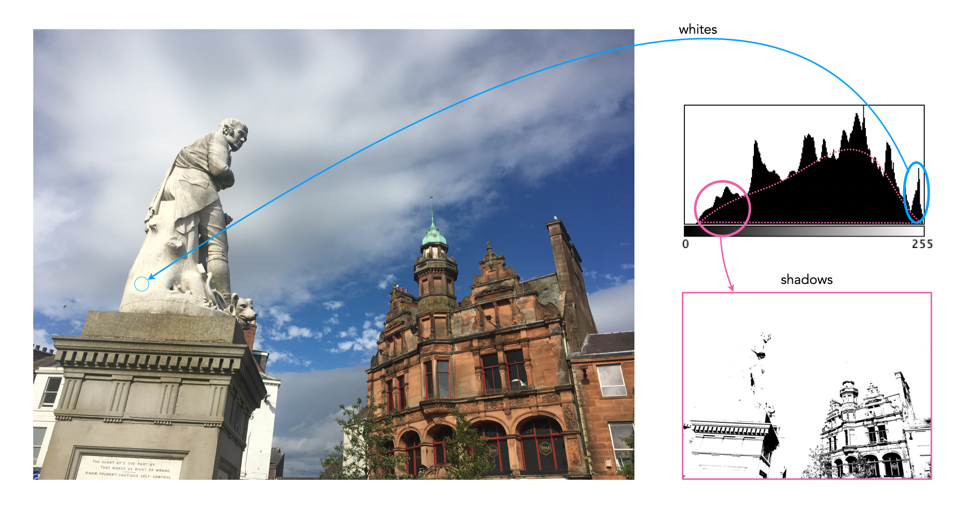
This series of photographs and their associated histograms covers multipeak-unimodal histograms, i.e. images which have a histogram which has a core unimodal shape, yet is festooned with peaks.
Histogram 1: A statue against the sky
This image, taken near Glasgow Scotland, has a broad spectrum of intensity values. The histogram has an underlying core “unimodal” shape, bias towards highlights, a result of both the statue and the clouds. The image has exceptionally good contrast. The jagged, multipeak appearance is an artifact of the broad distribution of intensities, and intricate details, i.e. non-uniform regions, in the image.
iPhone 6s (12MP): 4.15mm; f/2; 1/3077
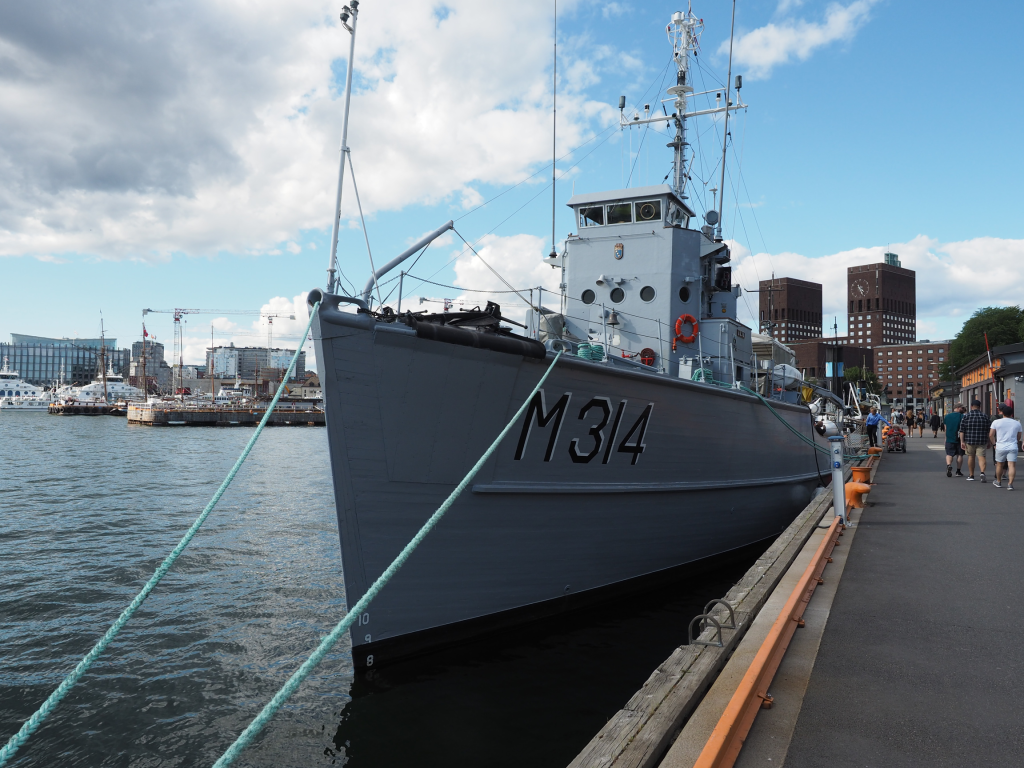
Histogram 2: Oslo lion
This image, taken in Oslo (Norway), is the “poster-boy” for good histograms (well almost). It has an underlying unimodal shape, mostly in the midtones. It is a well-formed image with good contrast and colour. There are shadows in the image, but that is to be expected considering the clear sky and the orientation of the sun. There are no pure blacks in the image, the shadow tones created by the dark windows. There are also few whites, less than 1% of pixels, that are the result of light reflecting off light surfaces (such as the lion).
iPhone 6s (12MP): 4.15mm; f/2; 1/1012
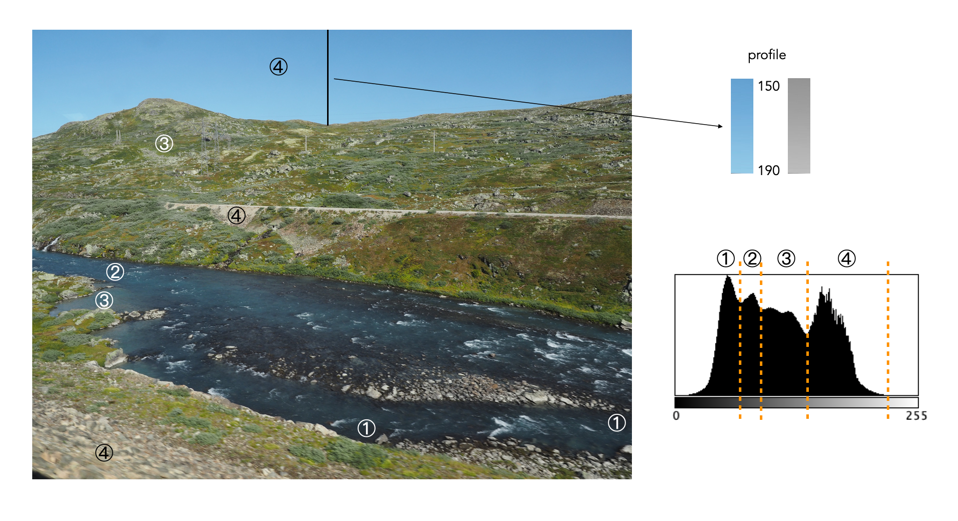
Histogram 3: Plateau river
This image, taken from a moving train on the Bergen Line in Norway, high up on a mountain plateau. The histogram has an underlying core unimodal shape, composed predominantly of midtones, in addition to the lighter end of the shadows (①). There are no blacks and few highlights to speak off. The image has exceptionally good contrast. The jagged, multipeak appearance is an artifact of the image detail, i.e. non-uniform regions, in the image. For instance the sky tapers gradually from 150 to 190 near the top of the hill.
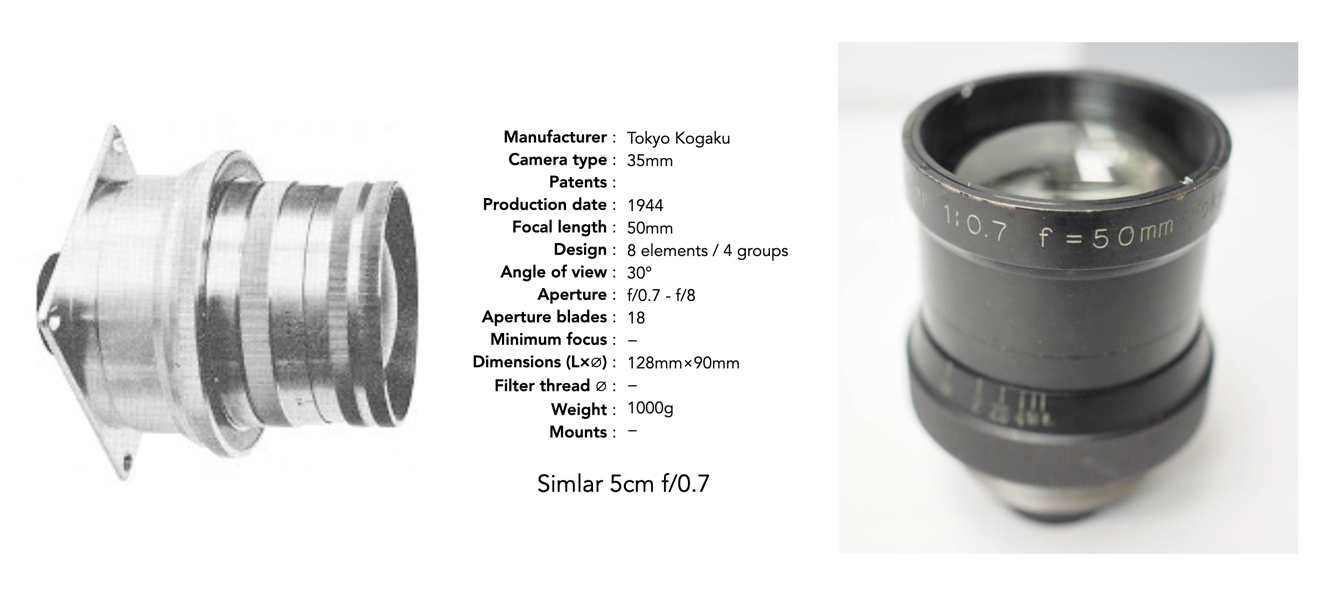
The Zeiss 50mm f/0.7 Planar was not the only f/0.7 lens of the period. There was also the Simlar 50mm f/0.7. The Simlar lenses were made by Tokyo Kogaku, which would eventually become Topcon (Japan). The original lens was designed by Maruyama Shūji. The story of the lens originates from the December 1951 issue of Asahi Camera [1]. It was ordered by the Japanese Army for use in nighttime reconnaissance photography, and was completed in 1944. Before it could be used for its intended purpose, the copies of the lens were claimed by the Aeronautical Engineering Institute of Tachikawa for X-ray medical photography. The article suggests ten copies were made by wars end, but their fate is unknown except for one lens kept by Maruyama Shūji.
A second, postwar version of the camera was produced in 1951 – the dimensions and the weight had both changed (123.7mm×105mm ∅, 2.5kg). Only three copies of the lens were made, of which two were supposedly used on a Antarctic expedition by the Mainichi Newspaper. The Trade and Industry of Japan publication from 1955 shows the lens.
The strange thing about the second series is that the weight of the lens changed from 1kg to 2.5kg, which is a substantial increase. I would beckon to suggest that the design of the original series was copied from either the wartime Zeiss objective, or perhaps the Herzberger objective. When the war was over, there was either issues with using the patent, or an inability to obtain the proper glass, adding extra weight. However there does not seem to be any surviving pictures of the second series.
For those interested, here is a link to another lens, the Simlar-F 180mm f/1.5 produced in 1942. It provides a sense of the aesthetics of the Simlar lenses.
Further reading:
Asahi Camera December 1951. “Toki no wadai: Hachi-nen mae ni Nihon de dekite ita F0.7 no renzu” (時の話題・八年前に日本で出来ていたF0.7のレンズ, Topic of the time: An f/0.7 lens made in Japan eight years ago). P.84.
“In a civilization which is becoming more and more mechanized, in which buildings look more and more alike, in which native crafts which gave identify to individual tribes and nations are being replaced with machine-made goods, in which relatively few people make music and many listen to it, in which passive sitting before a TV set is the order of the day, photography offers the ability to produce works of art.”
Norman Rothschild, “The Super-Q-Gigantar lens – it’s a gag, but some people took it rather seriously”, Popular Photography, 72(5), pp.58,62 (1975)
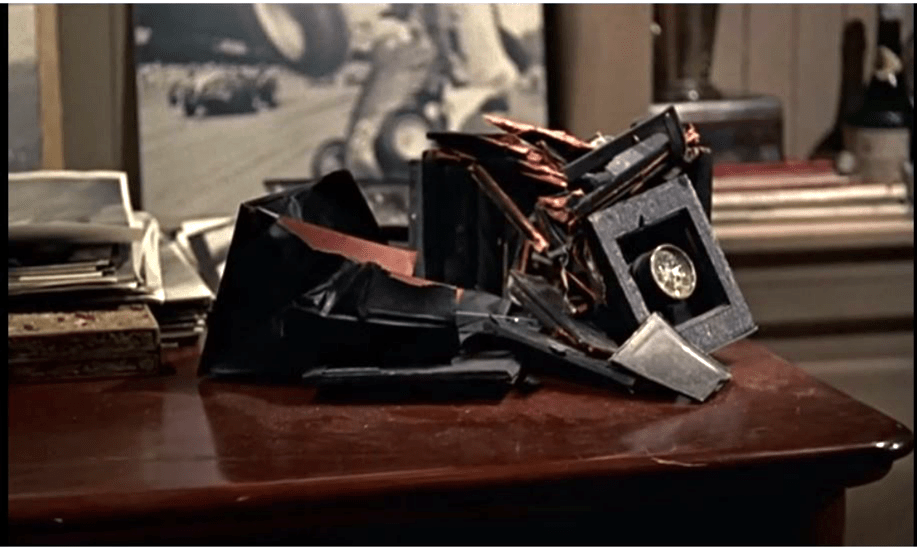
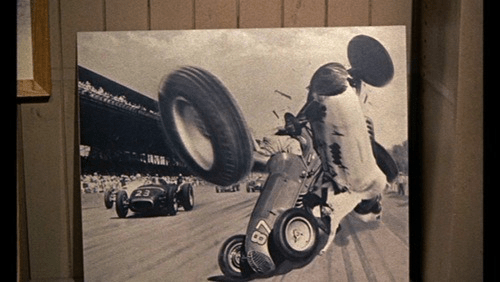
Although L.B. “Jeff” Jefferies used an Exakta camera in Hitchcock’s “Rear Window”, there were other cameras present in the room – most notably the one that took the photograph on the racetrack that lead to Jeff being in a wheelchair with a broken leg. What was that camera?
From the image shown it is clear that it is a large-format camera, most likely a Graflex Speed Graphic, a type of press cameras. As the name implies, these cameras were mainstays of press photographers until the 1960s, cumbersome but often preferred for their large negatives which allowed extensive cropping and enlargement without loss of detail. Considering the closeness of the shot taken by the camera on the track, it is a wonder Jefferies survived at all.
“Once the transistor radio is turned off, once the hi-fi set is not being used; and once the thrilling ride in the sports car, motorcycle or snowmobile is over, there is silence – the actual experience is over except as a fond or not-so-fond memory. Carrying the use of the camera to its logical conclusion gets you a picture, a solid reminder of your continued involvement.”
Norman Rothschild, “The Super-Q-Gigantar lens – it’s a gag, but some people took it rather seriously”, Popular Photography, 72(5), pp.58,62 (1975)
This series of photographs and their associated histograms covers aesthetically pleasing bimodal histograms.
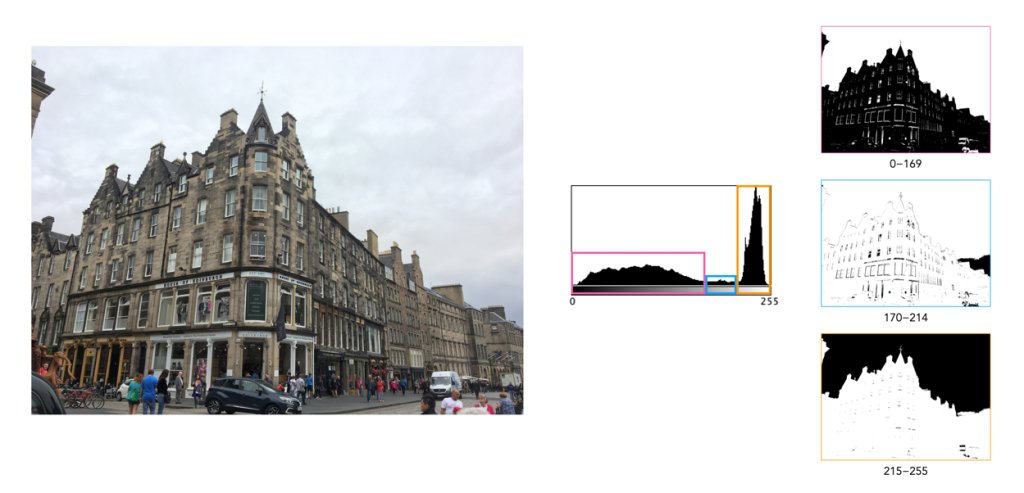
Histogram 1: A sky with texture
This image (of a building in Edinburgh) has a broad spectrum of intensity values. The histogram is bi-modal with two distinct humps. The right peak is associated with the overcast sky (and white van). The left shallow mound comprising both midtones and shadows makes up most of the remaining image content. There is a small flat region in between the two that makes up features like the lighter portions of the building. Note that pixels maps on the right of the histogram below show the associated pixels in black.
Histogram 2: Out on the lake
This photograph of the Kapellbrücke was taken in Lucerne, Switzerland. The histogram is bimodal, and asymmetric, and reflects the information in the image: the left hump (①) is associated with the lower portion of the image (shadows and midtones), and the right peak (② highlights) with the sky. There is relatively well contrasted image. The clouds have some good variation in colour, as opposed to begin pushed completely into the whites.
Fujifilm X10 (12MP): 7.1mm; f/9; 1/800
Histogram 3: Carved in stone
This is a photograph of the Lion of Lucerne, in Lucerne, Switzerland. It provides a classic asymmetric bimodal shaped histogram. The left mound, ①, contributes the images dark, shadowy regions, whereas the remaining, larger peak ②, bias towards highlights, defines most of the remaining image. It is well contrasted given that a shadow is cast on the sculpture as it is relief into the wall. The overlapping region between the two entities, ③, forms the transition regions from ① to ②, often visualized in the picture as regions of low “shadow”.
Many people buy a camera for taking photographs when travelling. Yeah sure, you could use a smartphone, but it won’t provide you with the flexibility of a real camera. Really. Smartphones are restricted to having small sensors (with tiny photosites), a low-power flash, and uber-poor battery life. While they have improved in recent years, offering quite incredible technology inside their limited form factor, they will never replace dedicated cameras. Conversely, you don’t have to carry around a huge DSLR sporting a cumbersome 28-400 zoom lens.
There are so many posts out there which are titled something like “best travel camera 2022”, it’s almost overwhelming. Many of the cameras reviewed in these posts have never really been tested in any sort of real setting (if at all). So below I’m going to outline some of the more important things to consider when choosing a travel camera? Note that this is a list of things to think about, not a definitive and in-depth interpretation of requirements for cameras used for taking travel photos. Note that this discussion related to digital – choosing a good analog cameras for travel is another thing altogether.
What will you be snapping? − buildings? people? close-up shots of flowers?
① Budget − Of course how much you want to spend is a real issue. Good cameras aren’t cheap, but spending a reasonable amount on a camera means that it should last you years. You want a good balance of the items described below. If your budget is limited, go for a compact camera of some sort.
② Compactness − The first choice from the camera perspective may be whether you want something that will fit in a pocket, a small bag (e.g. mirrorless), or a complete camera backpack (e.g. full-frame, which I would avoid). For a compact, you could go with one that has a zoom, but honestly a fixed focal length works extremely well. Good examples include the Ricoh GRIII (24.3MP, 18.3mm (28mm equiv.) f/2 lens) and Fujifilm X100V (26.1MP, 23mm (35mm equiv.) f/2 lens, 4K video). Because of their size, compacts sometimes have to sacrifice one feature for another. You also don’t want a compact that has too many dials – their real benefit is being able to point-and-shoot.
Mirrorless cameras are smaller than full-frame cameras because they don’t need to fit a mirror inside – they use a digital viewfinder instead of an optical one. They have a compact size, and provide good image quality. The downside is that they generally have smaller sensors, like APS-C and MFT. I normally opt for both a compact pocket camera, and a mirrorless. Some are better suited to some situations, e.g. compact cameras are much less conspicuous in indoor environs, and places like subways – that’s why they are so good for street photography. More compactness = enhanced portability.
③ Resilience − When you travel, there is often very little time to worry about whether or not a camera is going to get banged up. Cameras made of metal are obviously somewhat heavier, but offer much better survivability if a camer is accidentally dropped, or banged against something. A camera constructed with a body made of magnesium alloy is both durable and lightweight. It is both corrosion resistant and can handle extremes in temperature well. A magnesium alloy body has less chance of cracking as opposed to a polycarbonate body.
④ Weather resistance − You can never predict weather, anywhere. Some places are rainy or drizzly, others environs are dry and may have particles of stuff blowing in the air. Obviously you’re not going to take photos in pouring rain, but dust and dirt are often a bigger concern. My Ricoh GRIII is not weather sealed, which seems somewhat crazy when you consider it is a street camera, but there are always tradeoffs that have to be considered. In the case of the GRIII, adding weather sealing would have resulted in less flexibility on lens barrel construction, button/dial layout, and heat dissipation. My Fuji X-H1 on the other hand is weather resistent. Of course you should also choose lenses which are weather resistent. If weather resistance is important, be sure to read up on the specifics for a camera. For example the Fuji X100V is deemed to be weather-sealed, but the lens is not. To achieve this you have to buy an adapter, and add a filter.
⑤ Weight − How much are you willing to lug about on a daily basis when travelling? You don’t want to choose a camera that is going to give you back or shoulder pain. Larger format cameras like full-frame are heavier, and have heavier, larger lenses. If choosing a camera with interchangeable lenses, you also have to consider their weight, and the weight of batteries, and anything else you want to carry. There are even differences between compact cameras, e.g. the GRIII is 257g, versus the X100V at 478g, 85% more.
⑥ Lenses − If you choose an interchangeable lens camera, then the next thing to do is choose some lenses… a topic which deserves numerous posts on its own. The question is what will you be photographing? In general it is easy to narrow the scope of lenses which are good for travelling because some just aren’t practical. Telephoto for example – there are few cases where one will need a telephoto when travelling, unless the scope of the travelling involves nature photography. Same with macro lenses, and fisheye lenses (which really aren’t practical at the best of times). In an ideal world the most practical lenses are in the 24-35mm (full-frame equivalent) range. I think prime lenses are best, but short-range zooms work quite well too. I would avoid long-range zooms, because you will always use the smaller focal lengths, and long-range zooms are heavy.
⑦ Batteries − Camera batteries should have a reasonably good use-time. Using camera features, and taking lots of photos will generally have an impact on battery life. For example using image stabilization a lot, being connected to wi-fi, or turning the camera on and off a lot will run down the battery. There are other things to consider as well. For example most batteries run down quicker in colder environs. Full-frame cameras are bigger, and therefore have a longer battery life than cropped-sensor cameras. Also determine if the camera just comes charging in-camera, you will likely need to buy an external charger. Some battery chargers are also slow. Ideally always carry extra batteries no matter what the manufacturer claims.
⑧ Use − What is the camera’s main use during travelling? Street-photography? Vlogging? Landscapes (for poster-sized prints)? Or perhaps just simple travel snapshots. If the latter, then a compact will work superbly. If you want to have the flexibility of different lenses, then a mirrorless camera makes the most sense.
⑨ Video − Do you plan to take videos on the trip? If yes, then what sort of capabilities are you looking for? Most cameras produce video in HD1080p, and some have 4K capability. Some cameras limit the length of a video. If you plan to use the camera mostly for video, choose one specced out for that purpose.
⑩ Stabilization − Many cameras now offer some form of image stabilization, which basically means that the camera compensates for rudimentary camera shake due to hand-holding the camera, and keeping the camera steady in low-light situations. This is more important for travel photography because it is cumbersome to lug around a tripod, and many places, like the Arche de Triumph won’t allow the use of tripods. Some compacts like the Ricoh RGIII do have stabilization, whereas others like the Fuji X100V do not.
The best way of choosing a camera is to first make a list of all the things you want from the camera. Then try and find some cameras which match those specifications. Then see how those cameras stack up against the considerations outlined above. Narrow down the list. When you have about three candidates, start looking at reviews.
I tend to stay away from the generic “big-box” style reviews of cameras, especially those who use the term “best of YEAR” in the title. I instead pivot towards bloggers who write gear reviews – they often own, have rented, or are loaned the cameras, and offer an exceptional insight into a cameras pros and cons, and provide actual photographs. Usually you can find bloggers that specialize in specific types of photography, e.g. street, travel, video. For example, for the Ricoh GRIII, here are some blog reviews worth considering (if anything they provide insight into what to look for in a review):
5050 Travelog – A travel blog which offers camera and lens reviews. (lots of Fuji)
Lastly, don’t worry about what professional photographers carry when travelling. Chances are they are on assignment, and carry an array of cameras and related equipment.
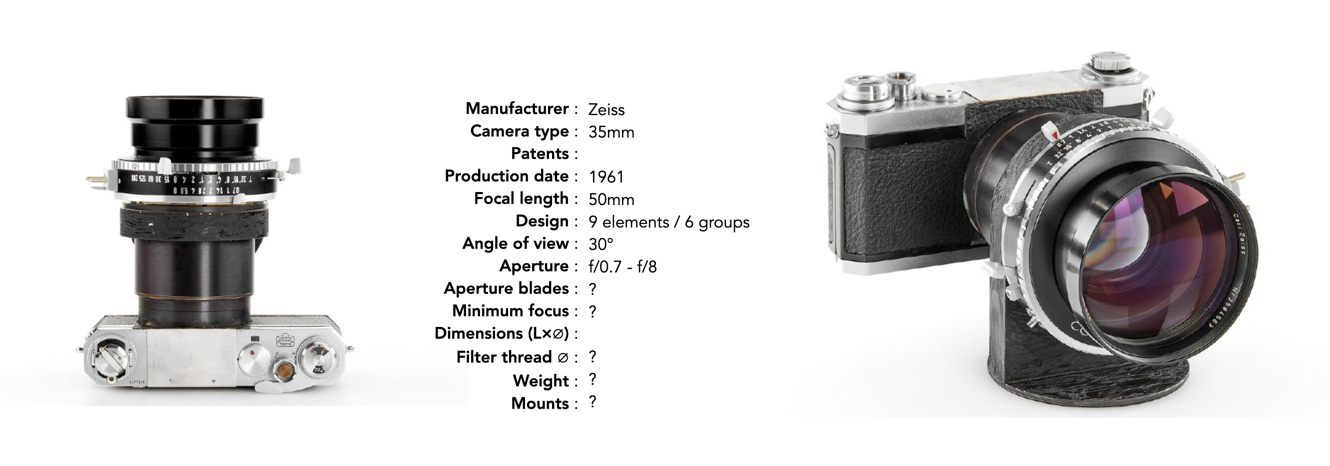
The quintessential vintage ultra-fast camera lens is the Zeiss Planar 50mm f/0.7. It was developed in 1961 for a specific purpose, namely to photograph the dark side of the moon during the NASA Apollo lunar missions. Only 10 lenses were built, one was kept by Zeiss, 6 went to NASA and 3 were sold to director Stanley Kubrick. Kubrick used the lenses to film scenes lit only by candlelight in the movie “Barry Lyndon” (1975).
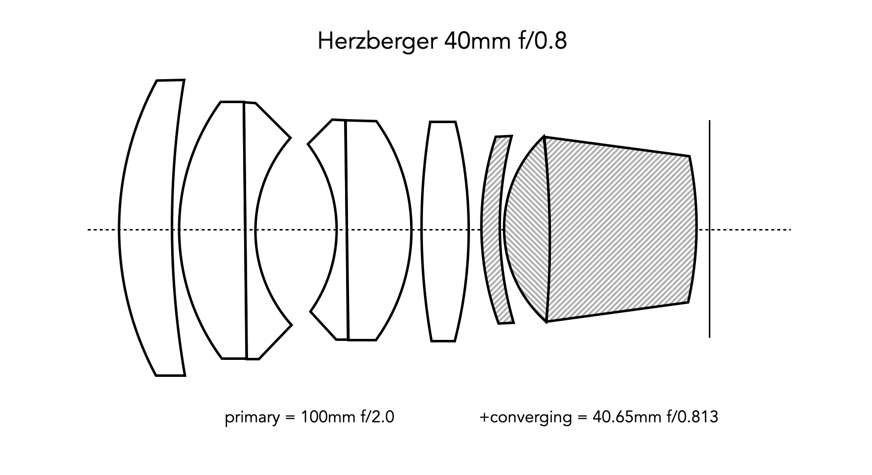
There is a similarity, at least in the double-Gauss optical design – it is essentially a Gauss front with two doublets glued together and a rear group which functioned as a condenser. (copies of optical diagram). The 50mm f/0.7 Planar was designed by Dr. Erhard Glatzel (1925-2002) and Hans Sauer. It is supposedly based on an f/0.8 lens designed by Maximilian Herzberger (1900-1982) for Kodak in 1937. Looking at the two schematics, they look quite similar. The idea is to take the 70mm f/1, and by adding a condenser, brute-force the lens into a 50mm f/0.7. The condenser actually shortens the focal length and condenses the light – in reality adding a ×0.7 teleconverter that gives 1 f-stop.
But this lens has an interesting backstory. According to Marco Cavina, who has done a lot of research into the origin of this lens (and others), the design of this lens was derived at least in part from lenses designed for the German war effort. During WW2, Zeiss Jena designed a series of lenses for infrared devices to be used for night vision in various weapons systems. One such lens was the Zeiss UR-Objektiv 70mm f/1.0. The design documents were apparently recovered during Operation Paperclip from the Zeiss Jena factory before the factory was occupied by the Soviets and then provided to the new Zeiss Oberkochen.
The design went through four prototypes before achieving the final configuration [1]. The final scheme was optimized on an IBM 7090, which had been in operation since the late 1950s. The lenses were used on a modified Hasselblad camera.
Glatzel, E., “New developments in the field of photographic objectives”, British Journal of Photography, 117, pp.426-443 (1970)
This series of photographs and their associated histograms covers good renditions of highlight clipping, i.e. photographs in which there are regions of white pixels, but they either genuinely exist in the image as white regions, or do not directly impact the aesthetics of the image.
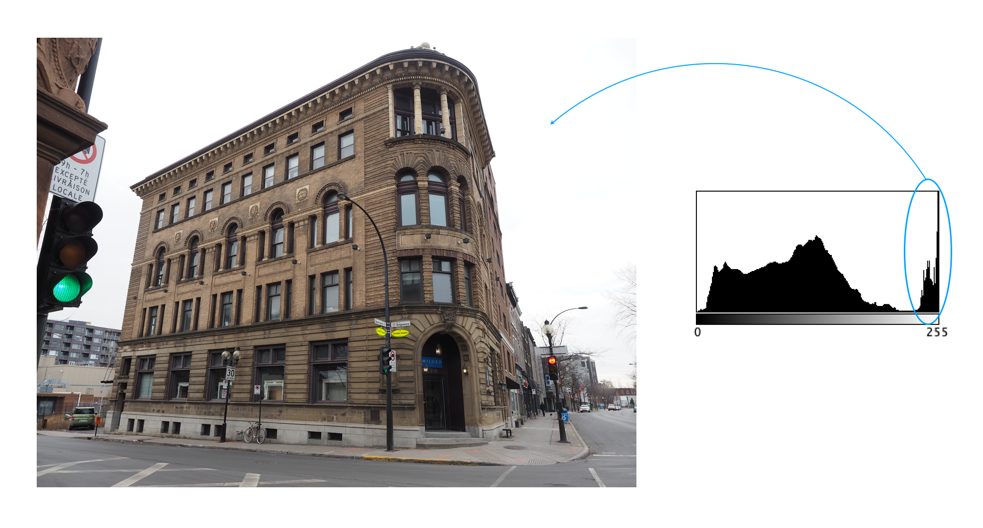
Histogram 1: A bright overcast sky
The image was taken on a very overcast day in Montreal. This is a good example of an image with highlight-clipping in the histogram, which is neither good nor bad. The building itself does not suffer from a lack of contrast, although the non-sky region can be enhanced slightly with no ill effects on the sky (because it is already basically white). This is a common situation in outdoor, overcast scenes. In an ideal world, more texture and contrast in the sky would be great, but in reality you have to use what nature provides.
Histogram 2: White buildings
This photograph was taken in Luzern, Switzerland. It is a well contrasted image, with a somewhat indistinct, multipeak histogram. The pixels are well distributed over the range of intensities, except for the spike at values 240-255. Here highlight clipping seems as though it has occurred because there are quite a number of white pixels in the image. However this density of white pixels comes not from anything being overblown, but rather from the white buildings in the image (of which there are many).
Fujifilm X10 (12MP): 7.1mm; f/4.5; 1/950
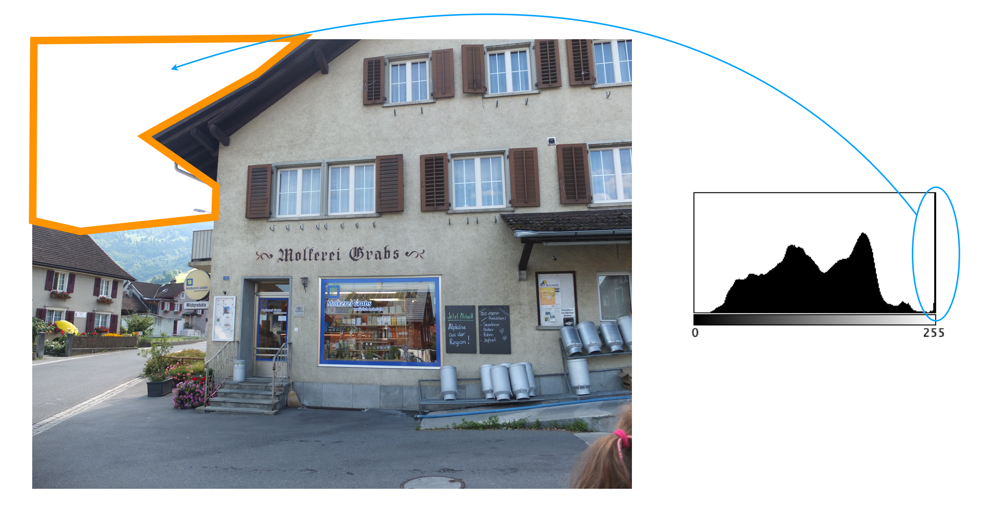
Histogram 3: A bit of overblown sky
This photograph was taken in Grabs, Switzerland. The histogram is a nonuniform, and basically unimodal in shape, with the exception of a huge spike in the whites causing clipping. But this is a case of the highlight clipping not really affecting the core content of the image, i.e. it comprises the overblown sky in the top-left of the image. On a bright, partially overcast day, this is not an unusual scenario.
There are a whole lot of contemporary super-fast lenses, but that is to be expected from modern optical technology. For example the Voigtländer 50mm f/1.2 Nokton E is still a simple 8 element lens, but contains two optical elements each with two aspherical surfaces, helping to reduce lens aberrations. The Nikon Nikkor Z 50mm f/1.2 on the other hand has 17 elements in 15 groups, with three aspherical and two low-dispersion elements (but at 150mm in length, and 1090g it is a true monster). These lenses are now commonplace, but what about their vintage counterparts?
By the mid 1950s, lenses with speeds of f/2 and f/1.4 were commonplace. Lenses with large apertures such as f/1.0 were also available for applications such as radiography and motion-pictures. Sub-f/1.4 lenses for the 35mm “miniature” cameras had also started to appear. The literature of the period, such as Popular Photography, wrote a series of articles over the years, investigating these new fast lenses. Many of these technology reviews were not damning, but neither were they an acclamation of a new era in photography.
The September 1955 issue included an article “The new superspeed lenses – how useful will they be”, by Bob Schwalberg [2]. Schwalberg describes the rumours that superspeed lenses with apertures of f/1.1 and f/1.2 were in the offing from three different Japanese manufacturers. He suggested that although an f/1.4 lens should mathematically pass 100% more light than an f/2 lens, the actual results are more like 50%. Using the pretext that actual light transmission is 50% of that indicated, he surmises that an f/1.1 lens would only be 30% faster than an f/1.4 lens, but maybe even less due to more elements, and an increased number of light absorbing light-to-air surfaces. These tests were made by comparing exposures at different apertures changing nothing else. Schwalberg concedes that the lenses would be good for use with colour film, however doubted whether the same could be said for black-and-white film. One of the reasons was the reduced depth-of-field, although he concedes it is no worse than for the f/1.4 but regardless both require very close focusing for sharp pictures.
Norman Rothschild described the Zunow 50mm f/1.1 lens in a 1956 article [4], putting the lens through a series of tests, and exploring whether the addition of new optical elements would effect the speed advantage of the lens. He used an exposure meter (Norwood Model A) taped to the back of a Leica M-3 to measure light-transmission of the Zunow, and two control lenses (f/2, f/1.8). The findings indicated that the readings for the f/1.1 proportionally higher than those for the f/2. He also performed a number of practical field tests. Colour photos made with the lens were found to be ”warm, or reddish, but not displeasingly so”. Rothschild questioned the practicality of the lens, with its shallow depth of field, but concluded that while focusing was challenging, it is “no more severe than a press photographer using an f/3.5 lens on a 4×5 camera”.
When asking why these lenses weren’t more popular during the period they were developed, there are likely a number of differing factors. Foremost was cost. Lenses such as 50mm f/1.2 may have tested the limits of both manufacturing processes, and price to consumer. Making lenses with apertures larger than this may have been an act of sheer folly, as is testament to the few that were manufactured. Development costs associated with these lenses were likely steep, as was the use of optical elements containing rare-earth metals, and ultra-precise manufacturing techniques. To all but the professional photographer, these lenses were prohibitively expensive (and still are). When these fast lenses started to appear there was as much skepticism than there was praise. In a follow up article in 1956, “Another look at superspeed camera lenses”, Bob Schwalberg made the following points [3]:
The exposure gain obtained from f/1.1 and f/1.2 lenses was easier to obtain from additional development of f/1.4 and f/1.5 negatives.
Apertures larger than f/2 were seldom used for B&W work, but would be advantageous in colour work.
The reduced depth-of-field which limits the usefulness of f/1.4 and f/1.5 lenses at full aperture will further limit the usefulness of the f/1.1 and f/1.2 lenses.
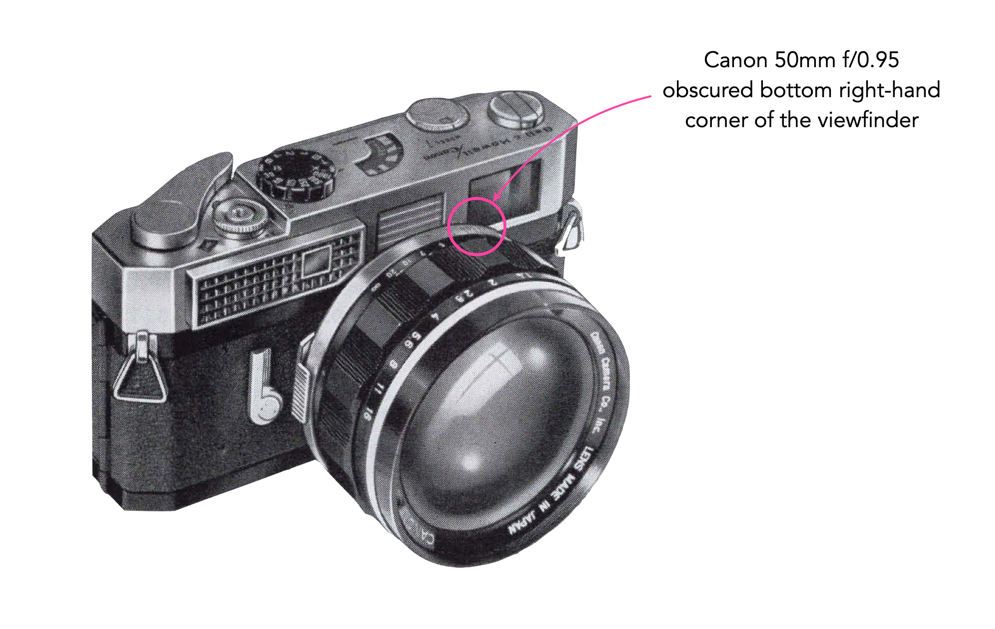
The lenses are large and heavy, sometimes obscuring the rangefinder and viewfinder windows.
The lenses are “extraordinarily” expensive. A 50mm f/1.1 lens retailed for $3 more than a Leica M-3 with aa 50mm f/2 Summicron lens.
Lens apertures greater than f/2 with a small amount of over-exposure can lead to drastic loss of definition and detail resolution. Tests shows that “at f/1.4 as little as 1/2 stop overexposure can kill sharpness”. Three times as much overexposure is required to produce the same ill-effects at f/2.
Schwalberg called it the “super-aperture problem”. He goes on to suggest that what was needed was not faster lenses, but better lenses, citing that film resolution was increasing to the point where lenses were not capable of producing.
In another Popular Photography article in 1956, it was suggested the ultimate value of f/1.1 and f/1.2 lenses was still a matter of conjecture [5]: “Speeds of f/1.4, f/1.5, and f/2, have long been with us and have proven extremely practical. Unless you are in the darkest, blackest, dingiest location, and unless every bit of shutter speed counts because of subject movement, it is highly advisable to limit black-and-white shooting to a maximum aperture of f/2.” The article cited a series of limiting factors that made photographers wary of the usefulness of sub f/2 lenses [5]:
Depth of field – this only comes apparent at close distances, but a larger opening will result in a shallower DOF. A 50mm lens focused at 4ft has 3.5” of depth at f/1.5 and 4.75” at F/2. A smaller DOF will require more precision in focusing.
The gain in light transmission is often less than can be expected. Light transmission is directly proportional to the square of the f-number. f/2 squares to 4, and f/1.4 to 1.96. Theoretically then, f/1.4 should transmit approximately 100% more light, however tests have shown that it is likely only 50-60%. The reasoning is that the more the diaphragm is opened, the more we depend upon light rays from the periphery of the lens. These rays enter at a steeper angle of incidence than those on the edges at smaller f-stops. There is therefore greater loss through internal reflection.
The other issue is that apertures greater than f/2 require exacting levels of exposure. overexposure at f/1.4 can ruin crisp detail. Errors at f/2 are more forgiving.
The other issue was weight – these lenses were heavy. The SMC Pentax 50mm f/1.2 (1975) was 385g, and had a maximum diameter of 65mm. The f/1.4 of the same era was only 266g, meaning the f/1.2 was a 45% increase in weight. When the Nikkor-N 50mm f/1.2 first appeared, its internal mount was problematic, with the mount not really able to support the weight of the lens, causing the mount to bend. In addition, the focusing wheel on the camera could not be used because it could not handle the weight of the lens. The weight of the lens was 425g, in comparison a comparable 50mm f/2 was around 200g.
There were many factors which contributed to the lack of interest in fast lenses. By the mid 1960s colour film was faster, and so there was less need for faster lenses. There were a number of f/1.2 options, but also many more options are f/1.4 at a much lower price point. So why bother purchasing a vintage sub-f/1.4 lens? One reason is for the character it provides, or for shooting in extreme low-light conditions. Why not to buy them? Mostly they are expensive.
Further reading:
G.H. Smith, Camera Lenses: From box camera to digital (2006)
Bob Schwalberg, “The new superspeed lenses – how useful will they be”, Popular Photography, 37(2), p.48 (September, 1955)
Bob Schwalberg, “Another look at superspeed camera lenses”, Popular Photography (April, 1956)
Norman Rothschild, “Meet the Zunow f/1.1”, Popular Photography, pp.126/128 (February, 1956)
“The Versatile 50-mm Lens”, Popular Photography, 39(2) pp.40,41,84 (August, 1956)