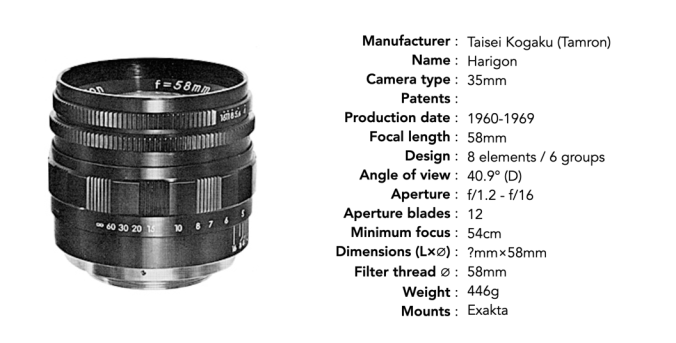
Not all fast lenses came from the lens giants. Other slipped under the radar. A good example is the Harigon 58mm f/1.2. It was made by Taika, which in reality was a export brand of Taisei Kōgaku Kōgyō K.K., the company which would later become Tamron (in all likelihood, Taika was a simpler and easier brand to remember than the company name). It was also sold as a Tamron lens.
The Harigon 58mm f/1.2
The lens was introduced in 1960, for the US market. The design was likely along the lines of the Zunow 5.8mm f/1.2, which is a itself is scarce as hen’s teeth.
Optical Science has produced this all-new Taika Rare Earth Lens, Eight hard coated complex elements of fabulous precision are responsible for its superb color correction and sharpness beyond reproach. The Taika Harigon has a dignified beauty – ebony black with colored engraved scales. A “Rolls Royce” in performance and appearance. You will be proud to own it, proud to show it and proud to exhibit its beautiful pictures.
Apparently it was available in Exakta mount, in addition to Praktica M42, and Miranda. In the early 1960s it was advertised as the standard lens on the Exa II camera for US$198.50 (from Seymour’s, NY). Interestingly the lens itself sold for US$169.50. By the time the Adapt-A-Matic Lenses appeared in the late 1960s, the 58mm lens had disappeared. There seem to be very few on the market today.
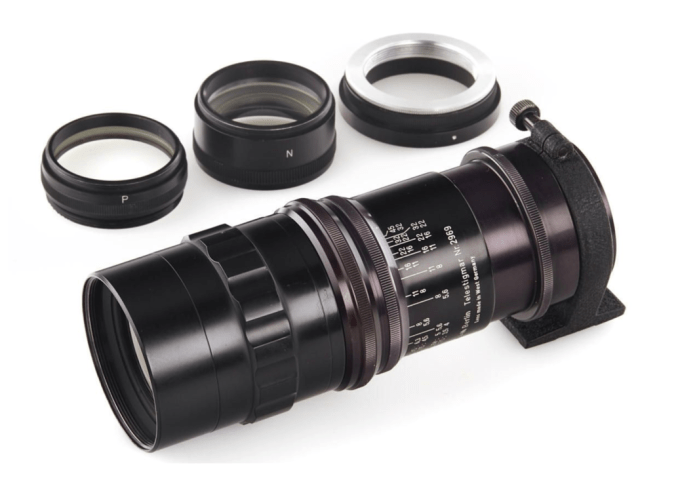
Dr. Max Weth Optik, was a German lens maker located in Berlin in the 1950s (West Germany). The company is best known for its Telestigmar multi focal lens set, first made in 1955 (sometimes known as Votar Telestigmar). This was a very unique 6-element lens, with the ability to configured in four different focal lengths, with four different apertures: 315mm f/6.3, 250mm f/5, 225mm f/4.5, and 175mm f/3.5. The lens was described in a 1957 article in Modern Photography [1]. The lens has three interchangeable components: N and P are negative and positive lenses, and Z an extension tube, i.e. spacer (the kit also included R, a close-focus extender). When one or two of these are combined with the front lens, V, the different focal lengths are obtained. For example P+V = 135mm. The article suggest that the best “critical sharpness” was obtained using N+P+V=225mm lens. The lens was made in mainly in M42, and Exakta mounts (and custom ALPA).
TheTelestigmar multi focal lens
The rationale behind the lens was that it provided four telephoto lens without the weight of four telephoto’s. It was basically a prime lens with two ancillary rear elements and a spacer. The lens would ultimately be superseded by zoom lenses of similar focal range, i.e. 175-315mm. In 1957 the lens sold for US$220. The most recent prices online are around US$100-300.
Further reading:
“The Amazing Tele-Lens of Dr. Weth”, Modern Photography, 21(10), pp.70,71,140 (Oct,1957)
“The Magical Optic of Dr. Weth”, Peter Dechert (1992)
There aren’t many Swiss companies that manufacturer lenses apart from Kern, but one lens exists in the form of Volpi AG, a company based in Urdorf near Zurich. The company specialized in higher-end projection systems. In the early 1970s the company produced a lens called the Peri-Apollar 360°.
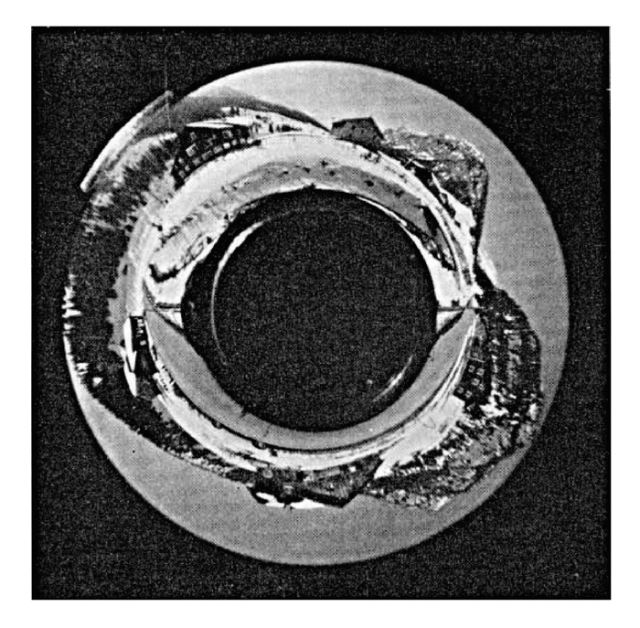
The Peri-Apollar 360°, nicknamed the “optical bell”, or “Swissorama” lens, does not use the fisheye principle or any of the other well-known panorama methods. It was developed by H. Brachvogel of Volpi AG, allowing the capture of 360° seamlessly in one image. If the camera is pointed with the lens in a vertical position, then the camera and photographer are covered by the centre of the image, which is blocked out. The inner edge of the circular ring is the lower edge of the image, the outer edge is the upper edge of the image.
Fig.1: The Volpi Peri-Apollar lens
The lens came in two focal lengths 25mm f/4, and 40mm f/5.6. The lenses could be adapted to many differing formats, including 16mm, 35mm, and 120 film (and could also be used as a periscope without a camera). The lens covers a complete circular image of 360°, without any gaps. When mounted in vertical position, the field of view has an angle of 60°, i.e. 30° above, and 30° below the horizon. The image is created according to the rules of central projection, where all verticals in the object field converge in a radially symmetric manner in the centre of the image. The lens was not actually intended for taking pictures in the horizontal direction
Fig.2: One of the few images available from the lens (somewhere in the Alps) Note that the point from which the image is taken, i.e. the lens itself in the image centre, is blacked out.
The light enters the protruding glass dome (which is an aspherical lens), and is refracted inwards at the transition between air and glass, and then totally reflected at the opposite glass-air interface. In this way the ring-shaped image is created in the front glass body. It then passes through a corrective lens and is projected onto the film by a lens of normal construction. Distance and f/stops can be set as with any normal lens.
Fig.3: A schematic of the lens configuration of the 40mm f/5.6 lens
The marketing material for the lens suggested applications in numerous fields, industrial applications, e.g. remote observation of pipes, police and military applications, recording of traffic intersections, aviation, and internal observation of nuclear reactors. The 25mm f/4 C-mount lens (with an attachable 90° periscope viewfinder sold for US$4,995 (1983); and the ALPA 40mm f/5.6 was US$3,595 (1977). In the US it was marketed by Karl Heitz. The lens is often attributed to Kinoptic because it appeared in their catalogs, however they did not produce the lens.
Lens specifications:
24mm×36mm
16mm film
lens
40mm f/5.6
25mm f/4
focal length of the peri-lens
20mm
15mm
aperture of the peri-lens
f/1
f/1
outer diameter of the image
23mm
11mm
inner diameter of the image
8mm
4mm
degrees, horizontal
360°
360°
degrees, vertical
2×30°
2×30°
number of lens elements
8
4
aperture range
f/5.6 to f/22
f/4 to f/22
close focusing distance
0.1m
0.1m
weight
900g
750g
Acknowledgement: Data for the table, and help with schematics adapted from information in “Fisheye-Objektive und verwandte Abbildungstechniken (IV)”, J. Scheibel in PHOTO-TECHNIK UND WIRTSCHAFT, No.8, pp. 225-227 (1973)
Vintage lenses of a certain era often contain air bubbles, but this by no means suggests that they are of inferior quality. A 1940 article in Minicam Photography describes this as a fallacy [1]. It seems that in early cameras, some photographers may have been weary of such imperfections. In all likelihood there are like-minded individuals today.
“They may look like undesirable blemishes, but they are much more apparent visually than photographically.” [1]
In early glass manufacturing, air bubbles were practically impossible to eliminate. At the time the rationale provided was that bubbles formed when ingredients were melted together at temperatures of 2750°F to form glass. Even first-glass lenses contained some number of bubbles.
“In the manufacture of the famous Jena glass the various elements used must be heated for a given length of time and to a certain degree, the process being stopped at just the right moment whether all the air has been driven out or not. There is no alternative.” [2]
The article goes on to provide an example of a 6-inch, f/4.5 lens with a diameter of 32mm across the front lens [1]. They count 12 bubbles, on average 0.1mm in diameter. The lens has an area of 804mm², and the bubbles an area of 0.0942mm², making up 0.012% of the surface area. So only 0.012% of the light passing through the lens is impeded by the air bubbles. The outcome? Light interference caused by bubbles is negligible.
“The actual loss of light is inappreciable, and the presence of these bubbles, even if near the surface, has no effect whatever on the optical quality of the image.” [2]
“Air bubbles will be found in most high-class lenses and are a sign of quality rather than a defect, since at present it is impossible to make certain optical glasses absolutely bubble-free; their presence doesn’t affect the quality of the image in any way. [3]
In the literature for many modern optical glass manufacturers, e.g. Schott, there are caveats on bubbles (and inclusions). Basically bubbles in glass cannot be avoided due to complicated glass compositions and manufacturing processes. The melting of raw materials produces reactions which invariably form gas bubbles in the melt (typically carbonates or hydrogen-carbonates) [4]. These bubbles are removed in the refining process, when the temperature of the glass is increased, reducing the viscosity of the glass and allowing bubbles to move up through the melt and disappear. Some residual bubbles are still left from imperfect refining. However, it is actually quite rare to see bubbles in modern lenses.
So do they make a difference in vintage glass? According to much of the literature, not at all. Besides, vintage lenses are all about character – nobody is looking for a perfect image.
Further reading:
“Fallacy: That “air” bubbles in a lens are a sign of inferior quality”, Minicam Photography, 3(8), pp.30-31 (1940)
“The Crucible – Air-Bubbles in Lenses”, Photo-Era, 31(6) p.319 (1913)
“Andreas Feininger on Lenses at Work”, Popular Photography, 18(3) p.124 (1946)
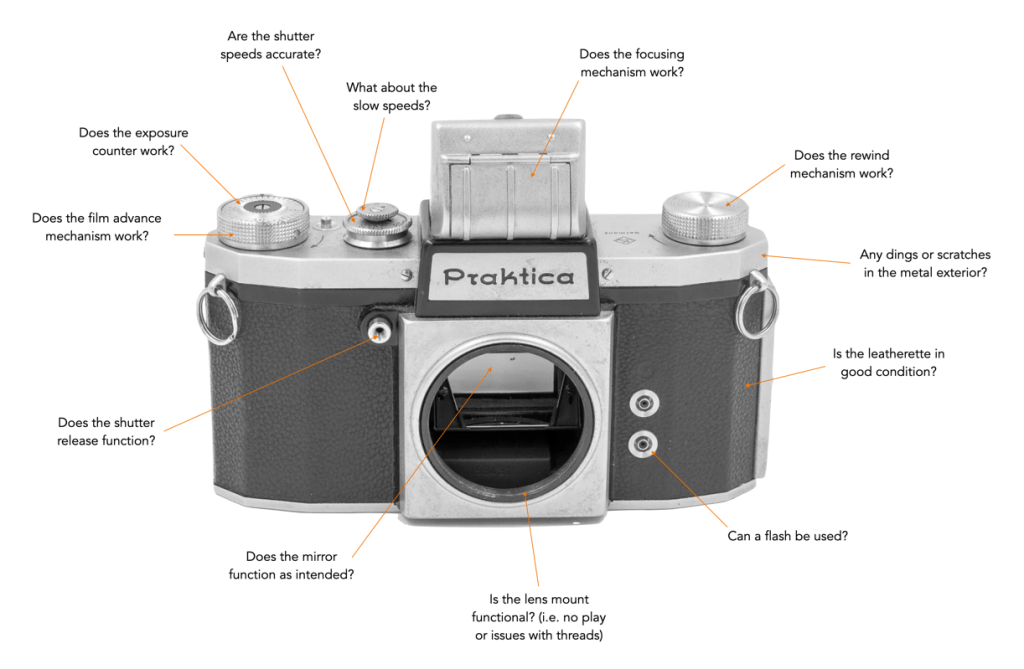
Examining vintage cameras is a little bit trickier than lenses, largely because of the variability found in camera bodies. For example there are rangefinders, SLRs, and compacts, some with interchangeable lenses, other with fixed lenses. Below is a list of things to look for. Ultimately a vintage camera can only really be tested by running a couple of films through it. Some online resellers do this, especially if the camera has some value.
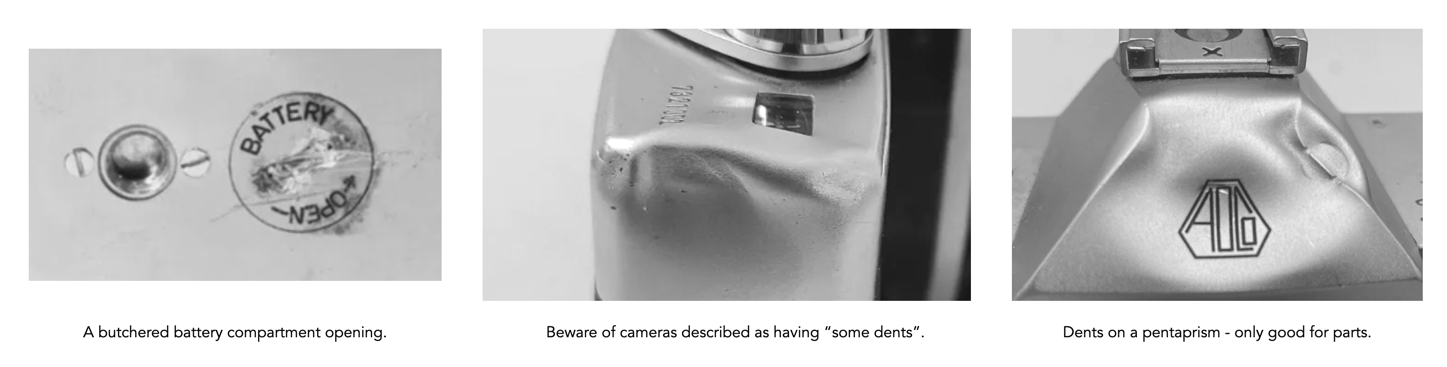
① Overall appearance
Start with what the camera looks like. Are there any indicators of DIY repairs, glue or tape residue? Then check the camera body for major dents and dings. These will stand out on vintage camera bodies as many were made of metal. Visible dents are likely are indication that the camera has been dropped, and potentially damaged things inside. The presence of small dings, dents, and scratches are probably just signs of normal use. Vintage camera bodies were often covered with a leatherette, so it is good to check if it is lifting from the camera body. This is more of a cosmetic issue, and is relatively easy to either re-glue, or replace. If the exterior of the camera is grimy, or has green corrosion, there may be further issues inside, indicative of improper storage.
Fig.1: Some red flags on damaged cameras (if they are cheap, they may be fine for parts)
If you are physically examining the camera, as opposed to buying it online, then I would also give the camera a good smell. If it has any sort of musty smell, then it might indicate it was stored somewhere with less than optimal conditions, e.g. an attic or basement. This might be indicative of problems inside the camera that you can’t see – avoid it.
② Functionality
The first thing to check is that there isn’t anything missing from the camera, e.g. buttons, levers, etc, and that there isn’t anything broken, e.g. film advance lever. Check that the external controls (shutter speed selector, aperture selector, ISO selector, etc.) all work properly. Does the film advance lever or knob work? Is it smooth? It should be possible to engage the film advance lever, and then fire off the shutter – there shouldn’t be any weird noises, or lagging when the lever is engaged. Also make sure the film counter is advancing with every frame advance. It is often suggested not to touch the self-timer on old mechanical cameras, as they can be problematic.
Fig.2: Some of the things to consider on a fully manual camera (no light meter, or battery)
③ Camera optics
This refers to the viewfinder and focusing screen. The viewfinder should be clear, not cloudy, and not infected by fungus. A small bit of dust isn’t going to be a bother, because it won’t show up on any photographs, but scratches and cloudiness may interfere with focusing. Also do a visual check of the mirror. Some mirrors can have scratches, corrosion, fungus, or even de-silver over time. Mirrors can also get stuck when the shutter is released, and not return to the proper position. In cameras with batteries, mirror lock-up can occur because of no battery (or it has a low charge), where the mirror remains in the locked position once the shutter is fired.
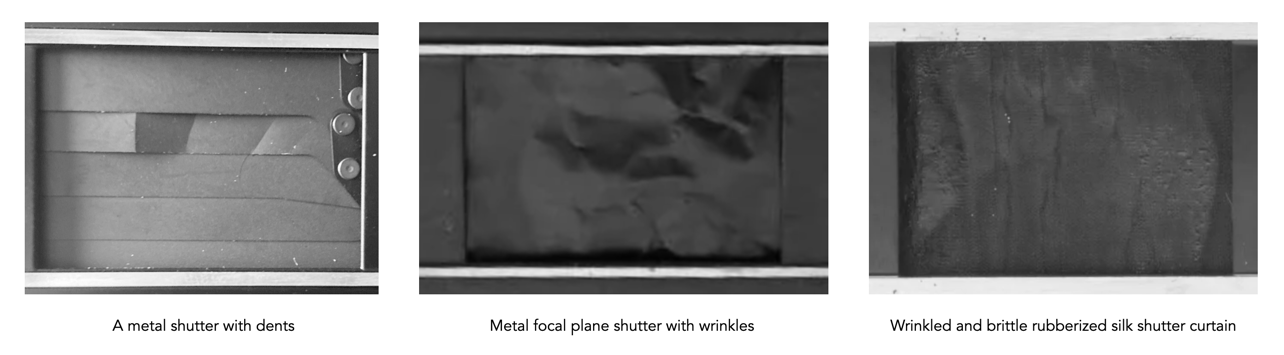
④ Shutter
Check the physical condition of the shutter, e.g. tears, creases, pinholes, or mould/degradation (cloth), or dents (metal). Does the shutter work? Press the shutter button – can you hear the shutter open and close? Look through the lens (on a fixed lens), through the front camera opening, or via the open back of the camera to watch the shutter open and close. Sometimes a camera might have fairly accurate high speeds, but not actually fire on speeds slower than 1/125s. The shutter speed is one of the most critical components of a vintage camera body, and honestly the hardest to test without proper equipment. The best way in-situ might be to test the camera side-by-side with a camera known to be accurate. There are distinct differences in sound from a fast (1/1000) to slow (1/30) speed. Very few places have the equipment to accurately test a cameras shutter speeds.
Fig.3: Examples of types of shutter curtain damage
⑤ Light seals
Older cameras have light seals that fail – the foam strips across the back of the camera with the film door is opened. They often aren’t apparent until a film is run through the camera. They are honestly one of the easier things to repair, so it is not a big issue.
⑥ Light meters
If the camera has a light meter, make sure it is working. There are a wide variety of exposure meters fitted to vintage cameras, from simple uncoupled ones that just measure the amount of light to complex systems which set the exposure on the camera automatically. If the meter is not functioning, the camera can often still be used in manual mode using an external light meter and transferring the settings to the camera. Typically selenium cell meters are the most common inoperable meter – they don’t need a battery to operate, however the selenium does delete over time (note that cameras with meters that have not been exposed to light may still function well).
Many of the uncoupled light meters are recognizable as a light cell on the camera body, and a meter (typically on the top plate). The best way to check these is to test how the meter responds to light – point it at dark and light areas, and compare the readings. Does the meter needle move when the light level changes? If not then check the battery if there is one. Online, many resellers will describe the light meter as not being tested. As long as you are comfortable not using a light meter, it shouldn’t matter.
⑦ Batteries
This is the one thing people tend to forget about. If there is no battery, then the camera is much simpler, and there is much less to go wrong. Firstly see if there is any damage to the battery compartment, e.g. corrosion, caused by leaking batteries. Ideally the camera will contain a battery already (if it doesn’t have one it can be a red-flag, because it makes it harder to test the camera). It is also good to check the type of battery. Is it still possible to get the required battery? For example many old cameras used mercury oxide batteries, such as the PX13 and PX625, for their CdS (cadmium sulfide) metering systems. Mercuric oxide batteries provide a constant and stable 1.35 volts over most of their life. However they were outlawed in many places in the 1980s and so an alternative has to be found (which isn’t as problematic as it may sound). If there are markings on the compartment door (or it is hard to open), or there is green/white build-up in the compartment itself, this might indicate the camera suffered from battery leakage at some point.
Note: Many cameras with serious maladies are usually sold for parts only or repairs. Given that the cost of many repairs these days is prohibitive, e.g. changing a shutter curtain or fixing shutter speeds, it is best to avoid damaged cameras.
Pierre Angénieux (1907-1998) was born in Saint-Héand near Lyon in 1907. In 1928 he graduated with a engineering degree and a year later received a degree in optical engineering. In 1930 he joined Pathé, a company involved in the motion picture industry in France. In 1935 he founded a manufacturing company specializing in cinematic gear in Paris. Initial production was primarily for military purposes, and this was discontinued during WW2. During the war, 35mm lenses were manufactured predominantly for the Swiss Alpa camera. The first lenses ca. 1938 were the 50mm f/2.9, and 50mm f/1.8 (for Alpa). In 1940 the Paris workshop was closed, and work relocated to Saint-Héand.
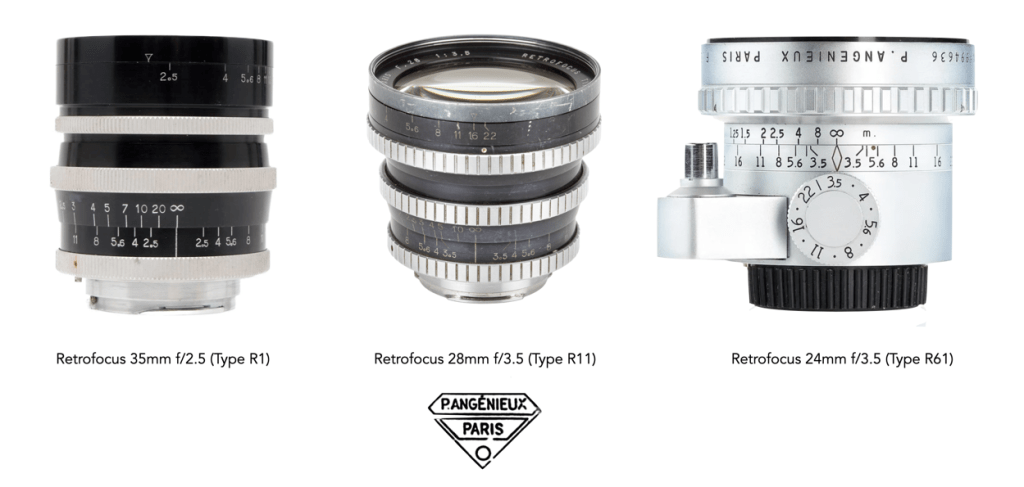
In 1950 Angénieux eleased the first retrofocus lens. These lenses used an inverted-telephoto design, with the negative lens group at the front of the lens, increasing the back focal distance. The first lenses were intended for rangefinder cameras, but the design was ideal for 35mm SLRs which allowed a wide-angle lens without interfering with the moving mirror. The first lens was the Retrofocus R1 series – 35mm, f/2.5. This was followed by the R11 28mm f/3.5 in 1953, and the R61 24mm f/3.5 in 1957. The Retrofocus design allowed wide-angle lenses on the range of interchangeable lens SLRs developed in the 1950s. By the 1950s they were producing 45,000 retrofocus lenses a year.
The most famous Angénieuxretrofocus lenses
This “retrofocus” design moved the optical focal point further to the front of the lens, using an additional lens element. A focal length shorter than 40mm was achieved by placing a diverging lens with a very large diameter in the front of the optical system. Traditional lenses using the Gaussian-double design could not be positioned close enough to the image plane without hindering the movement of the mirror in SLR cameras. Angénieux also made standard lenses in 50mm, 75mm, 90mm, 135mm and 180mm focal lengths.
In 1951 Angénieux adapted the Retrofocus lens or cine lenses, 8mm, 16mm, and 35mm. In 1960 the first Angénieux 35mm cine zoom was released, the 35-140mm f/3.5. This was followed by a litany of cine zoom lenses. NASA was to use Angénieux’s 25mm f/0.95 lens in the Ranger 7-9 missions. The NASA Gemini missions used Maurer 16mm cameras with 18mm f/2, 25mm f/0.95, and 75mm f/2.5 cameras, optics which would again appear on the Apollo 7, 8, 9, and 10 missions – on Apollo 11 the lenses would help record Neil Armstrong’s first steps on the Moon. Angénieux’s work with NASA would continue through the space shuttle era.
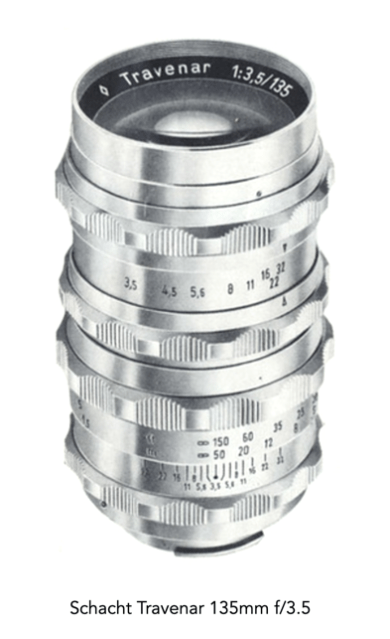
Schacht was founded by Albert Schacht in 1948 in Munich (Germany). Albert Schacht had a long pedigree of lens design. From 1913-1919 he was an operations manager at Carl Zeiss Jena, followed by seven years at ICA A.G., before it was merged into Zeiss Ikon (Dresden) where he continued until 1939. During the war years until 1946 he was a technical director at Steinheil in Munich. Schacht focused on designing and building lenses for 35mm film cameras. In 1954 production was moved to Ulm. Schacht manufactured interchangeable lenses in the range of 35-200mm for all common camera connections. Most lenses at Schacht were designed by Ludwig Bertele, who founded an optics office in Switzerland in 1946 with the help of Wild Heerbrugg.
The first interchangeable SLR lens manufactured was the Albinar, 13.5cm f/4.5 in 1952. It was produced exclusively for export to the USA and with an Exakta bayonet connection. It wasn’t really a telephoto, but rather just used a simple 4-lens design. Production was then expanded to include three more common focal lengths: the Travenar 50mm f/2.8, 85mm f/2.8, and 135mm f/3.5. The Albinar was renamed Travegon in 1954. They were available in Alpa, Exakta, Praktica (M42), Pentacon, and Leica mounts. In 1956 a wide-angle Travegon 35mm f/3.5 was introduced. Schacht produced lenses in the most popular focal lengths, and was one of the first lens manufacturers to deliver SLR lenses with an automatic aperture.
Fig.1: Advertisements from Schacht
Most of its early lenses were of standard 1950s aluminum construction. In the 1960’s Schacht changed the visual appearance of their lenses to match those of other manufacturers, i.e. a black lens with a zebra-style design which initially incorporated berg-and-tal stype controls, opting eventually for a more modest raised style of grip. These are generally considered good quality lenses, however not as common as other brands. Early lenses are marked as A. Schacht Munchen, older ones A. Schacht Ulm. Brands included: Albinar, Travenar, Travegon, Travelon, Travegar, Travenon, sometimes with the prefix tele- S-, M-, or Tele-.
Fig.2: Schacht changed their design over the years from an aluminum aesthetic to black with a zebra-style look.
In 1967 the company was acquired by Constantin Rauch. In 1969 the optics division was sold on to the Wilhelm Will KG company in Wetzlar. Due to production difficulties, lens production ended in 1970.
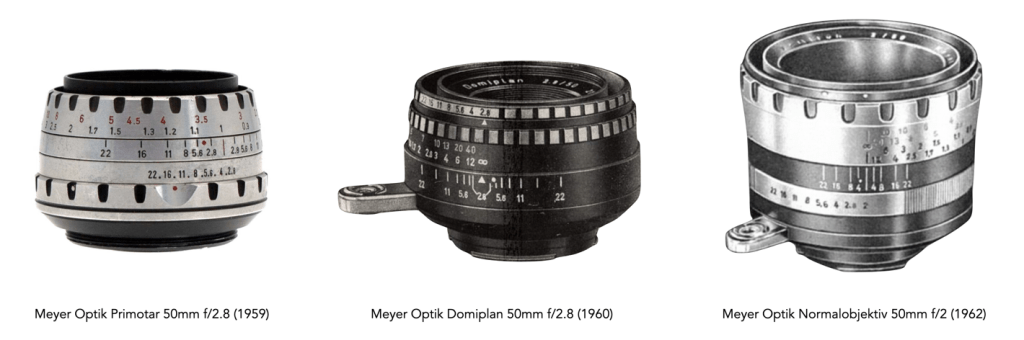
When you look at modern lenses, there isn’t much that sets them apart. They are usually pretty plain black cylinders, partially due to the consistency of modern lens design. The same could not be said of vintage lenses. Maybe this has something to do with the fact that many vintage lenses were made by companies that focused purely on lenses, and as such tried hard to differentiate their lenses from their competitors. For example a company like Meyer Optik Gorlitz manufactured lenses for cameras using the Exakta mount had to compete for the consumer spending with lenses from a myriad of other companies (at least 25-30).
Over time the appearance of lenses naturally changed, as new materials were introduced, often for the purpose of reducing the overall cost of lenses. For example, many early 35mm lenses had a shiny, chrome-like appearance. The earliest, pre-war lenses were often made of chrome-plated brass. As the Second World War progressed, shortages or re-direction of materials like brass led some manufacturers had begun to transition towards aluminum, which was both less expensive, easier to manufacture, and produced a lighter lens. While these early aluminum lenses were aesthetically pleasing there was little that differentiated them in a world where there was an increasing number of 3rd party lens manufacturers.
Fig.1: Evolution of the aluminum design of the Zeiss Jena Biotar 58mm f/2
When it first appeared as a lens material, aluminum was chic. The 1950s was the age of aluminum, which was a symbol of modernism. Many of the largest aluminum producers pursued new markets to absorb their increased wartime production capacity, used in everything from drink cans to kitchenware and Airstream trailers (there was also extra aluminum from scrapping of war surplus aircraft etc.). These aluminum lenses were initially clear-coated to reduce the likelihood of tarnishing, but eventually anodized to provide a robust black coating. Also in the 1950s, lens manufacturers to realize changing trends in lens design – buyers had moved away from the idea of pure practicality, and focused also on design. This wasn’t really surprising considering the broad scope of modernist design during this period – design tended to favour sleek and streamlined silhouettes. It is interesting to note that most of the aesthetically pleasing lenses of the post-1950 period originated from Germany.
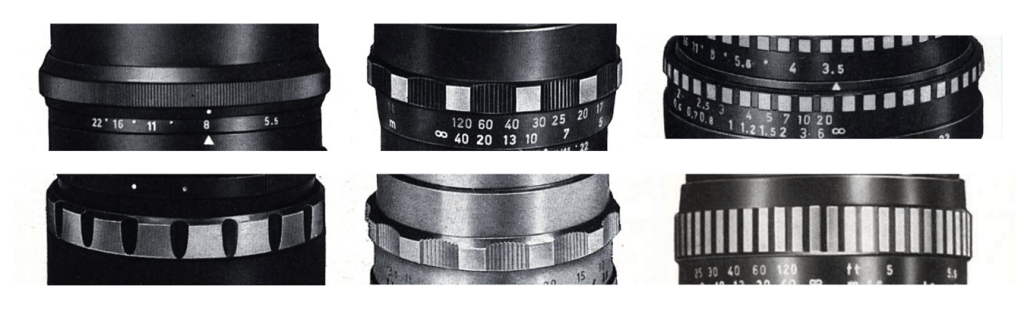
Fig.2: Every lens manufacturer had a different interpretation of both “berg-and-tal”, and the black-and-white “zebra” aesthetic
The first notable change was the gradual move towards what in German manufacturers called the “berg und tal” design, or rather “mountain and valley” design of the grips on a lens – usually knurled depressions milled into the surface of the ring (but also the opposite like the lenses of Steinheil where the depressions are smooth and the mountains are knurled). English-speaking regions often referred to this as a “knurled grip”. Appearing in the early 1950s, it was particularly common for focusing rings, making them more prominent, and likely more ergonomic, i.e. easier to grip. Some lenses started with the focusing ring, and eventually used the same design on the aperture ring. Prior to this most lenses used a simple straight knurl on the adjustment rings.
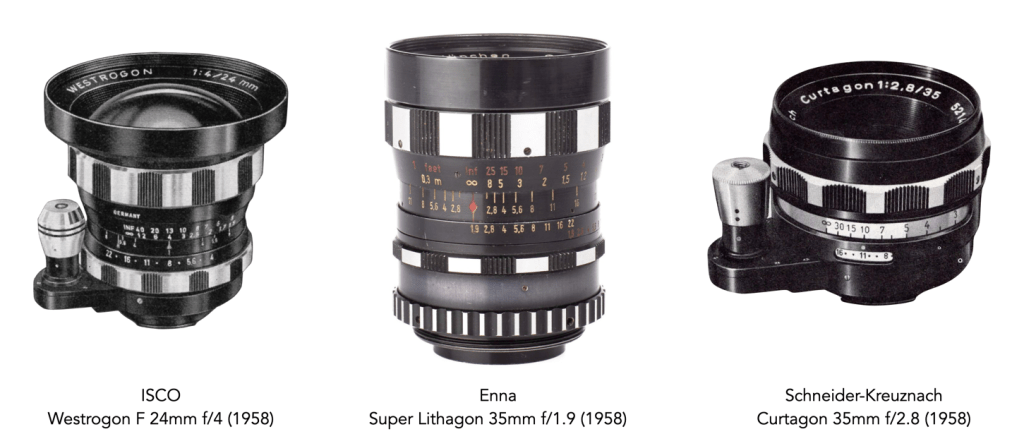
Towards the end of the 1950s, the pure-aluminum design transitioned to a combination of silver and black anodized aluminum. The lens bodies themselves were mostly black, with the “berg und tal” designs alternating between black and silver. This alternating pattern is what is colloquially known as “zebra” design. Many lens manufacturers utilized the zebra aesthetic in one form or another including Schacht, Enna, Steinheil, Schneider-Kreuznach, Meyer Optik, Rodenstock, ISCO etc..
Fig.3: Meyer Optik had an interesting twist on the zebra design. There were very few of these lenses and they are very minimalistic in design.
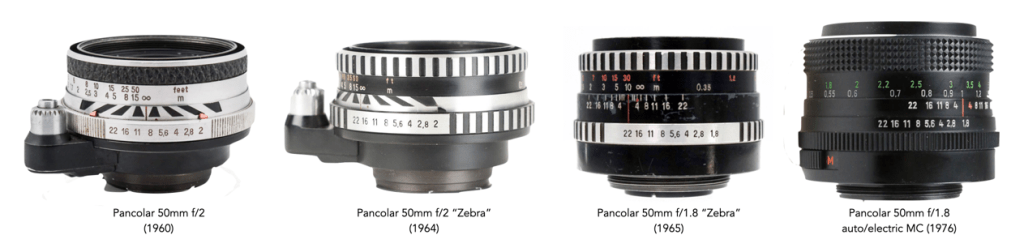
Zeiss probably produced the best known examples of the zebra aesthetic design with the Pancolar and Flektogon series of lenses. Although these lenses did not appear until the early 1960s, they bypassed the more prominent berg-und-tal in favour of a much subdued black-and-white knurled grip (which is also something Meyer Optik did with lenses like the Lydith 30mm). This design for both focusing and aperture rings replaced the rough textured rings of the earlier lenses. Some call these lenses the “Star Wars lens”. The Pancolar 50mm f/2 appeared ca. 1960 in the form of an f/2 lens with dual black-silver body encompassing a “converging-distance” depth of field range indicator, and either a textured or nubbed rubber focusing ring. This evolved a few years later to the classic “zebra” design, shortly before the release of the classic Pancolar 50mm f/1.8, which also sported the zebra design. By the 1970s, the Pancolar 50mm f/1.8 had morphed into a complete black configuration with a large rubber cross knurling focus grip and a finely knurled aperture ring.
Fig.4: Evolution of design aesthetics of the Zeiss Pancolar 50mm lens.
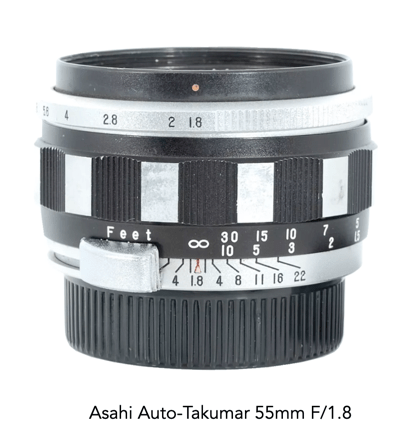
Japanese manufacturers transitioned from aluminum/chrome to black bypassing the zebra design. The one exception seems to be the Asahi Auto-Takumar 55mm F/1.8, which appeared in 1958, but is the sole example of zebra design (at least by Asahi). Japanese manufacturers did however embrace the berg-and-tal design.
Fig.5: Some lens companies couldn’t settle on a design. Here we have differing focus ring designs from the same Meyer Optik catalog in the 1960s
By the mid-1960s many camera manufacturers were producing their own lenses, particularly in Japan. As such lenses became more consistent, with little need to compete with other lens manufacturers. There were still 3rd party lens manufacturers but their perspective was to concentrate more on the manufacture of inexpensive lenses. Most lenses transitioned to using standardized, nonchalant black aluminum lenses, with the onus being more on the quality of the optics. Grips transitioned from berg-und-tal to a flatter, square-grooved style, still using a in black/chrome contrast (which likely resulted in a cost saving). By the mid-1970s focus rings were provided with a ribbed rubber coating, still common today on some lenses.
Fig.6: Berg-und-tal overkill?
Fig.7: One of the few Japanese zebra lenses.
Today, the sleek aluminum lenses are sought after because of their “retro” appeal, as too are the zebra lenses.
A “slide” in the more common use of the word refers to a translucent positive image which is held inside a cardboard sleeve, or plastic frame (or mount). A positive image is created using reversal film, whereas negative film produces an inverted or reversed image (which in turn is used to make a paper photo). When a slide is held up to the light, it is possible to see the scene as it was shot rather than the “negative” of the scene. Slides are typically viewed using a slide projector which projects the image against a white screen. Without the mount, the film would not be able to “slide” from one image to another when inside the magazine of a projector.
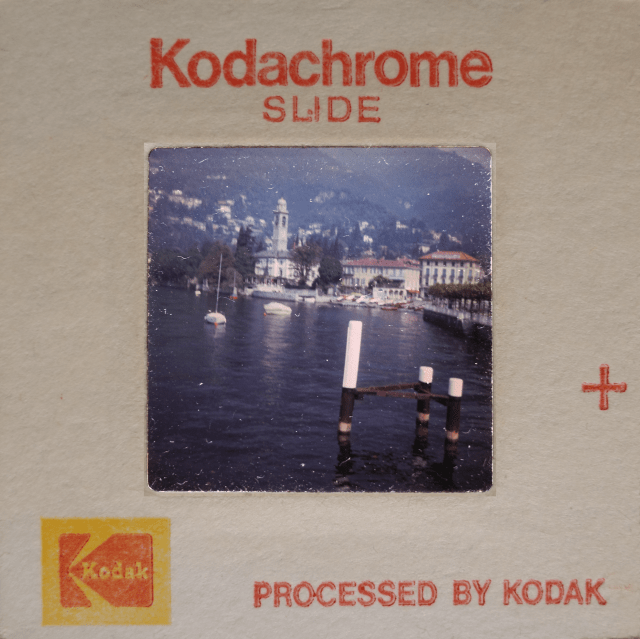
The classic Kodachrome slide
The slide is not a modern phenomena. The earliest was likely the Lantern slide, also known as the “magic lantern”. It was an early type of image projector which appeared in the 17th century which projected glass slides onto various surfaces. With the advent of photographic processes in the mid-19th century, magic lantern slides were black-and-white positive images, created with the wet collodion or a dry gelatine process on glass. Slide shows became a popular pastime in the Victorian period, but they were not the same as modern film slides.
Examples of colour slides
It 1826 Nicéphore Niépce invented the first form of negative photography, but it would take nearly a century before its use in flexible celluloid film became a reality. The earliest commercially successful reversal process came into being in 1907 with the Lumière Autochrome. It was an additive screen-plate method using a panchromatic emulsion on a thin glass plate coated with a layer of dyed potato starch grains. It was Leopold Godowsky Jr., and Leopold Mannes working with Kodak Research Laboratories who in April 1935 produced the first commercially successful reversal film – Kodachrome (first as a 16mm movie film, and in May 1936 as 8mm, 135 and 828 film formats). Based on the subtractive method, the Kodachrome films contained no colour dye couplers, these were added during processing. In 1936 Agfa introduced Agfa Neu, which had the dye couplers integrated into the emulsion, making processing somewhat easier than Kodachrome.
For sparkling pictures big as life. . . . Kodak 35 mm color slides.
Kodak’s commercial slogan during the 1950s
There are different types of reversal film, based on the type of processing. The first, which includes films like Kodachrome, uses the K-14 process. Kodachrome is essentially a B&W stock film, with the colour added during the 14-step development process. That means it has no integrated colour couplers. Kodachrome was an incredible film from the perspective of the richness and vibrancy of the colours it produced – from muted greens and blues to bold reds and yellows. However developing Kodachrome was both complex and expensive, which would eventually see the rise of films like Ektachrome, which used the E-6 development process (a 6-step process). Films like Ektachome have different emulsion layers, each of which is sensitive to a different colour of light. There are also chemicals called dye couplers present in the film. After slide film is developed, the image that results from the interaction of the emulsion with the developer is positive.
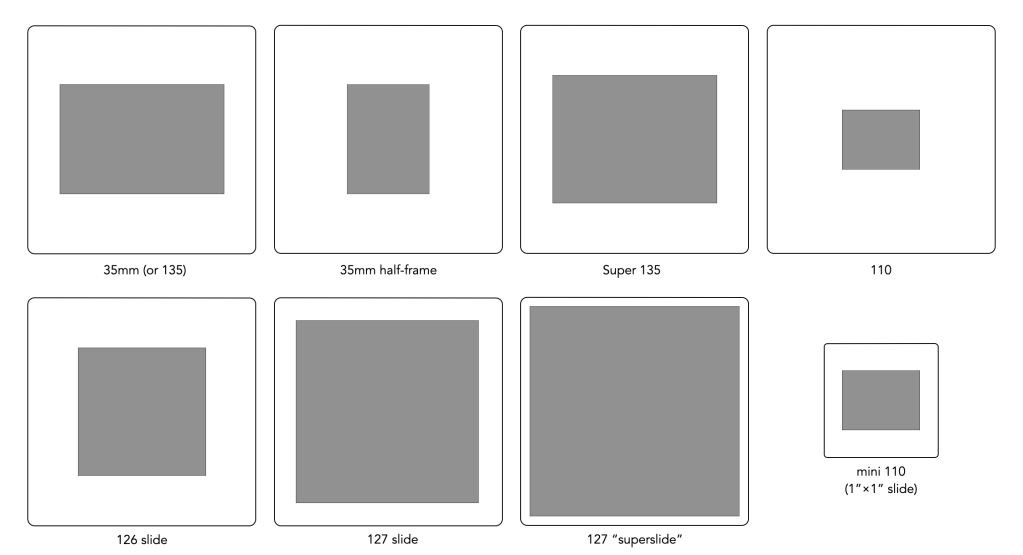
Common slide mount sizes
Many companies made reversal films, typically acknowledged through the use of the “chrome” synonym – e.g. Agfachrome (Agfa), Fujichrome (Fuji), Ektachrome (Kodak), Scotchchrome (3M, after buying Italian filmmaker Ferrania), Ilfochrome (Ilford), Peruchrome (Perutz), and Anscochrome (the US arm of Agfa). The initial Kodachrome had a very slow speed (10 ASA), this was replaced in 1961 by Kodachrome II (1961) which produced sharper images, and had a faster speed (25 ASA). In 1962 Kodak introduced Kodachrome X (ASA 64). Kodak’s other transparency film was Ektachrome, which was much faster than Kodachrome. In 1959 High Speed Ektachrome was introduced, providing a ASA 160 colour film (by 1968 this had been pushed to ASA 400).
Format
Year it appeared
Transparency size (w×h)
Notes
35mm /135
1935
36mm × 24mm
very common
Super 135
36mm × 28mm
110
1972
17mm × 13mm
also on 1”×1” slides (mini 110)
Half-frame
1950s
24mm × 18mm
126
1963
28mm × 28mm
127
1912-1995
40mm × 40mm
Super 127
1912-1995
rare
Table 1: Characteristics of slide sizes
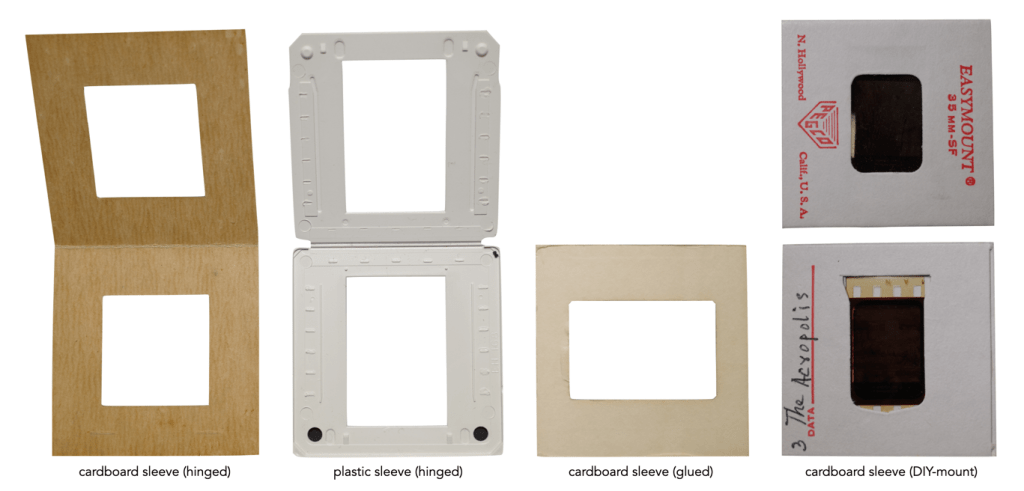
What about the “slide” side of things? A patent for a “Transparency Mount” was submitted by Henry C. Staehle of Eastman Kodak in October 1938, and received it in December 1939. Its was described as “a pair of overlapping flaps formed from a single strip of sheet material such, for example, as paper.”. Early slide mounts were mostly made of cardboard, but as plastic became more common, various designs appeared. Most cardboard mounts were either hinged on one side or two separate pieces, glued together after the emulsion was sandwiched between the two sides of the frame. There were also systems for the DIYer, where the emulsion could simply be inserted to the slide frame. Plastic frames were either welded together or designed in an adjustable format, i.e. the film frame could be inserted and removed. The exterior dimension of most common slide formats is 2 inches by 2 inches. There were many different sizes of slides, all on a standard 2″×2″ mount, to encompass the myriad of differing films formats during the period. Slides are usually colour – interestingly, black-and-white reversal film does exist but is relatively uncommon.
Some different types of slide frames
Slides were popular from the 1960’s probably up until the early 1990’s. It was an easy way to get a high-quality projected image in a pre-digital era. Slides were a popular medium for tourists to take pictures with, and then beguile visitors with a carousel of slides depicting tales of their travels. Slide film is still available today, all of which uses the E-6 process. E-6 slide film is a lot less forgiving as it has a lower ISO value but produces vivid colour with evidence of finer grain. Modern slide films include Kodak Ektachrome 100, Fujifilm Velvia 50, and Fujifilm Fujichrome Provia 100.
In the 1980s, Fuji ran magazine ads with the headline shown below. It was to proclaim how good their lenses were, in a time when competition among camera manufacturers was high. Does this statement still hold true in the digital age?