For many years the concept of crisp, sharp images was paramount. It lead to the development of a variety of image sharpening algorithms to suppress the effect of blurring in an image. Then tilt-shift appeared, and was in vogue for a while (it’s still a very cool effect). Here blur was actually being introduced into an image. But what about actually taking blurry images?
I have been experimenting with adding blur to an image, either through the process of manually defocusing the lens, or by taking a picture of a moving object. The results? I think they are just as good, if not better than if I had “stopped the motion”, or created a crisp photograph. We worry far too much about defining every single feature in an image, and too little on a bit of creativity. Sometimes it would be nice to leave something in an image that inspires thought.
Here’s an example of motion-blur, a Montreal Metro subway car coming into a platform. It is almost the inverse of tilt-shift. Here the object of interest is blurred, and the surround area is kept crisp. Special equipment needed? Zip.
A megapixel is 1 million pixels, and when used in terms of digital cameras, represents the maximum number of pixels which can be acquired by a camera’s sensor. In reality it conveys a sense of the image size which is produced, i.e. the image resolution. When looking at digital cameras, this can be somewhat confusing because there are different types of terms used to describe resolution.
For example the Fuji X-H1 has 24.3 megapixels. The maximum image resolution is is 6000×4000 or 24MP. This is sometimes known as the number of effective pixels (or photosites), and represents those pixels within the actual image area. However if we delve deeper into the specifications (e.g. Digital Camera Database), and you will find a term called sensor resolution. This is the total number of pixels, or rather photosites¹, on the sensor. For the X-H1 this is 6058×4012 pixels, which is where the 24.3MP comes from. The sensor resolution is calculated from sensor size and effective megapixels in the following manner:
Calculate the aspect ratio (r) between width and height of the sensor. The X-H1 has a sensor size of 23.5mm×15.6mm so r=23.5/15.6 = 1.51.
Calculate the √(no. pixels / r), so √(24300000/1.51) = 4012. This is the vertical sensor resolution.
Multiply 4012×1.51=6058, to determine the horizontal sensor resolution.
The Fuji X-H1 is said to have a sensor resolution of 24,304,696 (total) pixels, and a maximum image resolution of 24,000,000 (effective) pixels. So effectively 304,696 photosites on the sensor are not recorded as pixels, representing approximately 1%. These remaining pixels form a border to the image on the sensor.
So to sum up there are four terms worth knowing:
effective pixels/megapixels – the number of pixels/megapixels in an image, or “active” photosites on a sensor.
maximum image resolution – another way to describe the effective pixels.
total photosites/pixels – the total number of photosites on a sensor.
sensor resolution – another way to describe the total photosites on a sensor.
¹ Remember, camera sensors have photosites, not pixels. Camera manufacturers use the term pixels because it is easier for people to understand.
Full-frame sensors take their dimensions from traditional 35mm film, but where did the ubiquitous 35mm come from?
The second half of the 19th Century spirited the development of many photographic materials and processes. Kodak’s first roll-film camera, the No.1 was introduced in 1888. By 1901, the use of roll-film had become quite common, with Kodak releasing the 120 film format, which was approximately 60mm wide and allowed for various frame sizes. Thomas Edison invented¹ the Kinetoscope in 1893, a device for showing basic film loops, and which used 35mm (1⅜”) gauge cine-film, half the size used in Eastman Kodak cameras. In March 1895, The Lumière Brothers introduced their Cinématographe, the first motion picture film camera, using the same width as Edison, 35mm. By 1909, 35mm had become the standard motion picture film.
Why is it called 35mm film? The 35mm represents the width of the film, irrespective of the size of the frame on the film.
A number of manufacturers started using 35mm cine-film for still photography between 1905 and 1913. The first patent for a 35mm camera was issued to Leo, Audobard and Baradat in England in 1908. It represented one of many patents and prototypes, few of which were produced commercially or even built. The first publicly available 35mm cameras were that used 35mm cine-film were the Tourist Multiple, and the Simplex. The TouristMultiple, built by US company Herbert & Huesgen, was released in 1913. It was a half-frame camera, taking (750) 18×24mm exposures on 35mm cine-film. The Simplex, invented by Alfred Huger Moses, and was released in 1914. It existed in a number of different models, many of which allowed convertible full/half-frame exposures. The Simplex Model B was the only one to use standard 35mm format (it was only produced from 1914-1918).
The Simplex Model B.
It was Oskar Barnack (1879-1936), who produced the first commercially successful 35mm camera, at the Ernst Leitz Optische Werke in Wetzlar. In 1912, Barnack began work on a new motion picture camera, yet he struggled to get shutter timings right, largely because film emulsions were quite inconsistent. Proper exposure in the early days of motion picture was challenging because of the lack of devices such as photoelectric meters. In response to this, Barnack created a film tester to determine correct exposure settings. Barnack’s device would allow small test exposures to be processed, and exposure issues adjusted accordingly. This prototype device became known as the Ur-Leica, where the prefix “Ur” in German means prime, or original. It was equipped with a Mikro-Summar f / 4.5, 6-element, 42mm lens.
Barnack’s design allowed the camera to move the film horizontally, increasing the frame size to increase to 24×36mm, instead of the 18×24mm exposures of cameras that carried film vertically. This essentially created “double-sized” images. The aspect ratio also changed from 3:4 to 2:3. With the onset of WW1, it was not until 1924 that Leica decided to produce the 35mm camera, with the 35mm Leica I (A) making its first appearance as the Leipzig Spring Fair in 1925. The Leica I had an all-metal housing, a collapsible lens, and a focal-plane shutter. The Leica succeeded because it was compact, and the quality of the exposures was as good as the more commonly used roll film.
So why did 35mm film become so successful? It was partially to do with cost. Due to its use in the cinematic industry, 35mm motion picture film was widely available, and inexpensive. The number of exposures which could be loaded into a camera was 40. Initially the film had to be loaded in the dark, however Barnack soon realized this was a problem and developed a reloadable cassette which could easily be inserted into the camera, and could accommodate 36 exposures. By 1932, Leica’s competitor Zeiss had introduced the 35mm Contax, and Kodak entered the market in 1934 with the Retina I.
¹ It is widely believed that the Kinetoscope was actually designed by one of Eastman’s employees, William Dickson.
For more information on early 35mm cameras check out Max Bertacchi’s page dedicated to early 35mm cameras, or early Leica’s.
A pixel is an abstract, size-less thing. A pixels size is relative to the resolution of the physical device on which it is being viewed. The photosites on a camera sensor do have a set dimension, but once an image is acquired, and the signal are digitized, image pixels are size-less.
For example, let’s consider TVs, and in particular 4K Ultra HD TVs. A 43″ version of this TV might have a resolution of 3840×2160 pixels (w×h). The 75″ version of this TV has *exactly* the same number of pixels – about 8 million of them. What changes is the pixel size, but then so does the distance you should view the TV from. The iPhone 11 in comparison has a screen size of 1792×828. For example, the 43″ 4K TV has dimensions of roughly 37″×20.8″, which means that the size of a pixel is 0.24mm. A 75″ 4K TV would have a pixel size of 0.41mm. An Apple Macbook Air with a 13.3″ screen (2560×1600 pixels) has a pixel size of 0.11mm.
As an example consider the image below. Two sizes of pixels are shown, to represent different resolutions on two different physical devices. The content of the pixel doesn’t change, it just adapts to fill the physical pixels on the device.
Pixel sizes on different screens
Likely more important than the size of pixels is how many of them there are, so a better measure is PPI, or pixels-per-inch. The iPhone 11 has 326ppi, a typical 43″ TV has 102ppi, and the 75″ TV has 59ppi.
So camera sensors don’t have pixels, but what is a pixel?
A pixel is short for picture element, and represents the essential building block of images. The term was first coined in 1965, in two different academic articles in SPIE Proceedings in 1965, written by Fred C. Billingsley of Caltech’s Jet Propulsion Laboratory. An alternative, pel, was introduced by William F. Schreiber of MIT in the Proceedings of the IEEE in 1967 (but it never really caught on).
Pixels are square in shape. In the context of digital cameras, a pixel is derived from the digitization of a signal from a sensor photosite. Pixels come together in a rectangular grid to form an image. An image is somewhat like a mosaic in structure. Each pixel provides data for representing the entire picture being digitized.
What are the characteristics of a pixel? Firstly a pixel is dimensionless. Pixels are not visible unless an image is overly enlarged, and their perceived “size” is directly related to the size of pixels on a physical device. An image shown on a mobile device will be deemed to have smaller pixels than an image shown on a 4K television.
Pixels have a value associated with them which represents their “colour”. This value relates to luminance in the case of a grayscale image, with a pixel taking a value between black (0) and white (255). In the case of a colour image this is both luminance and chrominance. A pixel in a colour image typically has three components, one for Red, one for Green, and one for Blue, or RGB – when the values are combined they derive a single colour.
The precision to which a pixel can specify colour is called its bitdepth or colourdepth. For example a typical grayscale image is 8-bit, or contains 2^8=256 shades of gray. A typical colour image is 24-bit, or 8 bits for each of Red, Green and Blue, providing 2^24 or 16,777,216 different colours.
A single pixel considered in isolation conveys information on the luminance and/or chrominance of a single location in an image. A group of pixels with similar characteristics, e.g. chrominance or luminance, can coallesc together to form an object. A pixel is surrounded by eight neighbouring pixels, four of which are direct, or adjacent, neighbours, and four of which are indirect or diagonal neighbours.
Pixel neighbours: The red pixels are the direct neighbours, while the blue pixels are the indirect neighbours.
The more pixels an image contains, the more detail it has the ability to describe. This is known as image resolution. Consider the two pictures of the word “Leica” below. The high resolution version has 687×339 pixels, whereas the low resolution image is 25% of its size, at 171×84 pixels. The high resolution image has more pixels, and hence more detail.
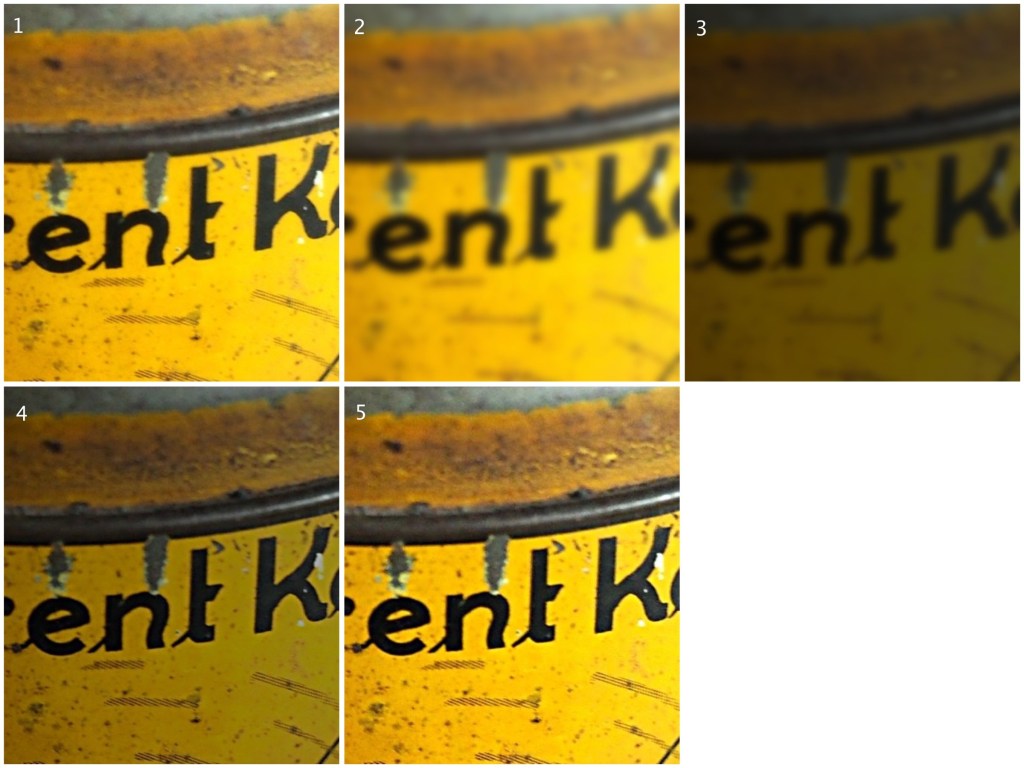
Some photographs contain blur which is very challenging to remove. Large scale blur, which is the result of motion, or defocus can’t really be suppressed in any meaningful manner. What can usually be achieved by means of image sharpening algorithms is that finer structures in an image can be made to look more crisp. Take for example the coffee can image shown below, in which the upper lettering on the label in almost in focus, while the lower lettering has the softer appearance associated with de-focus.
The problem with this image is partially the fact that the blur is not uniform. Below are two regions enlarged:containing text from opposite ends of the blur spectrum.
Reducing blur, involves a concept known as image sharpening(which is different from removing motion blur, a much more challenging task). The easiest technique for image sharpening, and the one most often found in software such as Photoshop is known as unsharp masking. It is derived from analog photography, and basically works by subtracting a blurry version of the original image from the original image. It is by no means perfect, and is problematic in images where there is noise, as it tends to accentuate the noise, but it is simple.
Here I am using the “Unsharp Mask” filter from ImageJ. It subtracts a blurred copy of the image and rescales the image to obtain the same contrast of low frequency structures as in the input image. It works in the following manner:
Obtain a Gaussian blurred image, by specifying a blur radius (in the example below the radius = 5).
Filter the blurred image using a “Mask Weight, which determines the strength of filtering. A value from 0.1-0.9. (In the example below, the mask weight =0.4)
Subtract the filtering image from the original image.
Divide the resulting image by (1.0-mask weight) – 0.6 in the case of the example.
1. Original image; 2. Gaussian blurred image (radius=5); 3. Filtered image (multiplied by 0.4); 4. Subtracted image (original-filtered); 5. Final image (subtracted image / 0.6)
If we compare the resulting images, using an enlarged region, we find the unsharp masking filter has slightly improved the sharpness of the text in the image, but this may also be attributed to the slight enhancement in contrast. This part of the original image has less blur though, so let’s apply the filter to the second image.
The original image (left) vs. the filtered image (right)
Below is the result on the second portion of the image. There is next to no improvement in the sharpness of the image. So while it may be possible to slightly improve sharpness, where the picture is not badly blurred, excessive blur is impossible to “remove”. Improvements in acuity may be more to the slight contrast adjustments and how they are perceived by the eye.
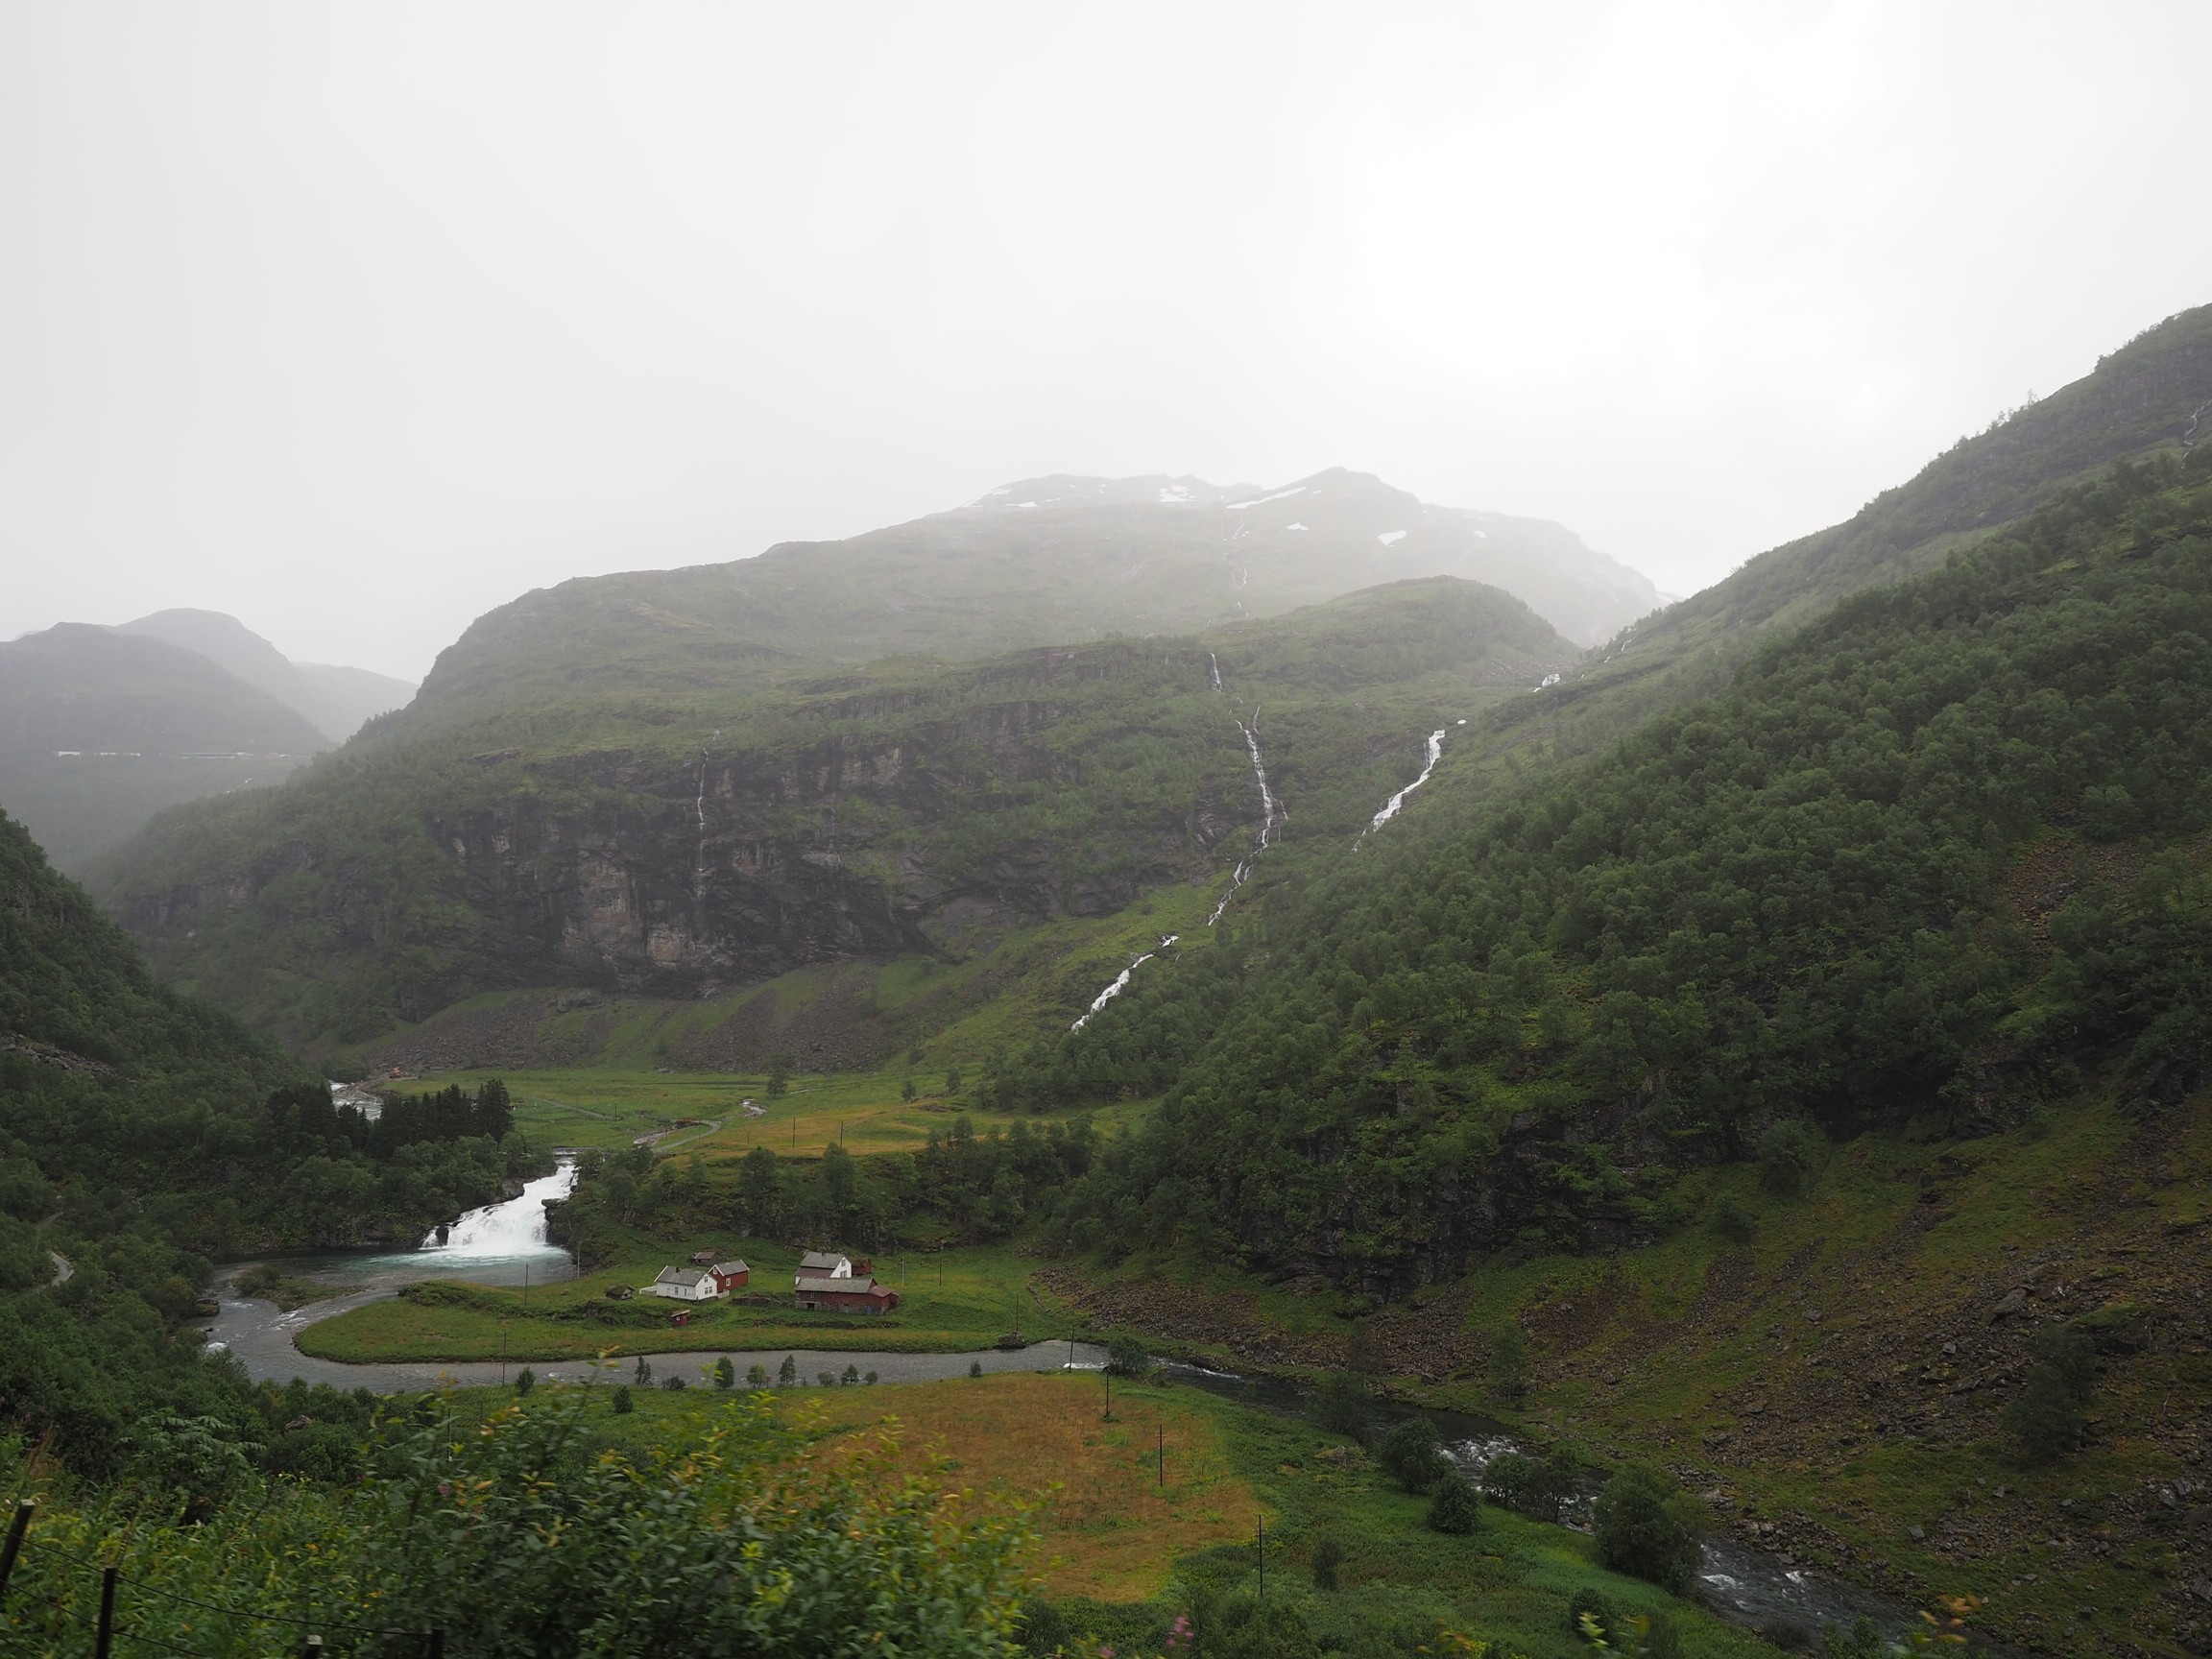
Consider the following photograph, taken on a drizzly day in Norway with a cloudy sky, and the mountains somewhat obscured by mist and clouds.
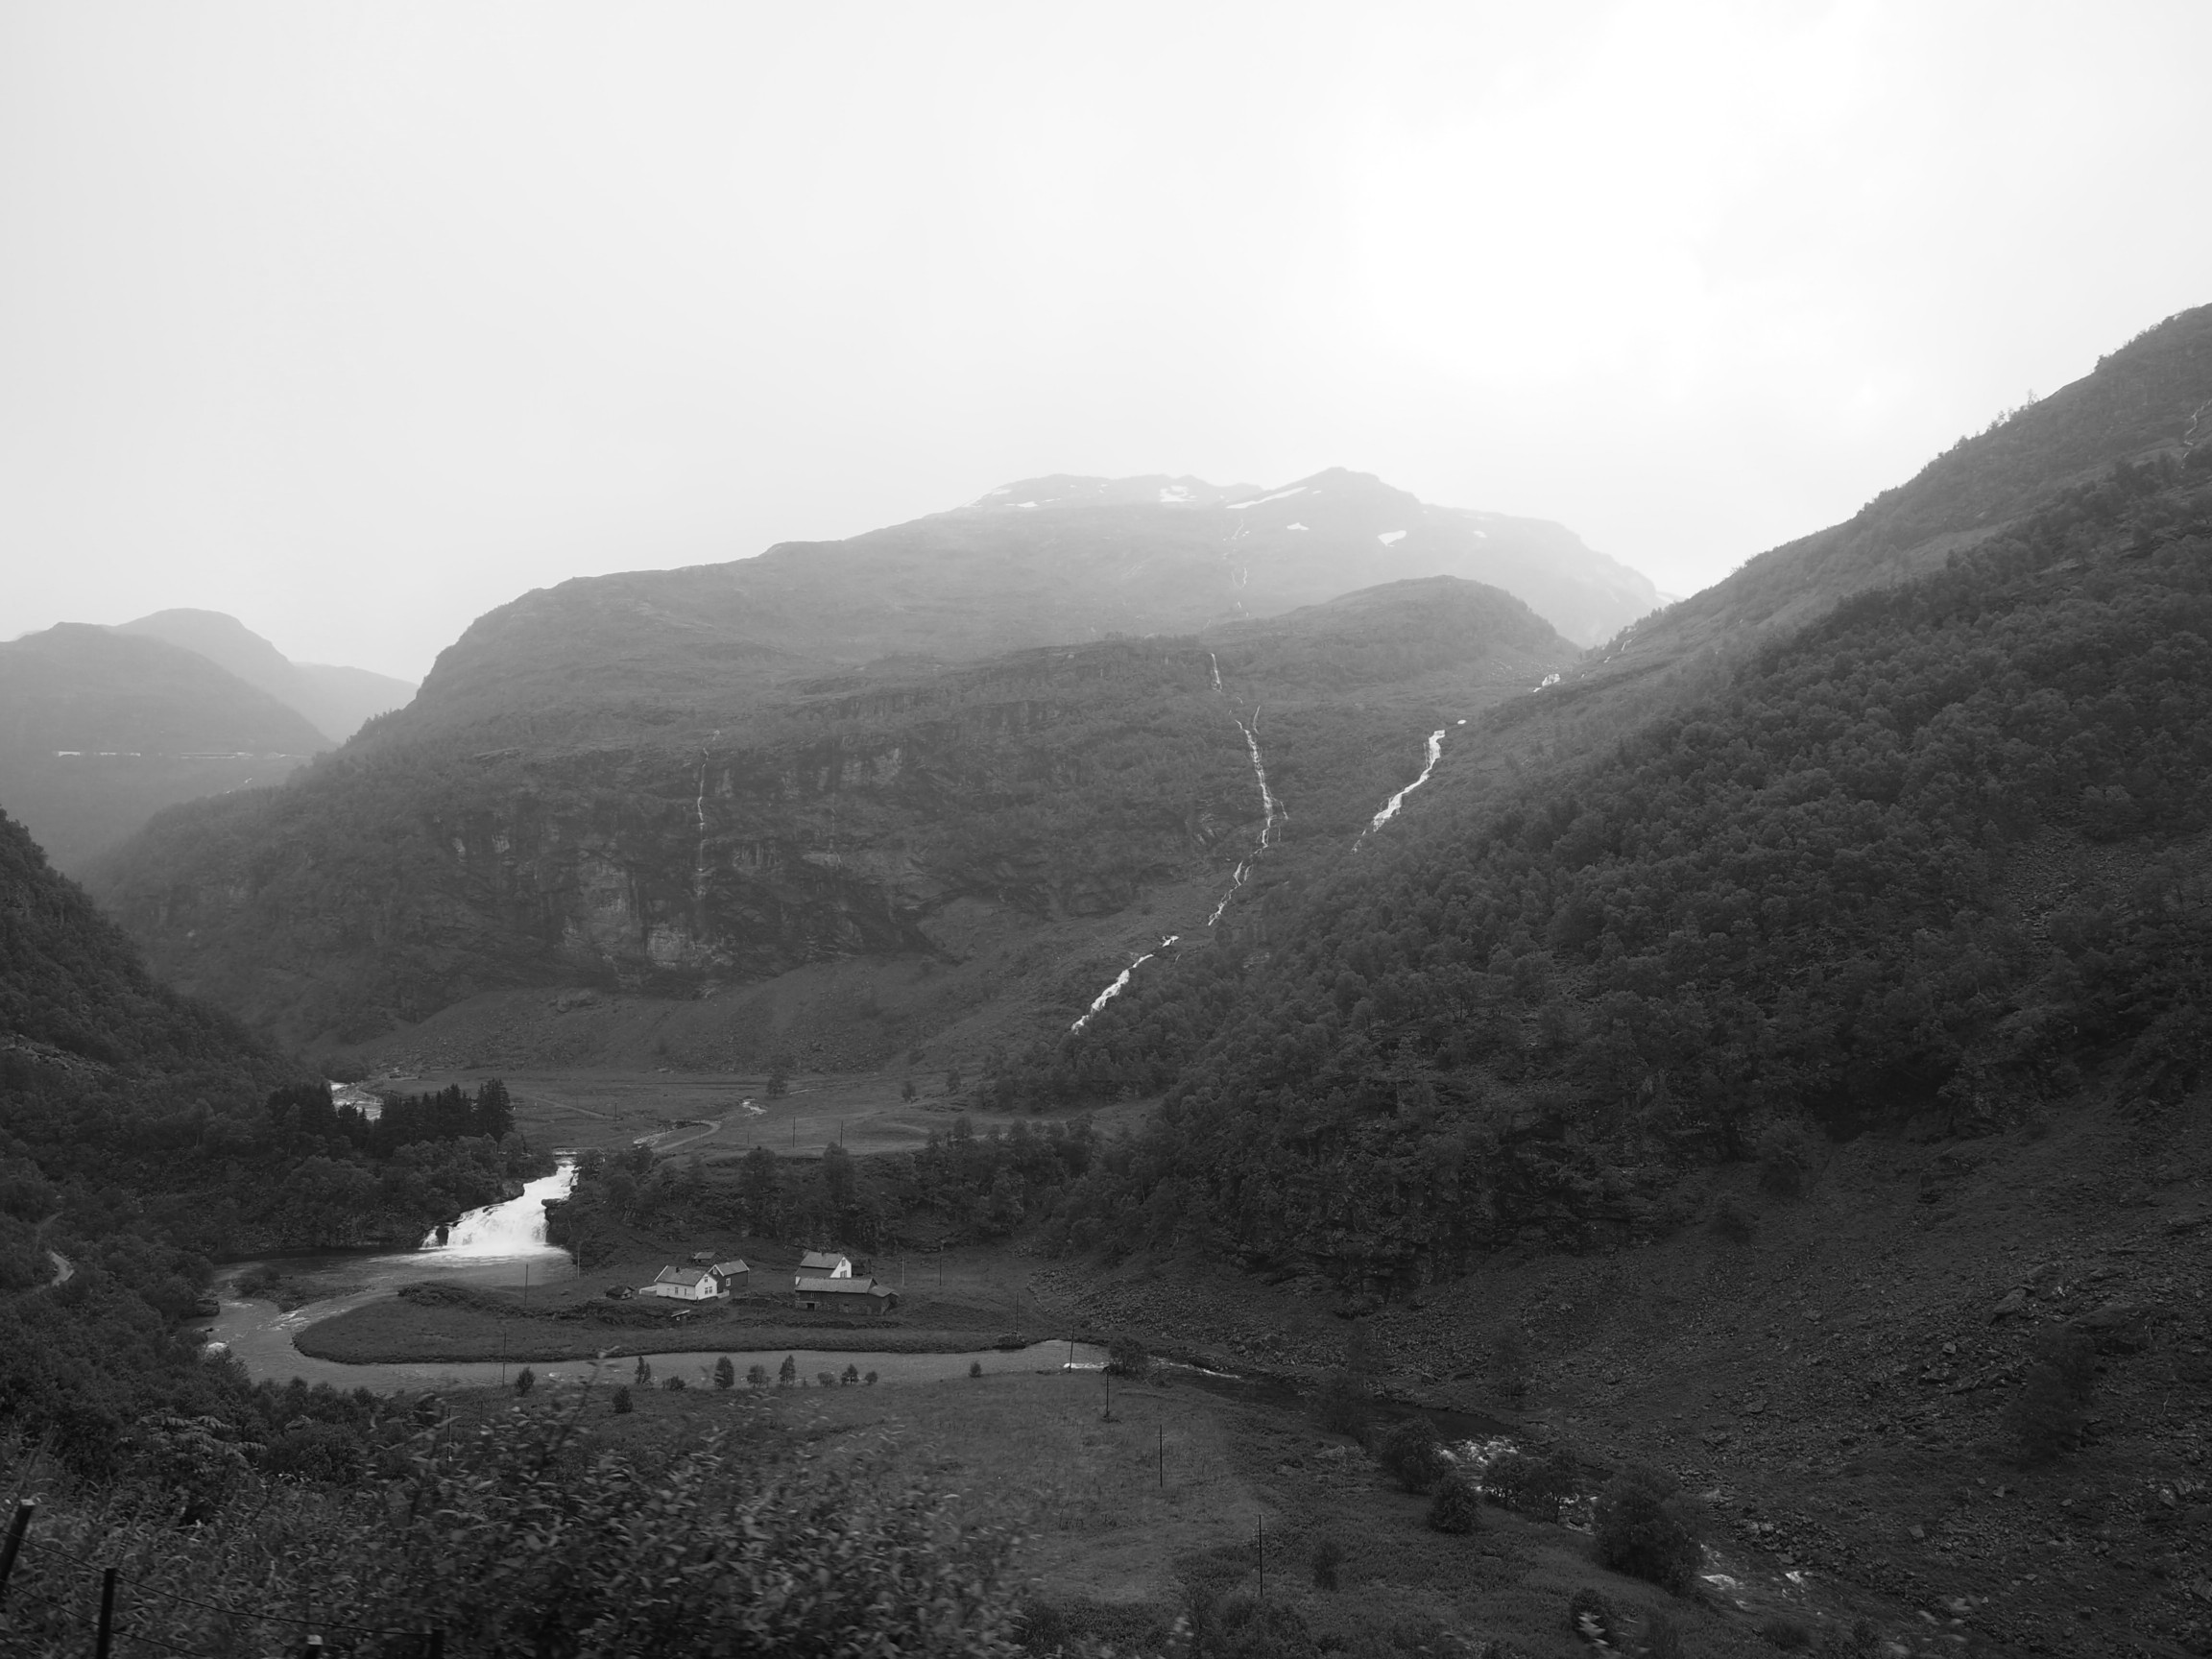
Now let’s look at the intensity image (the colour image has been converted to 8-bit monochrome):
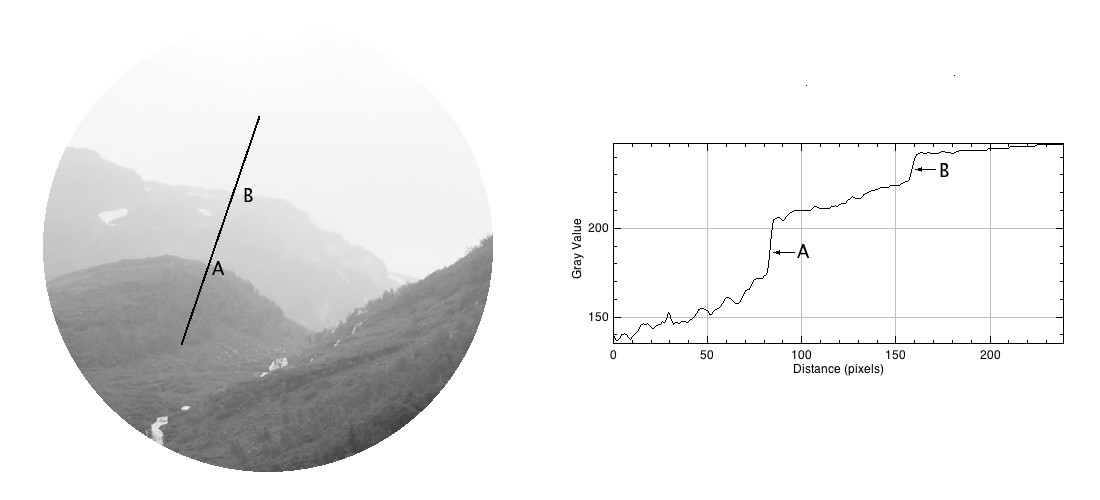
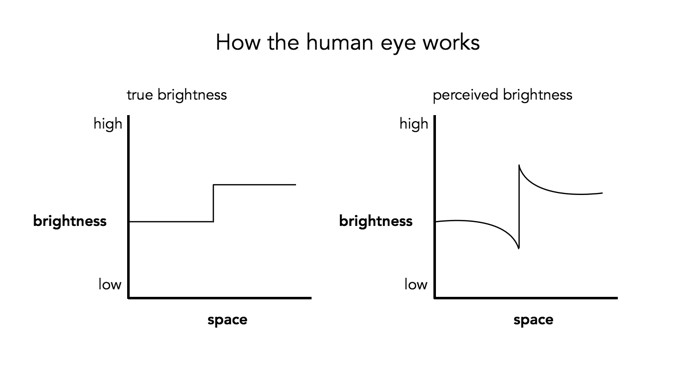
If we look at a region near the top of the mountain, and extract a circular region, there are three distinct regions along a line. To the human eye, these appear as quite uniform regions, which transition along a crisp border. In the profile of a line through these regions though, there are two “cliffs” (Aand B) that marks the shift from one region to the next. Human eyes don’t perceive these “cliffs”.
The Mach bands is an illusion that suggests edges in an image where in fact the intensity is changing in a smooth manner.
The downside to Mach bands is that they are an artificial phenomena produced by the human visual system. As such, it might actually interfere with visual inspection to determine the sharpness contained in an image.
Photographs, and the results obtained through image processing are at the mercy of the human visual system. A machine cannot interpret how visually appealing an image is, because aesthetic perception is different for everyone. Image sharpening takes advantage of one of the tricks of our visual system. Human eyes see what are termed “Mach bands” at the edges of sharp transitions, which affect how we perceive images. This optical illusion was first explained by Austrian physicist and philosopher Ernst Mach (1838–1916) in 1865. Mach discovered how our eyes leverage the use of contrast to compensate for its inability to resolve fine detail. Consider the image below containing ten squares of differing levels of gray.
Notice how the gray squares appear to scallop, with a lighter band on the left, and a darker band on the right of the squares? This is an optical illusion, in fact the gray squares are all uniform in intensity. To resolve the brain/eyes deficiency in being able to resolve detail, incoming light gets processed in such a manner than the contrast between two different tones is exaggerated. This gives the perception of more detail. The dark and light bands seen on either side of the gradation are the Mach bands. Here is an example of what human eyes see:
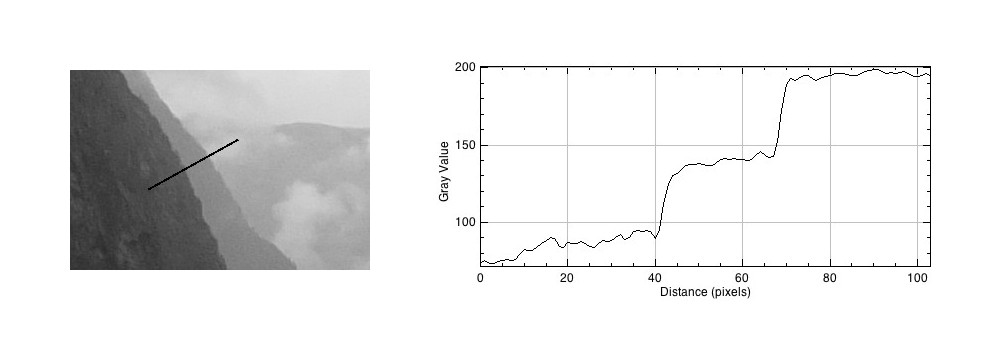
What does this have to do with manipulation techniques such as image sharpening? The human brain perceives exaggerated intensity changes near edges – so image sharpening uses this notion to introduce faux Mach bands by amplifying intensity edges. Consider as an example the following image, which basically shows two mountain sides, one behind the other. Without looking too closely you can see the Mach bands.
Taking a profile perpendicular to the mountain sides provides an indication of the intensity values along the profile, and shows the edges.
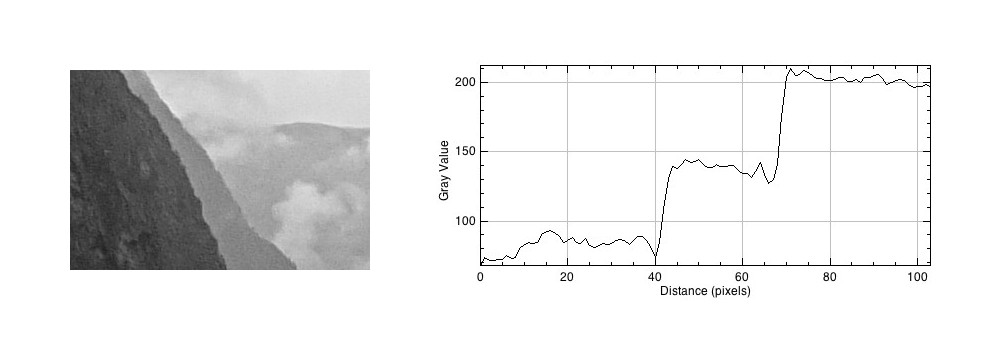
The profile shows three plateaus, and two cliffs (the cliffs are ignored by the human eyes). The first plateau is the foreground mountainside, the middle plateau is the mountainside behind that, and the uppermost plateau is some cloud cover. Now we apply an unsharp masking filter to the image, to sharpen the image (radius=10, mask weight=0.4)
Notice how the UM filter has the effect of adding a Mach band to each of the cliff regions.
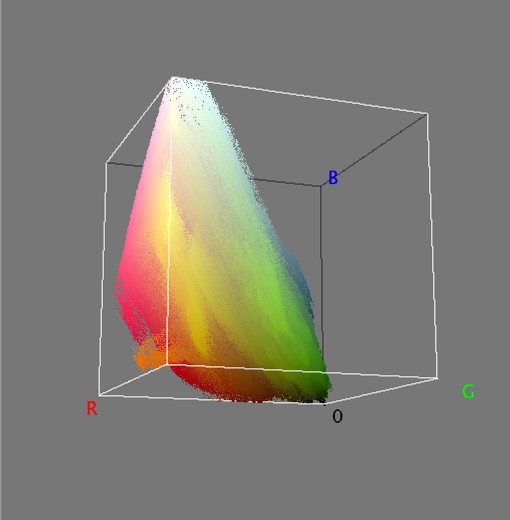
The number of colours in a 24-bit colour image is 256³ or 16,777,216 colours. So how many colours are there in a 8 MP photo? Consider the following beautiful photograph:
A picture of a flower from a Japanese quince
In this image there are 515,562 unique colours. Here’s what is looks like as a 3D RGB histogram:
Most photographs will not contain 16 million colours (obviously if they have less than 16 MP, that’s a given). If you want to check out some images that do, try allrgb.com. Here is another image with more colours: 1,357,892 to be exact. In reality, very few real everyday photographs contain that amount of hue varieties.
Stained glass window at Metro Charlevoix in Montreal
Now as the average number of colours humans can perceive is only around a million, having 16 million colours in an image is likely overkill.
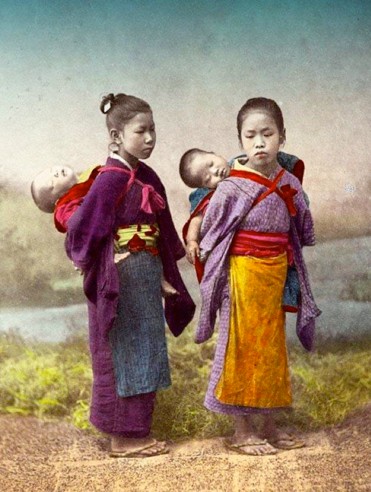
Colour is a complex sensation, but we should remember that an object has no single characteristic colour because its appearance is affected by a number of factors. If we ask what the colour of the girls kimonos are from the image below (from a series of ca.1880s-90s full-plate images printed by sunlight on simple “salted paper”, and hand-tinted with transparent water colours), our first reaction may be to say that they are purple. By this means we identify the hue of the object. However, this description is clearly inadequate. To be more specific, we could say that one kimono is light purple and the other is dark purple. This describes the brightness of the colour. Colour could also be described as bright, dull or vivid, a characteristic known as saturation. Therefore the perception of colour is comprised of three characteristics, any one of which can be varied independently. But we are really describing sensations, not the object, nor the physical stimuli reaching the eye.