A short introduction to the film slide

A “slide” in the more common use of the word refers to a translucent positive image which is held inside a cardboard sleeve, or plastic frame (or mount). A positive image is created using reversal film, whereas negative film produces an inverted or reversed image (which in turn is used to make a paper photo). When a slide is held up to the light, it is possible to see the scene as it was shot rather than the “negative” of the scene. Slides are typically viewed using a slide projector which projects the image against a white screen. Without the mount, the film would not be able to “slide” from one image to another when inside the magazine of a projector.
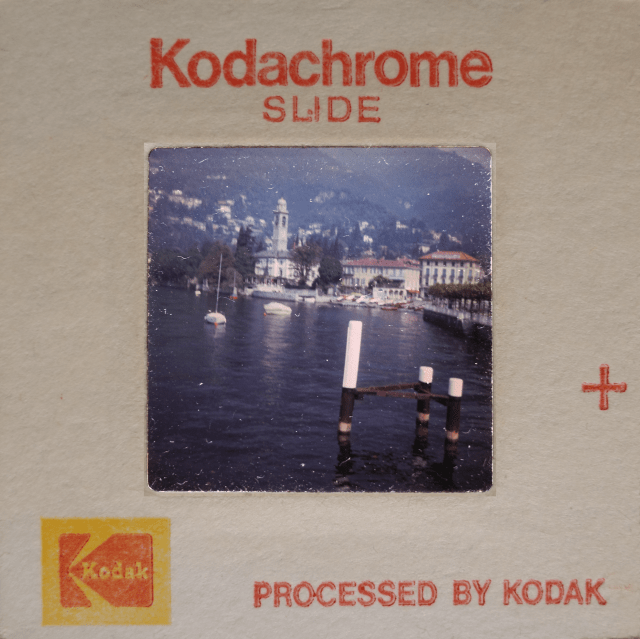
The classic Kodachrome slide

The slide is not a modern phenomena. The earliest was likely the Lantern slide, also known as the “magic lantern”. It was an early type of image projector which appeared in the 17th century which projected glass slides onto various surfaces. With the advent of photographic processes in the mid-19th century, magic lantern slides were black-and-white positive images, created with the wet collodion or a dry gelatine process on glass. Slide shows became a popular pastime in the Victorian period, but they were not the same as modern film slides.
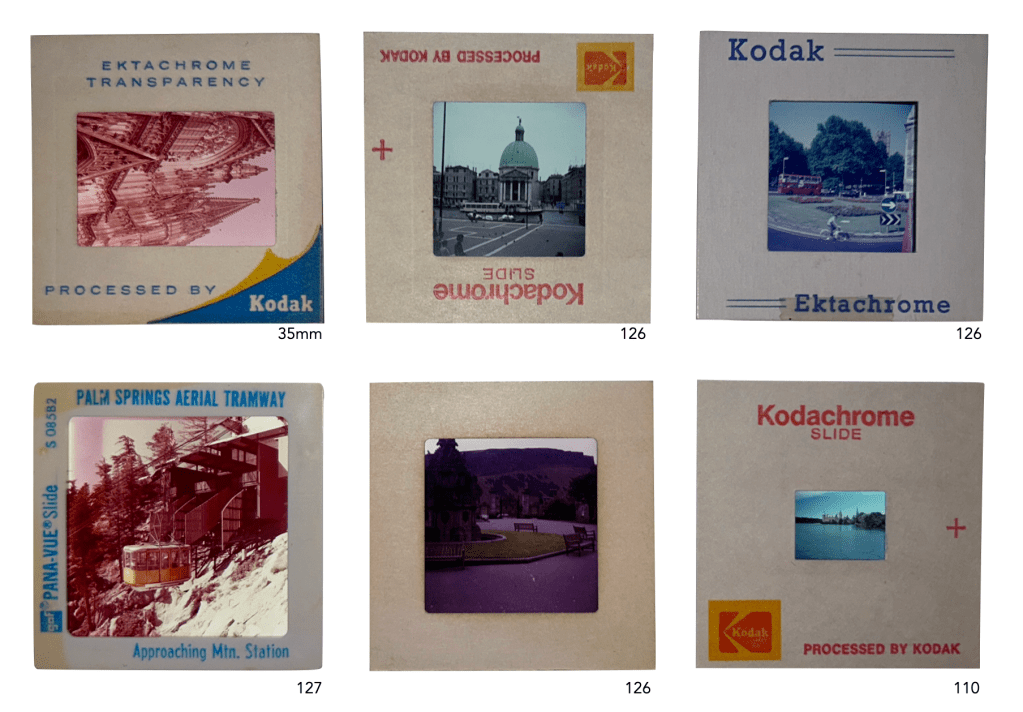
Examples of colour slides

It 1826 Nicéphore Niépce invented the first form of negative photography, but it would take nearly a century before its use in flexible celluloid film became a reality. The earliest commercially successful reversal process came into being in 1907 with the Lumière Autochrome. It was an additive screen-plate method using a panchromatic emulsion on a thin glass plate coated with a layer of dyed potato starch grains. It was Leopold Godowsky Jr., and Leopold Mannes working with Kodak Research Laboratories who in April 1935 produced the first commercially successful reversal film – Kodachrome (first as a 16mm movie film, and in May 1936 as 8mm, 135 and 828 film formats). Based on the subtractive method, the Kodachrome films contained no colour dye couplers, these were added during processing. In 1936 Agfa introduced Agfa Neu, which had the dye couplers integrated into the emulsion, making processing somewhat easier than Kodachrome.

For sparkling pictures big as life. . . . Kodak 35 mm color slides.

Kodak’s commercial slogan during the 1950s

There are different types of reversal film, based on the type of processing. The first, which includes films like Kodachrome, uses the K-14 process. Kodachrome is essentially a B&W stock film, with the colour added during the 14-step development process. That means it has no integrated colour couplers. Kodachrome was an incredible film from the perspective of the richness and vibrancy of the colours it produced – from muted greens and blues to bold reds and yellows. However developing Kodachrome was both complex and expensive, which would eventually see the rise of films like Ektachrome, which used the E-6 development process (a 6-step process). Films like Ektachome have different emulsion layers, each of which is sensitive to a different colour of light. There are also chemicals called dye couplers present in the film. After slide film is developed, the image that results from the interaction of the emulsion with the developer is positive.
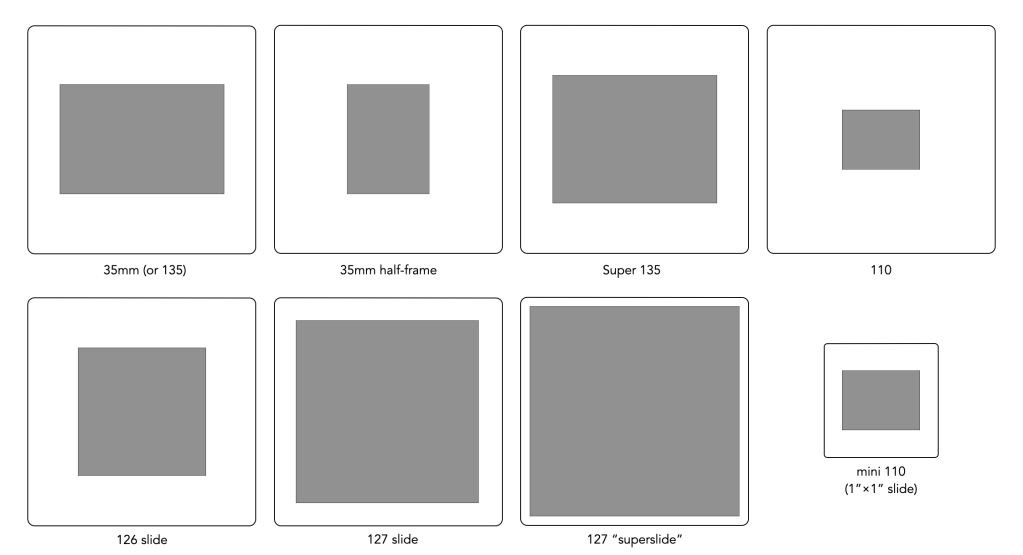
Common slide mount sizes

Many companies made reversal films, typically acknowledged through the use of the “chrome” synonym – e.g. Agfachrome (Agfa), Fujichrome (Fuji), Ektachrome (Kodak), Scotchchrome (3M, after buying Italian filmmaker Ferrania), Ilfochrome (Ilford), Peruchrome (Perutz), and Anscochrome (the US arm of Agfa). The initial Kodachrome had a very slow speed (10 ASA), this was replaced in 1961 by Kodachrome II (1961) which produced sharper images, and had a faster speed (25 ASA). In 1962 Kodak introduced Kodachrome X (ASA 64). Kodak’s other transparency film was Ektachrome, which was much faster than Kodachrome. In 1959 High Speed Ektachrome was introduced, providing a ASA 160 colour film (by 1968 this had been pushed to ASA 400).

FormatYear it appearedTransparency size (w×h)Notes
35mm /135193536mm × 24mmvery common
Super 13536mm × 28mm
110197217mm × 13mmalso on 1”×1” slides (mini 110)
Half-frame1950s24mm × 18mm
126196328mm × 28mm
1271912-199540mm × 40mm
Super 1271912-1995rare
Table 1: Characteristics of slide sizes

What about the “slide” side of things? A patent for a “Transparency Mount” was submitted by Henry C. Staehle of Eastman Kodak in October 1938, and received it in December 1939. Its was described as “a pair of overlapping flaps formed from a single strip of sheet material such, for example, as paper.”. Early slide mounts were mostly made of cardboard, but as plastic became more common, various designs appeared. Most cardboard mounts were either hinged on one side or two separate pieces, glued together after the emulsion was sandwiched between the two sides of the frame. There were also systems for the DIYer, where the emulsion could simply be inserted to the slide frame. Plastic frames were either welded together or designed in an adjustable format, i.e. the film frame could be inserted and removed. The exterior dimension of most common slide formats is 2 inches by 2 inches. There were many different sizes of slides, all on a standard 2″×2″ mount, to encompass the myriad of differing films formats during the period. Slides are usually colour – interestingly, black-and-white reversal film does exist but is relatively uncommon.
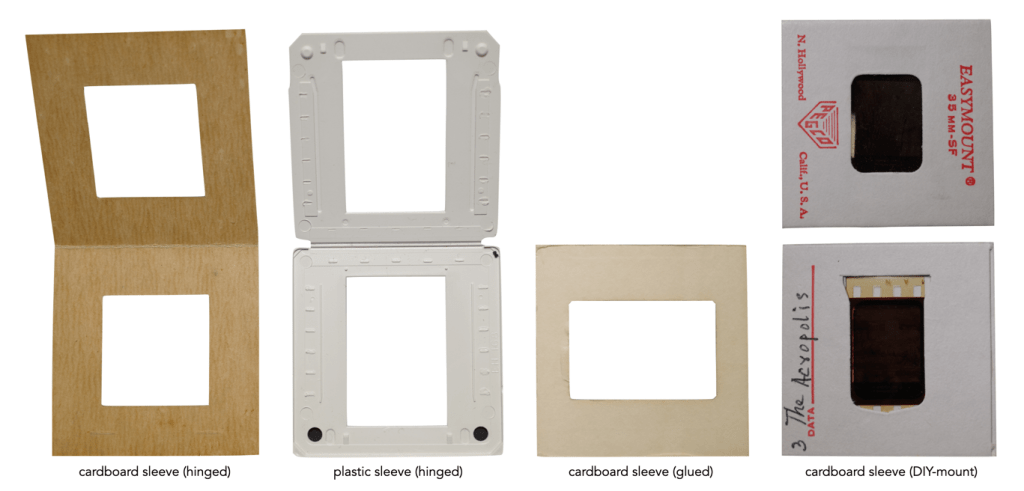
Some different types of slide frames

Slides were popular from the 1960’s probably up until the early 1990’s. It was an easy way to get a high-quality projected image in a pre-digital era. Slides were a popular medium for tourists to take pictures with, and then beguile visitors with a carousel of slides depicting tales of their travels. Slide film is still available today, all of which uses the E-6 process. E-6 slide film is a lot less forgiving as it has a lower ISO value but produces vivid colour with evidence of finer grain. Modern slide films include Kodak Ektachrome 100, Fujifilm Velvia 50, and Fujifilm Fujichrome Provia 100.

Further reading:

Lenses make a camera

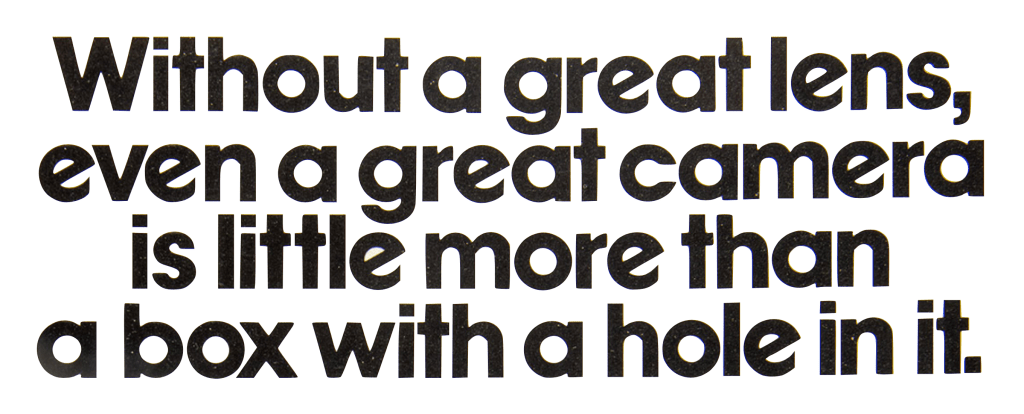
In the 1980s, Fuji ran magazine ads with the headline shown below. It was to proclaim how good their lenses were, in a time when competition among camera manufacturers was high. Does this statement still hold true in the digital age?

Vintage lens makers – Kern (Switzerland)

The Kern company was established by Jakob Kern (1790-1867) in the Swiss Canton of Aargau in 1819. Over the years it was involved in the design and manufacturing of drawing tools, surveying instruments, binoculars, army optics, and camera optics.

The start of the First World War was problematic for Kern because it put a strain on the procurement of lenses and prisms for use in surveying instruments. The parts were sourced entirely from abroad, and so Kern decided to establish their own optics production. At the same time the company was looking for products to expand beyond surveying equipment, which ultimately lead to the choice to develop cameras, binoculars, and associated optics. After the war there was growing competition from new surveying instruments producer Wild Heerbrugg (Heerbrugg, SG).

The foray into lenses was spear-headed by Walther Zschokke (1870-1951). Born in Gontenschwil, Aargau, he started as an optician’s apprentice at the Steinheil company in Munich in 1888. In 1895 together with Max Loehr he founded Steinheil’s branch workshop in Paris, and in 1901 he moved to the Goerz company, Berlin-Friedenau where he developed lenses such as the wide-angle Hypergon and the Goerz Dagor. From 1914 to 1918, Zschokke ran the “Sendlinger optical glassworks” founded by Rudolf Steilheil, and then 1919 returned to work for Kern, developing their first lenses. He left the company in 1925.

Early Kern products

In 1923 the company also began manufacturing “plate” cameras, with the first model being the “Bijou”. They followed this with roll-film cameras, a 35mm stereo camera. The company was also involved in making 3rd-party lenses, e.g. to equip the wooden cameras from the Swiss company Frey & Co.

The first cinematic and projection lenses appeared in the late 1920s, particularly for the Bolex film cameras (designed by Jacques Bogopolsky of ALPA fame). After the takeover of Bol S.A. in 1930 by Paillard S.A., there was close cooperation between the two companies. In 1937 Paillard developed the 8mm Bolex which would have a substantial impact on lens development. Kern would supply the Paillard-Bolex cameras with lenses with brand names such as Switar (high aperture), Pizar (cheaper lenses), and Vario-Switar. In 1946 Kern and Paillard jointly founded the company Yvar in Geneva to produce the Yvar cinema lenses. A lot of cinema lenses were produced over the years including the Switar 5.5mm f/1.8 (a 8/4 design by Hans Schlumpf), and the 13mm f/0.9 (a 10/5 design also by Schlumpf).

Kern also built a whole series of varifocal lenses. The first was made for the Bolex 16mm in 1955 by Dr. Raimond Stettler – it was the Vario-Switar 21-75mm f/2.8. There were no computers at the time, so he calculated the complicated optics by hand using logarithmic tables. This lens was not produced, however provided research for the first mass-produced Vario lens – the Vario-Switar 18-86mm f/2.5. This lens was the first computer calculated lens, designed by Dr. Stettler and Walter Zuercher, and released in 1960. By 1964 one million lenses had been produced in the Aarau and Yvar S.A. factories. Paillard S.A. was responsible for this success as most Bolex film cameras were equipped with Switar lenses for 8mm, Super-8mm and 16mm formats.

An ALPA brochure for the Switar 50mm f/1.8

Kern only really made one focal length of 35mm lens, and typically only for one company – ALPA. At the end of the 1940s, Pignons S.A. approached Kern regarding lenses for its ALPA series cameras. Of course during this period there was a lot of competition from both German and French optical companies. Hans Schlumpf, who had achieved remarkable things with his cinema-Switars, created the Photo-Switar in 1950, followed in 1960 by the Macro-Switar, both 7-element lens, and in 1968 the improved 8-element Macro-Switar. These lenses were only made for ALPA, with production continuing until 1970, however the supply was so good that some ALPA cameras produced in the 1980s still came equipped with the lens.

  • 50mm f/1.8 Photo-Switar Apochromat
  • 50mm f/1.8 Kern Macro-Switar Apochromat (7-element)
  • 50mm f/1.9 Kern Macro-Switar Apochromat (8-element)

On Monday 21 July 1969, Neil Armstrong became the first human to set foot on the moon during the Apollo 11 mission. This was the first time Kern had supplied lenses to NASA. It was lenses made by Kern that captured the descent of the Eagle module which took Neil Armstrong and Buzz Aldrin to the surface of the moon. There were four data acquisition cameras (Maurer 16mm data acquisition camera) used to collect data. Mounted both on the command module and on the lunar module, the 16mm cameras recorded the events for later evaluation. The lenses for these cameras were supplied by Kern: 180mm f/4.5 (2 pieces), 75mm f/2.2 (21 pieces), 18mm f/0.9 (21 pieces), 10mm f/1.6 (33 pieces).

In 1988 it became part of the Wild Leitz Group and the Aarau factory closed in 1991.

Notable lenses: Switar 50mm f/1.8

Further reading:

A photograph is made to be looked at

That’s pretty obvious right? But the eye sees things a little differently. The process of looking at a photograph is by no means trivial.

The thing is that the human eye does not stand still. Try focusing your eye on an object for a minute or two. After just a few seconds your eyes will begin to tire, and you long to move them onto something new. By the time you reach a minute, if you have even made it that long, you will struggle to continue staring at the object – your eyes are well past being bored. How many times during the day do you suppose you look at anything for more than a few seconds? (the TV doesn’t count because the picture changes) The answer is likely not many. The same can be said of people that look at the photographs we take. After an initial view, their eyes become restless, longing to move on.

In reality, most people will spend less than a minute looking at a photograph, especially if they have seen the subject/object of the picture before. The only person who really spends a great deal of time looking at a photograph is the person who took it. So with such a short viewing time-span it is important for an image to contain an interesting subject, and provide enough distraction to spend longer considering its message. To do this you have to somehow control movement of the viewers eyes through the picture.

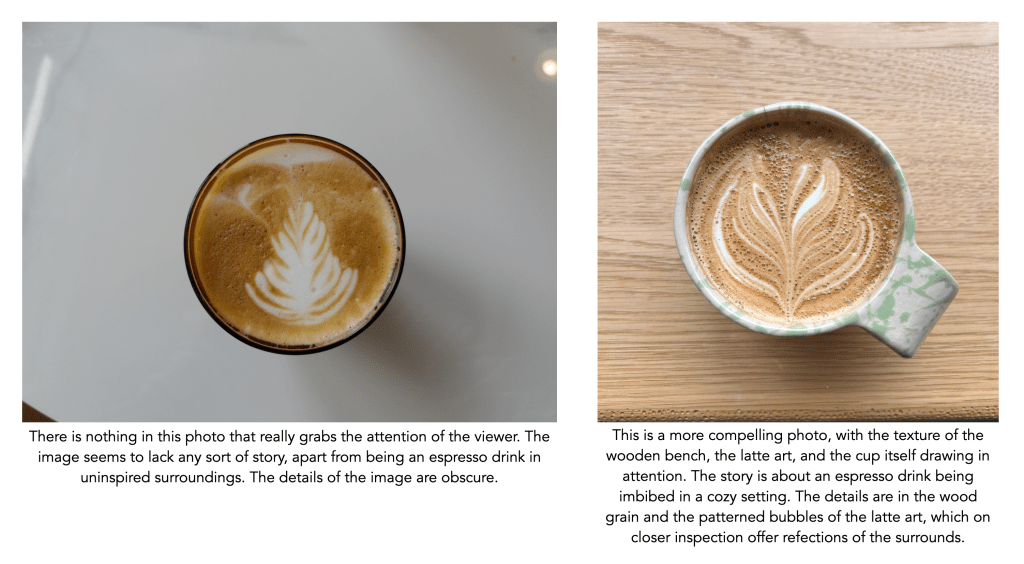
The simplest “scene” can be construed in different ways with respect to eye control.

The first step involves grabbing a viewers attention. Therefore there should be something in the image that is outstanding or unusual. In the second phase, the viewer should be made to understand the story of the image. This is all about the flow of the image, with the viewer being lead through the composition. The third step involves maintaining the viewers gaze by getting them interested in the details of the image. Examples are shown in the figure above.

Travel photography − Shoot now, discard later?

The 1950s heralded the golden age of travel photography. There was an abundance of camera options due initially to the emergence of East Germany as a powerhouse of inexpensive 35mm cameras, followed shortly afterwards by Japan, but also non-SLR cameras – and the travel revolution had begun. That’s not to say film was necessarily cheap – in 1955 you could buy three rolls of 20 exp. 35mm Kodachrome for about US$5.50 (usually this cheaper price was without processing). To put this into context, a loaf of bread was about US$0.12. Yet when people travelled, for example to Europe, the average length of a trip was about 50 days, at a cost of $1300 (1950), so in all likelihood for those who could afford it, film was a minor expense.

Anyone who knows someone who was an amateur photographer during the heyday of 35mm knows that they often took a lot of photos when travelling. Photos of people, photos of places, and things they saw along the way. Some turned out, others not so much. Why? Because you may never be able to retake a given situation, and because the situation of the travel photographer usually finds themselves in – a very limited time to shoot. You may never come back to the same place (and regardless it will have changed). However travel photography was still limited for the amateur photographer due to inexperience – this often resulted in photos that were out-of-focus, or had parts cut off (maybe sometimes made worse by camera manufacturers who made automatic cameras seem flawless). You never knew exactly what you were going to get until the film had been processed.

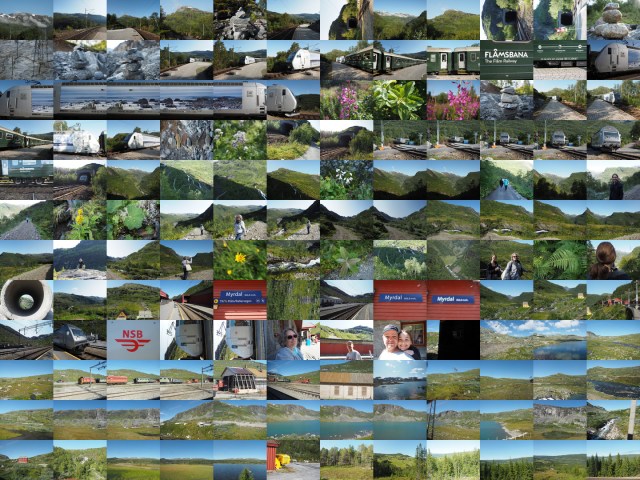
A collage of pictures from a trip to Norway
On a trip to Norway I took some 2000 pictures with iPhone and Olympus camera combined (and sometimes I still can’t find that elusive photo I never took).

With digital photography we have another dilemma – you can take hundreds (or even thousands) of photographs, because it is possible. There is no material limit beyond the capacity of a memory card, and that can easily be augmented with other cards. With the proliferation of intelligent cameras, the amateur photographer can focus more on content, and perhaps a little less on the technicalities of taking a photo. Travel photography has become a “shoot now, discard later” venture. But is quantity bad? This may be less about producing a safety net of good photographs, and more about shooting all you want to.

Well known Japanese street photographer Daido Moriyama is the type of photographer that has always believed that quality only comes with quantity. He is known to take 36 exposures in less than 100m of street photography.

“As I’ve said countless times before, my photography is all about quantity. I take lots of shots. Digital cameras are just so amazingly convenient. There’s no film to keep changing, and you just point the camera where you like… Of course, the batteries are a bit of a bother, but relatively speaking…”

Moriyama, How I Take Photographs (2019, p.78)

In the glory days of film, professional photographers would take roll after roll of film, from which only five or ten shots may be used to complete a story. This wasn’t really possible for the amateur film photographer, due to inexperience, cost, and equipment limitations. With digital many of these limitations have disappeared. For some people it is sometimes hard to take a large number of photographs. Sometimes it just doesn’t feel right, but things change over time when you realize that the photo you are looking for was one you never shot. Shooting copious frames in digital costs nothing from a storage perspective. Sometimes it is just finding the balance between quantity and art.

Vintage cameras – The porro prism

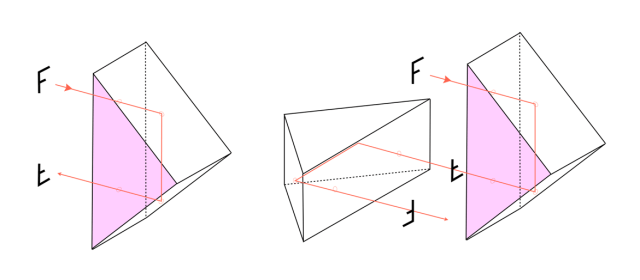
While the pentaprism is well known, the mainstay of 35mm SLR cameras, the use of the porro prism is less so. The porro prism was invented in 1854, by Italian inventor Ignazio Porro (1801-1875). Its simplest form had one lens, where the image is inverted in the plane in which reflection takes place, but, as there are two reflections, there is no reversion. However porro prisms are never used singly, they are more commonly used in pairs – a double Porro prism, with the second prism being rotated 90° with respect to the first. The effect of this double-prism is an image which is rotated 180°.

Fig.1: Single and double Porro prisms

The double Porro prism is commonly used in binoculars, which manifests itself in the distinctive offset zig-zag shape of the binoculars. It has also been used in the construction of terrestrial telescopes since the second half of the 19th century. The greatest difference between a Porro prism and a regular pentaprism is that it bends light 90° in one reflection, whereas a pentaprism uses two reflections to bend light through the same angle.

Fig.2: The effect of a Porro-prism in a camera

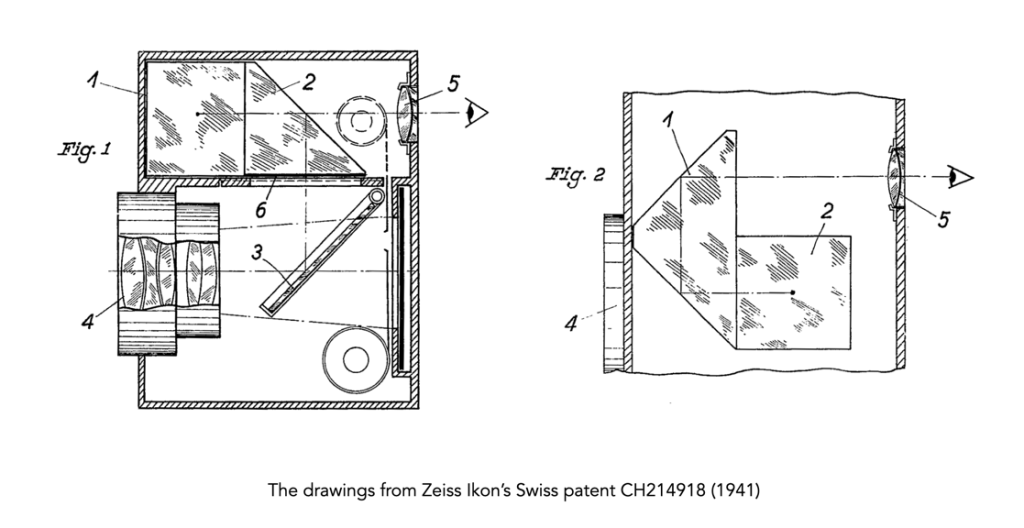
In the 1930’s Zeiss Ikon had been working on a 35mm SLR camera with a straight-view viewfinder, and a true laterally correct image, roughly at the same time as work on the Syntax camera. On September 8, 1938, a German patent application was made, the existence of which can only be concluded with the help of a note in a Swiss patent, No. CH214,918 submitted on August 1939. It described a prism finder system, and from the drawings it is evident that one of the two prisms in the system was formed from a rectangular half-cube – the porro prism.

Fig.3: The early Zeiss porro-prism system

There are however some issues with the use of the prism in an SLR. It is somewhat undesirable if there is a long path for the light to travel between the focusing screen and the eyepiece. Naturally a telescope has a long focal length, and a narrow image angle-of-view (AOV), the exact opposite of an SLR viewfinder. What is wanted in an SLR viewfinder is an image with the highest possible magnification – the long light paths of the Porro system only allows a small magnification on the screen image. The viewfinder might then produce small, somewhat dark images. Porro prisms have therefore never really become established in camera construction.

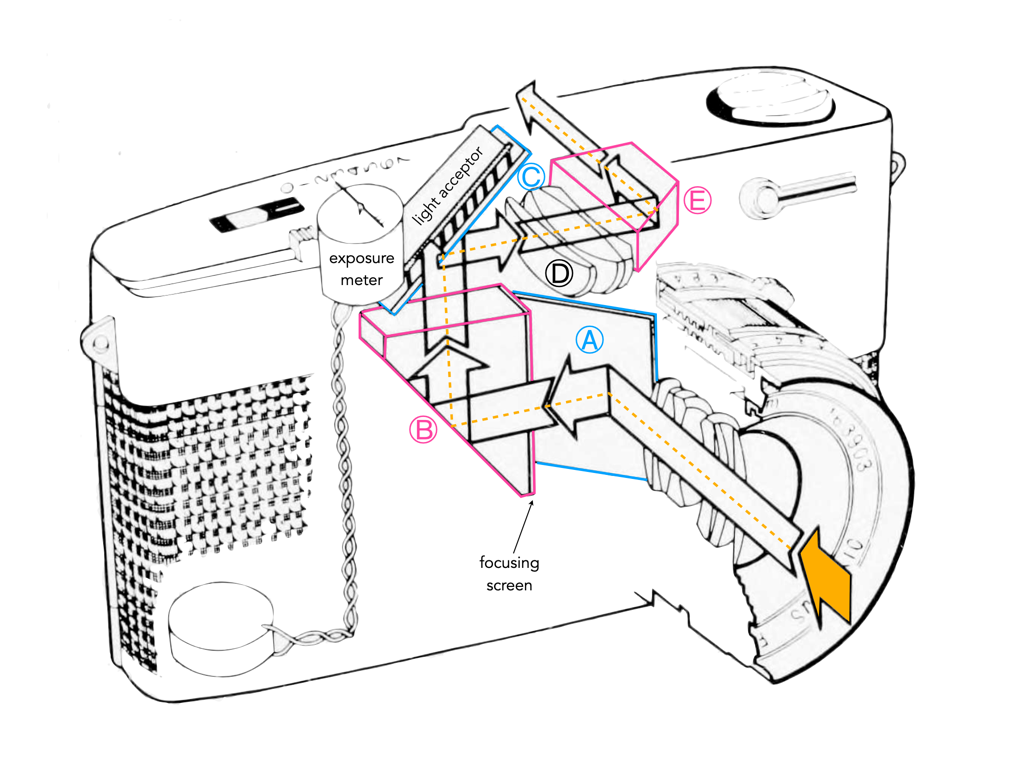
The first production camera to use the Porro prism may have been the Duflex (DUlovits reFLEX), primarily because at the time the use of a pentaprism was deemed too expensive (the camera came to market in 1949). The most well known camera however is the Olympus PEN F, half-frame camera (and the Olympus E-300 digital camera, 2005). The path of light for the Olympus PEN is shown in Figure 4. Light enters through the lens, and is reflected to the left via the quick return mirror (A). The light is reflected upward by the prism (B), is turned to the right by the upper (semi-transparent) mirror (C), and passes through the three-piece eye lens for magnifying the image (D) (0.8×) before it is reflected backward by the eye prism (E), and reaches the photographers eyes.

Fig.4: The Olympus PEN porro-prism system

The camera had some of the same issues as cited above. A test report of the Olympus PEN FT, in Camera magazine in Oct/Nov 1967 concluded the following: “…bending the light as it does around four corners and through several lenses, does present a bit of a problem to the viewer – light is lost to the metering system and this makes for a slightly dim image at the operator’s end.”. There is a reason for this – as the light comes from the first prism and strikes the mirror, a certain amount of the light is absorbed by the “light acceptor” which is subsequently read by the meter and translated to the TTL number.

Note: The Porro prism from the Zeiss Ikon patent also exists in the US system, published as an Alien Property Custodian on May 4, 1943. It seems that a patent was applied for on November 16, 1939 under the title “View Finders”, with the author being Heinz Küppenbender.

The good, the bad, and the bokeh

The idea of “bokeh” originated in Japan, the western term derived from the the two Japanese Katakana characters bo and ke, “ボケ”, which roughly translates to “to be out of focus”, “to be blurred”, or “out-of-focus blur”. The term made its western debut in 1997 courtesy of Mike Johnston in Photo Techniques magazine. For a long time, there was little or no interest in the concept, but in recent years, and with the use of vintage lenses on digital cameras, it has come to the forefront. Maybe too much so.

All images contain blur in one form or another, typically in the form of out-of-focus (OOF) regions. The blur that separates a subject/object from its surroundings is the result of shallow depth-of-field (it can occur behind or in front of the subject/object). In many cases OOF regions contribute to the overall aesthetic appeal of an image, either by isolating an object/subject or setting a particular mood. Bokeh is often defined as the quality and aesthetic appeal of the OOF regions of an image, as rendered by the camera lens. Sometimes a particular lens will produce exceptional out-of-focus regions, while others will produce harsh OOF in the same scene.

Bokeh is an optical phenomena that occurs naturally. In this photograph it exists as soft blur in the background. No orbs needed!

One of the problems with the term is that it is somewhat imprecise, and often used inappropriately. The Japanese boke is a very subjective, aesthetic quality, so there is no real way to describe it beyond its definition. An article which appeared in the same issue of Photo Techniques, “Notes on the Terminology of Bokeh” by Oren Grad explored many of the Japanese terms used to describe bokeh. For example when a lens diaphragm with six blades is stopped down the iris may become visible in the form of surudoi kado (sharp corners), resulting in ten boke (point bokeh). But there is no indication that this is necessarily “bad bokeh”. Amongst many terms, bokeh could be sofuto (soft) or katai (hard), hanzatsu (complex) or kuzureru (breaking-up). Some of the terms relate purely to out-of-focus highlights, but bokeh is the overall effect as well.

It is true that bo-ke plays a large role in Japanese photographic culture, where it is an aesthetic quality, but bokeh is not just about the optical aesthetics – there is such a number of differing variables at play. Bokeh can even be different within a single lens, changing with a change in aperture or focus, the nature of the subjects/objects in the frame, and lighting conditions. Bokeh, like photography itself is often an enigma of chance. Now it seems like every lens review has to include a lenses ability to produce bokeh. But we are not talking about the bo-ke of Japan, we are talking westernized Bokeh… dreamy, creamy, soapy bubbles. All these pictures with orb-like features in them. Blah! Smooth, or “creamy” blur is desirable, orbs with defined edges are undesirable, or “bad” bokeh.

“Bokeh is not a natural artifact, because humans don’t perceive it outside of photography.”

I mean, I don’t begrudge people for taking these surreal pictures, but real bokeh is not all about these glowing orbs. And what exactly does “buttery” mean? Or creamy? Sorry, these are ridiculous terms. You can’t describe out-of-focus regions as buttery, or creamy. Shortbread biscuits are buttery, but describing bokeh as buttery is weird. Is it meant to signify smoothness? Because butter is only smooth when left at room temperature (and even that is tenuous). The same with using “creamy” as a descriptive word. Mash potatoes can be creamy, as can ice-cream, but not bokeh. Creamy and buttery are not words that describe smooth, they describe mouthfeel and taste.

Most people who use the term bokeh, really don’t know what the term means, and spend too much time trying to create it, rather than letting it occur naturally, usually at the expense of the subject within the image.

Vintage lens makers – Enna Werk (Germany)

Enna Werk was a small German optical company founded in 1920 by Alfred Neumann and located in Munich. There seem to be two stories regarding its name: (i) Enna is the founder’s daughter’s name reversed, or (ii) Enna is derived from the reversed initials “N.A.”, of its founder (pronounced Enna). During WWII, the company supplied lenses for the German military. In 1945 the plant was destroyed by allied air raids and was relocated to Ebersberg, near Munich. After the death of Neumann, the running of the company was taken over by his son-in-law, Dr. Werner Appelt and renamed “Enna-Werk Optische Anstalt Dr. Appelt K.G.”. By 1948 the plant at Konradinstraße in Munich was rebuilt.

Fig 1: Some of the more interesting Enna lenses

Circa 1950 the company started making lenses under its own name – prior to this the company only manufactured lenses for other companies, including Alpa, Balda, Braun, Corfield, Edixa (Wirgin), and Ihagee. In 1952 it started producing lenses for interchangeable rangefinder cameras. This was followed in 1953 by the production of SLR lenses with a focal length range between 24 and 600 mm. By 1964 Enna had produced 4 million lenses. The primary lens designer was Dr. Siegfried Schäfer and some of his designs are based on drafts by Ludwig Bertele, designer of the famous Sonnar. They made lenses in various mounts including M42, M39, and Exakta.

The first interchangeable SLR lens was the 35mm wide-angle Lithagon f/4.5 (1953), followed soon afterwards by f/3.5 and f/2.8 and even f/2.5 versions (1956). A Lithagon with a 28mm focal length, the Ultra-Lithagon 28mm f/3.5 was unrivalled at the time (1955). A very fast Ennalyt 85mm f/1.5 appeared in 1954, followed a year later by a telephoto, the Tele-Ennalyt 135mm f/3.5. Enna had a number of milestones, which included the world’s fastest wide-angle lens, the 9-element Super-Lithagon 35mm f/1.9 in 1958, and the worlds first telephoto zoom lens, the Enna Tele-Zoom 85-250mm f/4 in 1961 (only two years after the release of the Zoomar, the worlds first zoom lens). The high-speed 6-lens Ennaston (later Ennalyt) 85mm f/1.5 was also one of the world-renowned lens developments in the 1950s.

Fig 2: Enna Lithagon 24mm f/4

Enna was the first lens manufacturer in West Germany to introduce a wide-angle lens of the Retrofocus type. This lens design, developed almost simultaneously by Angenieux Paris and Carl Zeiss Jena (Flektogon), enabled shorter focal lengths than 40mm in 35mm SLR cameras for the first time. This lens was the Ultra Lithagon 28mm f/3.5 (Patent#US2959100A) which appeared in 1955 (it was also the second 28mm lens ever made). It was the brainchild of Hans Lautenbacher, and was so named due to the existence of the Lithagon 35mm. His contributions also included the retrofocus lens calculations which produced the wide-angle Lithagon 35mm f/2.8 (1953, Patent#DE1062028), and Enna’s ultrawide Lithagon 24mm f/4 (1960, Patent#DE1228820).

Enna is most typically associated with the Lithagon family of lenses, mostly in the wide-angle spectrum. The name had to be abandoned around 1960 for legal reasons. From then on the lenses were called “Ennagon” or “Ennalyt”. Prior to 1956 Enna lenses read “Enna-Werk München” on the lens ring, and from 1957 onwards they read “ENNA München.” In 1958 Enna introduced the Sockel lens system “Springblendensockel”, a precursor to Tamron’s Adapt-all system. This allowed various lens units to be mounted to different cameras using appropriate adapters. The adapters incorporated both the aperture and focusing controls. There were two (incompatible) versions of the system: the first was semi-automatic, offering twelve lenses from 24-240mm for Exakta and M42 mounts; the second was automatic with ten lenses, and additional adapters for Alpa and Miranda.

The company still exists, but now focuses on precision plastic injection molding. This diversification had begun in the early 1970s, with the realization that German lens production was loosing ground to Japan. They started with the production of plastic parts for the camera industry, and by the 1990s it had become the main focus of the company.

Notable lenses:

  • Ultra Lithagon 28mm f/3.5
  • Super-Lithagon 35mm f/1.9
  • Lithagon 24mm f/4

Further reading:

Is weather sealing on a camera or lens necessary?

Experienced photographers and camera manufacturers often talk about weather-sealing. But what is it?

Weather-sealing is a term used to convey that there is a protective layer that helps block out things that are harmful to the electronics of a camera (or the internal workings of a lens) – things like dust, water, snow, and humidity. Whether a camera has weather-sealing or not, and how much weather sealing is dependent on the particular manufacturer. Typically the more expensive a camera, the greater the chance of weather sealing. Weather sealing consists of gaskets, and perhaps a lining made from rubber or silicon. This is particularly important in regions such as the lens mount, and any moving parts.

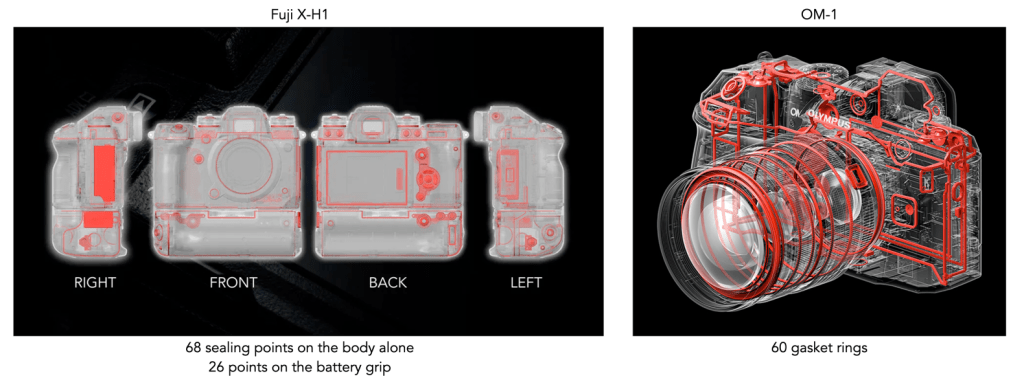
Weather sealing is challenging, partially because there are seams everywhere – between panels on the body and the battery and card compartments, the various controls like switches, push-buttons, rotating knobs and dials. Any break in continuity offers an opportunity for water to seep in. Larger components are the easiest to seal, often achieved using a gasket of some form, e.g. foam, rubber, between adjacent panels. Smaller controls also have foam or rubber gaskets, or O-rings where they interact with the camera body. Consider the Fuji X-H1 as an example (Figure 1). Fuji explained the weather sealing in “X-H1 Development Story #3”. They describe it as having a total of 68 sealing points on the body alone, and additional 26 sealing points for the battery grip. The X-H1 has rubber gaskets all over the body. The memory card door is locked firmly in place with a lock switch and the door has rubber seals to prevent moisture seeping into the compartment. Even the buttons and the joystick have rubber seals around to prevent moisture and dust from getting into the camera.

Fig.1: Weather sealing points on the Fuji X-H1 and Olympus OM-1

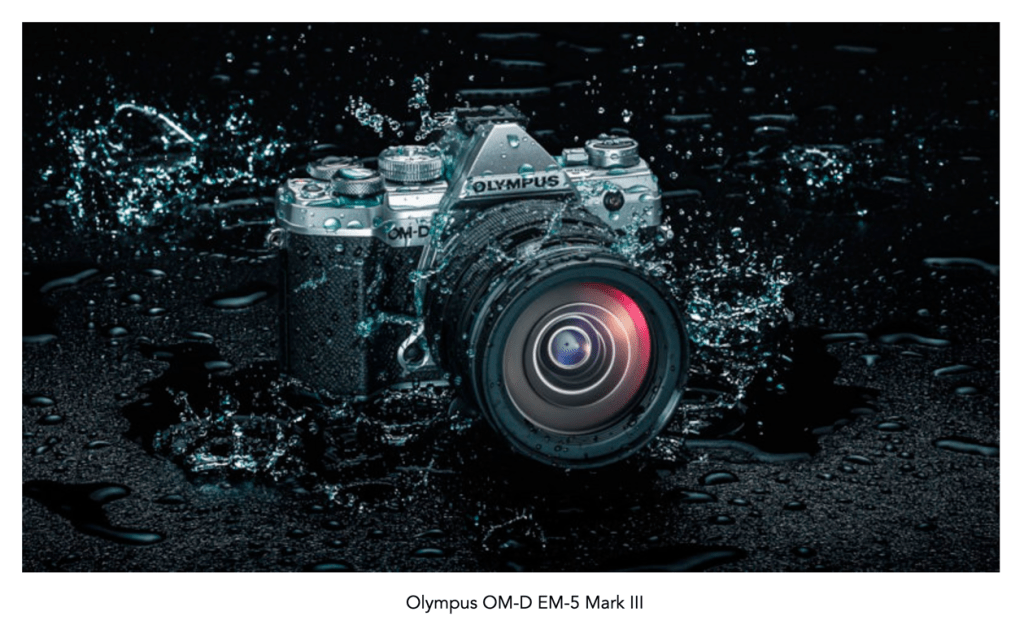
But weather-sealing is not the same as being water resistant, or waterproof. Weather sealing means a camera can withstand a few small droplets of moisture, or perhaps foggy environs, but it does not mean it one can sit out in a rainstorm. A waterproof camera on the other hand is one which can be fully submerged. Weather sealing also does not prevent condensation. This could only be prevented by filling the camera (and lens) with some inert gas, and sealing it completely. The sheer act of changing lenses allows air inside, and if moving from a warmer or cooler environment too quickly there is a risk of condensation forming. What does weather-sealing really mean? It’s honestly a bit like the terms used on outdoor gear like raincoats, i.e. somewhat vague. Ads for weather-sealing can be a bit bemusing. For example in the ad for the Olympus OM-D EM-5 Mark III, there is a camera sitting in a rainstorm with water splashing around it (Figure 2) – practical? I think not.

Fig.2: “WEATHERSEALED CONSTRUCTION: When your camera is splashproof, dustproof and freezeproof, you can stop worrying about the weather and focus on shooting.”

There is no real standardized means of rating weather sealing on cameras, however there is a system known as the IP or “Ingress Protection” rating and it is the standard that rates devices on their sealing properties. The IP rating is commonly used for smartphones, and security cameras. For example many recent iPhone’s have an IP rating of IP68. Notice the two digits, IP68? The first digit “6” indicates indicates the level of resistance and protection to harmful dust. The second digit “8” indicates the level of resistance to water. A rating of “8” means “protected from immersion in water with a depth of more than one meter.” These phones are well protected against dust and are also water-resistant but not fully waterproof.

One of the few digital cameras to get an IP rating, the OM-1 Mark II (formerly Olympus) has a rating of IP-53. This rating provides the second-highest level of dust protection that exists (partial protection against dust that may harm equipment) and certifies that the camera can continue to operate with water falling as a spray onto it at an angle of up to 60°. This means the camera can withstand most weather phenomena, and work in temperatures as low as -10°C. The OM System M.Zuiko 12-40mm f/2.8 Pro II lens (2022) has the same rating. The camera in the rainstorm, the OM-D EM-5 Mark III had an IPX1 rating, meaning it is water resistant to some extent, i.e. protected against vertically falling drops of water (which did not exactly make it splashproof, as IPX1 is the lowest level of protection against liquids). A step above IP-53 is the Leica SL3 with a rating of IP-54 which means the camera is protected from water spray from any direction.

Fig.3: An example of the most common IP constituents used for cameras

The biggest question is does a camera need weather sealing? The answer is based on whether or not a photograph engages in activities where dust and moisture become an issue. This includes travel to places that are susceptible to inclement, or “four seasons in one day” type weather. Weather sealing is somewhat of an insurance policy, but isn’t necessary for most photographers. It is also better at keeping out dust than moisture. The reality is that most camera manufacturers don’t actually designate an IP rating for their cameras – that’s not to say cameras aren’t well protected against the elements. And terms like splashproof, and weather resistance are really not that useful if they aren’t definable (e.g. in terms of IP ratings), otherwise you have to ask – how resistant?

So how does one deal with weather if you are in photographing in places with inclement weather? Firstly, store the camera gear in a waterproof bag. Avoid sand – it is not the same thing as dust. Also avoid salt water, it does not behave in the same way as fresh water – salt is everyone’s enemy. If shooting in a place like Iceland, where rain is always a possibility, use a rain and dust covers. Sleeves like the Op/Tech Rainsleeve are inexpensive and easy to carry (the Original sells for about C$15 for a pack of two). Another option is a shell from Peak Design which sells for about C$65 (medium). Something that is certainly taboo is changing a lens in rainy or windy conditions – it might be one of the worst things that can be done to a camera.

Want to see how weather sealing works? Check out this article by Dave Etchells [6] who delves into the intricacies of weather sealing technology at Olympus. He investigates both cameras and lenses, with photos of the weather sealing inside the camera (from Olympus R&D).He has also tested the Fuji X-T3 [4], the Canon EOS R [7], and Nikon Z6/Z7 [8]. There is also a great article on PetaPixel [9], that explores the various ways OM (formerly Olympus) tests its cameras (arguably one of the best testing environments around).

Further reading:

  1. Fuji, “Weather resistant technology” (2015)
  2. Jeff Carter, “Out in All Weathers”, FujiLove (2018)
  3. Chris Gampat, “Watch the Not Weather-sealed FujiFilm XS10 Survive being Frozen”, The Phoblographer (2020)
  4. Dave Etchells, “Fuji X-T3 Weather-Resistance Test Results”, Imaging Resource (2019)
  5. What nobody told you about Fujifilm weather sealing.
  6. Dave Etchells, “How to REALLY weather-seal a camera. We go deep behind the scenes at Olympus R&D headquarters”, Imaging Resource (2020)
  7. Dave Etchells, “Canon EOS R Weather-Resistance Test Results”, Imaging Resource (2019)
  8. Dave Etchells, “Nikon Z6 / Nikon Z7 Weather-Resistance Test Results”, Imaging Resource (2019)
  9. Jaron Schneider, “How OM Digital Torture Tests its Weatherproof Cameras”, PetaPixel (2022)
  10. Chris Gampat, “No, Your Camera is not Waterproof. It’s Protected, Maybe.”, The Phoblographer (2022)
  11. Mac, “Peak Design Shell Camera Cover Review”, Halfway Anywhere (2023)

Choosing a vintage SLR camera – buying FAQ

This FAQ deals more with the purchasing side of things of SLR cameras.

What is the average price of a vintage SLR?

There is no such thing. See below.

What sort of things impact price?

The cost of a vintage SLR is directly associated with a number of differing things. Firstly things like brand and rarity. Rare cameras cost a lot, sometimes it doesn’t even matter that their condition is somewhat mediocre. Next there is the brand, specific type, year of manufacture, condition, i.e. what works, and what doesn’t, and of course the spec of the lens attached to the camera. Some cameras will sell just as bodies, and others will be coupled together with a lens of some sort – it might be the stock lens the camera camera with, or perhaps something similar.

Why are some cameras so expensive?

Some cameras are expensive, either because the camera is rare, or has some attribute that makes it more expensive, or a review by someone with a lot of followers has pushed prices up. It also depends on the condition of a camera, those in pristine condition will have a greater value associated with them.

Are prices sometimes overinflated?

Basically yes. Sometimes this is due to someone’s belief that a camera (or lens) is worth far more than it actually is. Sometimes it is because of availability – there may have been 10,000 copies of a camera manufactured, but if only two are currently available on the market, it will invariably push up the price. Desirability also helps over-inflate prices.

Is price equitable with value?

Not always. Someone might advertise a camera for $4000, even though it’s value may only be $2500 – this may be related to availability (or possibly the camera is just overpriced).

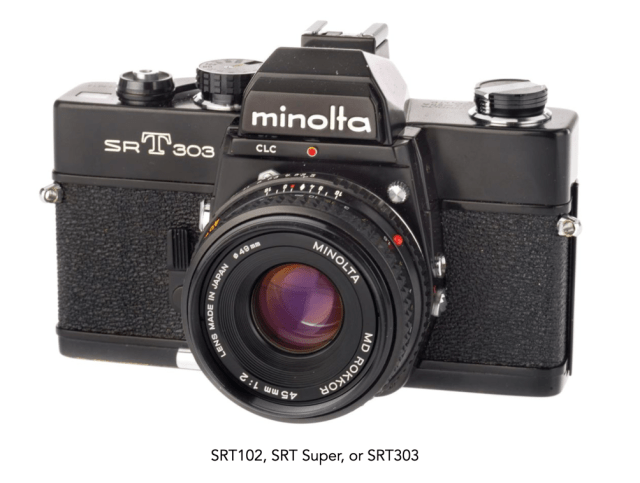
This is an extremely inexpensive manual SLR, usually around $100-250 (with lens). It has three different designations, for the markets it was sold in: SRT102 (North America), SRT330 (Europe), and SRT Super (Asia)

What is the cheapest SLR?

There are quite a few cheap SLRs on the market. For example Asahi Pentax sold over 4 million Spotmatic cameras between 1960 and 1977 – a Spotmatic SP1000 can go as cheap as C$150, whereas a Spotmatic F might go for C$350. Generally lesser-known brands are always less expensive, e.g. Konica, Miranda, Yashica.

Is the market for vintage cameras the same as that for vintage lenses?

No, largely because there is one end-user for cameras, and two for lenses. Lenses will be bought by people who (i) want to use them on a film camera, or (ii) want to use them on a digital camera. Photographers purchasing vintage cameras will only use them for film, and may only purchase one or two film cameras (useless they have GAP), whereas lens purchasers may buy many.

Should I take a risk on a cheap camera?

Sometimes there are sellers who are selling a camera without knowing what they have, usually because it was part of an estate, and not something they normally deal with. If the item is cheap enough, there is likely very little risk, but if it seems too expensive (or seems to have excessive shipping), avoid it. This is especially true if the item is marked “rare”.

How do you know a camera will be in good condition?

You don’t, unless you buy it from a reputable dealer. Someone who has been dealing in vintage photographic equipment for a long time, and sells a good amount of it will provide a good insight into a particular camera body, including providing a quality rating. Otherwise, without a full evaluation it is difficult to know exactly how well a camera will function. For example, unless shutter speeds are tested, there is no way to properly determine that they function accurately. The word “functioning” is pretty vague if there aren’t any qualifying statements. It could just mean the person has played with all the knobs and levers, and they work. Whether the shutter speeds are accurate is another thing altogether.

Are there red-flags for purchasing cameras online?

Yes – if a listing somewhere only has 1-2 images, and offers no real description, then stay well clear – unless of course it is a $500 camera selling for $20, and even then you have to wonder if there is anything wrong with it.

Is eBay any good?

Like anything, it really depends on the seller. Some sell only camera gear, and have been doing it for a while, or have a physical shop and use eBay as their storefront. Always check the resellers ratings, and review comments.

There are a lot of vintage cameras available on eBay from Japan – are they trustworthy?

In most circumstances yes. There are a lot of physical camera stores in Japan, so its no surprise that there are a lot of online stores. Japanese resellers are amongst the best around, because nearly all of them rate every aspect of a camera, cosmetic and functional. If something seems like a bargain it is likely because there are a lot of vintage cameras in Japan.

What should camera ratings include?

If we take the example of Japanese resellers, there are normally four categories: overall condition, appearance, optics, and functionality (body and lens). Appearance deals with aesthetics of the lens, and indicates any defects present on the lens body, e.g. scratches or scuffs. Optics deals with the presence of absence of optical issues: haze, fungus, balsam separation, scratches, dust. Finally functionality deals with the operation of the lens, and camera (e.g. shutter speeds).

What does “untested” mean?

If a posting is marked as untested, it basically means exactly that, you are buying the camera “as is”. There is usually some basic information on condition, but the camera functions haven’t been tested in any manner, i.e. shutter speeds, or with film. If a camera is marked as “parts-only”, it means exactly that, i.e. it does not function properly.