The simple answer is no. One could argue that all 50mm lenses should do the same job, but from the perspective of image quality, nothing could be further from the truth. There are many reasons for this: the complexity of the optical formula, and its ability to keep optical deficiencies to a minimum, the quality of the glass, whether or not the housing is metal or plastic, whether or not the lens is automatic or manual… lots of things.
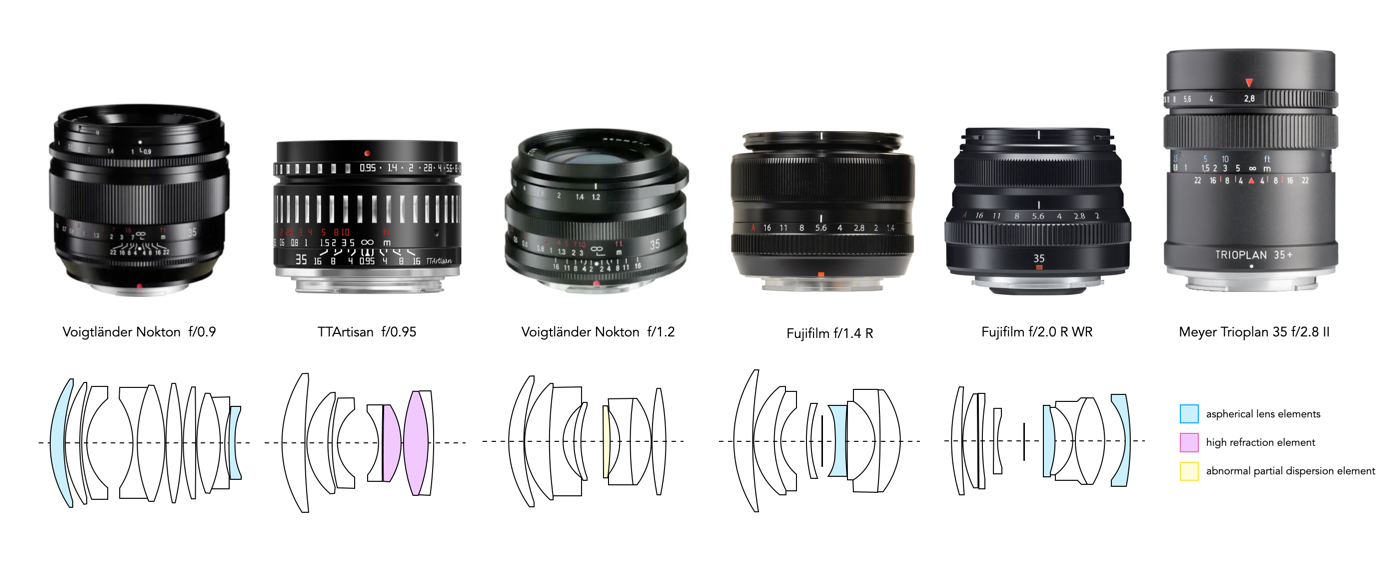
What I want to do in this post is provide some examples of how prime lenses differ (in the context of the Fuji-X system, although the same logic can be applied to any lens on any system). Let’s consider a series of lenses for the Fuji-X system with a focal length of 35mm, being the “normal” lens for APS-C size cameras, with a varied range of maximum-aperture values. The core characteristics are shown in Table 1, with the visual aspects such as lens design shown in Figure 1. Note that I have not included the sub-$100 category of cheap lenses, just because I don’t necessarily think they can be compared in the same manner (from the perspective of build-quality).
| 35mm (APS-C) | Voigtländer Nokton f/0.9 | TTArtisan f/0.95 | Voigtländer Nokton f/1.2 | Fujifilm f/1.4 R | Fujifilm f/2.0 R WR | Meyer Trioplan 35 f/2.8 II |
|---|---|---|---|---|---|---|
| aperture | f/0.9 | f/0.95 | f/1.2 | f/1.5 | f/2.0 | f/2.8 |
| aperture blades | 12 | 10 | 12 | 7 | 9 | 12 |
| weight | 492g | 250g | 196g | 187g | 170g | 270-300g |
| focusing | manual | manual | manual | automatic | automatic | manual |
| elements | 10/9 | 7/5 | 8/6 | 8/6 | 9/6 | 5 |
| housing | aluminum | metal | aluminum | aluminum | aluminum | aluminum |
| country of origin | Japan | China | Japan | Japan | Japan | Germany |
| price | C$2000 | C$300 | C$840 | C$800 | C$540 | €899 |
There are many things about these lenses that are very similar. The bodies are made of metal, they all weight roughly the same (except the Nokton f/0.9), the number of aperture blades is similar, and all bar the Fujifilm lenses use manual focus. Where they differentiate from a technical viewpoint is maximum aperture. From the perspective of design, most are based on some variant of the ubiquitous double-Gauss lens design. As shown in Figure 1, each lens is tailored to the specific “needs” of the manufacturer, augmented with specialized lens elements such as aspherical lenses.
The number one factor which differentiates lenses is usually price. Here native lenses are often more expensive than third-party ones, but not always. The most expensive lens comes from Voigtländer, the Nokton f/0.9, which is not surprising considering it has the largest maximum aperture, and is the most complex design, but also because Voigtländer is known for high precision optics. Voigtländer lenses are made by Cosina who make everything from scratch in its factories in Japan. For a slower lens there is the Nokton f/1.2 which is less than half the cost, but this is largely because of the lack of aspherical elements, and a simpler design.
At the opposite end of the spectrum, is the TTArtisan f/0.95 lens which sells for C$300. Why the disparity? Likely less expensive manufacturing, or the lack of aspherical lenses. Many of these less expensive lenses seem to be based on older lens designs which have been improved in some manner. But the goal of Chinese lens manufacturers is to provide good quality optics at a reasonable price. Some of these cheaper lenses may also have some optical deficiencies, but this can be regarded as providing a “vintage” look in the way of creating images with character. For example sharpness at full aperture may not always be what one would expect. The TTArtisan 35mm f/0.95 has excellent bokeh, but does suffer from both vignetting on images with light corners, and lens flare at lower apertures.
Are these 35mm lenses created equal? Probably not, except perhaps in the context of providing the same angle-of-view. Their differences are varied, and can’t really be described in any meaningful way. We could compare them using 101 different tests, from measuring sharpness to the presence of optical artifacts such as chromatic aberration, but this is often a very qualitative endeavour. So which lens of this group is the best choice? Ultimately it comes down to budget, and personal preferences.
Note that this principle extrapolates out to most standard focal lengths.