Examining vintage cameras is a little bit trickier than lenses, largely because of the variability found in camera bodies. For example there are rangefinders, SLRs, and compacts, some with interchangeable lenses, other with fixed lenses. Below is a list of things to look for. Ultimately a vintage camera can only really be tested by running a couple of films through it. Some online resellers do this, especially if the camera has some value.
① Overall appearance
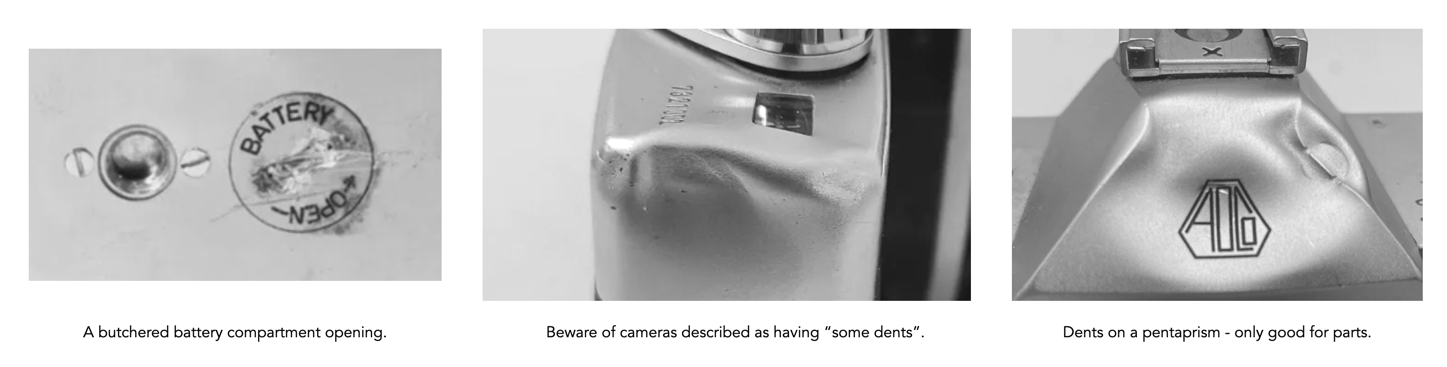
Start with what the camera looks like. Are there any indicators of DIY repairs, glue or tape residue? Then check the camera body for major dents and dings. These will stand out on vintage camera bodies as many were made of metal. Visible dents are likely are indication that the camera has been dropped, and potentially damaged things inside. The presence of small dings, dents, and scratches are probably just signs of normal use. Vintage camera bodies were often covered with a leatherette, so it is good to check if it is lifting from the camera body. This is more of a cosmetic issue, and is relatively easy to either re-glue, or replace. If the exterior of the camera is grimy, or has green corrosion, there may be further issues inside, indicative of improper storage.
If you are physically examining the camera, as opposed to buying it online, then I would also give the camera a good smell. If it has any sort of musty smell, then it might indicate it was stored somewhere with less than optimal conditions, e.g. an attic or basement. This might be indicative of problems inside the camera that you can’t see – avoid it.
② Functionality
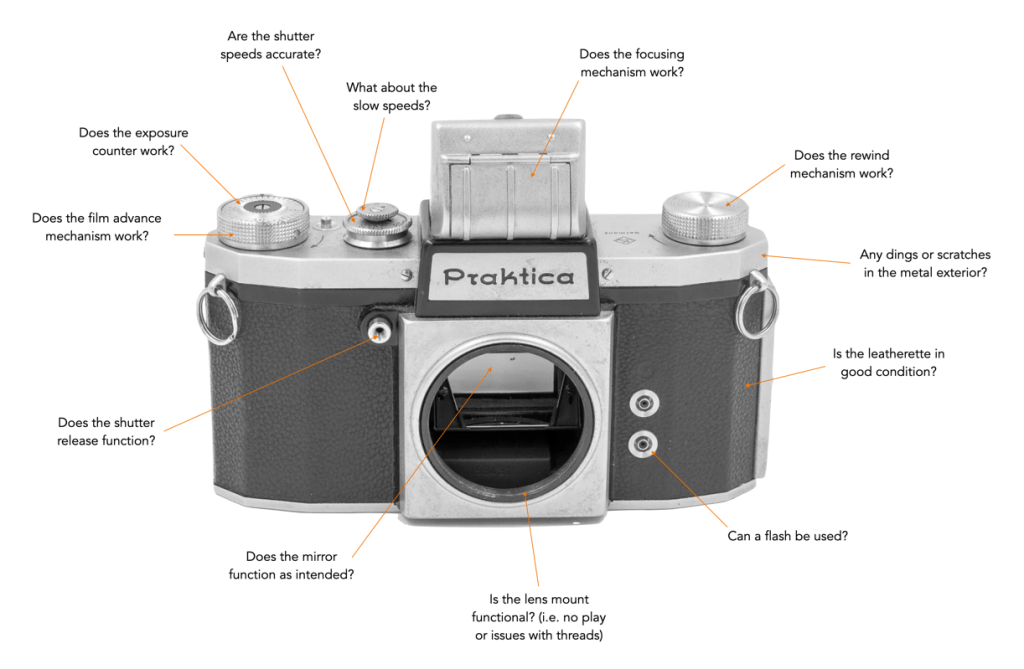
The first thing to check is that there isn’t anything missing from the camera, e.g. buttons, levers, etc, and that there isn’t anything broken, e.g. film advance lever. Check that the external controls (shutter speed selector, aperture selector, ISO selector, etc.) all work properly. Does the film advance lever or knob work? Is it smooth? It should be possible to engage the film advance lever, and then fire off the shutter – there shouldn’t be any weird noises, or lagging when the lever is engaged. Also make sure the film counter is advancing with every frame advance. It is often suggested not to touch the self-timer on old mechanical cameras, as they can be problematic.
③ Camera optics
This refers to the viewfinder and focusing screen. The viewfinder should be clear, not cloudy, and not infected by fungus. A small bit of dust isn’t going to be a bother, because it won’t show up on any photographs, but scratches and cloudiness may interfere with focusing. Also do a visual check of the mirror. Some mirrors can have scratches, corrosion, fungus, or even de-silver over time. Mirrors can also get stuck when the shutter is released, and not return to the proper position. In cameras with batteries, mirror lock-up can occur because of no battery (or it has a low charge), where the mirror remains in the locked position once the shutter is fired.
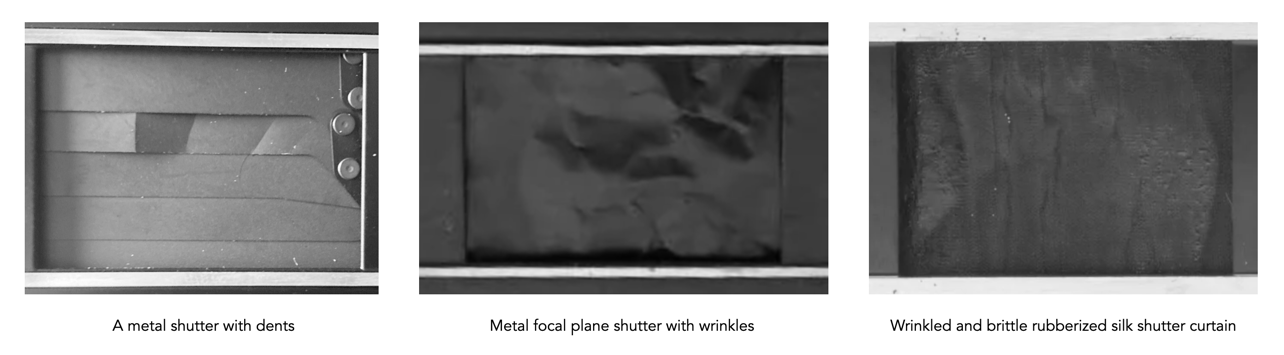
④ Shutter
Check the physical condition of the shutter, e.g. tears, creases, pinholes, or mould/degradation (cloth), or dents (metal). Does the shutter work? Press the shutter button – can you hear the shutter open and close? Look through the lens (on a fixed lens), through the front camera opening, or via the open back of the camera to watch the shutter open and close. Sometimes a camera might have fairly accurate high speeds, but not actually fire on speeds slower than 1/125s. The shutter speed is one of the most critical components of a vintage camera body, and honestly the hardest to test without proper equipment. The best way in-situ might be to test the camera side-by-side with a camera known to be accurate. There are distinct differences in sound from a fast (1/1000) to slow (1/30) speed. Very few places have the equipment to accurately test a cameras shutter speeds.
⑤ Light seals
Older cameras have light seals that fail – the foam strips across the back of the camera with the film door is opened. They often aren’t apparent until a film is run through the camera. They are honestly one of the easier things to repair, so it is not a big issue.
⑥ Light meters
If the camera has a light meter, make sure it is working. There are a wide variety of exposure meters fitted to vintage cameras, from simple uncoupled ones that just measure the amount of light to complex systems which set the exposure on the camera automatically. If the meter is not functioning, the camera can often still be used in manual mode using an external light meter and transferring the settings to the camera. Typically selenium cell meters are the most common inoperable meter – they don’t need a battery to operate, however the selenium does delete over time (note that cameras with meters that have not been exposed to light may still function well).
Many of the uncoupled light meters are recognizable as a light cell on the camera body, and a meter (typically on the top plate). The best way to check these is to test how the meter responds to light – point it at dark and light areas, and compare the readings. Does the meter needle move when the light level changes? If not then check the battery if there is one. Online, many resellers will describe the light meter as not being tested. As long as you are comfortable not using a light meter, it shouldn’t matter.
⑦ Batteries
This is the one thing people tend to forget about. If there is no battery, then the camera is much simpler, and there is much less to go wrong. Firstly see if there is any damage to the battery compartment, e.g. corrosion, caused by leaking batteries. Ideally the camera will contain a battery already (if it doesn’t have one it can be a red-flag, because it makes it harder to test the camera). It is also good to check the type of battery. Is it still possible to get the required battery? For example many old cameras used mercury oxide batteries, such as the PX13 and PX625, for their CdS (cadmium sulfide) metering systems. Mercuric oxide batteries provide a constant and stable 1.35 volts over most of their life. However they were outlawed in many places in the 1980s and so an alternative has to be found (which isn’t as problematic as it may sound). If there are markings on the compartment door (or it is hard to open), or there is green/white build-up in the compartment itself, this might indicate the camera suffered from battery leakage at some point.
Note: Many cameras with serious maladies are usually sold for parts only or repairs. Given that the cost of many repairs these days is prohibitive, e.g. changing a shutter curtain or fixing shutter speeds, it is best to avoid damaged cameras.