Do some sensors have too many photosites?

For years we have seen the gradual creep of increased photosites on sensors (images have pixels, sensors have photosites – pixels don’t really have a dimension, whereas photosites do). The question is, how many photosites is too many photosites (within the physical constraints of a sensor)? It doesn’t matter the type of sensor, they have all become more congested – Micro-Four-Thirds has crept up to 25MP (Panasonic DC-GH6), APS-C to 40MP (Fuji X-T5), and full-frame to 60MP (Sony A7R-V).

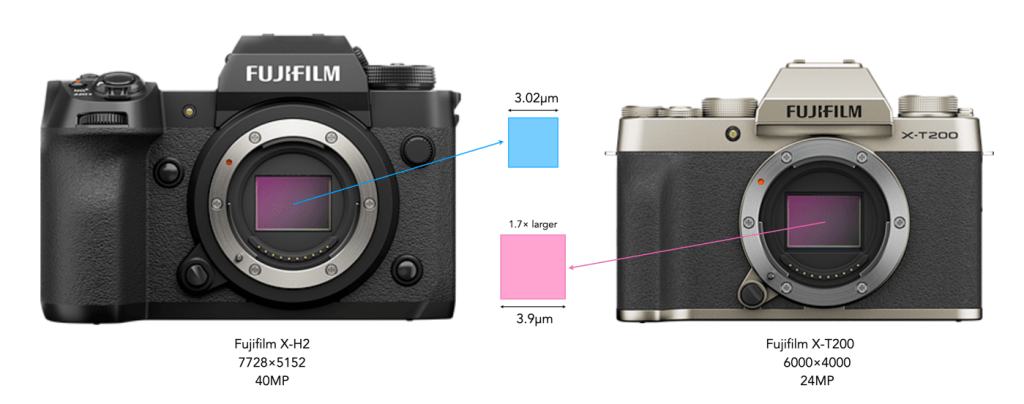
Manufacturers have been cramming more photosites into their sensors for years now, while the sensors themselves haven’t grown any larger. When the first Four Thirds (FT) sensor camera, the Olympus E1, appeared in 2005 it had 2560×1920 photosites (5MP). The latest rendition of the FT sensor, on the 2023 Panasonic Lumix DC-G9 II has 5776×4336 photosites (25MP), on the same sized sensor. So what this means of course is that ultimately photosites get smaller. For example the photosite pitch has changed from 6.89μm to 3μm, which doesn’t seem terrible, until you calculate the area of a photosite: 47.47μm2 to 9μm2, which is quite a disparity (pitch is not really the best indicator when comparing photosites, area is better, because it provides an indication of light gathering area). Yes, its five times more photosites, but each photosite is only 16% the area of the original.

Are smaller photosites a good thing? Many would argue that it doesn’t matter, but at some point there will be some diminishing returns. Part of the problem is the notion that more pixels in an image means better quality. But image quality is an amalgam of many differing things beyond sensor and photosite size including the type of sensor, the file type (JPEG vs. RAW), the photographers knowledge, and above all the quality of a lens. Regardless of how many megapixels there are in an image – if a lens is of poor optical quality, it will nearly always manifest in a lower-quality image.

The difference in size between a 24MP and 40MP APS-C sensor. The 40MP photosite (9.12μm2) is 60% the size of the 24MP photosite (15.21μm2).

However when something is reduced in size, there are always potential side-effects. Small photosites might be more susceptible to things like noise because despite algorithmic means of noise suppression, it is impossible to eliminate it completely. Larger pixels also collect more light, and as a result are better at averaging out errant information. If you have two different sized sensors with the same amount of photosites, then the larger sensor will arguably deliver better image quality. The question is whether or not photosites are just getting too small on some of these sensors? When will MFT or APS-C reach the point where adding more photosites is counterproductive?

Some manufacturers like Fuji have circumvented this issue by introducing new larger sensor medium format cameras like the GFX 50S II (44×33mm, 51MP) which has a photosite size of 5.3µm – more resolution, but not at the expense of photosite size. Larger sensors typically have larger photosites, resulting in more light being captured and a better dynamic range. These cameras and their lenses are obviously more expensive, but they are designed for people that need high resolution images. The reality is that the average photographer doesn’t need sensors with more photosites – the images produced are just too large and unwieldy for most applications.

The reality is, that cramming more photosites into any of these sensors does not really make any sense. It is possible that the pixel increase is just a smokescreen for the fact that there is little else in the way of camera/sensor innovations. I mean there are the stacked sensors, but their development has been slow – the Foveon X3 has shown little use beyond those found in Sigma cameras (they haven’t really taken off, probably due in part to the cost). Other stacked CMOS sensors are in development, but again it is slow. So to keep people buying cameras, companies need to cram in more photosites, i.e. more megapixels. Other things haven’t changed much either, I mean aperture is aperture right? For example autofocus algorithms haven’t taken a major step forward, and the usability hasn’t done much of anything (except perhaps catering to video shooters). Let’s face it, the race for megapixels is over. Like really over. Yet every new generation of cameras seems to increase the number slightly.

Vintage digital – the Olympus E-1

The Olympus E-1 was introduced in 2003, the first interchangeable lens camera designed specifically from the ground up to be digital. It would provide the beginning for what would become the “E-System”, containing the 4/3″, or “Four Thirds” sensor. The camera contained a 5-megapixel CCD sensor from Kodak. The 4/3″ sensor had a size of 17.3mm×13.0mm. The size of the film was akin to that of 110 film, with an aspect ratio of 3:2, which breaks from the traditional 35mm 4:3 format.

The E-1 had a magnesium-alloy body, which was solid, dense, and built like a proverbial tank. The camera is also weather-sealed, and offered a feature many through was revolutionary – a “Supersonic Wave Filter”, to clean off the dust on the imaging sensor. From a digital perspective, Olympus designed a lens mount that was wide in relation to the sensor or image-circle diagonal. This enabled the design of lenses to be such that they minimized the angle of light-ray incidence into the corners of the frame. Instead of starting from scratch, Canon, Konica-Minolta, Nikon and Pentax just took their film SLR mounts and installed smaller sensors in bodies based on their film models. The lens system was also designed from scratch.

The tank in guise of a camera

The E-1, with its sensor smaller that the APS-C already available had both pros and cons. A smaller sensor meant lenses could be both physically smaller and lighter. A 50mm lens would be about the same size as other 50mm lenses, but with the crop-factor, it would actually be a 100mm lens. 4/3rd’s was an incredibly good system for telephoto’s because they were half the size and shape than their full-frame counterparts.

Although quite an innovative camera, it never really seemed to take off in a professional sense. It didn’t have continuous shooting or even the auto-focus speed needed for genres like sports photography. It also fell short on the megapixel side of things, as the Canon EOS-1Ds with its full-frame 11-magapixel sensor had already appeared in 2002. A year later in 2004, the Olympus E-300 had already bypassed the 5MP with 8MP, making the E-1 somewhat obsolete from a resolution viewpoint. The E-1’s photosite pitch was also smaller than most of its APS-C rivals sporting 6MP sensors.

Further Reading

Cameras tell “constructive” lies

A camera either tells a lie, or does not tell a lie. It may seem somewhat confusing, but it is all a matter of perspective.

The camera, being a machine, cannot really lie because the picture it is taking is what it is designed to take. Therefore every unmanipulated photograph, no matter its context is essentially true. This includes the use of things like film simulations – if the settings in a Fujifilm camera are modified to take a photograph using a simulation to mimic Kodak Porta 400 film, then the picture produced is true. On the other hand, the human eye, being subject to the interpretation of the brain often sees things differently from the camera lens with the result being that what the camera perceives as true, appears as false. In other words, it is the human eye that lies, or deceives us. Therefore to make the cameras rendition correspond closer to the humans perception, a photographer may have to force a camera to effectively tell a lie. The resulting picture then is a constructive lie, because the lie serves a constructive purpose.

Consider as an example, cars driving down a road. Since your eyes can follow the cars in transit, you can perceive them in the form of sharp images, while understanding that the cars are actually moving. A camera, using the appropriate fast shutter speed, will freeze the scene, effectively giving the erroneous impression that the cars on the road are standing still. There is no real difference between a picture of the cars in motion, or standing still. Motion can be rendered in the photograph with blur – using a slow shutter speed will cause a slight blur in the rendering of the picture. The eye does not see this blur in real life, so the photograph would not be true, but rather a constructive lie. The resulting image is much more descriptive of the scene.

The constructive lie and moving cars

Another example of a constructive lie deals with the colour temperature of a scene. The lighting in a scene may not create the most optimal scene from a visual perspective, perhaps due to the temperature of the light source, resulting in what is known as a colour cast. As a result a photographer may modify the temperature by means of a white balancing setting to the point where the eye perceives it as “normal”. For example a scene lit by a tungsten light would have an orange hue. A photograph taken of this scene would have a corresponding colour cast, which would be rejected by the brain as seeming “unnatural”, because colour memory makes us see things in the same light as a sunlit scene. This is another case where the photograph of the scene is “true”, and the corrected version is false – constructive lie.

The constructive lie and the ‘keystone effect’

The third example is the classic one where tall building appear somewhat skewed, leaning back into the scene – what is known as the keystone effect. This convergence of parallel lines is a perfectly natural example of perspective, which is perfectly acceptable in the horizontal plane, e.g. railway tracks, but seemingly deplorable in the vertical plane. Converging lines are easy to fix, either by means of the tilt-shift lens, or using software (some cameras have this built-in), with the resulting image being a constructive lie as opposed to the seeing the building as it really appears.

Photographing large objects in the landscape

Photographing large objects in the landscape can be tricky. Some are near impossible, for example bridges. An exceptional example is the Landwasser Viaduct, part of the Rhaetian Railway in Graubünden, Switzerland. The best possible shot is taken from the valley beneath, preferably with a train crossing the viaduct, but that’s not a shot possible for everybody, because most people are on the train, and therefore won’t get anywhere near the perspective of a ground shot. It’s the same with many of these famous bridges, and viaducts. Some, like the Glenfinnan Viaduct, often known as “The Harry Potter Bridge“, are easier to photograph (there are some good instructions to help find the most optimal spots). Not to say that the Landwasser Viaduct can’t be photographed, there are also good commentaries on doing that as well.

Dunnotarr Castle in Scotland. Although the castle itself is not a “large” object, it becomes large when combined with the headland. If it wasn’t perched on a rocky headland, the resulting image would be quite flat, however the combination of man-made and natural features gives the photograph a great deal of depth.

While train journeys are fun, actually photographing things from the train doesn’t always produce the images people expect. It’s the same with large objects of any sort. Sometimes the best images these days are taken using drones, because they are able to take in the whole landscape. But not everyone has a drone available, and in some places they have actually cracked down on them over the past few years. landscape scenes in Iceland are monumental when taken from a drone… these are perspectives of features like waterfalls that just can’t be achieved any other way. But at nearly every major tourist site in Iceland, you will see ‘No Drone’ signs, e.g. Gullfoss waterfall.

So if you are interested in photographing a large natural, or man-made object, what’s the best approach? There are two good methods. Firstly, shooting from a distance, to provide an overall outlook. This involves finding the best position that allows for an uninterrupted view, and makes an interesting shot. Secondly, shooting up-close, providing a near perspective of the object, photographing just a portion of the structure and bringing things like texture and intricate detailing into play. Describing an object visually should never be just a one-perspective deal. It should incorporate different granularity of details, which help describe the object as a whole. You also want to be cognizant that you don’t just create the same picture that the masses do.

The Culloden Viaduct from a distance.
A perspective view.

As a case in point, consider these photographs of Culloden Viaduct, just east of Inverness, Scotland. This is an easy viaduct to get both a distant shot, and close shots, as a road goes directly underneath the southern portion of the viaduct. There are many options here, shooting it from the distance to provide an overall viewpoint of the viaduct, or from one end to provide a perspective. The viaduct is a long linear feature, which means distance shots make it appear small in relation to the rest of the photograph. The photograph also feels “flat”, something that can be partially fixed by shooting from an elevated position (which is above the feature being photographed, and hence the value of drone-based photography). A perspective view will often allow the scale of the structure to be included, in addition to a more 3D feel.

The interplay of arches
A close-up view of the arches

Close-up shots will fail to show the viaduct in its entirety, but will instead portray more architectural details, in this case, the design of the arches. It also provides more of a three-dimensional perspective of the viaduct than long-distance shots. it is the arches that make this viaduct interesting, and a distance shot will not do them justice. A close-up view exposes the tapered structure of the piers, and the precise nature of the arches. You can even goes as far as taking shots of individual components of an object to illustrate things like texture, and interplay of materials.

P.S. Naturally, aerial shots acquire with a drone do provide much more of a perspective of an object in the context of its surroundings, but that isn’t always realistic for the average photographer.

Good photography is not about technology

It’s funny how people get so tied up with the technical side of photography. They worry about the number of megapixels, the sharpness of the lens, and other such mundane things. Sure these are importance, but if you concentrate too much on the technical aspects of cameras and lenses, you miss out on the pure joy of taking photographs – I mean that’s the whole point right? Despite what people think, photography is not really a technical art. Sure there are lots of technical aspects to the art of photography (e.g. chemistry, physics), but these are but a means to an end.

People often tend to believe that fancier cameras and more megapixels makes them a better photographer. It doesn’t. Good photos come from experience, and an ability to observe the world around you in such a manner that allows meaningful photographs to be taken. The device being used should almost be an afterthought, although simpler is often better. Good photographs do not come from Photoshop… if there was no substance in the photograph to begin with, manipulating it in any manner will not induce any more aesthetic appeal, will not add any more meaning.

Good photography is about what you have inside your mind. It is the sum of all your life experiences and your aesthetic point of view, your interpretation of the world around you. A camera is merely a light capturing tool. You can make a photograph using a very expensive Leica, or a cheap disposable. At the end of the day, it is all about the aesthetic you are trying to achieve, and the story you want to tell.

Is that a Swiss camera in Wes Anderson’s “Asteroid City”?

Wes Anderson’s movies are always somewhat surrealistic. In Asteroid City we are taken to a remote one-café desert town in Nevada, in 1955. The town’s claim to fame is that it is built next to a 3000-year-old meteor crater and adjoining space observatory. The movie follows a writer on his world famous fictional play about a grieving father who travels with his tech-obsessed family to Asteroid City to compete in a junior stargazer’s convention, only to have his world view disrupted forever.

There looks to be a distant atomic explosion, which photographer Augie Steenbeck captures on his camera.

The camera is supposedly a Müller Schmid, “Swiss Mountain Camera”. But of course it isn’t. Does the “Swiss Mountain Camera” have some loose nod to the Swiss camera brand ALPA? Does Müller Schmid signify anyone? The closest association I could find is a Joey Schmid-Muller (1950-), a Swiss/Australian surrealist artist. Sure, Anderson could have pulled the name out of thin air, but I highly doubt it.

The camera of course may seem familiar to some. It seems like a rangefinder camera that came from Zeiss Ikon – perhaps a Contax? In the 1950s these cameras were produced in West Germany by Zeiss Ikon AG in the form of the Contax IIa and IIIa. Or it could have been a pre-1945 Contax II or III. The Contax III is an obvious contender, because it looks familiar, but there are two issues. Pre-war Contax III’s did not have a flash sync, and the film rewind knob was much taller. So it isn’t a Contax III. Instead we have to look further east, to Ukraine. After WW2, much of the Contax production line was taken as war reparations from the Zeiss-Ikon factories, to the Zavod Arsenal facility in Kiev. Production then started on Contax-döppelganger Kiev brand cameras in 1947 (the early models, Kiev 2, are believed to have been made from original Zeiss Ikon stock).

Why it’s a Kiev 4!

Now the Zavod factory made a bunch of different Kiev cameras, both metered and unmetered. The bump on the top identifies this as a metered Kiev. The most likely candidate is one of the most common Kiev’s, the Kiev-4, produced between 1957-79. All that has been done to this camera to convert it to a Müller Schmid is that three marking plates have been overlaid on the exiting camera – one for “Müller Schmid”, one for “Swiss Mountain Camera” plus a small Swiss flag, and one for “LAND-LOCKED” (is this somehow a nod to the fact that Switzerland is a land-locked country?). They are metal overlays because you can see the open seams in some areas.

What about the lens? It is just marked as “COMBAT LENS”, a 5cm, f/2 lens – again there is no such brand – obviously a node to the fact that Steenbeck is a war photographer. In all likelihood the lens is a Jupiter-8 50mm f/2 lens, which was the standard lens on the Kiev-4 (a copy of the Zeiss Sonnar lens of 1929). Want to buy a Kiev 4? They aren’t that expensive, you can pick one up from between US$100-200, but I would suggest buying one from a reputable source such as Fedka.com.

Further reading

The pros and cons of third-party lenses

Once you have chosen a particular camera, (and manufacturer) it is time to think about lenses. Most people will buy a camera with some sort of kit lens attached, usually because it is cheaper. Others buy just the camera body, and outfit it accordingly, but it often a vast maw of choices. Lens choice is usually foremost about need, and ultimately focal length. What are you going to be shooting – portraits, landscapes, architecture? Then it becomes a balancing act of lens characteristics. If you choose, say a 35mm lens on an APS-C sensor, so 50mm equivalent, then it’s about things like size/weight (e.g. for travelling), weatherproofing, maximum aperture, build (metal/plastic), and of course cost.

This leads us to the question some people end up pondering – do you buy a lens from the camera manufacturer or a third-party? Firstly, let’s consider each type of lens. Lenses produced by the camera manufacturer are often considered the creme-de-la-creme. They are designed from the bottom up, as integral components of the system. Quality and compatibility are the reasons why professional photographers stick with first-party lenses. These particular lenses are made specifically for the camera brands that they carry, so they are not compatible with any other manufacturers or brands.

Third-party lenses on the other hand, are often designed by lens companies from the perspective of creating a variety of lenses that will fit cameras from multiple manufacturers with the simple change of a mount (and tweaking some other specs). For example Sigma produces a 28mm f/1.4 lens that is available in Canon (EF), Nikon (F), Sony (E), and Leica (L) mounts. As with many manufactured items there are different levels of third-party lens manufacturers, from precision, high-priced lenses to mass-produced budget-oriented lenses. Third-party lenses can also be differentiated into long-established ”old-school”, and newer lens manufacturers. Voigtländer and Zeiss are good examples of well-established 3rd party lens makers who produce higher-end “boutique” glass.

Manufacturer versus third-party lenses

So why choose a 3rd party lens? There are many reasons. I suspect most people go that route because of the general affordability of the lenses. This also makes sense if someone wants to experiment with a particular lens, but doesn’t want to pay a small fortune. Affordability is often perceived as a sign that the lenses are inferior from the viewpoint of capabilities or build, but this isn’t always the case. Sometimes the lower price is a factor of trades-offs: manual focus instead of auto-focus capabilities, polycarbonate lens body instead of metal, etc. Some third-party lenses offer functionalities such as large apertures, e.g. f/1.0, or a smaller, lighter build, or even a lens not offered by a camera manufacturer, e.g. fish-eye lenses. For example the shortest focal length produced by Fuji is 8mm f/3.5 (12mm eq.), however it is US$800. An alternative for the photographer wishing to experiment with fish-eye lenses is the Tokina SZ 8mm f/2.8 (US$300).

What about disadvantages? Well the flip-side of 3rd party lenses is the lower-cost is that the lenses are sometimes optimized for lower cost. There may be some manufacturers that sacrifice the quality of materials used in lens manufacturing, and hence lens durability for a lower price. There is also the chance that the lens will not be 100% compatible with every one of the cameras it fits on. This goes back to the materials/build sacrifices made in construction. Another “disadvantage” for some is that many third-party lenses is manual focus. This is partially because it is cheaper and easier to produce a lens without focusing mechanisms, and electronic connections to the camera. However manual focusing is not a huge issue, because of functions built-into many cameras these days which assist with manual focusing, e.g. focus-peaking.

Actually the main problem in choosing lenses from 3rd-party manufacturers is differentiating between them. Because apart from the price differential, the specs of many lenses look quite similar. Below are five third-party 12mm lenses for the Fuji-X system (Fuji does not make a 12mm, the closest is a 14mm f2.8).

Aperture rangeElements/groupWeightBarrel materialCost (US$)
Zeiss Touitf/2.8 − 2211/8260gmetal$999
Rokinsonf/2.0 − 2212/10260gmetal + plastic$399
Meikef/2.8 − 2212/10326gmetal$230
Pergearf/2.0 − 2212/9300gmetal$165
7Artisansf/2.8 − 168/10265gmetal$149
Table: The gamut of 12mm lenses for Fuji-X

So when you get to choosing a lens, you may be swayed by the extremely reasonable prices of some of the 3rd party lenses. So what to do? Well the first thing to do is to find a website that maintains an updated list of lenses for a particular system. I’ll give examples of Fuji-X, because that has become my core system. Here is a good list from Alik Griffin. Third party lens manufacturers can be separated based partially on the quality of optics (and let’s face it, cost). At the end of the day, the actual lens you choose will depend on budget and individual requirements. If you decide to buy a third-party lens, make sure you do a good amount of research into the lens. Check out independent reviews from photographers, both professional and hobbiest, that have used the lens.

The Grand Kilar?

In a 1956 copy of Popular Photography, there was an article on the German lens maker Kilfitt. In the article, reference was made to a 180mm f/1.9 lens called the Grand-Kilar… there was even a picture. But did this lens actually exist? Well according to vague literature, it appeared in 1955, a 4-element lens, designed by A. Burger. But brochures of the early 1960’s show nothing in the way of 180mm lenses. It does appear in various editions of Arthur Cox’s “Photographic optics” in the 1960s, however searching the net does not seem to yield anything in the way of tangible proof to suggest any exist today. Perhaps very few were actually manufactured. In comparison the to SLR, it seems like a massive lens for the period.

Superfast lenses – the Zoomatar 180mm f/1.3

We now look at a fast telephoto lens – the Zoomatar 180mm f/1.3. This lens may have been a natural successor to the Grand-Kilar, the lens that seemingly never was. It was produced in the period after Zoomar Inc. took over Heinz Kilfitt. It is one of the fastest lenses above 100mm.

It was one of two super-fast telephoto lenses produced by Kilfitt in the 1960s, the other being the Zoomatar 75mm f/1.3. Both were intended for use in cinematography, with the 180mm also able to cover the 36×24mm area of normal SLRs. It seems like the 180mm lens was designed with the sole purpose to allow a maximum amount of light in, and it had the proportions to justify this – it was 250mm in length, had a diameter of 166mm, and weighed an astonishing 7kg – heavier than their Reflectar 1000mm f/8.

Kilfitt Zoomatar 180mm f/1.3

It has an optical scheme with six lenses, with a large difference between the diameter of the front (140mm) and rear (31mm) elements. Interestingly, because this lens was a cinematographic lenses, there is also some data on light transmission. Supposedly the light transmission was 80%, giving a T-stop of 1.5. Unlike the 75mm lens which was only supplied in C-mount, the 180mm lens came in various film formats (16mm and 35mm cine), in addition to 35mm. This means the angle-of-view could range from 3° on 16mm film to 7° on 35mm film. In 2011, one of these lenses sold on eBay for US$10,480.

Super Zoomatar 240mm f/1.2

Considering it sold in the mid-$2000’s in the 1970s, I don’t imagine many were actually manufactured (I have seen estimates of between 50-70). Zoomar did however create an even faster lens, relative to focal length – the Super Zoomatar 240mm f/1.2 – it was a behemoth at 11kg. It was originally developed for instrumentation cameras and for use with image intensifier tubes.

Further reading: