Architectural photography usually involves photographing interesting buildings – new, creative buildings, or historic period buildings. Average buildings aren’t usually that interesting, unless you can find an interesting angle. Almost any building can be made interesting just by looking for qualities that make the building stand out.
Consider the photographs below, of one of the buildings in Canada Square in Toronto. The building is simply known as 2180 Yonge Street, and was built in 1972 for the Canadian Tire Corp. This is a building that has only been around for 52 years, but like so many buildings is due to be replaced sometime soon by some neomodernist nightmare. I don’t really know what architectural style the building exhibits, perhaps internationalism? I don’t think most people really think about the building when they walk by it – it is fairly nondescript, from afar it looks like a black block.
The building at 2180 Yonge Street – not known for much except being the home of Canadian Tire and TVO
But it does have one interesting characteristic – it is festooned with mirrored glass. This can be used to create a series of photographs that reflect the changing neighbourhood. Unlike the many flat modern mirrored buildings, the face of this one has a textured appearance created by different colours of horizontal glass, and vertical banded divisions. This creates an abstract mosaic effect of the the buildings reflected from the opposing side of the road. It almost makes the building seem like a huge screen, bringing it to life. So the interest is not in the building per se, but it’s interaction with its surrounds.
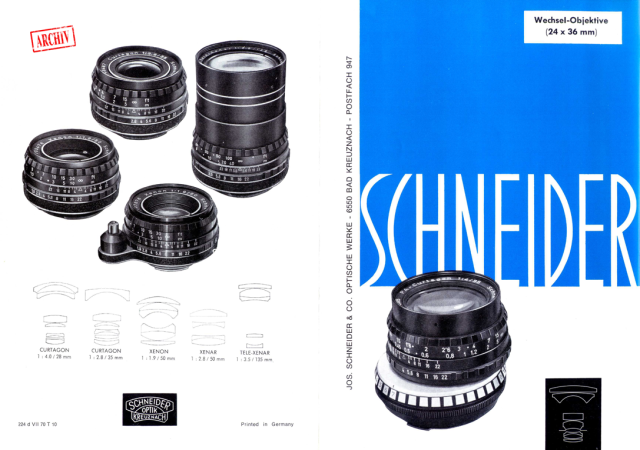
Joseph Schneider (1855-1933) founded Optische Anstalt Jos. Schneider & Co in Bad Kreuznach on January 18, 1913, and in 1922 changed its name to Jos. Schneider & Co., Optische Werke, Kreuznach. The chief designer was Albrecht Wilhelm Tronnier (1902-1982), who joined the company in 1924, and would eventually set up the sister company ISCO (throughout his life he accumulated 124 German patents). They produced a large series of lenses with early trademarks such as “Symmar”, “Componar” and “Isconar”, and “Xenar”. From 1919 they produced a Tessar clone, the “Xenar” in focal lengths from 75 to 480mm. In 1925 the famous “Xenon” was introduced, with focal lengths up to 80mm. The Xenon, is perhaps the company’s most famous lens, and is still being made today.
Schneider’s most famous lens?
In 1933 with the passing of Joseph Schneider, his son Josef August Schneider took over the company. In 1936 ISCO was formed as an offshoot of the company. Schneider was one of the lens suppliers to the first Exakta, the 4.5×6cm VP Exakta, providing the Xenar f/3.5, the Xenar f/2.9, and the Xenon f/2. The same lenses would find their way onto the first 35mm SLR, the Kine Exakta in 1936.
During WW2, Schneider had to supply the German Wehrmacht and was forced to manufacture Zeiss products. In the 1950s the company continued development of interchangeable SLR lenses, and supplied lenses to almost all German camera manufacturers. Lenses were made in mounts for Edixa-Mat, Pentax (M42), Praktica, Exakta, and Praktina. Lenses for film cameras were also produced, especially for the 8 and 16 mm narrow film cameras that were popular at the time. Also in the 1950s, the company was one of the first to use computers, the Zuse Z22 to perform lens calculations.
Schneider started developing zoom lenses from 1957, which led to the market launch of the Variogon 1:4/80-240 in 1964. At the end of 1967, Schneider introduced its first TV lens, the TV1 Variogon 2.1/18-200mm. NASA used Schneider lenses on its “Lunar Orbiter” space missions of the Apollo program from 1959 to 1976 and on the space shuttle flights since 1990. The first images of the Earth were taken using Schneider lenses with 45 and 75 mm focal lengths. The lunar orbiter probes also each had a Schneider “Xenotar” on board.
Due to changing economies, Schneider ran into economic difficulties and filed for bankruptcy in 1982. The company was subsequently re-founded by Heinrich Manderman and over the years, acquired the B+W filter factory and Rollei photo technology, among others. After German reunification, Manderman also became involved with Pentacon in Dresden and resumed production of the Exakta 66. The company still exists today, producing cinematic lenses and filters, industrial optical filters, industrial lenses (e.g. C-mount), and photo optics, most notably the B+W Filter brand.
Have you ever noticed how often camera companies release new camera bodies? There is always a lot of fanfare about the fantastic new things these cameras do – but here’s the thing, nothing much has changed with digital cameras in the past decade. In the era of film companies produced new camera bodies as well, but usually only when they heralded the addition of new technology such as the transition to 35mm SLR, or through-the-lens metering. For the most part, analog cameras are just simply a light box which has a lens attached and is loaded with film. The lens deals with the aperture, the camera controls the shutter, and film deals with the fixed ISO.
Camera manufacturers try and make people believe that they need a new camera by flaunting its bells and whistles, to which there are rarely many new ones. More megapixels? Been there, done that. What else is there? Better processing power, more AI? The reality is the things that matter – aperture, shutter-speed, ISO – don’t really change that much. As I have mentioned before there is a point where more megapixels produced diminishing returns.
What really matters in digital photography is lenses. Good quality optics will make the difference between good and mediocre pictures – and lens technology has vastly improved over the past decade. To the point where maybe lenses are a little too complex, but that’s just my personal opinion. There will likely never be a “perfect” lens, but then again neither should there be – from the sheer perspective of character. But even more important than the lens is the ability of the photographer. So if you have a good digital camera, there is no real need to buy a new one. A 24 megapixel camera will be more than adequate for the foreseeable future. Features are nice, but in all likelihood don’t really contribute a great deal to good pictures.
Smartphones have an extremely limited battery life. The newer smartphones like the iPhone have exceptional battery life, for a phone, but not for a camera. Batteries just don’t last that long with smartphones, requiring a battery pack of some sort to keep them going. It is hard to pin down exactly how many photos you can take off a charge, because a smartphone is not a dedicated camera, and therefore uses power for things apart from taking photos. For average use, smartphone batteries are more than adequate, however when used when travelling it could become an issue, largely due to the number of photographs taken. It is easy to have multiple spare batteries for a camera.
Are smartphones limited by storage?
Smartphones differ on whether they just offer on-board storage (Apple) or offer access to a removable microSD card slot (Android). Choosing a smartphone with no expandable storage means things will fill up very quickly.
Are smartphones easy to use as cameras?
Smartphones tend to lack what I like to call tactile awareness. They aren’t really that ergonomic from the point of holding them, let alone using features. There are some apps that allow better creative control, but all have to be manipulated by means of the touchscreen. And even then they have somewhat poor creative control. Although cameras often suffer from poorly designed menus, the problem with smartphones is that even the best photography software suffers from having a lot of features in a small space. This is sometimes balanced by the amount of post-processing techniques available, but editing a photograph on a small screen is severely limiting. Sure, these smartphones do have fancy AI software to reduce issues, and make “nice” looking photographs, but there is one inherent limitation with this – a loss of character. Smartphone displays, however good aren’t really ideal for photography. Sometimes its hard to see what you are shooting due to glare. Cameras have an EVF which is shielded from the sun.
Can smartphones produce the same aesthetics?
Aesthetics on a camera is really down to the quality and type of lenses. Most cameras, except for compacts, have interchangeable lenses which makes it easier to achieve a certain aesthetic. For example smartphone cameras can generally not produce bokeh naturally. Smartphone cameras are not exactly designed to have narrow depth-of-field areas, without which it is impossible to naturally create bokeh. Bokeh is typically found in portrait-style photographs where it is added algorithmically by means of computational photography and machine learning (it basically delineates a subject, and then artificially adds blur to the background).
What things do DSLR/mirrorless cameras do better?
Real cameras have larger sensors. Larger sensors mean better quality images.
Real cameras have better lenses – high quality optical glass, and faster apertures.
Real cameras offer more control – shutter speed, ISO, aperture
Real cameras shoot in RAW
Real cameras are dedicated to one job, and last longer.
Can smartphone cameras handle climate extremes?
This is a important, because smartphones use Lithium-Ion batteries which are effected by temperature extremes. For example Apple suggests keeping their devices between zero and 35°C. Cold batteries can slow down the function of a smartphone. Cameras on the other hand have a broader working range of temperatures, from 0 to 40°C, and some are designed for temperatures as low as -10°C (e.g. Fujifilm X-T4). Smartphone batteries are also not removable, versus camera batteries which can be removed and kept warm while they are not being used in the cold. Smartphones and freezing temperatures do not mix well. Professional cameras can shoot through everything.
Are smartphone zoom lenses useful?
Smartphones can have either digital or optical zoom, or both. Optical zoom provides high-quality, lossless magnification. Digital zoom however enlarges the captured image, and does not involve movement of the camera lens. Digital zoom just zooms in on the pixels, and may result in a loss of image quality. It is achieved by magnifying and interpolating pixels, which can lead to a loss of sharpness and detail. When used on smartphones, digital zoom is often used when the physical limitations of the lens prevent further optical zoom. Some, like the plain iPhone 14, only have digital zoom (5× in this case). The main pros of digital zoom are related to smartphone form-factor: convenience, compact design and cost effectiveness. But the cons somewhat outweigh the pros: loss of image quality, no true magnification, interpolation artifacts, and inferior performance in low light.
Here I’m going to explain a bit more about the caveats of smartphone cameras in the form of a FAQ. I will add that for all their compactness, smartphone cameras produce incredible images, they just have the same limitations all small devices have.
Is the image quality as good as a dedicated digital camera?
Image quality is partially reliant on the size of photosites, the building blocks of digital images. The larger the photosite, the better it is for low-light conditions. Smartphones have relatively small sensors, and therefore are constrained by the size of their photosites. They still produce images with exceptional quality, but there is a reason people choose full-frame and medium sized sensors for professional work.
Regardless of what companies say, image quality on a smartphone will never be as good as those on a camera. The iPhone 14 Pro has a 1/1.28” sensor on the wide camera with a sensor area of 75mm2, and a pixel pitch of 1.22μm in 48MP mode (2.44μm in 12MP mode). Don’t get me wrong, the technology is amazing – squeezing a camera with a 7-element, 24mm focal length equivalent lens with optical sensor shift. But those pixels are small, and there is only so far you can scale up a 12MP image. In comparison, a 26MP APS-C camera sensor has photosites that have nearly four times the area of the 14 Pro, which means more light can be captured. It also has twice the number of photosites, more photosites amounts to better resolution.
Are lens elements made of plastic?
Cameras are all about the glass, or in the case of smartphones – plastic. Most smartphone cameras are comprised of lens elements made out of injection molded optical plastic. Now plastic lenses have been around for a long while, and they have benefits and drawbacks. There are many reasons for this, most notably the fact that plastic elements can be molded into much more extreme aspheric shapes, something not possible in optical glass (aspherical lenses are used in high-end optics to create sharper images and reduce or eliminate some types of optical imperfections). Plastic also allows for thinner lenses that have more complex flange geometries.
An example of a plastic 5-element smartphone lens.Made of injection-molded optical plastic, they are extremely cheap to produce.
Are lens apertures limited?
The aperture of a lens controls how much light makes its way through to the sensor, controlling things like depth-of-field (or how much of the scene is in focus). Smartphones that work well in low-light situations, without the use of a flash, have large apertures. The wide lens on the iPhone 14 Pro has an aperture of f/1.78, which allows for good low-light performance, but taken into context, an aperture of f/1.78 has the DOF equivalent of an f/6.1 aperture on a full-frame camera. That makes it hard to produce blurry effects naturally – they are usually added artificially in post-processing. These lenses are stuck with a single fixed aperture, providing limited control of exposure. It may seem like you can change the aperture, but apps that allow the aperture to be changed to increase the amount of background blur are really just adding a certain amount of artificial background blur. Camera lenses can change the aperture, and hence the depth of field, facilitating natural blur, i.e. bokeh.
Do smartphones create natural Bokeh?
Bokeh has to do with unfocused regions in an image, and relies heavily on a shallow depth-of-field. Many smartphones use wide-angle lenses, and as a result, have quite a large depth-of-field (DOF), the distance between the nearest and farthest elements in a scene that are in acceptably sharp focus. The available depth of field increases as the sensor size and lens focal length decrease, which is why smartphone photographs tend to have very large DOFs. Landscapes, everyday shots, even close-ups have very little out-of-focus. How is bokeh created? Through the power of algorithms. The iPhone uses both cameras to create a DOF-effect in Portrait Mode. It combines the photographs taken by the wide-angle and telephoto lenses, and after applying some computational magic, produces a blurred background. There is even a Depth Control feature which allows the bokeh, to be tailored, between an aperture of f/1.4 and f/16. But it is computationally created, and bokeh is a natural phenomena which occurs in part because of lens optics.
Are different lens focal lengths useful?
While these lenses are exceptionally designed for the small space they are required to inhabit, they can not really be compared to the larger glass available in dedicated cameras. Photography is about light, and smartphone lenses are extremely small and so don’t really let in the same amount of light. The 24mm equivalent wide angle lens of the iPhone 14 Pro has an actual focal length of 6.9mm (35mm equivalent), the 13mm is actually only 2.2mm, and the 77mm is only 9mm. Basically the focal lengths often used to described in lenses are in terms of their 35mm equivalents, likely to create better associations. For example a 77mm telephoto lens seems easier to understand than a 9mm telephoto.
To get a bit technical, this means the effective diameter of the entrance pupil (DEP) of the wide-angle 6.9mm lens with a max aperture of f/1.78 is 6.9/1.78 = 3.88mm. Comparing this to the equivalent 24mm full-frame lens, say the Sony FE 24mm f/1.4, and the DEP is 17.14mm, much larger. More area equals more light. Apart from the fixed aperture, and compactness of the lenses, there is another big issue. Smartphone lenses, regardless of how many of them are on a phone, can only cover a finite number of focal lengths. Cameras, especially those with interchangeable lenses, can use optical zoom lenses that cover a very broad range of focal lengths. For example the APS-C lens Fujifilm XF 18-135mm (f/3.5-5.6) covers the full-frame equivalent of 36 to 270mm.
Don’t believe the hype: a smartphone will never completely replace a traditional camera.
There is no doubt that smartphones have closed the gap on image quality, and they are popular for their convenience and ease-of-use. But they are not the same as digital cameras. Photography is a craft – it’s not just about capturing reality, which smartphones do really well. It’s about telling stories, and to do that you need some level of creative freedom, which is only available with a versatile camera. Cameras are ergonomically designed for taking photographs, that is their only job.
Cameras are a ubiquitous tool now, as everyone has one in the guise of a smartphone. In 2022 some 1.5 trillion photographs were taken, of which up to 90% originated from smartphones. The quality of the images produced by smartphone cameras is really very good, and why shouldn’t they be, as there is a crazy amount of technology that is incorporated into them. Smartphones of course have many functions, although I am increasingly convinced that their major roles are as a camera, a visual social media device, and a communications device that involves using the phone, or texting. I use mine as a translator with the Google Translate app because it conveniently takes a snapshot of the text I want to translate, and provides me with a quite accurate rendition of the text in English – useful because of the camera. A smartphone is inherently convenient, because it has a small form factor, and is convenient to travel with, allowing us to take pictures of whatever we want. It almost turns the phone into a form of visual record. Then of course there is social media like Instagram, which we use to take photos of things we like to share, like food. Where would we be without the smartphone camera?
However there are natural limits to the effectiveness of a smartphone camera. The first caveat is that while a smartphone is a jack-of-all-trades, a camera is dedicated to just one task – takingpictures. A camera is not a GPS, nor a social media device, nor a music player. But let’s look at some of the core issues. Smartphone cameras are small. As much as that plays as a strength to their overall usefulness, it is a deficit when it comes to being a platform for photography. There is only so much space in a smartphone, and the quality of the images produced is truly magical considering these constraints. The sensors are small, and are therefore limited in their versatility. Photography is all about light, and the more light that can be captured the better. To make up for their compactness, smartphones rely on software to improve the image quality of pictures that are captured.
The biggest elephant in the room with smartphone cameras may be image resolution. Most smartphones have restrained the megapixel count to around 12. The iPhone 14 Pro has a 48MP quad-sensor main camera, which seems quite spectacular, but in actuality the sensor defaults to 12MP – the quad-pixel sensor combines every four pixels into one large quad pixel. To create 48MP images ProRAW mode has to be activated, but the images produced are anywhere from 75-100MB in size. The 1/1.28” sensor is 10×7.5mm in size, giving it a crop-factor of 3.46. The crop-factor of APS-C is only 1.5 in comparison. Of course comparing a smartphone camera to a full-frame at the opposite end of the spectrum is hardly fair, they are really designed for different types of photographers.
There are situations where smartphone cameras perform extremely well, and there are others where they don’t. Convenience may be the key factor to their popularity. There is no need to worry about a memory card, and you always have a camera on you. But dig a little deeper, and for the photographer there are some issues. Foremost is the lens itself. It’s compact, small, has a fixed focal length, and usually made of plastic. They are usually good lenses, and continuously evolving, but you can never replicate the same quality as in a larger format camera lens – it just isn’t possible. Then how do smartphones produce images as good as those from full-frame cameras? The reason for the exceptional quality of photos from smartphones is the amalgam of post-processing that is achieved using fancy algorithms. Instagram filters are simple in comparison. Smartphone photo apps are full of “intelligent” computational photography algorithms capable of overcoming the limitations of small sensors and lenses. For example artifacts like geometric distortion, and vignetting, can be easily corrected in-situ. There are even high-end noise reduction algorithms to deal with the fact that smartphones contain small sensors with small photosites.
Then there are the physical things you can do with a camera, even a compact, that just aren’t possible with a smartphone. Case in point, focusing. I know most people never think twice about this because smartphone cameras auto-focus, but what if you don’t want that, what if you want to wrestle some control back? It’s hard. Even with apps like Halide, it isn’t exactly a trivial experience. Part of that has to do with the lack of tactile physical controls. It just isn’t the same trying to control some parameters using a touch-screen interface. There are other neat features on phones, to correct for various artifacts, or add artifacts, but it isn’t exactly easy trying to edit a photograph on a small screen. It’s hard to do things like play with DOF, or heaven forbid bokeh – the device just isn’t set up for that. I find phone cameras great for Instagram, or in situations where I need to copy a document – those apps are awesome. But otherwise, there is just something lacking. Smartphones cameras offer a record of events, places, and things. You can use them to take photos in places where cameras are shunned. In many ways they have created disposable images.
There are a myriad of articles pertaining to the death of cameras, but for true photographers, smartphone cameras will never be a replacement. The basic truth underpinning this is that regardless of the technology, smartphone cameras are limited by their form factor. Yes, smartphone cameras have high resolution, even 12MP is still impressive, but there are more components to the aesthetics of a photograph than just resolution. Even with some manufacturers breaking into uber-pixel smartphone camera, for example the Samsung Galaxy S23 Ultra can take 200MP images, but in reality these are often just more marketing hype than anything else. Yes, you can take a 200MP image, however perhaps not in low-light situations.
Now smartphone cameras can’t replace traditional cameras, but they can help augment your photography. I love my smartphone for the convenience it offers me, 12 megapixels, portability, basic in-app image processing, Instagram, and even being able to translate documents. Smartphones have completely automated photography, but one has to question what happened to the aesthetics of taking photographs? For photography is not just about recording events, it is about capturing a moment in time in such a way that it is memorable.
A lens that has been stored in an inappropriate environment, i.e. one that is dark and humid, may provide the perfect conditions for the growth of fungus. Fungus takes the form of tendril or web-like structures on the surface of the lens. The fungus secretes an acid that etches a lenses’ multicoating. This sort of damage can be permanent, and hard to remove. Too much fungus will lower contrast, and way too much will give darker, fuzzier images as it blocks light. Fungus is bad news – avoid lenses with it, however small the “infection”.
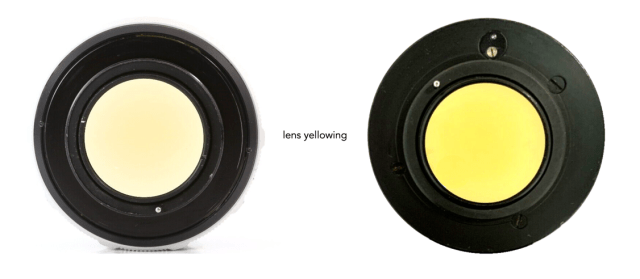
⑥ Yellowing
Coatings on lenses often yellow in time. Glass in general does not yellow, but lens coatings, or at least older ones do. This is also true of glass made with radioactive elements, e.g. Thorium, to reduce refraction.
⑦ Bubbles
Some lenses pre-1970 had defects caused by the optical glass manufacturing process which left a few pin-prick sized air bubbles inside the glass. These bubbles may come from different sources, but in most cases the source is imperfect refining. They look like tiny dust specks when viewed with the naked eye, but if magnified, they are indeed bubbles.
⑧ Separation
Lens groups are most often held together with some type of glue. In modern lenses this is usually a UV-cured epoxy. Vintage lenses typically use epoxy, polyester, and urethane-based adhesives, and some pre-WW2 lenses use Canada balsam (basically a resin from balsam fir trees). The balsam was used because it has a refractive index that is similar to crown glass and is invisible when dry. Unfortunately, Canada balsam is not resistant to temperature extremes or solvents. A degradation of the adhesive will result in the lens delamination. This usually manifests itself as a multicoloured band or blobs around the edge of a lens with coatings, or a white band/blobs on lenses with few or no coatings (but it can also occur in the centre of a lens). A small amount of separation on the edges of a lens will likely have little effect on image quality. A large amount may cause a decrease in contrast, flare and ghosting, softer edges, loss of sharpness, and a difficulty in focusing.
Fixing anomalies
Is it possible to rectify these optical defects? The table below provides a quick guide, and later posts will explore some of these defects in more detail.
Defect
Repairable?
Lens disassembly required?
Notes
scratches
maybe
no
It is hard to remove scratches, especially deep scratches, although fine scratches might be able to be buffed or polished out (some people suggest toothpaste).
haze/fog
yes
yes
It might be possible to use a cleaning solution to reduce or suppress the haze.
dust
yes
yes/no
Dust on external lens surfaces is easy to clean. Internal dust is harder because it requires lens disassembly.
blemishes
no
no
Multicoating damage cannot be repaired.
fungus
maybe
yes
It is possible to repair low levels of fungal infections, but it does require lens disassembly. Heavy fungal infections are not repairable.
yellowing
yes
no
Yellowing caused by the presence of Thorium can be reduced using UV lights.
bubbles
no
no
Intrinsic to the lens glass, consider it a feature of certain older lenses.
separation
no
yes
Separated lens groups are basically not fixable. Fixing these requires lens separation, re-centering and re-cementing.
There are a number of physical anomalies that can be found on the optics of vintage lenses. Regardless of the abnormalities of the lens body, the critical part is the optics. Sometimes people classify lenses as “a little rough”, or “needs some attention”. These can be red flags. Note that when shopping for vintage lenses in person, take an LED flashlight along as it will help peer inside the lens to determine if it is fit for use.
① Scratches
Glass doesn’t scratch that easily, but coatings do. Scratches are easy to detect, because they usually occur on the visible, exposed glass elements. Scratches usually occur on the front or rear element of a lens. They signify obvious signs of wear, or possibly damage. Small scratches will have little effect on an image, but deep scratches will. A few small scratches on the front element will not impair performance significantly – the reason is the depth of field generally works to negate their impact. The exceptions are macro lenses and wide-angle lenses. A large number of tiny scratches may also reduce the contrast of a lens. Scratches on the rear lens will be more problematic (it is best to avoid lenses with scratched rear elements). Because there is less distance between the element and the sensor/film, most scratches will appear on the resulting picture. Deep scratches can be a sign of severe trauma. Also check for pitting. Sometimes lenses have light scratches which are caused by poor lens cleaning/polishing techniques.
② Haze or fog
Haze can be anything that settles out of the air inside the lens onto the inner surfaces of the glass. The lubricants on the aperture mechanism and in the focus threads can vaporize over time and then resettle onto the glass, and with enough time other things (dust, salt-air, fungus) can get in and collect on the glass, to the point that they are dense enough to refract the light themselves and spread it around as a “foggy” look to pictures. Haze actually gets worse with age. This may be an indication that the lens was poorly constructed, or poorly stored.
A smoky haze diffuses light equally over the entire image. This is generally caused by trillions of particles much smaller then the wavelengths of light, smearing the light over all areas equally, simply making blacks gray and reducing the overall contrast. Oily haze on the other hand has tiny droplets larger than the wavelengths of light. Because the oily haze diverts light, the haloes are much stronger and more visible.
③ Dust
Dust particles somehow get into lenses. A small bit of dust will make little or no difference to image quality. Larger specks or clumps of dust should be avoided. Check for dust by shining a light through the lens. Dust may be especially prevalent in vintage zoom lenses where the increased movement can result in dust infiltrating the inner components of the lens. So how does dust get inside the lens? Vintage lenses are not air sealed, i.e. weather sealed, meaning that air moves in and out, and of course it carries dust with it. Zoom lenses with barrels that extend out essentially “pump” air/dust into the core of the lens. In reality, small amounts of dust will impede very little of the light passing through a lens, and its impact on the image quality is minimal. Inexpensive and simple lenses can be easily disassembled and cleaned, however re-assembling the lens may again introduce dust (unless you have a clean room). Large amounts of dust may be indicative of poor long-term storage.
④ Blemishes
Many vintage lenses have lens elements that are coated with layers of some non-reflective optical material. These multicoatings minimize light reflection and the resulting lens flare and ghosting. Blemishes are regions on a lens where material has been smeared or removed by physical damage, a manufacturing defect, use of an incorrect solvent, or even being eaten away by fungus. A small blemish likely won’t affect image quality.
A lens with a super-deep scratch. Being on the rear element, this will effect the image.
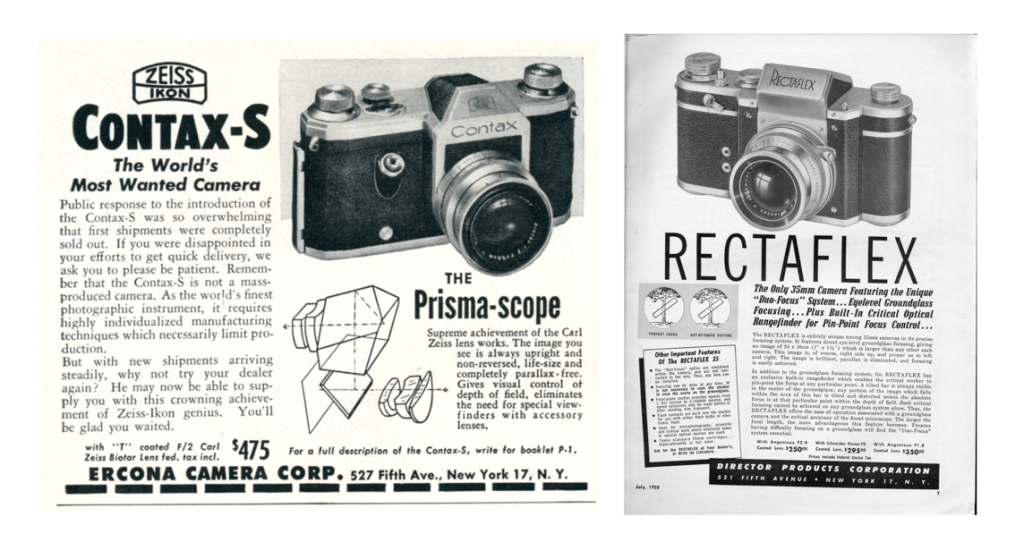
Which 35mm SLR camera had the first pentaprism? Was it the Rectaflex or the Contax S? This question has turned into a bit of a conundrum over the years – many sources cite the Contax S as the first, with just as many opting for the Rectaflex. This discussion tries to provide some insight into the timeline of pentaprism use by looking at both the patents for cameras containing pentaprisms, and the cameras actually produced. Note that some original historical patents are hard to find, e.g. those from Italy.
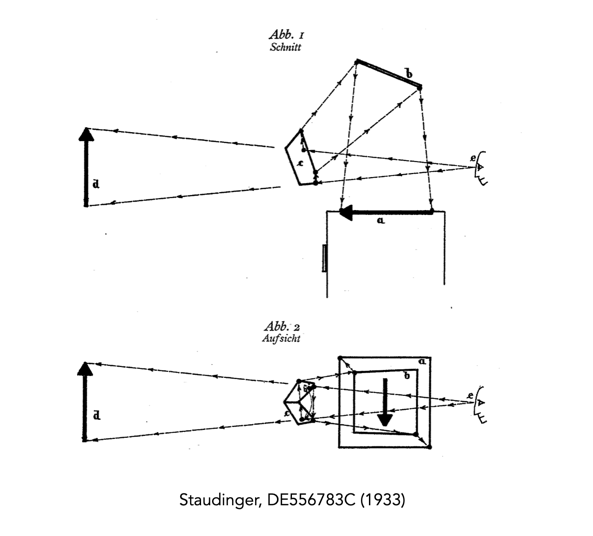
In all probability the idea of using a pentaprism in a camera had been floating around for a while. On 28 January 1933, German architect Kurt Staudinger was issued a patent for a reflex device with eye level vision, which used a pentaprism-like system (DE556783A, “Vorrichtung fuer Reflexkameras” (Device for reflex cameras). The invention related to a device which “…is intended to convert the horizontal and reversed image projected into the screen into a vertical, upright and reversed image.” However instead of using a prism, this was actually a series of mirrors, i.e. a penta-mirror. Although he tried to interest German camera makers, none were seemingly that eager. At the time there was likely was too much invested in rangefinder cameras to think that an alternative was worthwhile. The only German patent to cite this work was that of Arno Rothe (DE741844A, sub. May 5, 1939) who proposed a reflex camera using mirrors which allowed for both waist level, and eye-level viewing.
Fig.1: The concept of Kurt Staudinger
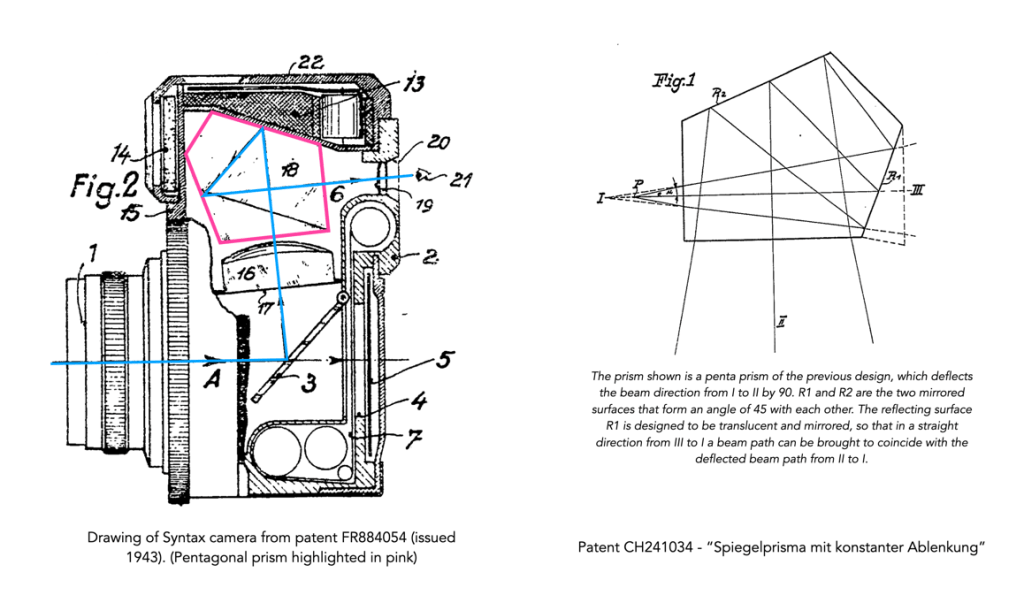
From about 1937 Zeiss Ikon began work on a 35mm reflex camera with a pentaprism eye-level viewfinder in the Camera Development Department. The camera was named the Syntax, and on September 2, 1940 Zeiss Ikon applied for a utility patent in Germany. Research has failed to find the German patent, but two patents associated with the camera were filed in France: FR884054 (sub. August 9, 1941) “Photographic apparatus constructed in particular in the form of a monocular mirror reflex camera”, and FR875596 (sub. August 9, 1941) “Mirror camera with photoelectric exposure meter forming part of the camera”. Both applications cite the filing of associated German utility patents on August 23, 1940. There is another Swiss patent submitted by Zeiss Ikon on 18 January 1943 (CH241034) – “Spiegelprisma mit konstanter Ablenkung” or “Mirror prism with constant deflection”. This gives further credence to the fact that Zeiss Ikon was working on a pentaprism for a camera.
Fig.2: Drawing of Zeiss’s Syntax camera from the French patent and a drawing of a “spiegelprisma” from the Swiss patent.
Work was slow, but it has been suggested that there was a working model by 1944, supposedly a Contax II body with its metal vertical focal-plane shutter, however having its view/rangefinder replaced by a reflex mirror, delivering an upright and right-way-round image via a roof pentaprism to the eyepiece [1]. However the viewfinder image was too dark, and required f/2 and faster lenses. A diagram of the Syntax from the French patent is shown in Figure 2. According to Siegfried Böhm, design engineer with Zeiss Ikon, there were a series of issues with the Syntax [1]. The camera was complex, and would have required 750 parts to produce, in part due to the vertical shutter, and external bayonet lens mount of the Contax II. Böhm was working on the design for a horizontal focal-plane shutter, however on February 13, 1945, everything related to the project was destroyed by Allied air raids.
Fig.3: Advertisements for the first two pentaprism cameras
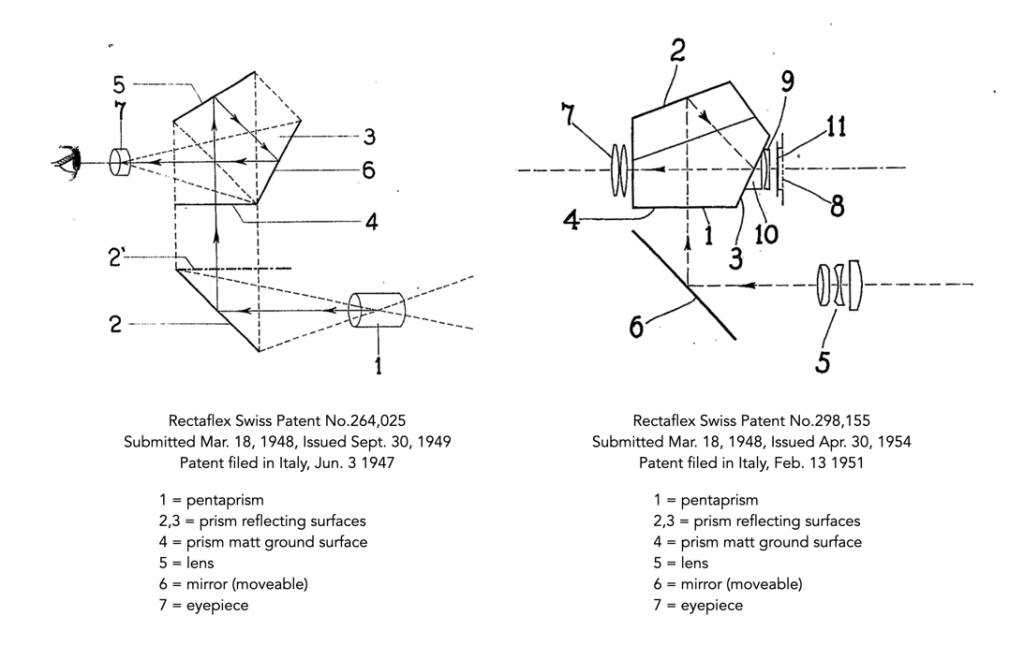
The first SLR manufactured with a pentaprism was the Rectaflex. It was the brainchild of Italian lawyer and camera enthusiast Telemaco Corsi (1899-1974), and was the only Italian SLR ever produced. Work began in 1946, and a prototype was shown at the Milan Fair in 1947 (this model used a flat pentaprism instead of a roof-pentaprism). This system seems to be described in a Swiss patent issued in 1949 (CH264025 based on an Italian patent filed in 1947). At the same fair a year later, a working prototype called the Standard 947 was introduced, with the production model A.1000 for sale in September 1948. Only 1150-odd copies were produced, with Rectaflex introducing the B.2000 in April of 1949, and the B.3000 in September. A patent for this pentaprism system is also described in a Swiss patent issued 1954 (CH298155, filed Jul.5/1951) – “Complementary sighting device in a photographic camera equipped with a reflector mirror viewfinder.”, and a West German patent (DE938764) filed the same month.
Fig.4: The Rectaflex pentaprism patents
The Wrayflex was England’s only attempt at developing a 35mm SLR. On Sept. 2, 1952 Wray (Cameras) Limited received a patent for “Reflex Camera with Curtain Shutter” (US2,608.921, filed on 21 May 1948). It matched a UK patent applied for on May 21, 1947 (GB2608921X), describing an SLR which contains a “pentagonal prism”, which appeared at the bottom of the camera, basically upside-down. However this “prototype” never seems to have been put into production.
Fig.5: The patent for the Wray Optical
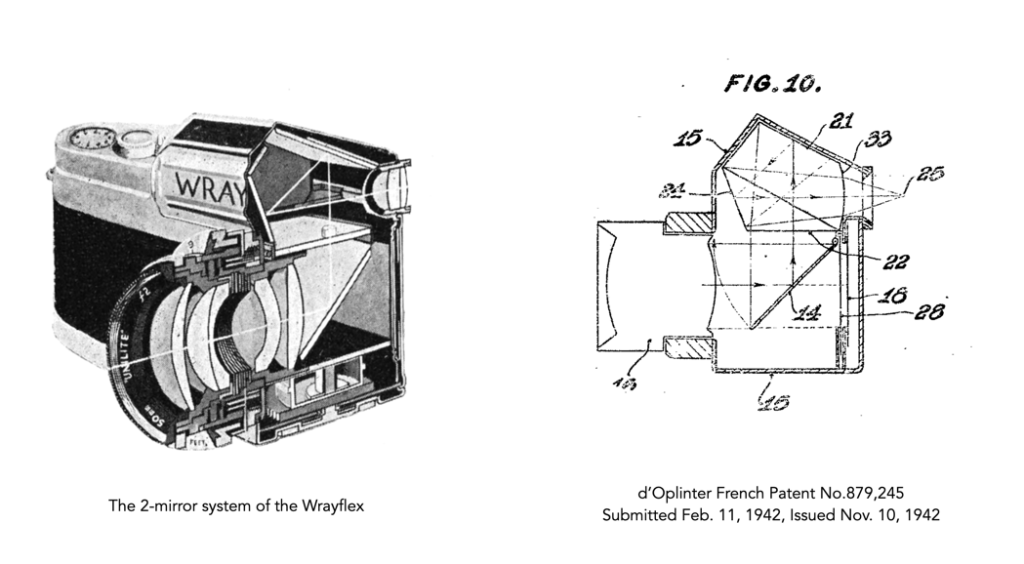
Instead the Wrayflex production model used a mirror which folds backwards and upwards when the shutter is released. This means there was no space for installing a roof prism – instead the Wrayflex used two mirrors, arranged so as to reflect the ground-glass image twice – this arrangement provides an image which is laterally reversed, but the right way up. The two mirrors must be accurately positioned so that there is no possibility of misalignment. The Wrayflex I and Ia both used mirrors, it wasn’t until the Wrayflex II in 1959 that a pentaprism was incorporated. In addition to the Wrayflex, there is also a patents by Belgian Jean de Wouters d’Oplinter (1905-1973), applied for in Belgium on February 11, and May 29, 1941. The French version of the patent, “Improvements to photographic cameras and similar devices”, was issued on November 10, 1942 (FR879245), however this camera was never produced.
Fig.5: The mirror system of the Wrayflex and the patent for the d’Oplinter camera
In September 1949, Rectaflex was to received some competition in the form of the Contax S from VEB Zeiss Ikon. The development of the Contax S (also known as the Spiegel-Contax) basically involved recycling the wartime Syntax project. The camera was introduced in 1949. The prism on the Contax S was built into the camera body. The view was life-sized, a result of three factors: the focal length of the lens, the prism itself, and the small magnifying eyepiece behind the prism. Many early prisms were bright in the centre, but susceptible to fall-off in the corners. Later SLRs used systems to overcome this problem – e.g. condensing lenses underneath the ground glass, a flat fresnel lens which spreads out the light, and increases brightness in the corners. While there were a number of patents filed for this camera, most had to do with the shutter mechanism, and shutter release [2]. There don’t seem to be any patents that relate specifically to the pentaprism mechanism (there are war-era patents but that’s another story). Zeiss Ikon certainly marketed their camera in the light that this was the most significant advance since the SLR itself.
Here is the camera being hailed as the most significant advance in camera design since the first miniature itself. The twin-image, coupled range-finder has given way to a single viewer, the Prisma-Scope which enables you to sight directly through the camera lens. You see a life-size image, always upright and non-reversed, that spins into sharp focus with a twist of the lens barrel. For the first time in a single lens reflex, all focusing and viewing takes place at direct eye level. Without sacrificing the compact qualities of the miniature, the nuisance of parallax is forever eliminated … accessory lenses require no coupling with special and costly range-finders … close-up photography requires only the addition of extension tubes. Here is the most versatile camera ever created!
The third pentaprism 35mm SLR was by Swiss company ALPA. However they went in another direction, choosing a prism derived from an Abbe prism, the Kern prism. The main difference between this and a pentaprism prism is the fact that the latter provides a 90° image, while the former is only 45°. So the early ALPA-Prisma Reflex cameras (introduced in 1949) offered an oblique view, not a perpendicular view. This feature continued until the Model 6c of 1960.
What about the Ihagee Exakta? Well the company that basically created the 35mm SLR was slower to adopt the pentaprism. It was not until 1949 that they incorporated the use of an auxiliary prism, the “Prismenaufsatz”, which provided a corrected right to left image (however it did make the camera top-heavy). Finally in 1950 Ihagee, introduced the Exakta Varex. As ALPA’s system did not produce an eye-level image, this really makes the Varex the third camera with an eye-level pentaprism. It was also the first SLR with an interchangeable viewfinder, as the waist-level viewfinder was still the most common of the period. The first Japanese pentaprism SLR did not appear until the Miranda T in 1955, followed by the Asahi Pentax, Minolta SR-2, Zunow, Nikon F and the Yashica Pentamatic.
So who was first? From a practical viewpoint of a manufactured camera, it was the Rectaflex. But I guess it depends on how you interpret history.
Notes:
The Gamma Duflex, designed by Hungarian Jenő Dulovits, was being sold by 1948, however despite some reports, it did not have a pentaprism. The patent for the optical viewfinder system incorporated a Porro-prism, but due to financial constraints only a Porro-mirror was implemented. It was however the first eye-level SLR, and had the first instant-return mirror. A design apparently existed for a ‘Duflex System Reflex S’ which did have a roof pentaprism, but it was never put into production.
Further reading
Schulz, A., “From Syntax to Praktina”, Zeiss Historica, 30(1) pp.7-16 (2008)
The state of a lens can tell a lot about how it was previously treated. There are many different aspects to choosing a vintage lens. One important aspect is physical condition. There are a number of things that cause a lens to lack perfection, some you can overlook, while others could indicate a lens should be avoided. Don’t forget these vintage lenses are anywhere from 30-75 years old, and they will not be in pristine condition (or if they are you will pay a premium). A lens may be pristine from an external viewpoint, but have issues with the aperture or focusing mechanism. Or it may be completely functional, yet be aesthetically distraught.
There are several different levels of lens examination. Obviously in an ideal world you could slot the lens on a camera and take some pictures, however that isn’t always feasible, and deep testing isn’t really an option in a store. Sometimes lenses are only available in online stores, so you have to rely on the quality of the stores vetting processes. The tests described below look at the physical properties of a lens, and does not test the optical characteristics by shooting test pictures. Please note that obviously if you are buying online, you cannot physically check the lens. And therefore must rely on the lenses quality being properly described. If buying online, purchase from a reputable shop. Note the 🕸️ symbol used below refers to hints for online purchasing.
① Lens body defects – scratches and dents
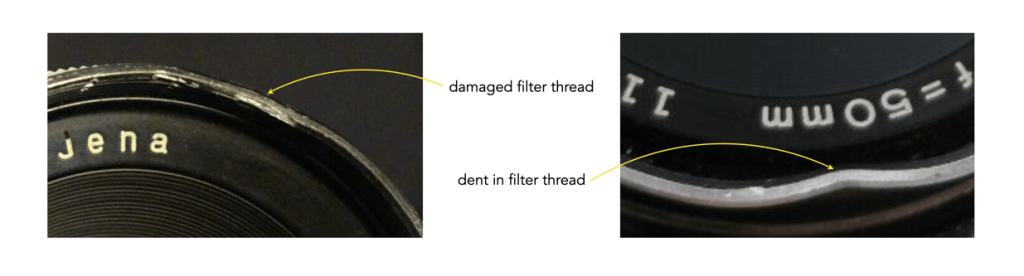
No vintage lens will be in perfect condition, unless it has sat in its box stored away somewhere and never been used (the so-called “new old-stock”). The first thing to check is what the lens looks like externally. Many vintage lens bodies are largely constructed of metal which has a tendency to scratch and dent. Scratches on the lens body are usually not that big a deal, dents are another matter altogether. Usually a dent will typically occur at either end of the lens, and can signify that the lens has been dropped. Some lenses are of course built like tanks, and can withstand a drop better than others. Damage to the lens mount will make it almost impossible to mount the lens. Conversely damage at the thread end will mean an inability to mount a filter (it means either replacing the front component, or for a minor issue using a lens vise to restore the thread).
Fig.1: Various types of physical damage to a lens
A dented filter ring is usually the result of a lens falling and landing on the front edge which could mean the lens elements have been knocked out of alignment. Lens bodies made of plastic will also scratch, however dropping them will likely cause more damage. It is also possible that a lens can lose coating, through abrasion or chipping. This is common in old chrome-plated lenses, as shown in the sample photograph in Figure 2.
Fig.2: More types of physical damage including the loss of coating on a lens body.
🕸️ A series of photos covering all aspects of the camera will help determine the shape it’s in.
② Movement of lens parts
Vintage lenses are composed of several different cylinders that move when the aperture or focus ring is activated. The first thing to do when testing a lens is to check it by gently moving the components, extending the segments, and rocking the whole lens. Basically this helps determine if any of the sections are loose, or if there are any loose components rattling around inside the lens. Next look to see if all the external screws are present, and if the front ring accepts a filter. Visible markings such as stripped screws might be indicative of disassembly/reassembly and internal issues in the past. Loss of some paint or wearing of rubber parts isn’t usually a problem.
③ Lens mount
The mount should be checked, firstly for compatibility, but also for damage. The mount can be checked by mounting it on an appropriate mount converter. It should go on easily, yet firmly, without any looseness. Does the locking pin catch properly? Check that a mount actually exists for converting the lens to a digital camera. For example some lenses such as the E. Ludwig Meritar 50mm f/2.9 were made for Altix cameras which have a breech-lock type mount, which is hard to find adapters for.
🕸️ A snapshot of the rear of the lens helps document the lens mount, which is especially important for less common lens mounts.
④ Aperture mechanism, i.e. diaphragm
Testing the aperture is a necessity, if the aperture on a lens is not performing well, it will feel loose and not well connected. An aperture that is slow to open or close may signify issues with the aperture mechanism. If the aperture mechanism does not move the aperture blades at all, there are serious issues. The number one thing to check is to make sure the aperture actually opens and closes smoothly (sometimes the aperture ring moves, but the diaphragm blades do not). Other things to check depend on the type of mechanism:
Manualmechanism – The simplest mechanism involves the aperture ring turning from the fully open position (smallest f-number) to the closed position (largest f-number).
Aperture pre-set mechanism – The pre-set ring should be set to the closed position, and then the second ring which closes the aperture should be rotated. Also make sure the pre-set ring rotates freely.
Auto-aperture mechanism – This mechanism uses a device that leaves the lens aperture open for as long as possible, and closes the aperture to a set f-stop simultaneously with shooting. In order to check the aperture, depress the pin of the mechanism, then rotate the aperture ring from open wide to closed. The diaphragm should open-close without issue.
⑤ Aperture – iris blades
Apart from the free movement of the diaphragm (iris) blades, the other thing to check for is whether they are dry or oily. Iris blades should be clean and dry – they do not require lubrication. Some aperture blades may appear oily which means it will be hard for them to open and close in a smooth manner. When oil is present on the aperture blades, there is friction from the oil’s viscosity and this impedes the quick closing action during exposure. The aperture takes too long to stop down, and as a result the shutter has already activated, and the photo can become overexposed. Where does the oil come from? An oily aperture is typically caused by exposure to heat. The focus mechanism of a lens uses lubricants, and heat can causes these lubricants break down, and to leak.
Fig.3: Oily iris blades in a Kilfitt Tele-Kilar 300mm
The best way to determine the state of the blades is to view them from the front by flashing an LED flashlight into the lens and look down on the blades. Oil will appear as a circle, or small triangular “wings”. A patterned discolouration is a sure sign of oily blades. Play with the aperture ring to check its “snappiness” – it should open and close easily without resistance or a feel of “sticking”. Dry blades are certainly better, but there are certain lenses (e.g. Helios) that are not greatly impacted by the presence of a small amount of oil. Some aperture blades may also have rust on them, this could be indicative of the lens being stored in a sub-optimal environment, e.g. one that is humid.
⑥ Lens focus mechanism
Rotate the focus ring back and forth a few times from the minimum focusing distance (MDF) position to the opposite (infinity) position. The focusing ring by itself should rotate smoothly, without hesitation or any sticking. A focus that is overly tight can lead to improper focus, whereas a loose focus means the focus can shift with the slightest move. What we are looking for here is whether or not the lens moves smoothly and doesn’t catch or have a gritty sensation. A stiff movement may be indicative of issues with the grease used to lubricate the focusing mechanism. Are there any dull spots where the focus mechanism doesn’t feel as smooth or gets slightly stuck? This might mean degrading grease and could need to be repaired. Make sure the focus doesn’t stick slightly at either extreme. If the focus ring doesn’t move at all, then it is likely the grease lubrication has solidified to the point where it is stopping movement.
⑦ Lens markings
It may seem trivial, but lens markings are important in identifying a lens. This information includes manufacturer, trademark, focal length, maximum aperture, coatings (e.g. multi-coating). See the post on lens markings. 🕸️ A snapshot of the front of the lens often means a serious reseller. A poor or unreadable picture suggests that reseller does not know how to sell the lenses and most likely an amateur.
⑧ Lens body defects – dirt, grime and corrosion
If a lens seems dirty and grimy, it may be indicative of how well the lens wasn’t cared for. Dirt and grime usually appear in textured surfaces which are subject to being hand-manipulated, such as the focus ring. Oil and sweat (from the skin) are deposited when these regions are touched and subsequently attract dirt. Failure to clean a lens will mean a built-up of grime over time. This dirt may eventually migrated to the interior of the lens by means of nearby lens openings. Sometimes vintage chrome-plated lenses appear green, and this is something commonly known as “green corrosion”. This can be the result of corrosion of the brass/copper underneath the chrome (chrome surfaces typically have a underlay). As brass contains copper, the copper reacts with oxygen, forming the greenish-blue layer, copper-oxide.
Fig.4: Dirt, grime and corrosion
If the outside of the lens looks and feels okay, then it is time to investigate the optics.