The term ISO (International Standards Organization) is used to describe light sensitivity. In the world of film, ISO relates to film sensitivity – film with high ISO is made with crystals capable of holding more light. The trade-off is that the crystals need to be larger, therefore as ISO increases crystal size becomes more visible, manifesting as film grain. In the digital realm, photosites cannot increase in size, so in low light they record less information. To compensate for a lack of information, the signal is amplified, thereby mimicking film sensitivity.
A low ISO (e.g. 100) setting mimics a low-sensitivity film, so that a longer exposure time, or large aperture setting is required. Conversely a high ISO setting, e.g. 1600, mimics a high-sensitivity film, so allows for a short exposure time (fast shutter speed), or small aperture. Increasing the ISO setting will effectively increase the brightness of the resulting image. Note that changing the ISO has nothing to do with the sensitivity of the photosites, they are by no means affected. This is different to film cameras, where changing the ISO setting is directly associated with the sensitivity of the film. The ISO in a digital camera has everything to do with what happens to the signal after it has been captured by the photosite and converted from light to an electrical signal. The ISO setting determines what happens when the electrical signal passes through an analog amplifier, i.e. it determines how much the signal is amplified (this is known as the gain).
Digital ISO
A brightly lit scene will produce a strong electrical signal, which requires less amplification (lower ISO setting), and results in a smoother image with less “grain”. Conversely, less light in a scene means photosites are able to capture less information, and generate weaker electrical signals which have to be amplified (using a high ISO setting). Unfortunately, photosites also capture noise, and changing the ISO will also affect it. For example increasing ISO will increase the amount of noise. This is why photographs taken with a high ISO often have a grainy appearance (attributable to noise). The lower the ISO used, the better the quality of the image will be.
Light is the building block of photographs. Luminance describes how much light comes from an object. In a grayscale image, there is only luminance. In many respects it is what provides the “structure” of an image. If no light were to come from an object, an image would appear black. Luminance is one of the primary cues that make you realize you are looking at a three-dimensional object rather than a flat picture.
The human visual system is designed to detect luminosity (light), and chroma (colour). The photoreceptors in human eyes include the cones which handle the chroma and the rods which handle the luminance. Luminance is perceived as different shades of light in grays while chroma are different hues of colour. Colours have intensity while light has brightness. Artists have known for a very long time that colour and luminance can be treated in an artistic sense quite independently. Picasso said, “Colours are only symbols. Reality is to be found in luminance alone.”
When high-luminance colours such as yellow are placed next to low-luminance colours such as darkblue, they create a strong contrast that the visual system interprets as a change in depth. The center-surround effect is also responsible for the optical illusion that colours look different depending on the colour of their surroundings.
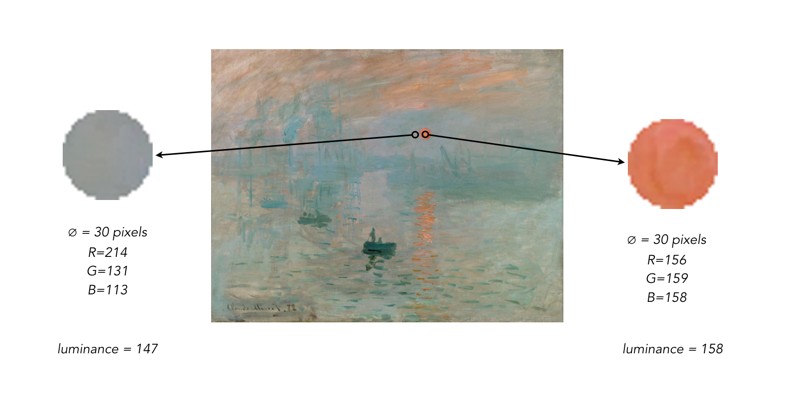
To understand better the interplay of luminance and colour, consider Claude Monet’s 1874 painting, Impression, soleil levant (English Impression, Sunrise), which depicts the the port of Le Havre, France at sunrise.
Monet’s Impression, Sunrise
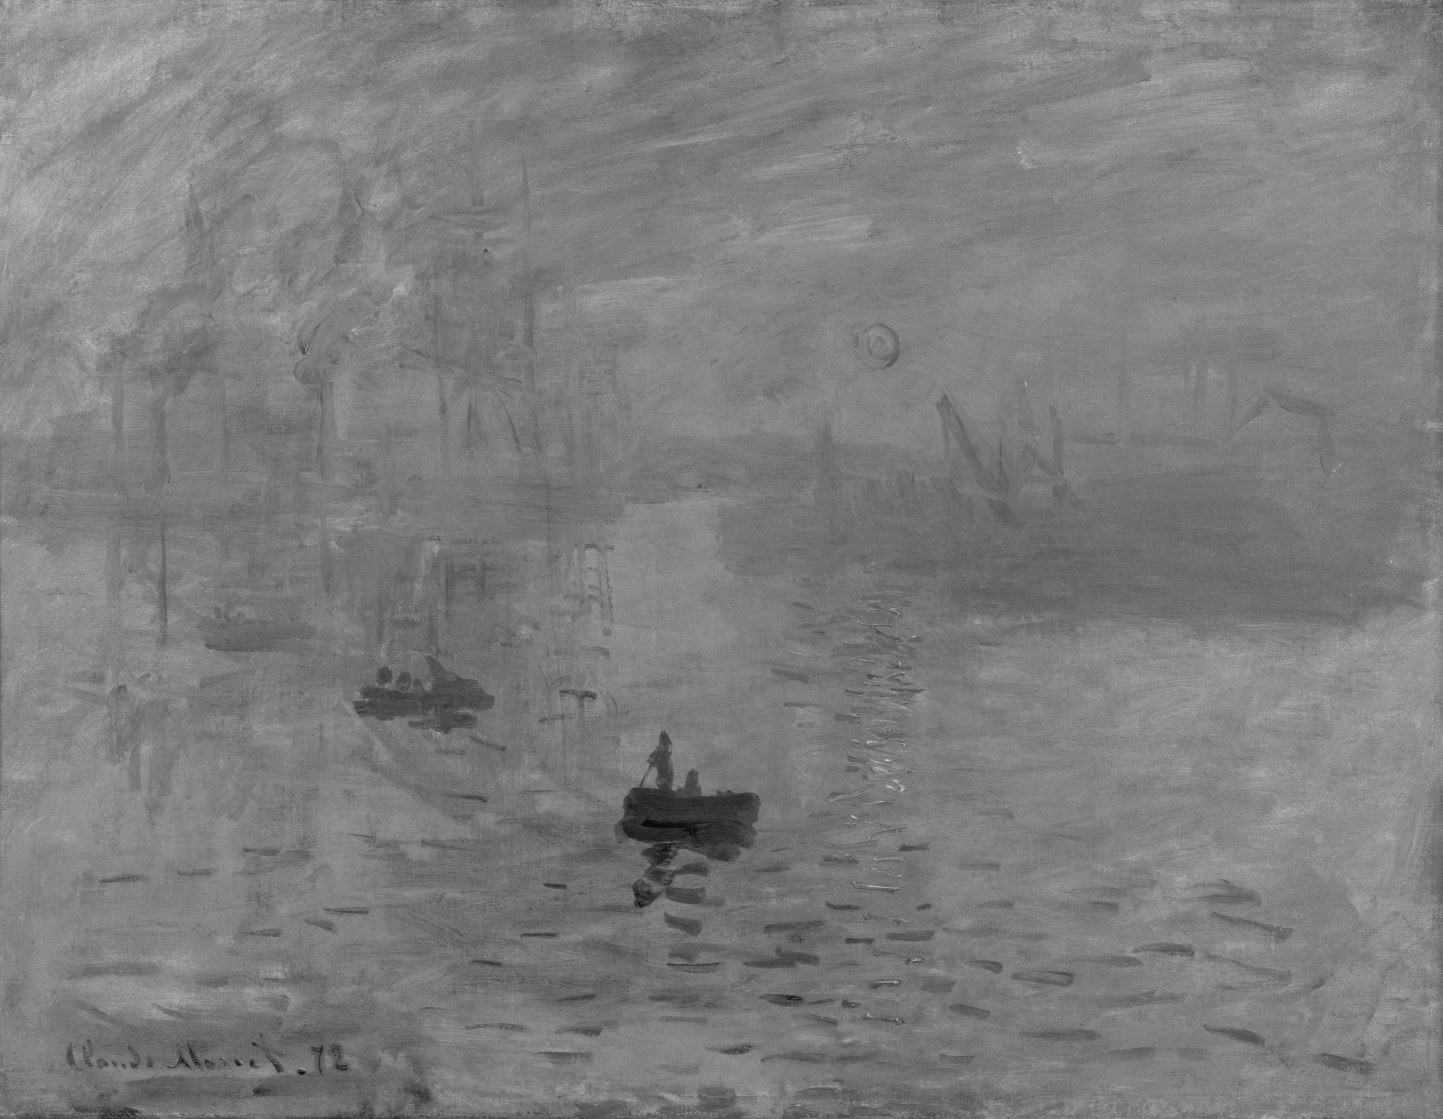
It would seem as though the rising Sun is the brightest object on the canvas, however when the image is desaturated by removing the colour component, it is shown that the sun, as well as its reflection have the same luminance as the sky – for all intended purposes, disappears. This can be achieved by converting the colour space to HSL, and extracting the Lightness/Luminance component.
Monet’s Impression, Sunrise – devoid of colour
Why? Because Monet used colours which had equal luminance, so the sun blends into the sky. The sun appears brighter because Monet uses a saturated complementary colour to the blue of the sky, so the colours accentuate one another. Without colour, the painting loses some of its meaning. To illustrate this another way, we extracted circles with a diameter of 30 pixels from the sun, and the area adjacent to it. Then the luminance was calculated using the average pixel value found in each extracted region.
The simplest data about an image it that contained within its histogram, or rather the distribution of pixel intensities. In an 8-bit grayscale image, this results in a 256-bin histogram which tells a story about how the pixels are distributed within the image. Most digital cameras also have some form of colour histogram which can be used to determine distribution of colours in an image. This lets the photographer determine whether the photograph is over- under- or correctly exposed. A correctly exposed photograph will have a fairly uniform histogram, whereas an under-exposed one has a bias towards darker tones, and an over-exposed one will have a bias towards brighter tones.
This by no means means that a histogram that has two distinct modes does not represent a good image. As long as the histogram is well distributed between the lower and upper limits of the colour space. Consider the image below:
From an aesthetic perspective, this does not seem like a bad looking image. Its histogram somewhat collaborates this:
In fact there is limited scope for enhancement here. Application of contrast-stretching or histogram equalization will increase its aesthetic appeal marginally. One of the properties of an image that a histogram helps identify is contrast, or dynamic range. On the other end of the spectrum, consider this image which has a narrow dynamic range.
The histogram clearly shows the lack of range in the image.
Stretching the histogram to either end of the spectrum increases the contrast of the image. The result is shown below.
It has a broader dynamic range, and a greater contrast of features within the image.
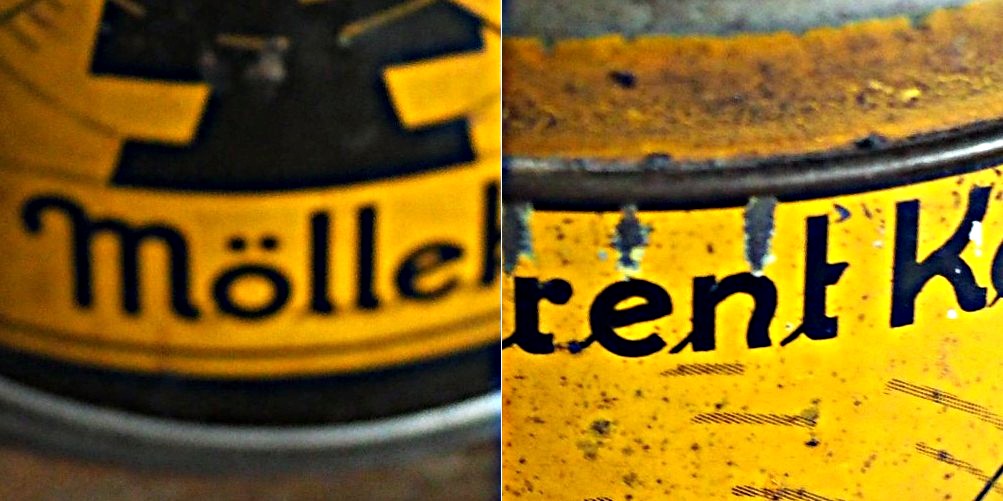
In a previous post we looked at whether image blur could be fixed, and concluded that some of it could be slightly reduced, but heavy blur likely could not. Here is the image we used, showing blur at two ends of the spectrum.
Blur at two ends of the spectrum: heavy (left) and light (right).
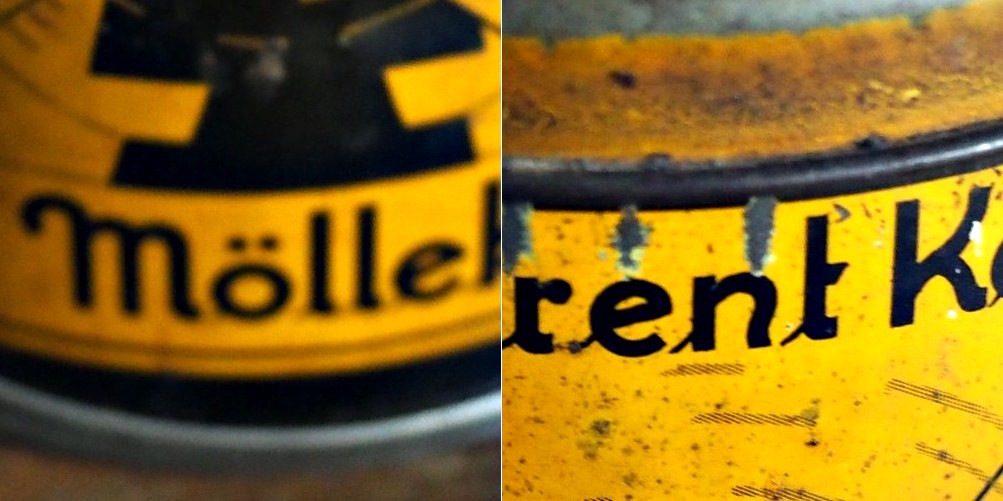
Now the “Unsharp Masking” filter in ImageJ, is not terribly different from that found in other applications. It allows the user to specify a “radius” for the Gaussian blur filter, and a mask weight (0.1-0.9). How does modifying the parameters affect the filtered image? Here are some examples using a radius of 10 pixels, and a variable mask weight.
Radius = 10; Mask weight = 0.25
Radius = 10; Mask weight = 0.5
Radius = 10; Mask weight = 0.75
We can see that as the mask weight increases, the contrast change begins to affect the colour in the image. Our eyes may perceive the “rent K” text to be sharper in the third image with MW=0.75, but the colour has been impacted in such as way that the image aesthetics have been compromised. There is little change to the acuity of the “Mölle” text (apart from the colour contrast). A change in contrast can certainly improve the visibility of detail in the image (i.e. they are easier to discern), however maybe not their actual acuity. It is sometimes a trick of the eye.
What about if we changed the radius? Does a larger radius make a difference? Here is what happens when we use a radius of 40 pixels, and a MW=0.25.
Radius = 40; Mask weight = 0.25
Again, the contrast is slightly increased, and perceptual acuity may be marginally improved, but again this is likely due to the contrast element of the filter.
Note that using a small filter size, e.g. 3-5 pixels in a large image (12-16MP) will have little effect, unless there are features in the image that size. For example, in an image containing features 1-2 pixels in width (e.g. a macro image), this might be appropriate, however will likely do very little in a landscape image.
Sometimes algorithms talk about the mean or variance of a region of an image (sometimes called a neighbourhood, or window). But what does this refer to? The mean is the average of a series of numbers, and the variance measures the average degree to which each number is different from the mean. So the mean of a 3×3 pixel neighbourhood is average of the 9 pixels within it, and the variance is the degree to which every pixel in the neighbourhood varies from the mean. To obtain a better perspective, it’s best to actually explore some images. Consider the grayscale image in Fig.1.
Fig 1: The original image
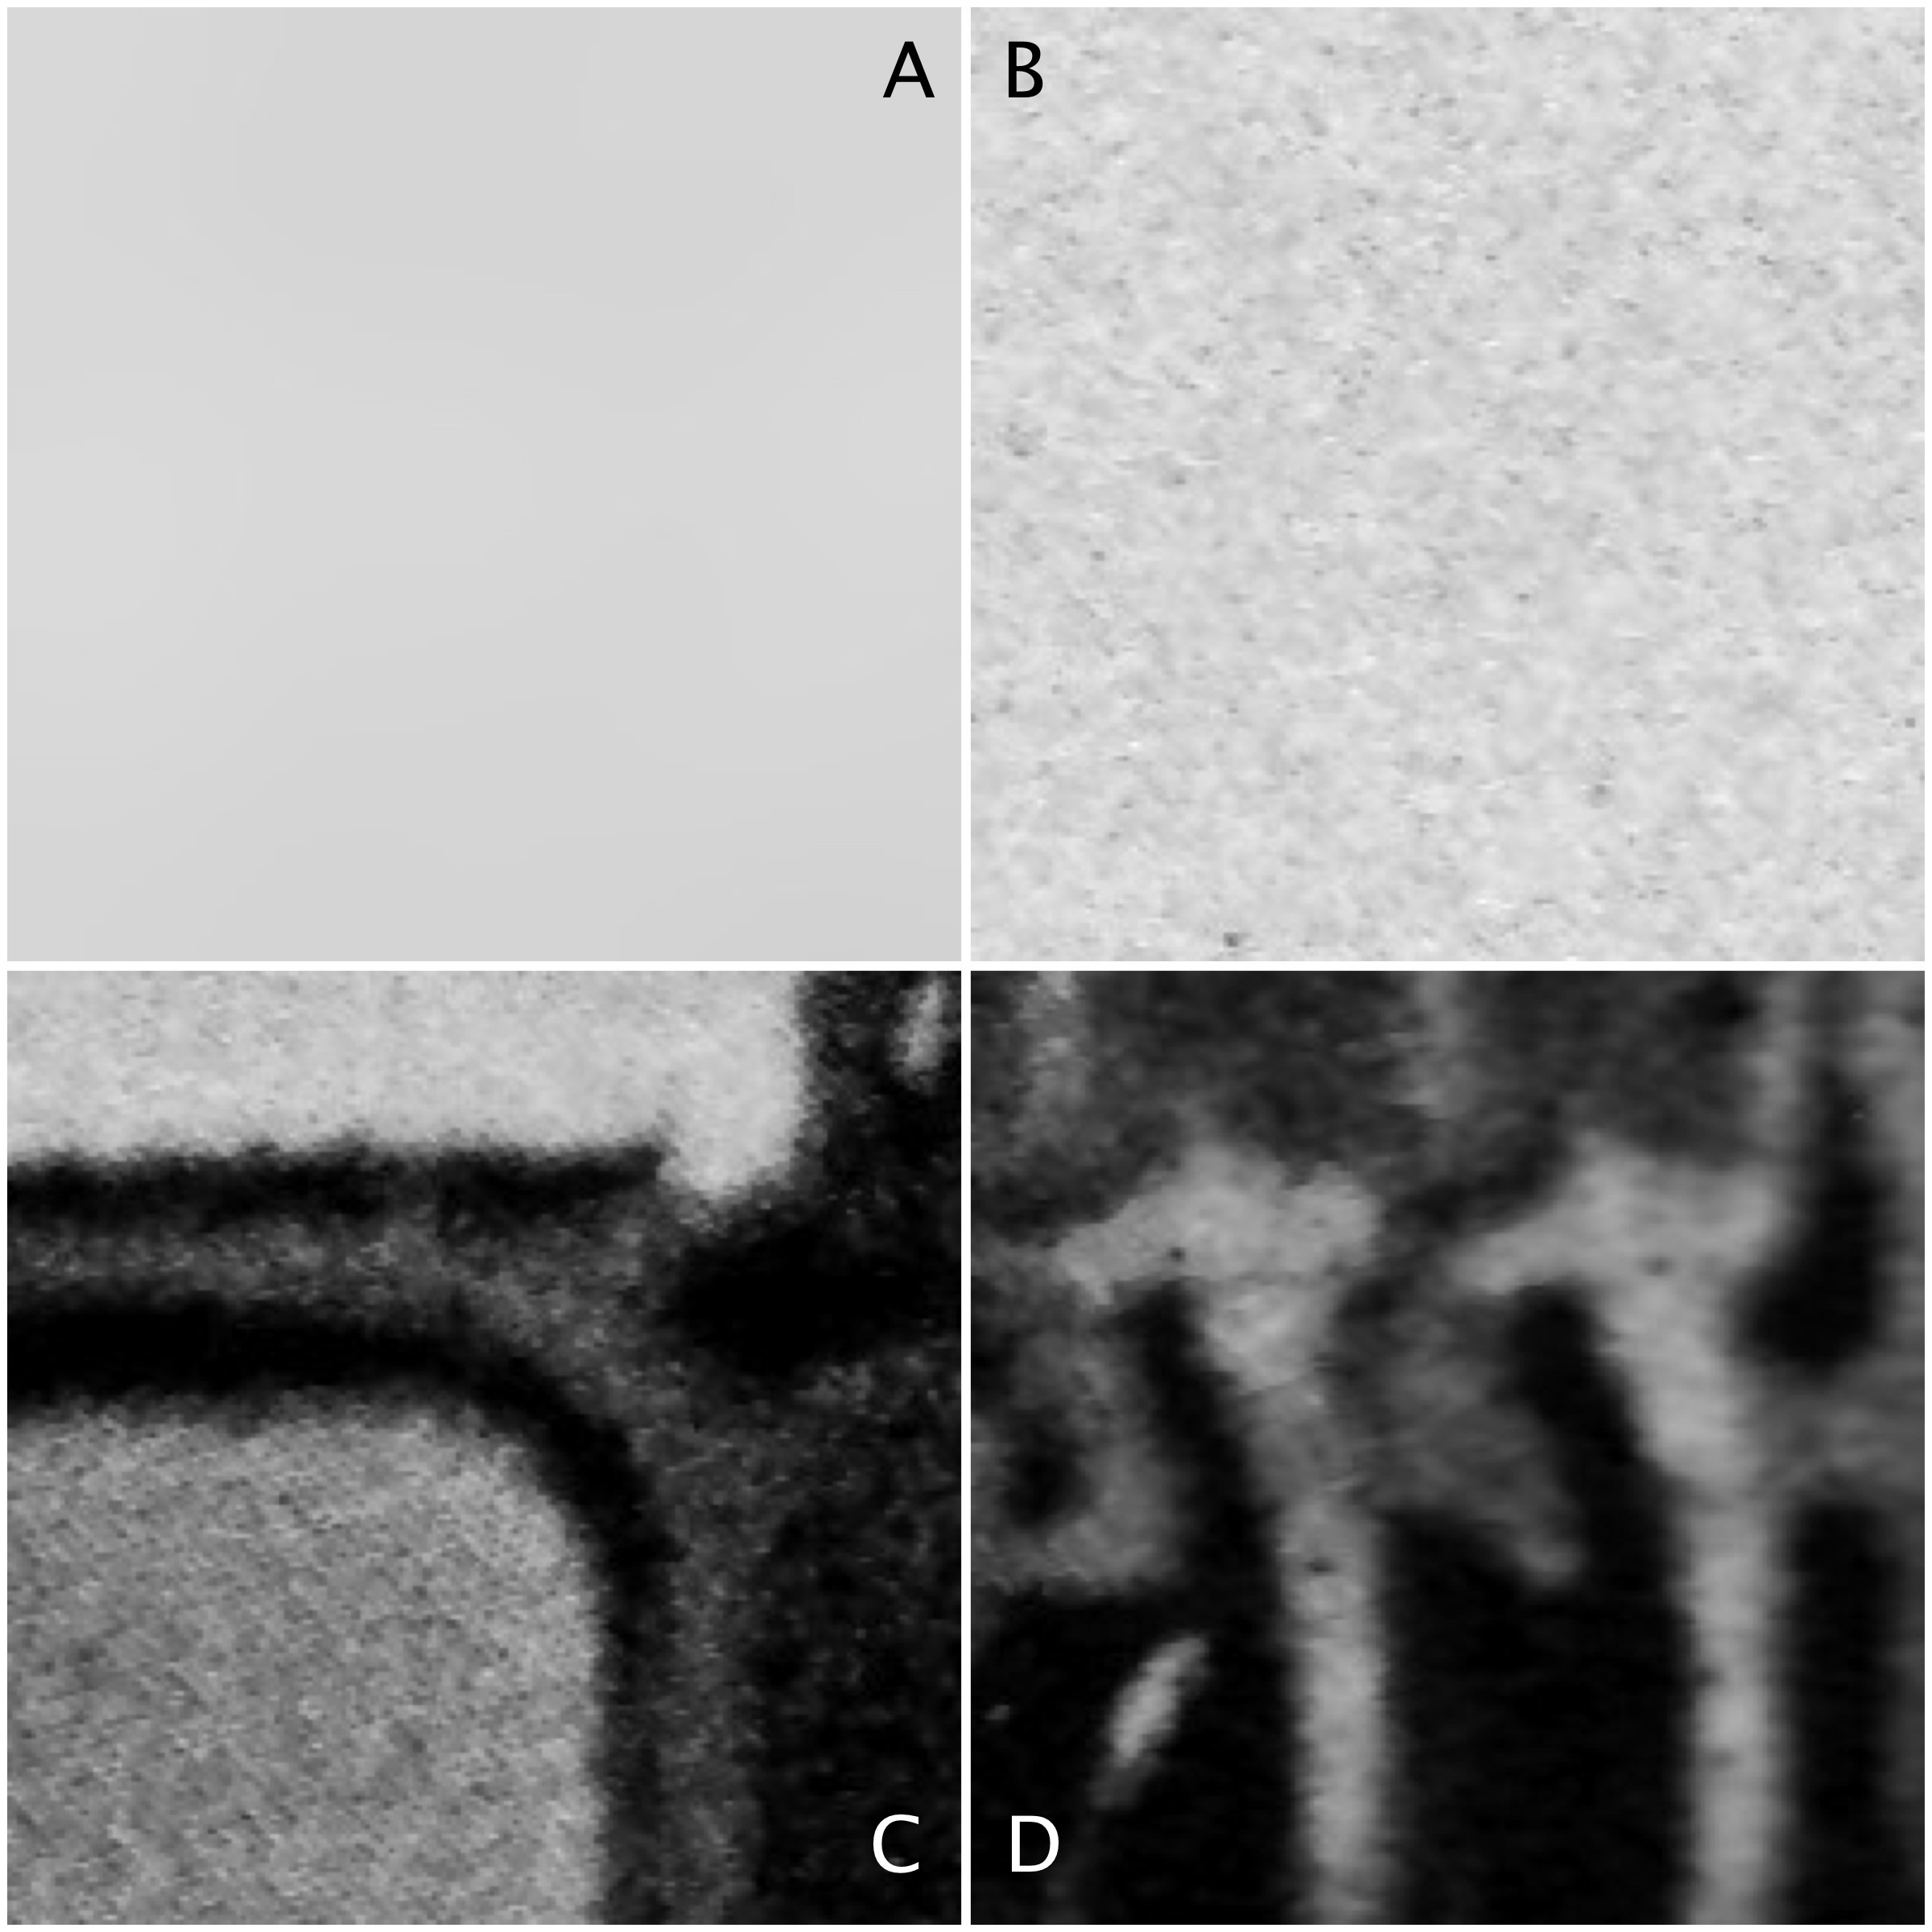
Four 200×200 regions have been extracted from the image, they are shown in Fig.2.
Fig.2: Different image regions
Statistics are given at the end of the post. Region B represents a part of the background sky. Region A is the same region processed using a median filter to smooth out discontinuities. In comparing region A and B, they both have similar means: 214.3 and 212.37 respectively. Yet their appearance is different – one is uniform, and the other seems to contain some variance, something we might attribute to noise in some circumstances. The variance of A is 2.65, versus 70.57 for B. Variance is a poor descriptive statistic, because it is hard to visualize, so many times it is converted to standard deviation (SD), which is just the square root of variance. For A and B, this is 1.63 and 8.4 respectively.
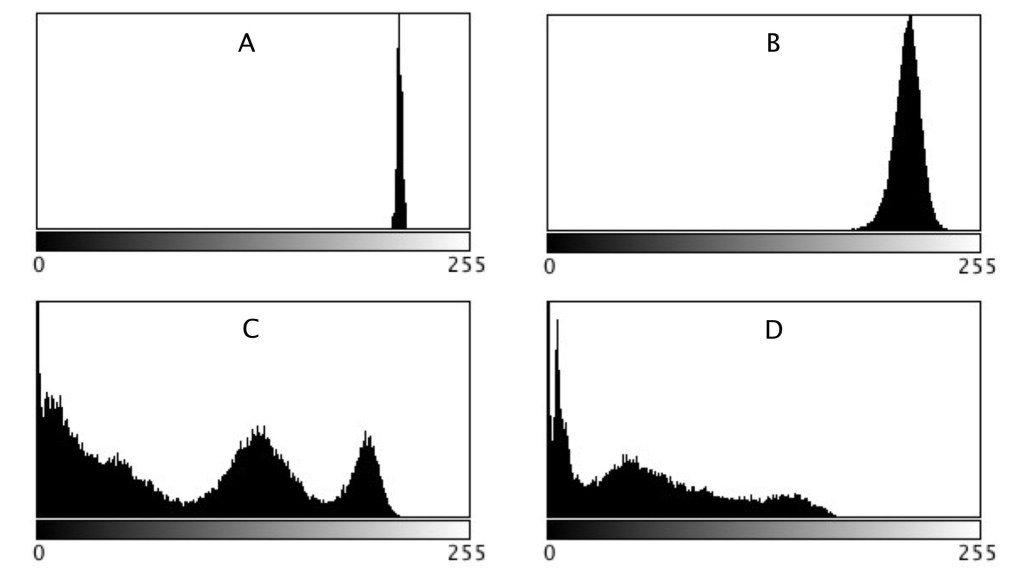
As shown in region C and D, more complex scenes introduce an increased variance, and SD. The variances can be associated with the distribution of the histograms shown below.
Fig 3: Comparison of histograms
When comparing two regions, a lower variance (or in reality a lower SD) usually implies a more uniform region of pixels. Generally, mean and variance are not good estimators for image content because two totally different images can have same mean, and variance.
The term snapshot is an interesting one. In reality all snapshots are photographs, but not all photographs are snapshots. A snapshot is almost an unexpected photograph, one taken quickly without thinking about it too much, and often in a surreptitious manner – an abrupt artifact. Snapshots are ubiquitous with small, pocket-cameras, like the Ricoh GR series, or even mobile phone cameras (although it just isn’t the same). Once a camera is set up using a tripod, or the camera itself is a behemoth dSLR, the whole atmosphere of taking a photograph changes. Often the thing that is to be photographed has already happened, the moment passed. Snapshots involving people also change as they become more self-aware. It’s hard to get a candid shot. Paul Strand [1] suggested that a snapshot is “when it becomes necessary to stop movement“.
A snapshot of the Hotel Spiezerhof in Spiez (Switzerland) taken from a ship moving on the lake, circa 1935.
For the first decades of the photograph, the snapshot did not really exist, for a number of reasons, both technological and sociological. From the 1840s to the turn of the century, the more formal portrait photograph was the mainstay. Cameras were slow, and although the “nuclear” family was considered a well developed entity, casual family life was not really considered a good basis for photographic subject matter. As Steven Halpern [2] suggests the portrait was a means for the masses to achieve a cultural identity. In 1878 Charles Haper Bennett discovered how to sensitize dry gelatin plates, a process which allowed exposures of 1/20th of a second or less. It was now possible to stop movements. The last two decades of the 19th century followed a series of innovations such as handheld cameras, roll film and the astigmat lens, culminating in the Kodak Brownie, which made photography available to everyone. Family life had also changed, and while the portrait had focused on the individual, the snapshot characterized the interaction of the whole family, in a much more laid-back manner.
A snapshot taken from the window of a moving VIARail train in Montreal using an iPhone.
Snapshots are interesting in scenes where there is movement, or change, a visual record of something that won’t happen the same way again. Taking pictures in a downtown core is a great example. Stand at a cross-walk and watch the movement of people. A snapshot will freeze the movement of people, but it is by no means an exact art. People can be partially in focus, partially blurred, or obscured. In that respect a snapshot means short exposures, using a fast shutter speed, and in the case of film, a high ISO film. Long exposures are by no means snapshots. Any photograph that stops movement could therefore be considered a snapshot.
[1] Paul Strand, The Snapshot, Aperture, 19(1), p.49 (1974) [2] Steven Halpern, The Snapshot, Aperture, 19(1), p.65 (1974)
Everyone has some image that they wish had better resolution, i.e. the image would have finer detail. The problem with this concept is that it is almost impossible to create pixels from information that did not exist in the original image. For example if you want to increase the size of an image 4 times, that basically means that a 100×100 pixel image would be transformed into an image 400×400 pixels in size. There is a glitch here though, increasing the dimensions of the image by four times, actually increases the data within the image by 16 times. The original image had 10,000 pixels, yet the new image will have 160,000 pixels. That means 150,000 pixels of information will have to be interpreted from the original 10,000 pixels. That’s a lot of “padding” information that doesn’t exist.
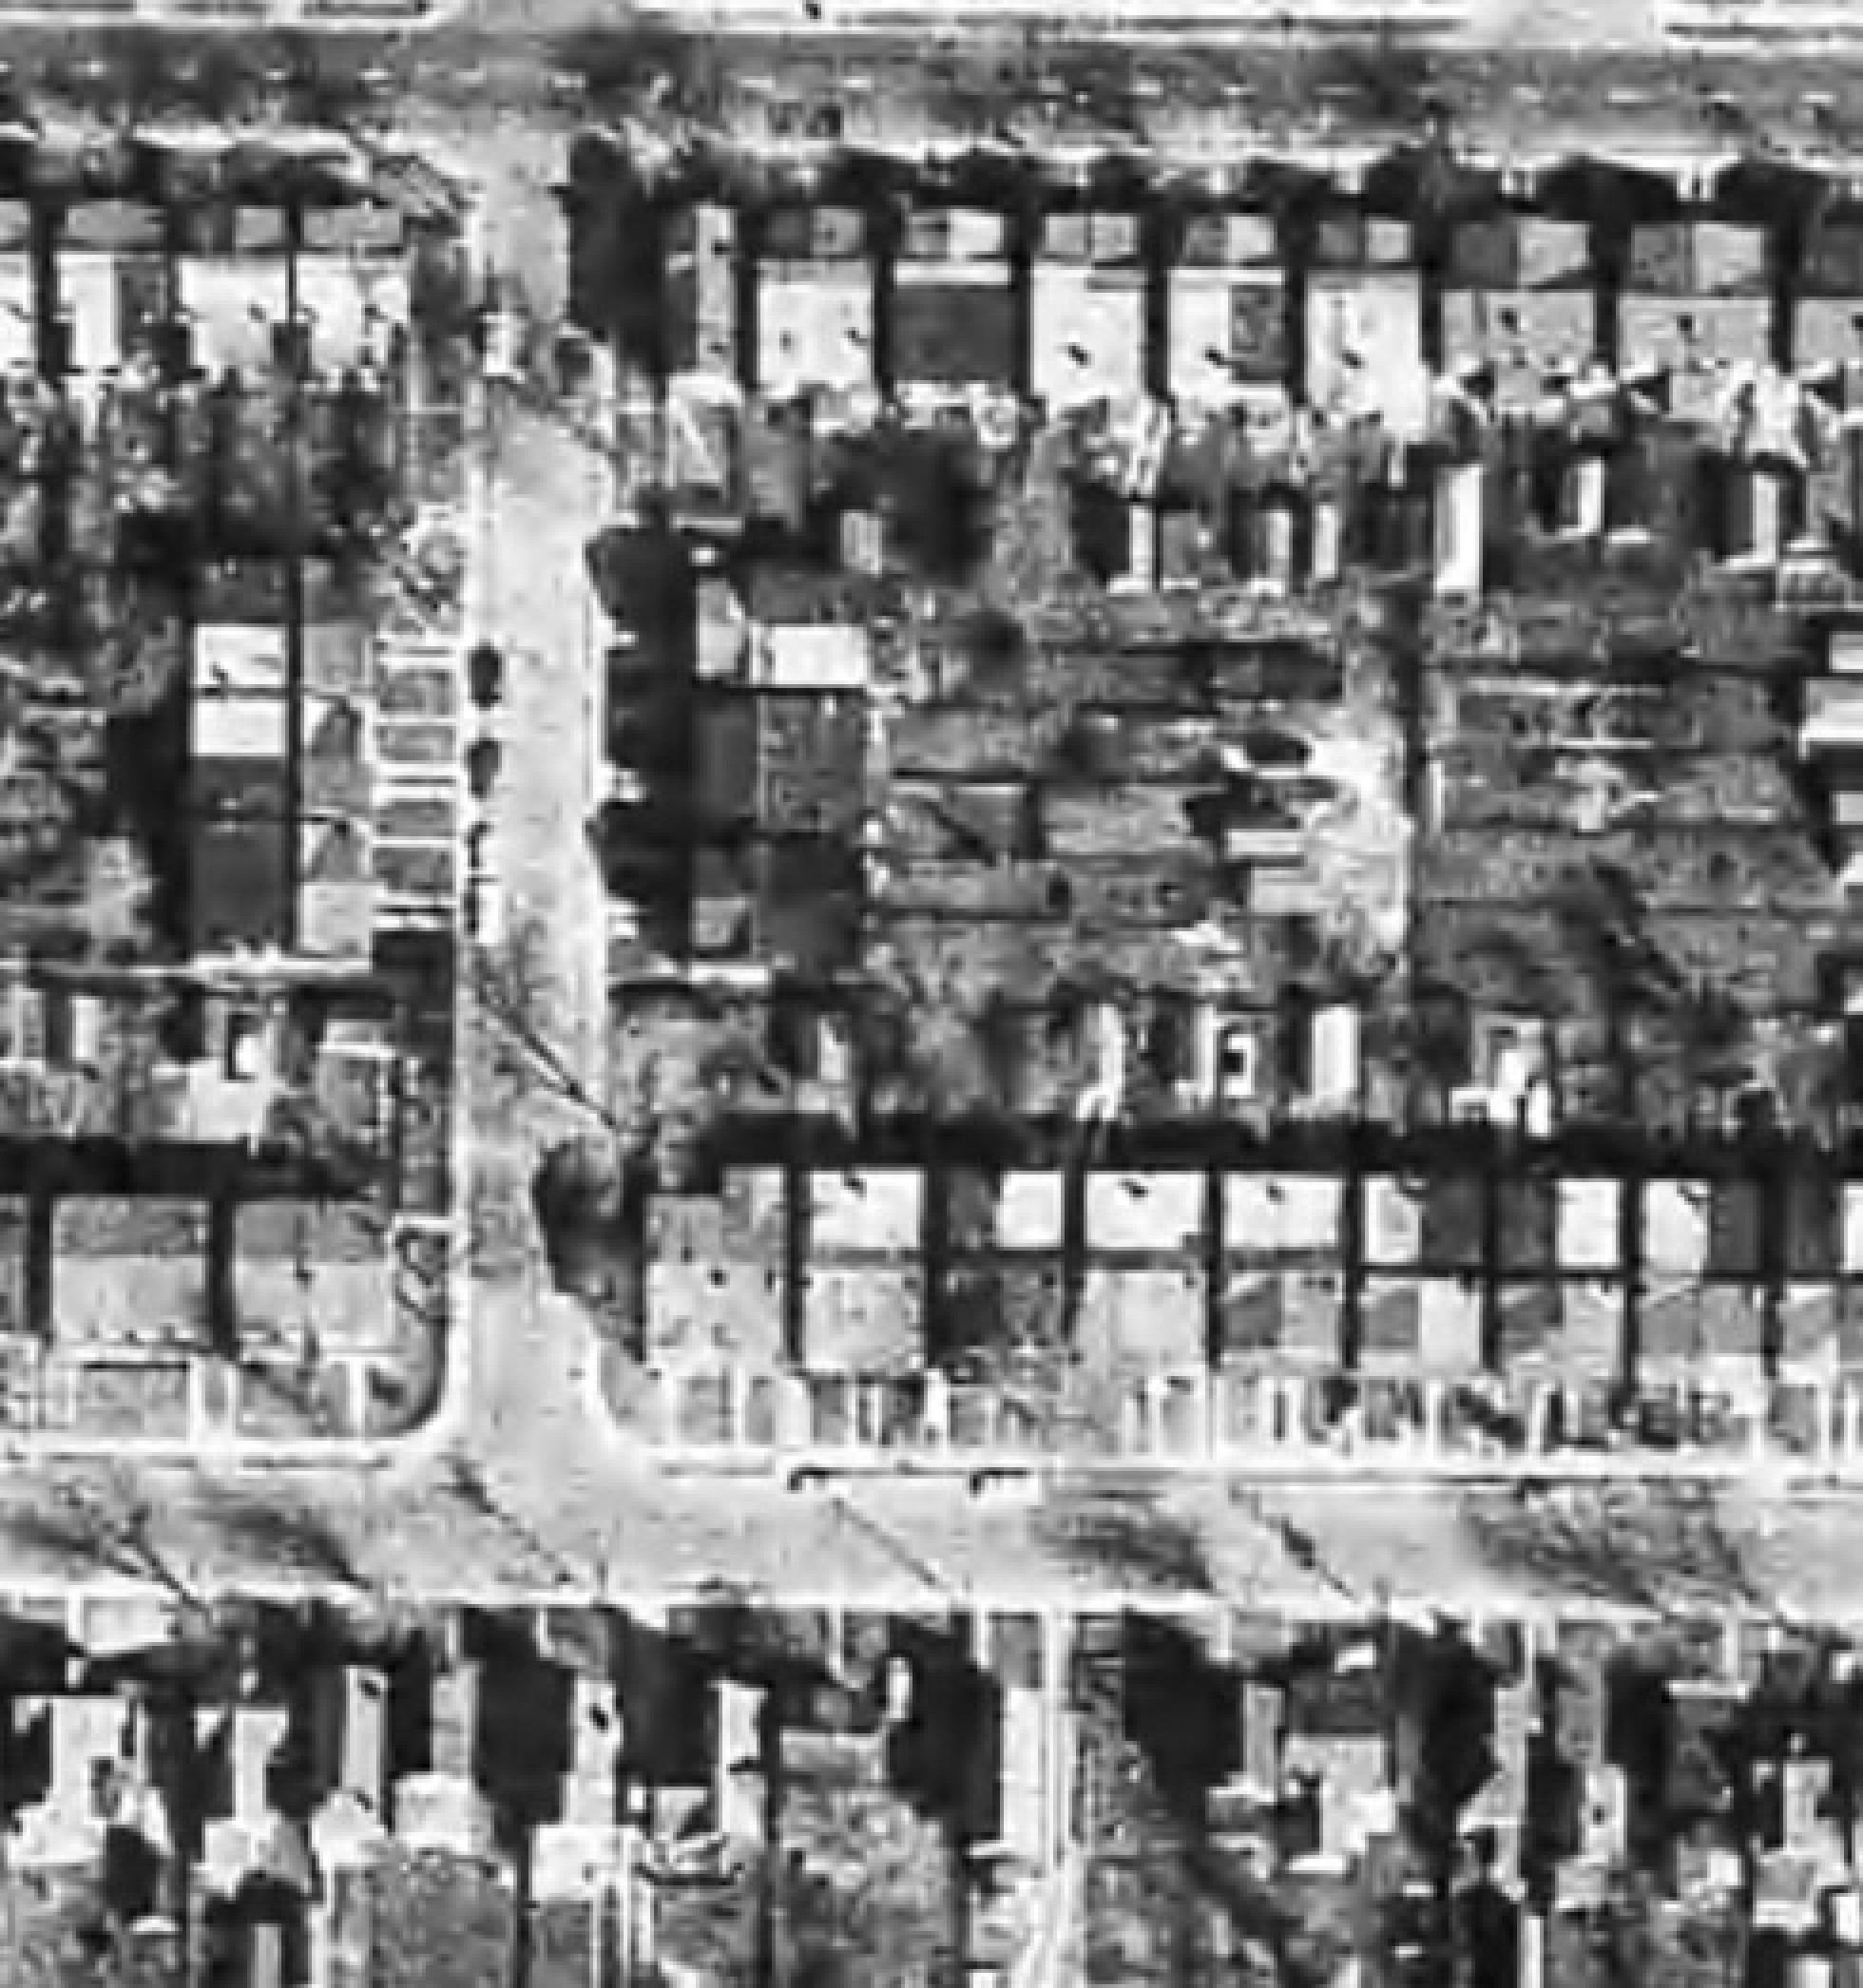
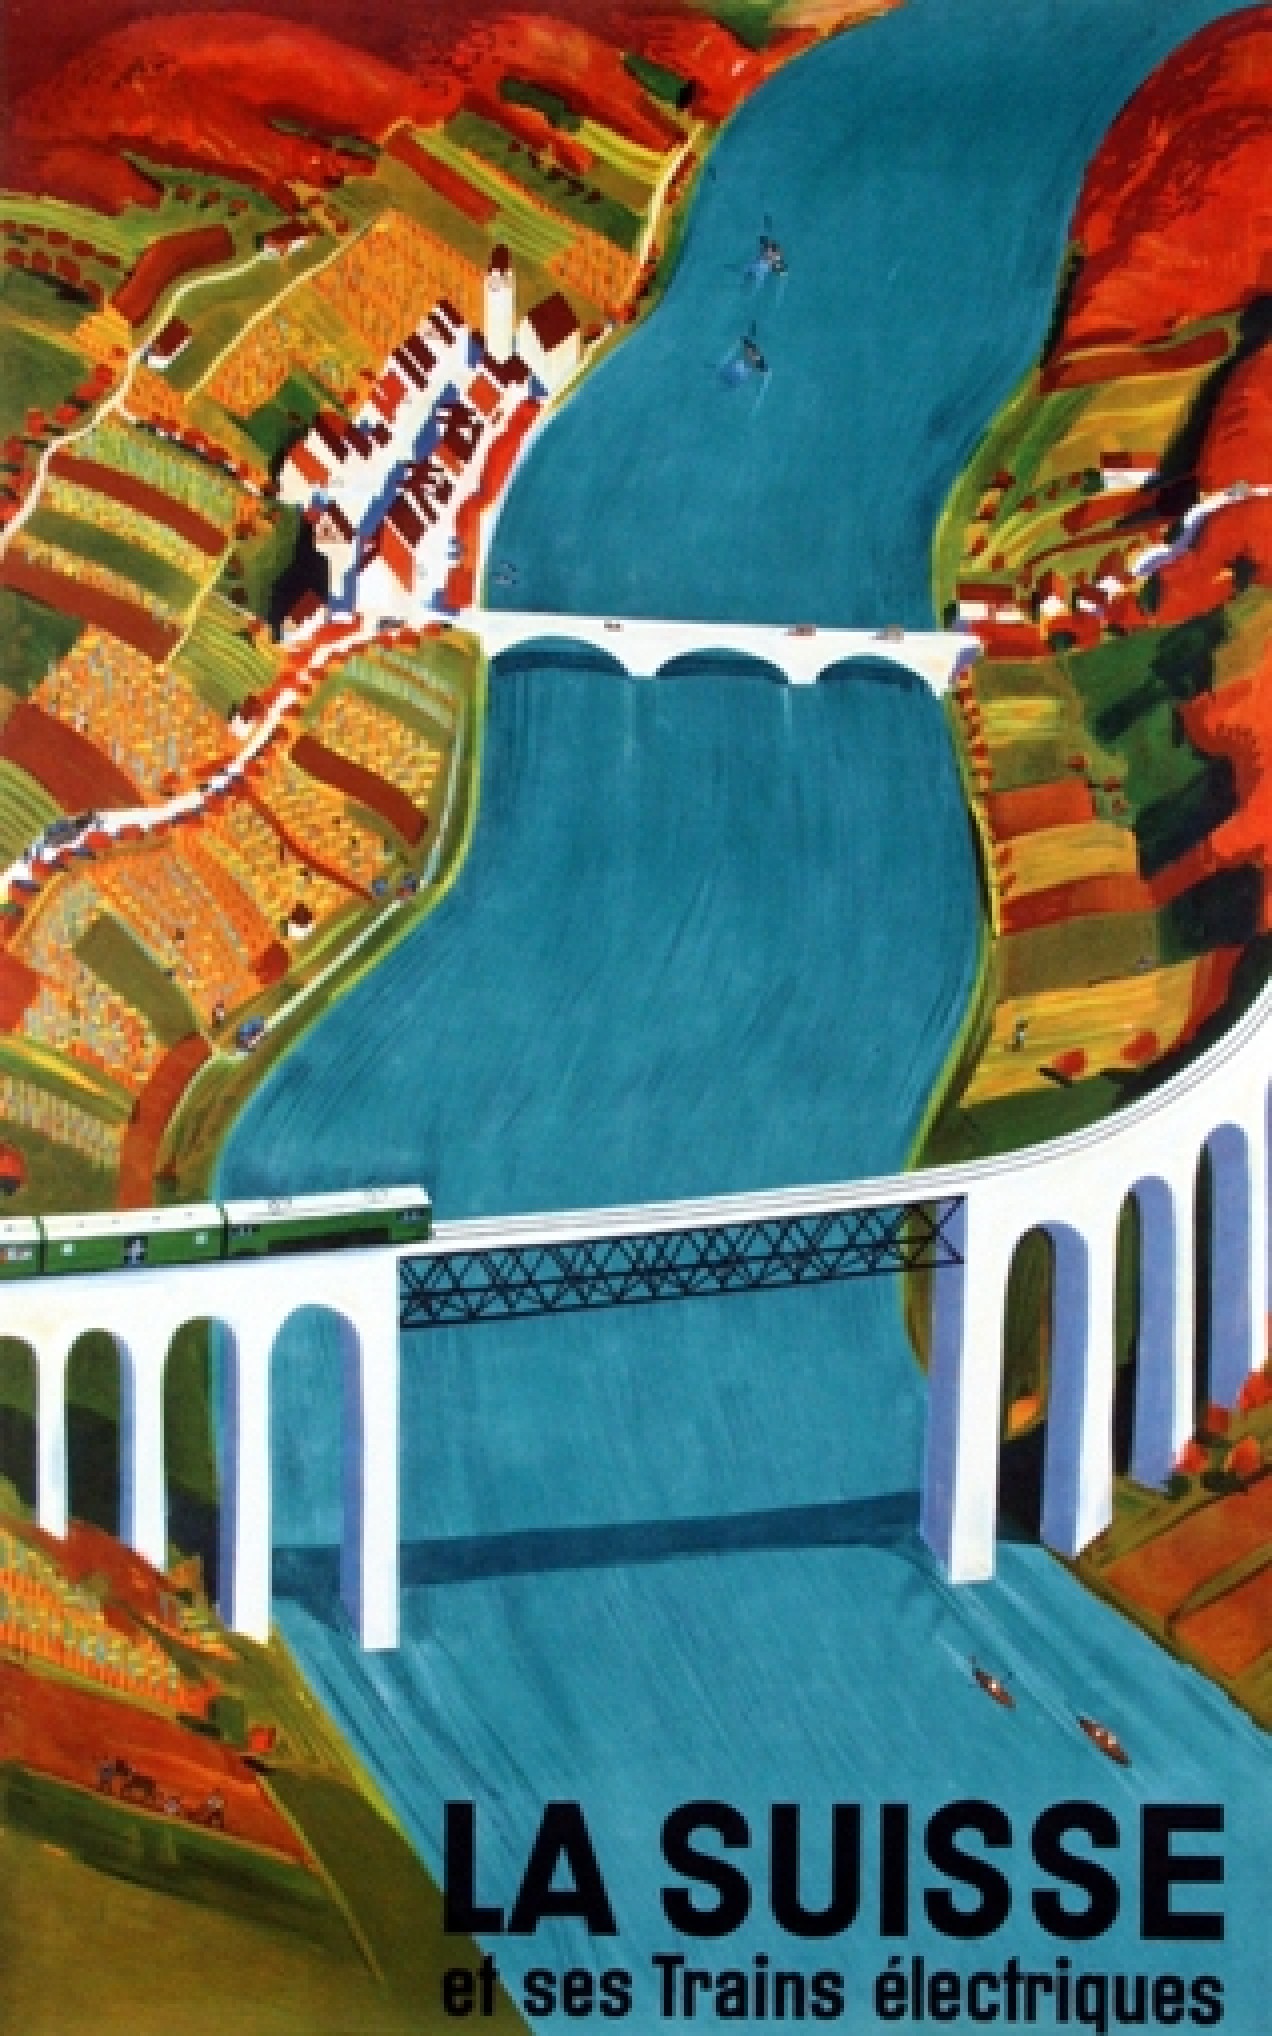
There are a lot of algorithms out there that suggest that they can increase the resolution of an image anywhere from 2-16 times. It is easy to be skeptical about these claims, so do they work? I tested two of these platforms on two vastly different images. Images where I was interested in seeing a higher resolution. The first image is a segment of an B&W aerial photograph of my neighbourhood from 1959. I have always been interested in seeing the finer details, so will super-resolution fix this problem? The second image is a small image of a vintage art poster which I would print were it to have better resolution.
My experiments were performed on two online systems: (i) AI Image Enlarger, and (ii) Deep Image. Now both seem to use AI in some manner to perform the super-resolution. I upscaled both images 4 times (the max of the free settings). Now these experiments are quick-and-dirty, offering inputs from the broadest ends of the spectrum. They are compared to the original image “upscaled” four times using a simple scaling algorithm, i.e. each pixel in the input image becomes 4 pixels in the output image.
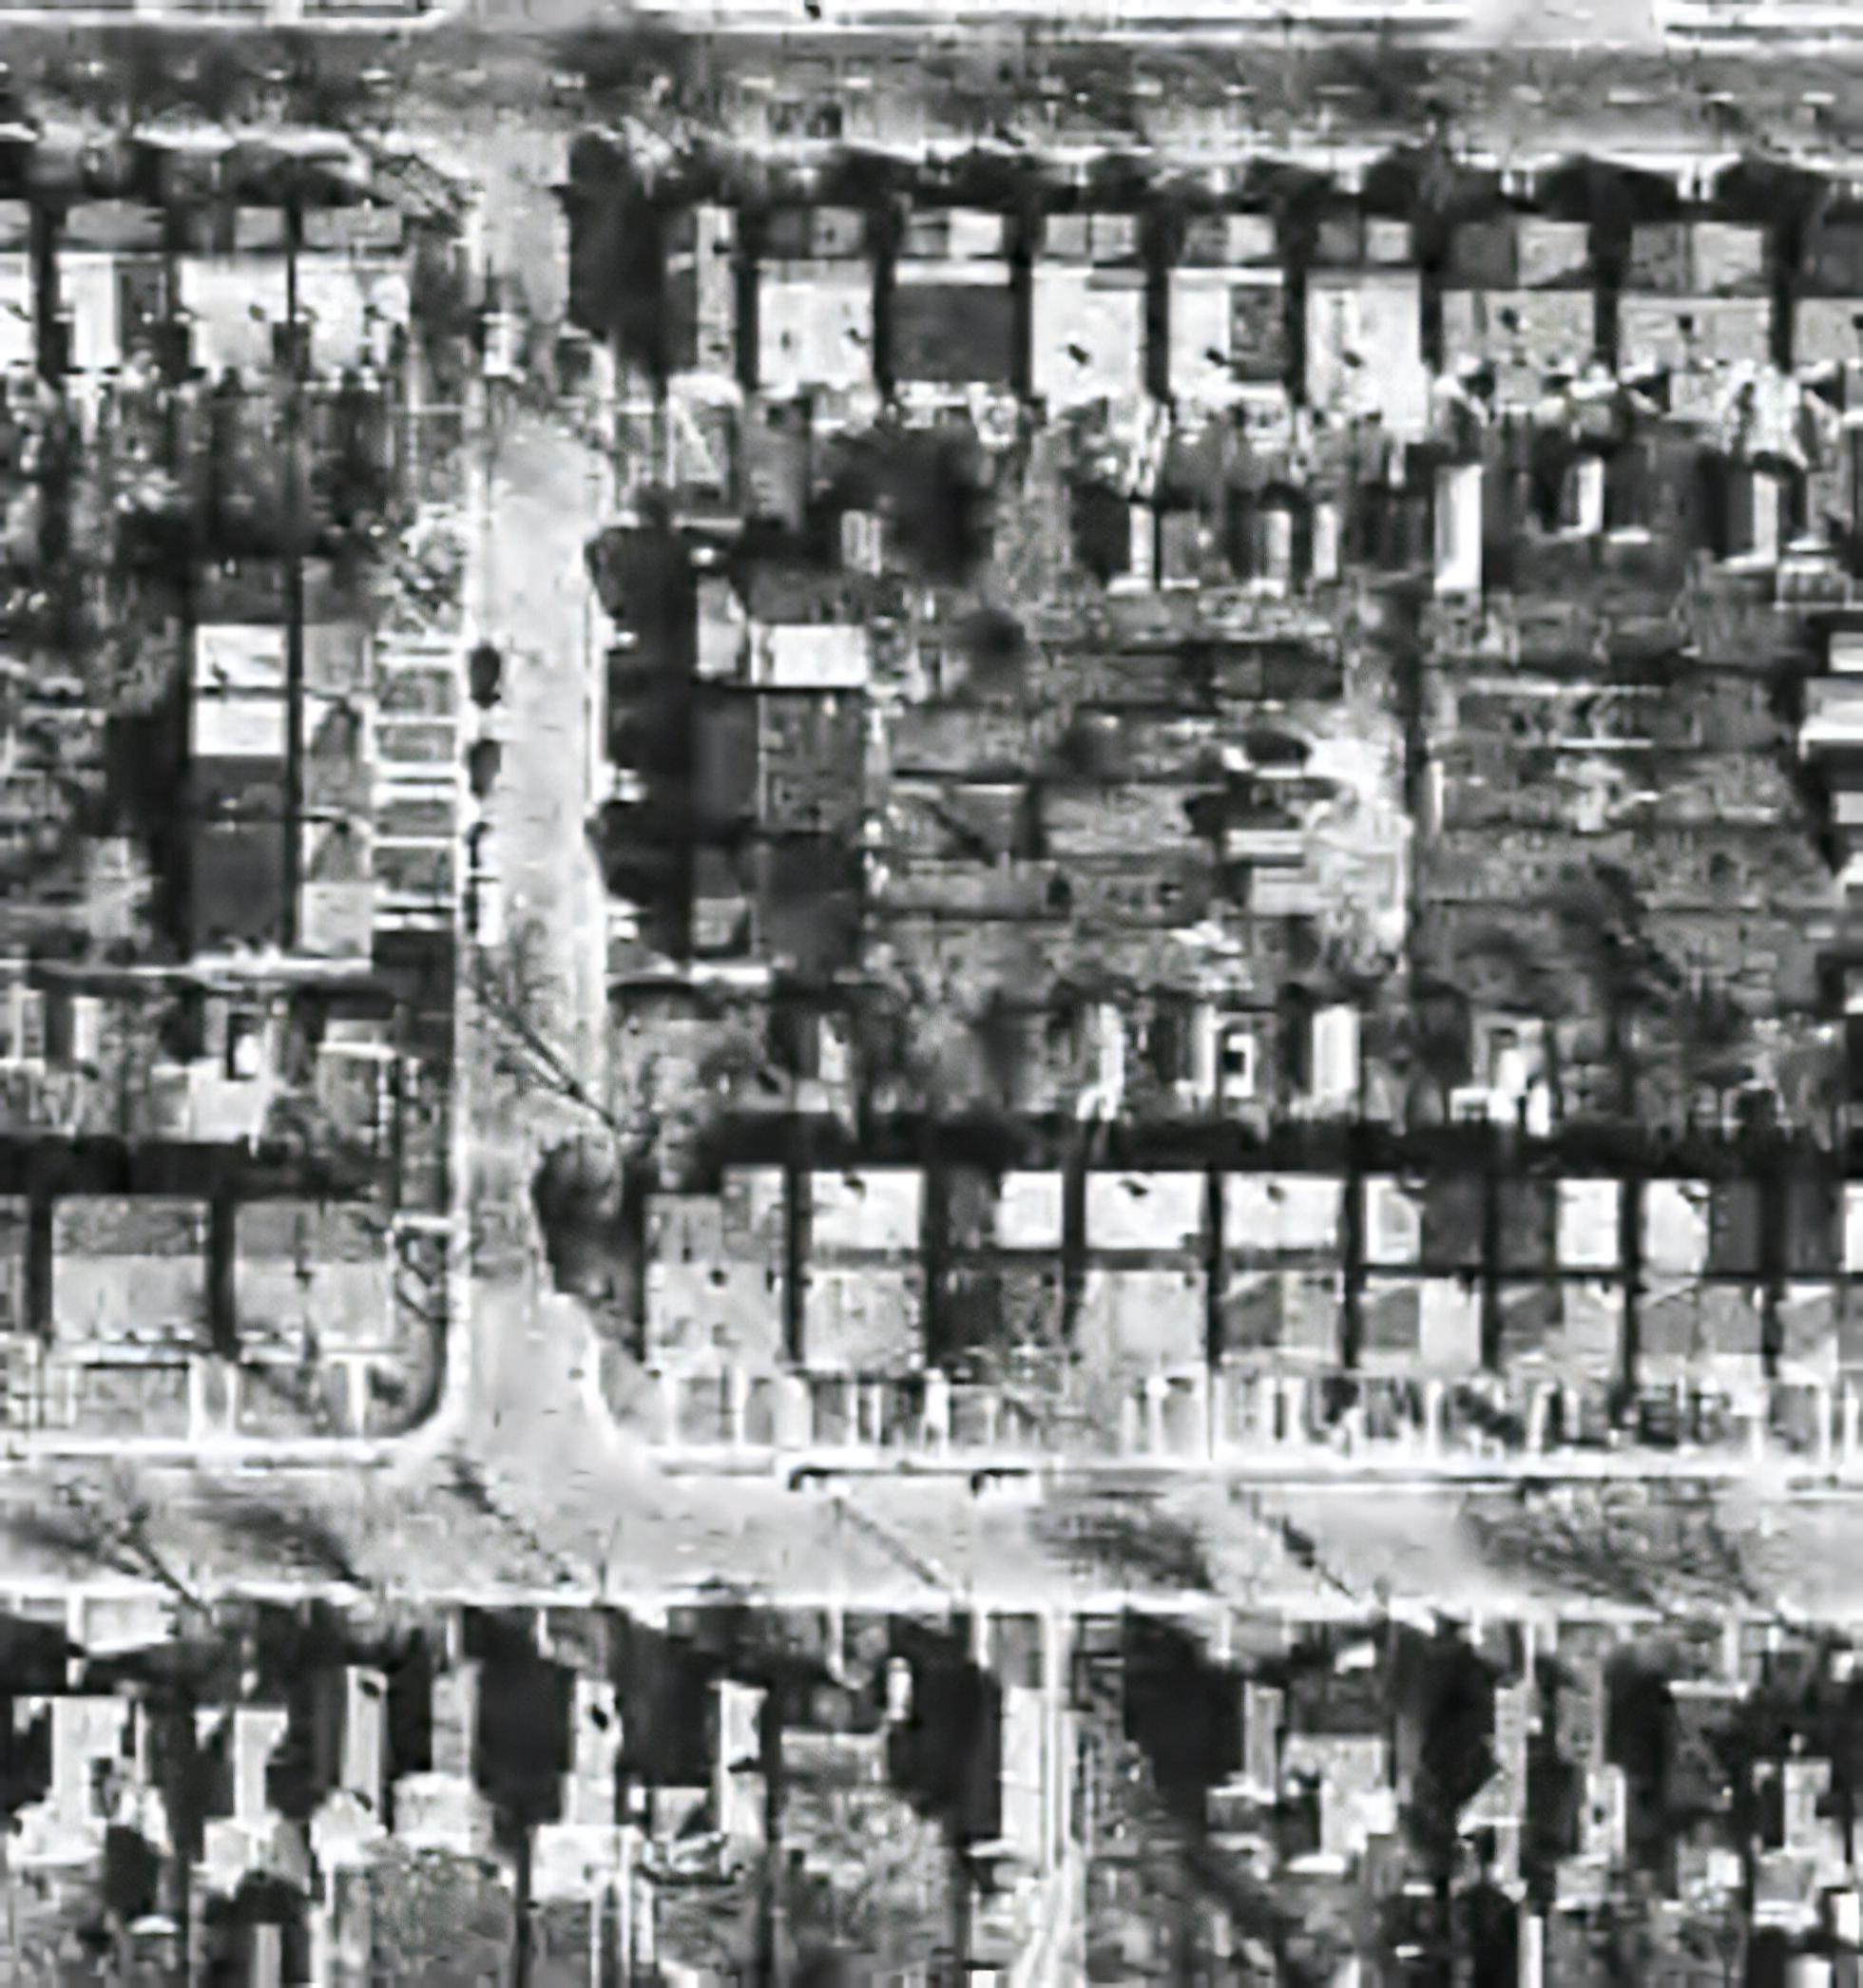
The first experiment with the B&W aerial photograph (490×503) increased the size of the image to 1960×2092 pixels. Neither super-resolution algorithm produced any results which are perceptually different from the original, i.e. there is no perceived enhanced resolution. This works to the theory of “garbage-in, garbage-out”, i.e. you cannot make information from nothing. Photographs are inherently harder to upsize than other forms of image.
The original aerial image (left) compared with the super-resolution image produced by AI Image Enlarger (right).
The original aerial image (left) compared with the super-resolution image produced by Deep Image (right).
The next experiment with the coloured poster (318×509) increased the size of the image to 1272×2036 pixels. Here the results from both algorithms are quite good. Both algorithms enhance detail within the images, making things more crisp, aesthetically pleasing, and actually increasing the detail resolution. Why did the poster turn out better? This is mainly because artwork contains a lot more distinct edges between objects, and the colour also likely contributes to the algorithms success.
The original poster image (left) compared with the super-resolution image produced by AI Image Enlarger (right).
The original poster image (left) compared with the super-resolution image produced by Deep Image (right).
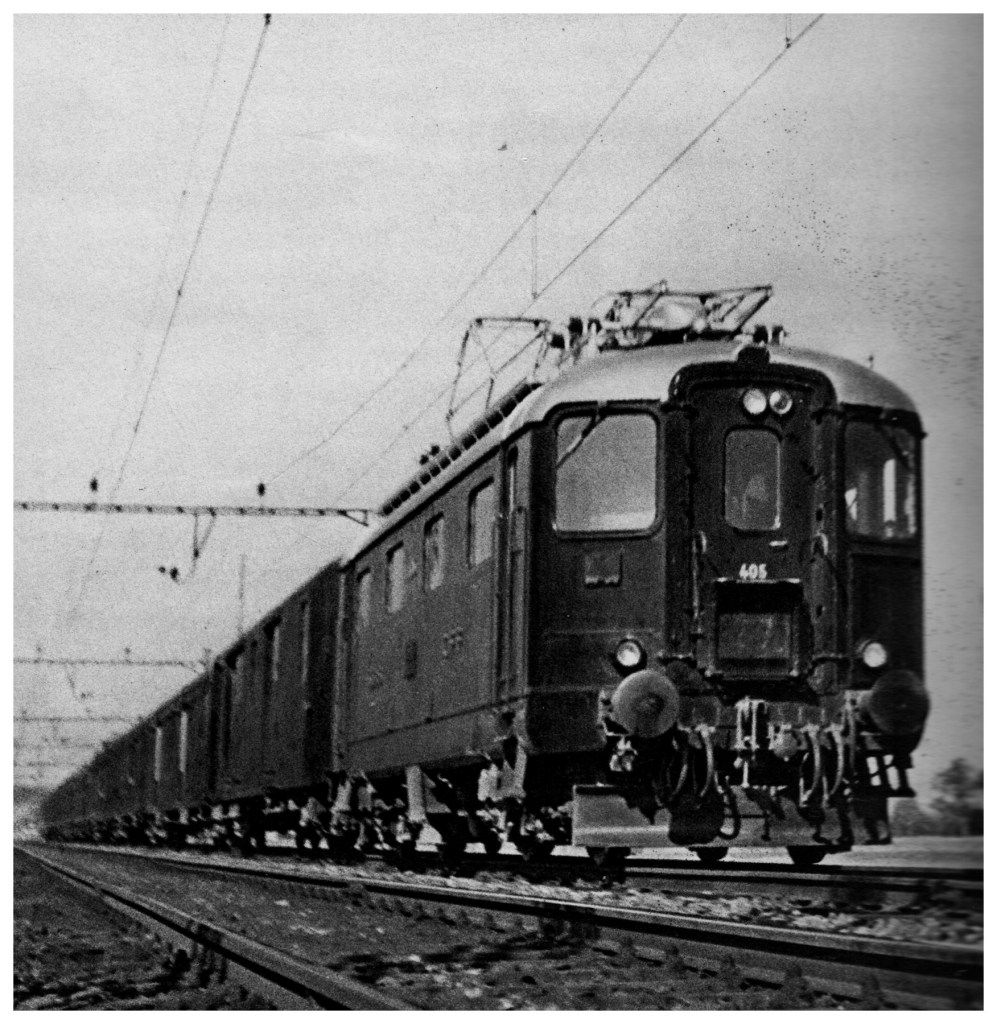
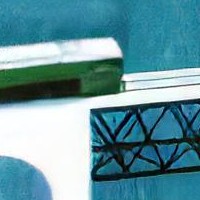
To compare the algorithms, I have extracted two segments from the poster image, to show how the differing algorithms deal with the super-resolution. The AI Image Enlarger seems to retain more details, while producing a softer look, whereas Deep Image enhances some details (river flow) at the expense of others, some of which it almost erodes (bridge structure, locomotive windows).
It’s all in the details: AI Image Enlarger (left) vs. Deep Image (right)
The other big difference is that AI Image Enlarger was relatively fast, whereas Deep Image was as slow as molasses. The overall conclusion? I think super-resolution algorithms work fine for tasks that have a good amount of contrast in them, and possibly images with distinct transitions, such as artwork. However trying to get details out of images with indistinct objects in them is not going to work too well.
Most modern cameras automatically focus a scene before a photograph is acquired. This is way easier than the manual focus that occurred in the ancient world of analog cameras. When part of a scene is blurry, then we consider this to be out-of-focus. This can be achieved in a couple of ways. One way is by means of using the Aperture Priority setting on a camera. Blur occurs when there is a shallow depth of field. Opening up the aperture to f/2.8 allows in more light, and the camera will compensate with the appropriate shutter speed. It also means that objects not in the focus plane will be blurred. Another way is through manually focusing a lens.
Either way, the result is optical blur. But optical blur is by no means shapeless, and has a lot to do with a concept known as the circle of confusion (CoC). The CoC occurs when the light rays passing through the lens are not perfectly focused. It is sometimes known as the disk of confusion, circle of indistinctness, blur circle, or blur spot. CoC is also associated with the concept of Bokeh, which I will discuss in a later post. Although honestly – circle of confusion may not be the best term. In German the term used is “Unschärfekreis”, which translates to “circle of non-sharpness“, which inherently makes more sense.
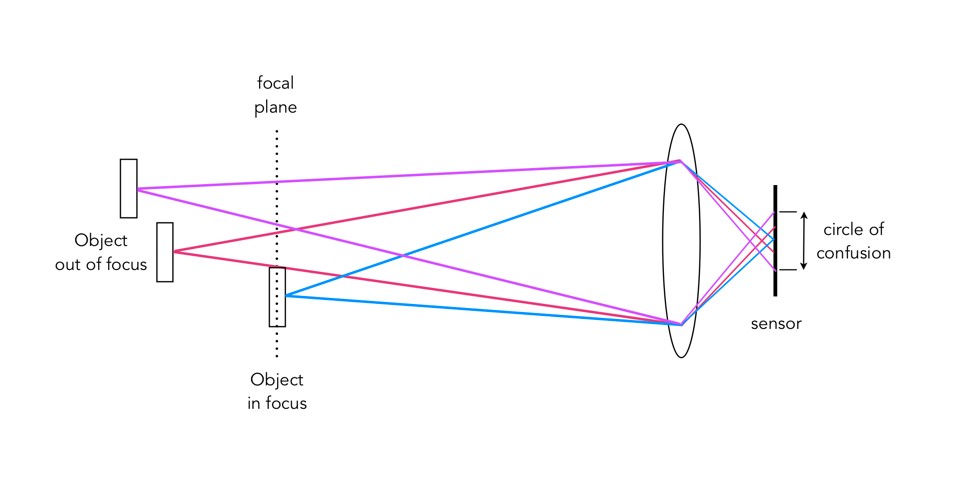
A photograph is basically an accumulation of many points – which represent the exact points in the real scene. Light striking an object reflects off many points on the object, which are then redirected onto the sensor by the lens. Each of these points is reproduced by the lens as a circle. When in focus, the circle appears as a sharp point, otherwise the out-of-focus region appears as circle to the eye. Naturally the “circle” normally takes the shape of the aperture, because the light passes through it. The following diagram illustrates the “circle of confusion“. A photograph is exactly sharp only on the focal plane, with more or less blur around it. The amount of blur depends on an objects distance from the focal plane. The further away, the more distinct the blur. The blue lines signify an object in focus. Both the red and purple lines show objects not in the focal plane, creating large circles of confusion (i.e. non-sharpness = blur).
The basics of the “circle of confusion”
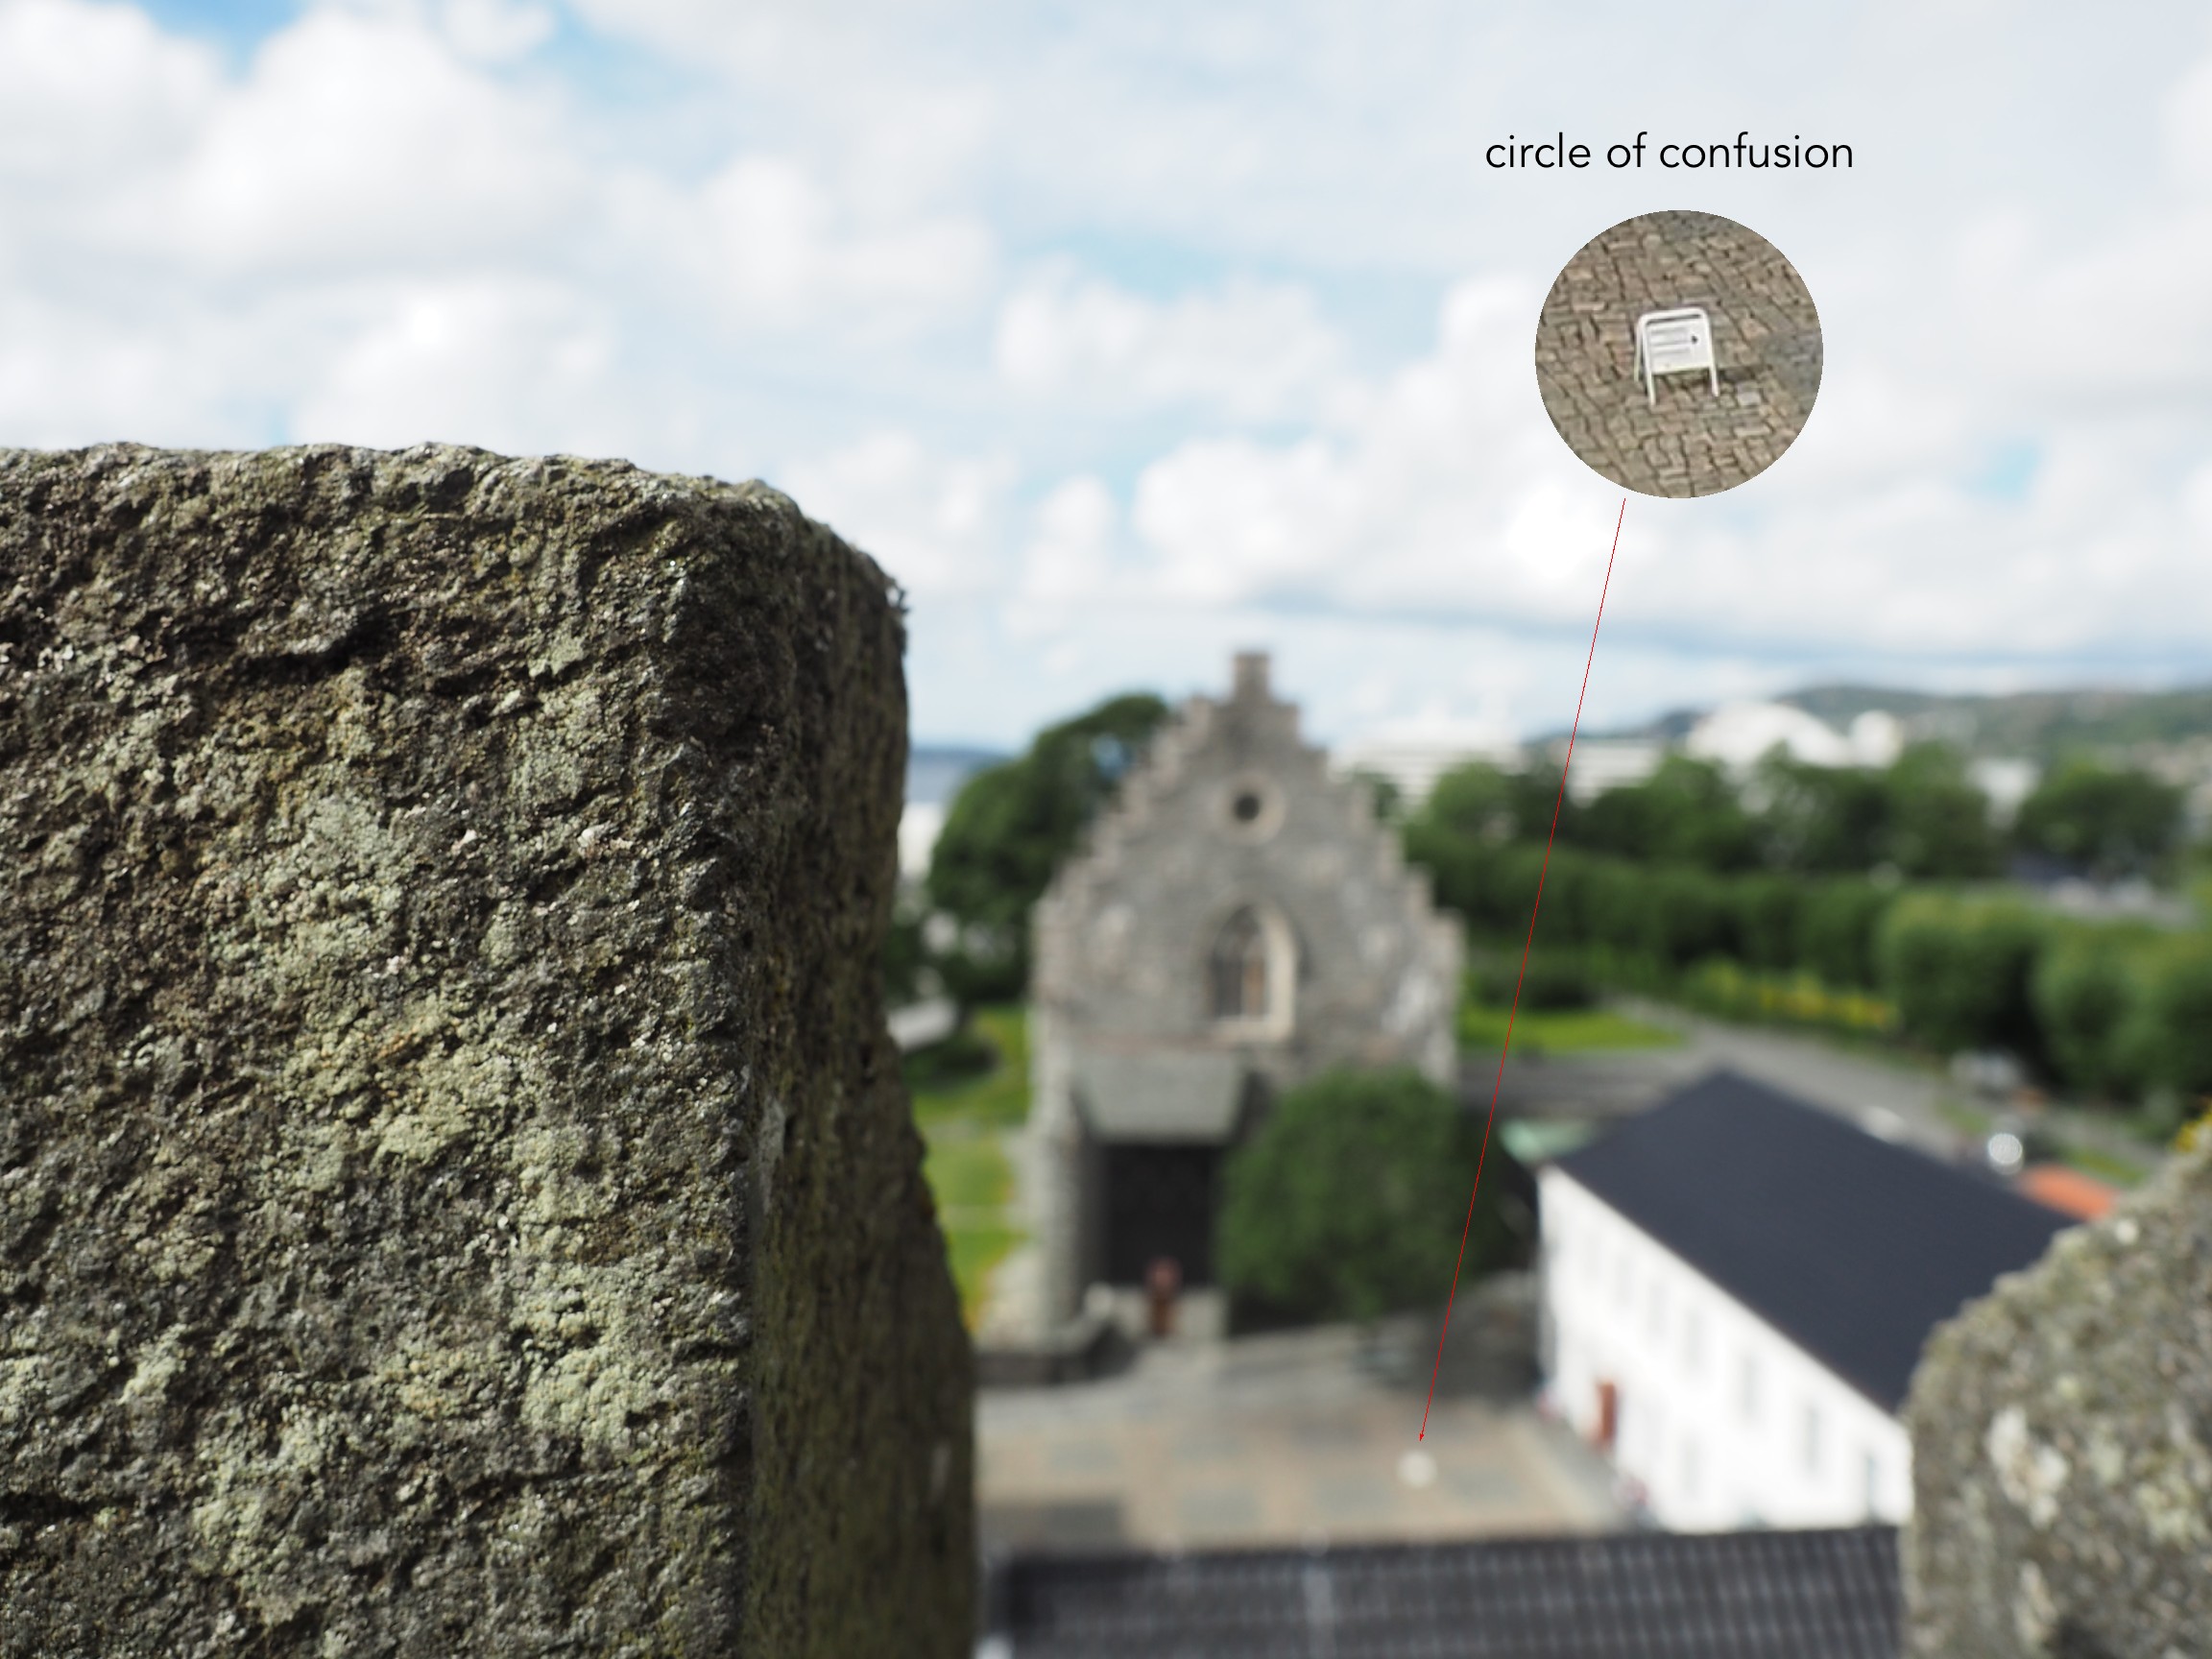
Here is a small example. The photograph below is taken in Bergen, Norway. The merlon on the battlement is in focus with the remainder of the photograph beyond that blurry. Circles of confusion are easiest to spot as small bright objects on darker backgrounds. Here a small white sign becomes a blurred circle-of-confusion.
An example of the circle of confusion as a bright object.
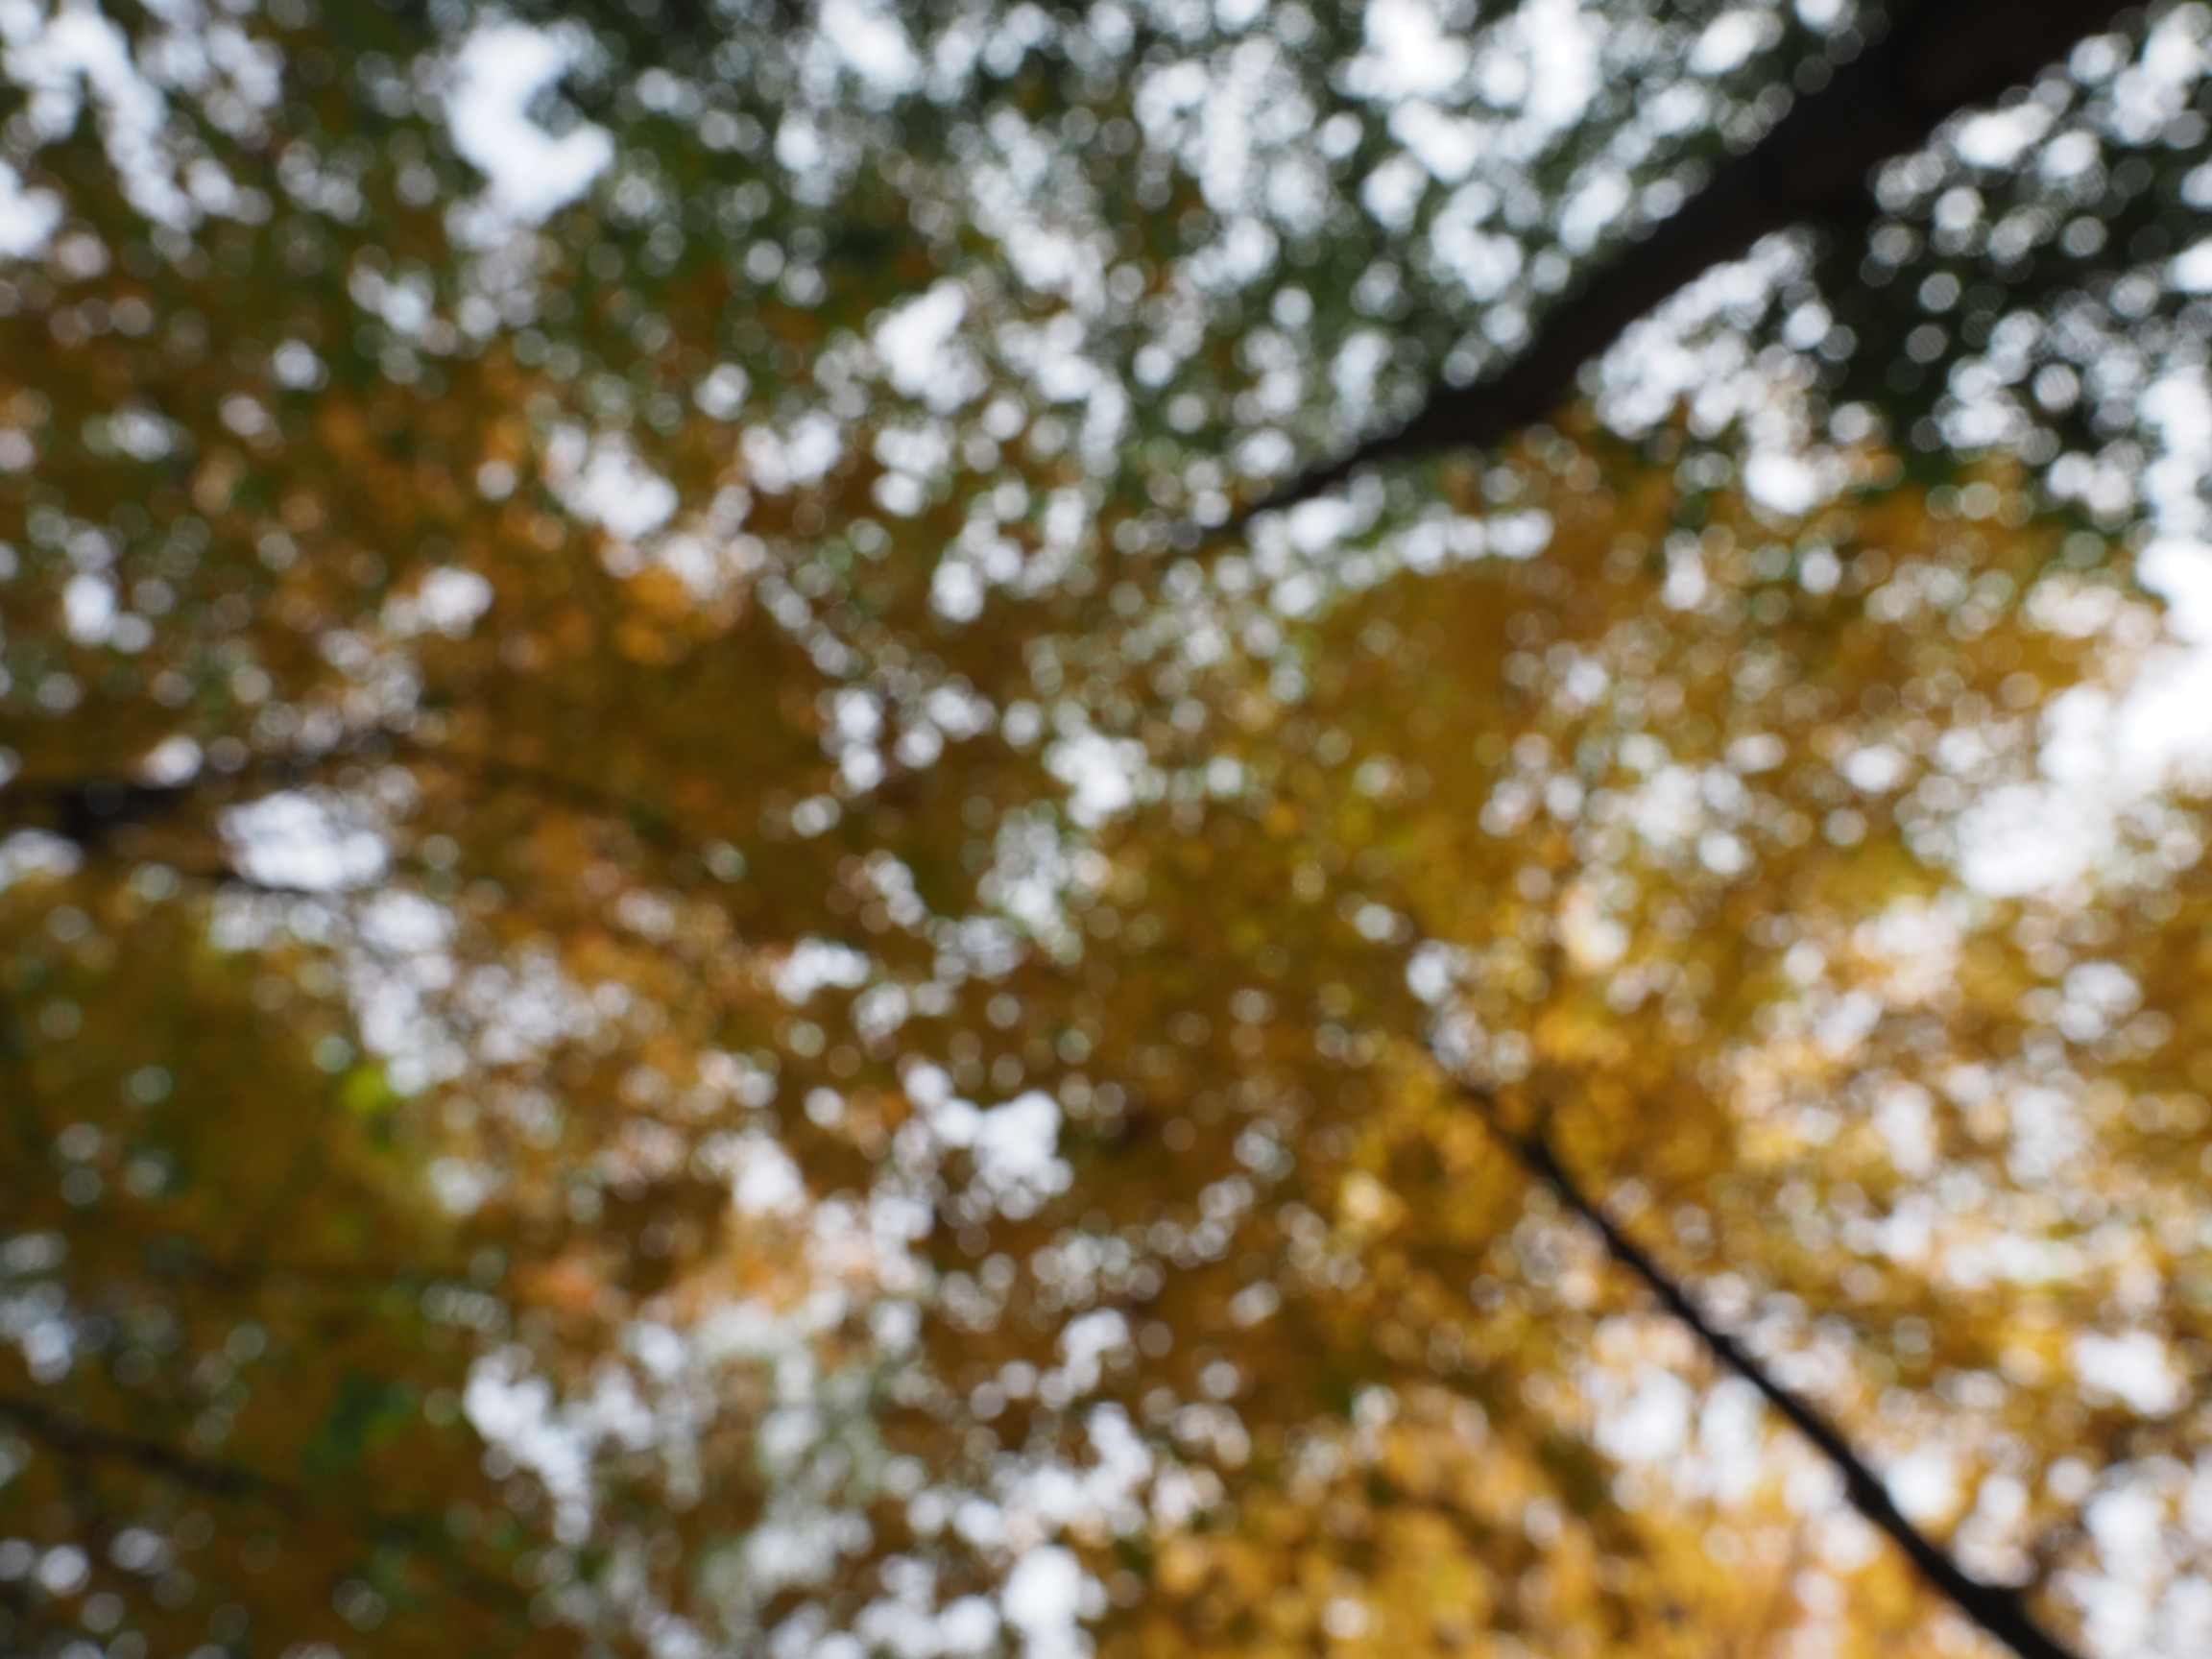
Here is a second example, of a forest canopy, taken through focusing manually. The CoC are very prevalent.
An example where the whole image is composed of blur.
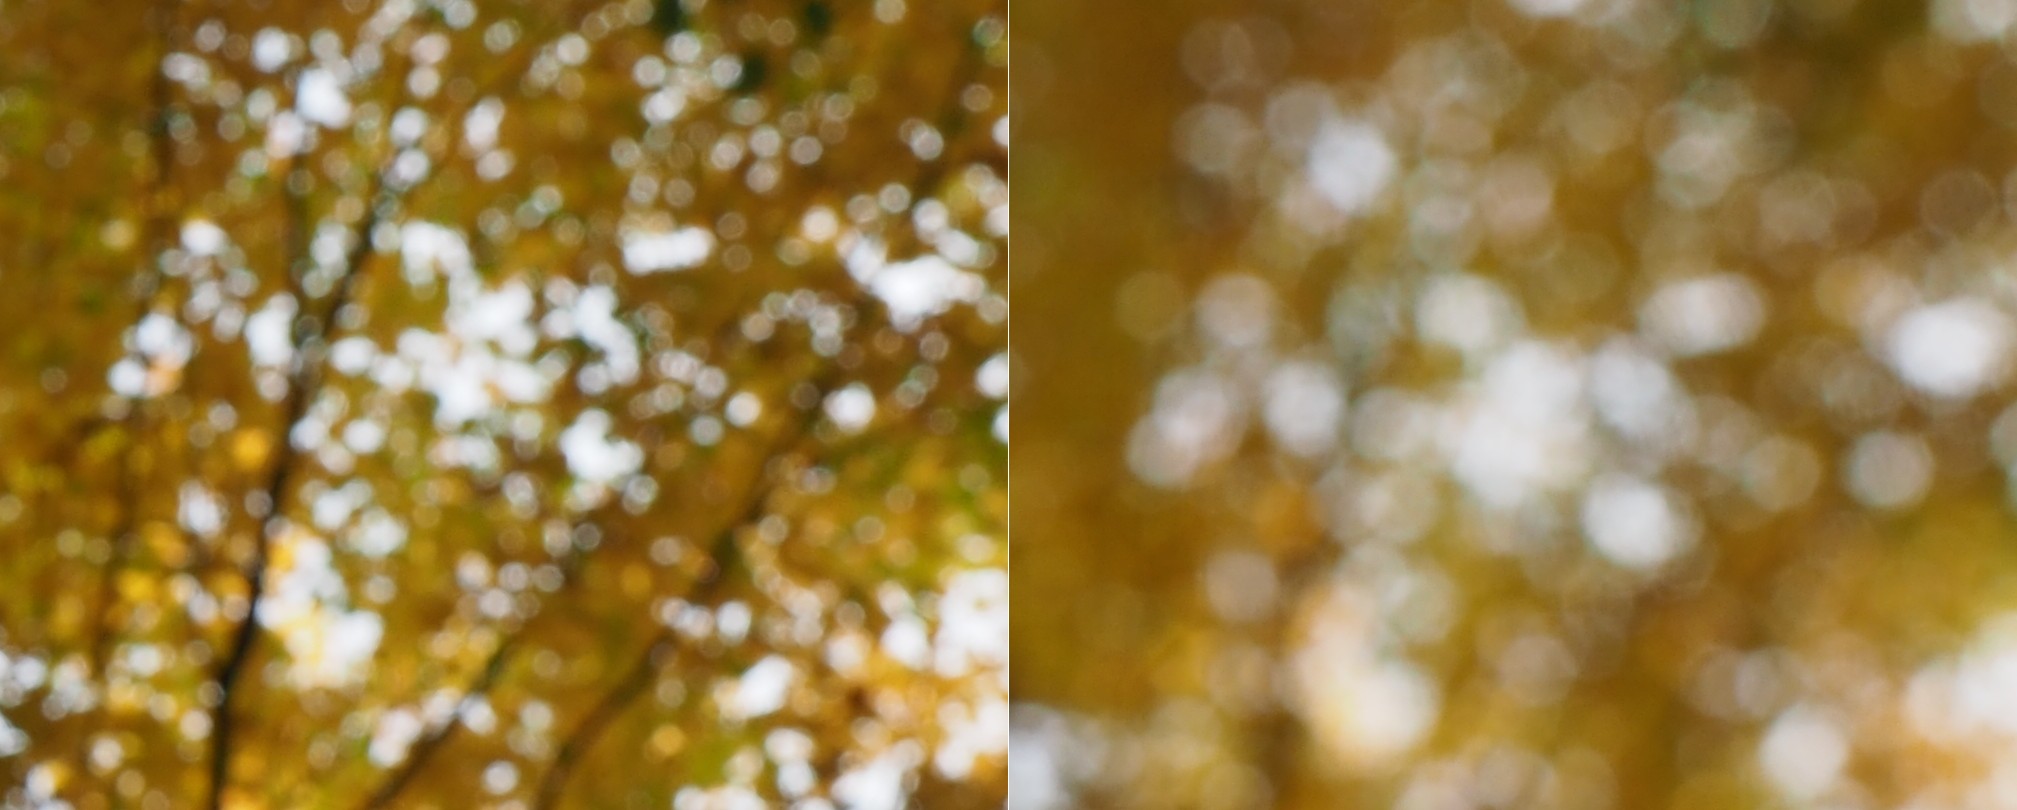
As we de-focus the image further, the CoC’s become larger, as shown in the example below.
As the defocus increases (from left to right), so too does the blur, and the size of the CoC.
Note that due to the disparity in blurriness in a photograph, it may be challenging to apply a “sharpening” filter to such an image.
About a year ago I decided to take a relook at film photography. After so many years taking digital photographs it seemed like an odd sort of move. My trip back to film began when I bought a Voigtländer 25mm lens for my Olympus MFT camera. It is completely manual, and at the moment I started focusing, I knew that I had been missing something with digital. Harking back to film seems a move that many amateur photographers have decided to make. Maybe it is a function of becoming a camera aficionado… the form and aesthetic appeal of vintage cameras brings something that modern digital cameras don’t – a sense of character. There is a reason some modern cameras are modelled on the appearance of vintage cameras. Here are some thoughts.
Digital has changed the way we photograph, and although we know we will never bungle a holiday snap, it does verge on clinical at times. I can take 1000 photographs on a 2-week trip, and I do enjoy having instant access to the photograph. Digital is convenient, no doubt about that, but there is some aesthetic appeal missing that algorithms just can not reproduce. Taking a digital image means that each pixel is basically created using an algorithm. Light in, pixel out. Giving an image a “film-look” means applying some form of algorithmic filter after the image is taken. Film on the other hand is more of an organic process, because of how the film is created. Film grains, i.e. silver crystals are not all created equal. Different films have different sized grains, and different colour profiles.
“Tea, Earl Grey, Hot”
There are many elements of photography that are missing with digital. Yes, a digital camera can be used in manual mode, but it’s just not the same. For the average person, one thing missing with digital is an appreciation for the theory behind taking photographs – film speed (meaningless in digital), shutter speed, apertures. Some digital lenses allow a switch over to manual focusing, which opens the door to control over how much of a photograph is in focus – much more fun that auto-focus. Moving to pure analog means that you have to have an understanding of camera fundamentals, and film types.
What type of camera to experiment with? While digital cameras tend to have the same underpinning technology, film cameras can be quite different. A myriad of differing manufacturers, and film sizes. Do you want to use a box camera (aka Brownie), or a foldable one with bellows? A vintage German camera (East or West?), Japanese, or Russian? Full frame or half-frame? SLR or rangefinder? Zone focusing? Fully manual, or with light meter (assuming they work). So many choices.
Another part of the organic nature of film photography is the lenses. Unlike modern lenses which can be extremely complex, and exact, vintage lenses often contain a level of imperfections which means they provide a good amount of character. If you want good Bokeh, or differing colour renditions, then a vintage lens will provide that. They are manual, but that’s the point isn’t it? Lastly there is the film. Each film has it’s own character. Monochrome film to render cinematic ambiance, or colour film that desaturates colours. There are also films which have no (inexpensive) digital equivalent – like infrared film (from Rollei, and not really the same as using a filter).
Apart from pure analog, there is also the cross-over of analog to digital, the hybrid form of photography. This is achieved by using vintage analog lenses on digital cameras, providing the best of both worlds. It does mean that functions such as aperture control, and focusing have to be done manually (which isn’t a bad thing), but also allows for much more creative control. There are also effects such as Bokeh, which can not be reproduced algorithmically in any sort of organic manner.
There is some irony in film though. Many people of course end up digitizing the film. But the essence of the photograph is captured in the film and digitizing it does not take all of that away (it does loose something as the transferral from film to paper adds another layer of appeal). To display your work, digital is still the best way (hard to write a blog post with a paper photograph). My foray into film is partly a longing to relive the experiential side of photography, to play with apertures, to focus a lens – it doesn’t have to be exact, and that’s the point.
The downside is of course you will never get to see the photograph until after it is developed. However it’s best to look at this more from a more expressive point-of-view. The art may lie partially in the unveiling. Maybe film photography lends itself more to an art form.
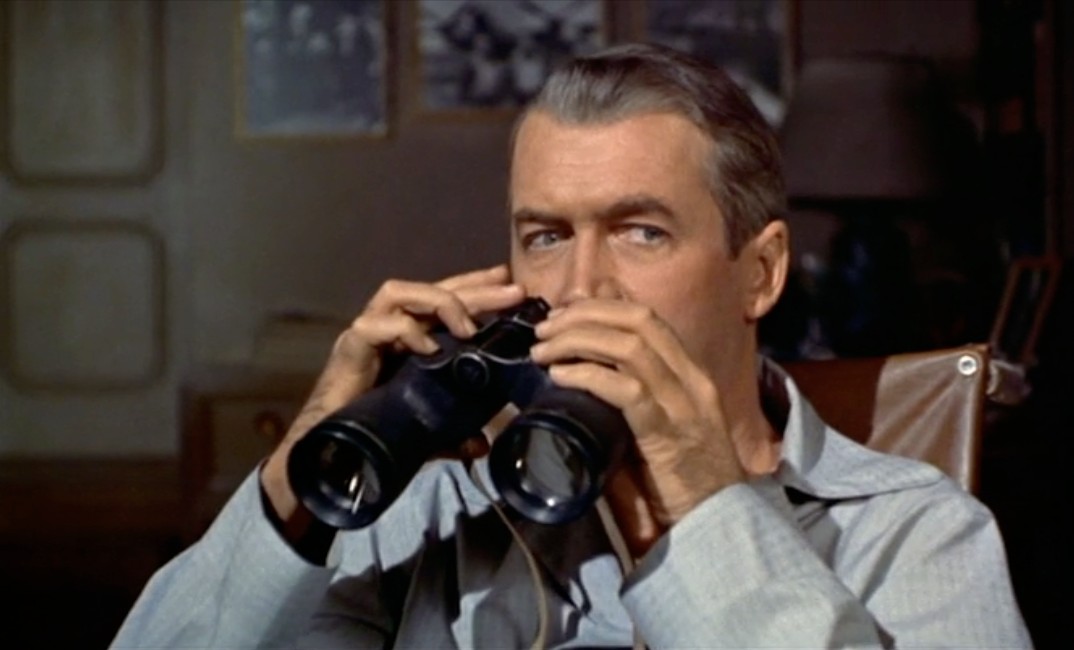
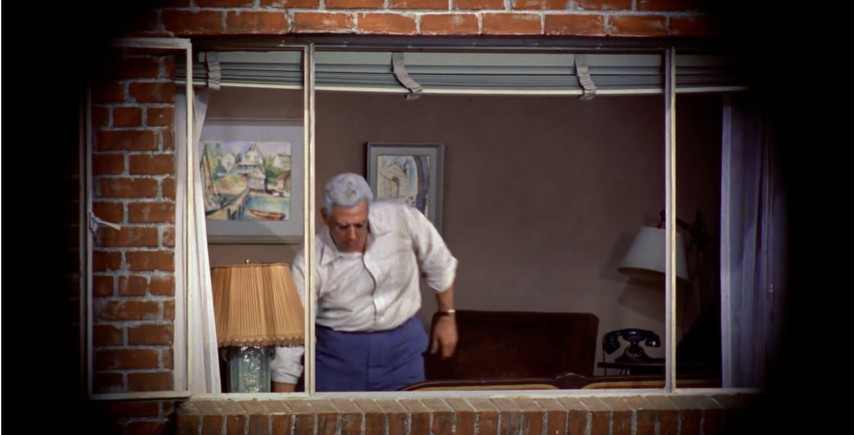
The other interesting thing about Hitchcock’s “Rear Window” is the fact that the binocular shots, and the camera shots appear the same. Again we could mark this down to artistic license, but there are inherently some issues which persist from an optical point-of-view. Firstly, what kind of binoculars are they? Little is written in the literature about the brand, so that requires a little investigative work.
Jeff with his binoculars in Rear Window
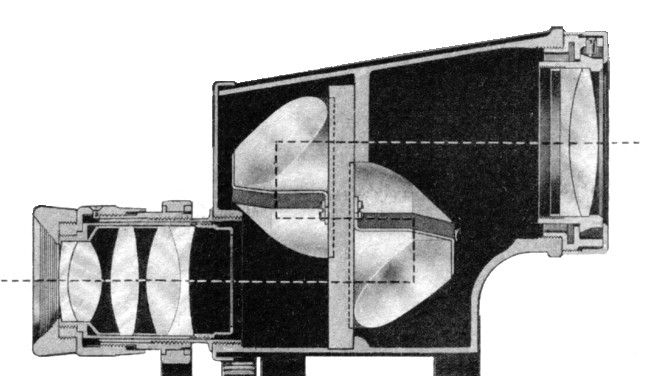
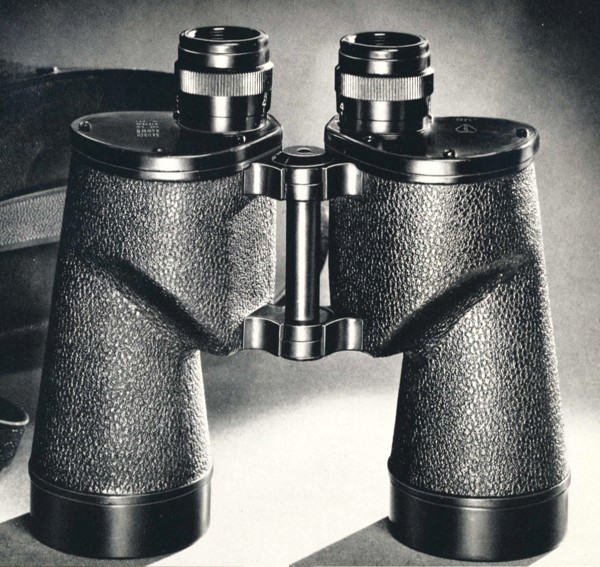
The most telling feature of these binoculars is that these are porro prism binoculars. In Porro prism Binoculars the objective or front lens is offset from the eyepiece. This offset is often characterized by a cap, which terminates the transition from ocular to objective lens.
The cross-section of half of a binocular. showing the transition from ocular (left) to objective (right) lens.
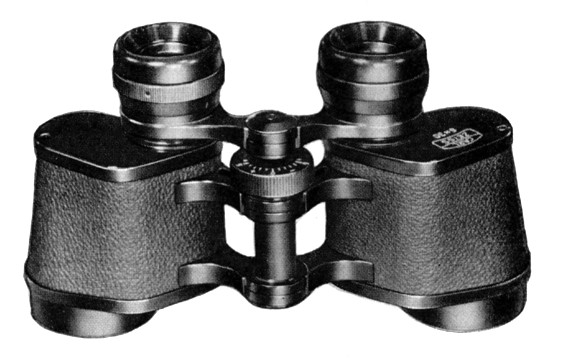
With some manufacturers, the transition seems to be smooth, with streamlined curves. There are a couple of brands that stand out in this respect: Bausch and Lomb (USA), Bushnell (USA), Cadillac (USA, made in Japan). Brands like Zeiss on the other hand, had a capped, “hard” transition.
A pair of Zeiss binoculars, showing the hard black “caps” covering the lenses.
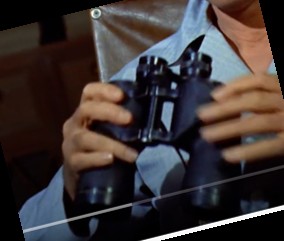
Beyond this, it is hard to tell what brand they were, because those markings would be on the front of the binoculars. More important are likely the power of magnification (how many times closer you are to the thing you are viewing), and the objective diameter of the lens. After doing some comparative measurements of the binoculars in the movie, with those in a early 1950s Bausch and Lomb catalog, I would guesstimate that these are the 7×50 binoculars, i.e. objective diameter was 50mm, and the power of magnification 7 times. A 400mm lens has a magnification factor of ×8, so binoculars with a power of ×7-8 would make sense (if we ignore the optical differences between binoculars and 35mm film lenses, e.g. cameras have a film plane, binoculars don’t).
A comparison of the binoculars in the movie, and the Bausch and Lomb 7×50 binoculars, circa early 1950s – notice the ergonomic flow of the lens parts.
The other factor which makes the B&L 7×50 the most likely candidate is that Bausch and Lomb supplied the US armed forces during WW2 (and Jeff was in the US Army Air Force), and this particular model was the Navy model, which had the “highest relative brightness of any binocular”, a so-called true “night glass”. So what are the issues between the 400mm camera lens and the binocular optics, assuming 7×50?
Field-of-View – The FoV of a 400mm lens is just over 5° (horizontal), which at 100′ distance (the width of the courtyard), translates to around 9 feet. The B&L 7×50 binoculars had a linear field of 381′ at 1000 yards, which would be about 12.7′ at 100′.
Full image circle – The camera would truncate the image circle of the lens to a rectangle, and therefore the maximum FoV is only possible along the diagonal of the frame. Binoculars allow you to see the full circle of the FoV and thus the maximum FoV in all directions. A 35mm camera with a 3:2 ratio only displays about 59% of an image circle with the same diameter as the diagonal of the rectangular image sensor.
Stereo Vision – Binoculars allow both eyes to see slightly different angles of the same objects that allow use of depth perception. Other than specialized 3D cameras, most cameras are monocular.
Rear Window: The view through the binoculars.
So Hitchcock’s use of both binoculars and a 35mm camera with a 400mm lens does take a lot of artistic license, because they are not the same, but portray the same thing on screen.