What is a pentaprism?

The first 35mm SLR camera, the Ihagee Kine Exakta, used a horizontal waist-level viewfinder. This was not unusual for the period, as there was no other means to view a picture through the camera at an eye-level (that wasn’t a rangefinder camera). The problem is that the image viewed would be flipped left-to-right. This would be rectified by the introduction of the first production pentaprism camera in 1947, in the guise of the Italian Rectaflex. The technology became more mainstream with the introduction of the Zeiss Ikon Contax S in 1949 (although waist-level viewfinders would still be dominant until the mid-1950s).

Fig.1: Early SLRs did not have a pentaprism, but instead required the photographer to look through a waist-level viewfinder

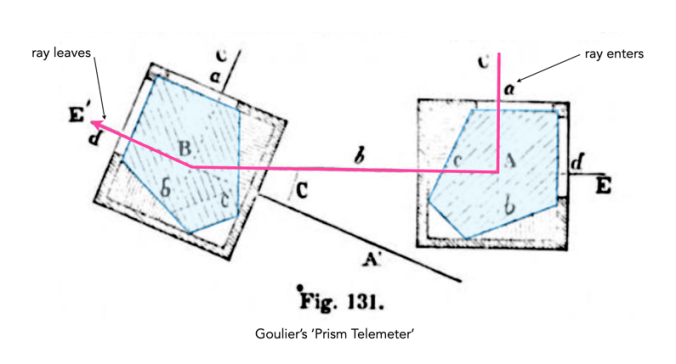
A pentaprism or pentagonal prism is a five-sided glass prism (although technically while the cross-section of a pentaprism is bound by five sides, it actually has seven or eight). Prisms were already being using in the Victorian era to design telescopes and binoculars. The use of a pentaprism in optics stems from an invention by a Captain Charles-Moÿse Goulier (1818–1891) of the French engineer corps in 1864, a “triangulation prism telemeter” [1]. It was a device with twin sighting paddles, connected by wire 40 meters long to establish a fixed baseline. Each paddle contains a five sided prism to give simultaneous orthogonal views. It may have been the first use of pentagonal prism in optics.

Fig.2: The pentaprisms used in Goulier’s 1964 invention (adapted from [1]).

This form of conventional pentaprism, sometimes referred to as a flat-roof or Goulier prism, is characterized by a 90° deviation angle (Fig.3(1)), i.e. it deviates a beam of light by 90°, reflecting the beam inside the prism twice. It is comprised of two reflective faces (Fig.3(1)b,c), arranged at 45° between them and two faces orthogonal to each other (Fig.3(1)a,d). The two surfaces performing the reflections are coated to provide mirror surfaces (e.g. silvered). The two opposite transmitting faces are often coated with an anti-reflective coating. In imaging applications this pentaprism will neither invert nor reverse an image, e.g. Fig.3(1). In the context of an SLR this still holds true, because the image is flipped as it passes through the lens and it is this flipped image that passes through the prism. So in the context of the ‘flippedi image, it is neither inverted or reversed. However, compared to the original object in front of the lens, the image viewed at the eyepiece is reversed left-to-right. Prior to the end of WW2, conventional pentaprisms were commonly used in telescopes, binoculars, and military equipment such as rangefinders.

This is illustrated in Fig.3(3) where the object F passes through the optical system of an SLR. The F is flipped by the lens and this flipped version of the F passes through the prism. The image viewed at the eyepiece is neither inverted nor reversed from that projected on the mirror. However compared to the original F, the image is reversed left to right.

Fig.3: The flat-roofed (conventional) pentaprism: (1) a simple optical path, (2) a breakdown of the angles, and (3) used in the context of an SLR optical system.

The more complex pentaprism found in the majority of SLR cameras is the roof pentaprism which reverses an image from left-to-right. It is similar to a conventional prism, but with the addition of two silvered “roof” surfaces. The concept of a roof prism was created by Italian astronomer Giovanni Battista Amici (1786-1863) in the mid-1800s. His Amici-roof prism, also known as a right-angle roof prism, was capable of reverting and inverting the image of an object while bending the line of sight through a 90° angle (Figure 4). It was used in various types of telescopes.

Fig.4: The Amici-roof prism.

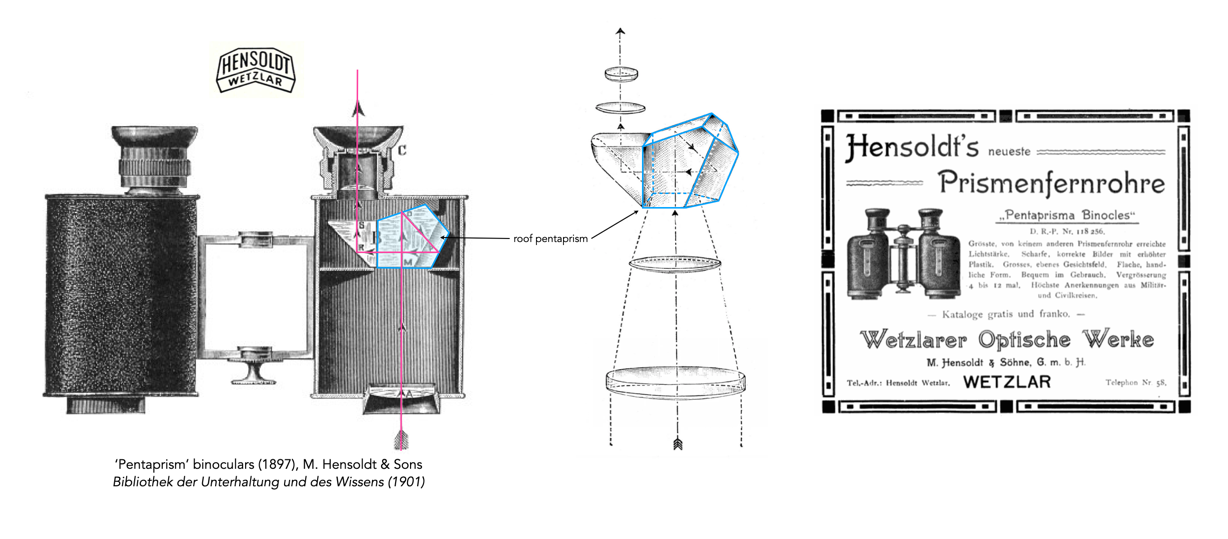
A roof prism is a prism containing a section where two faces meet at a 90° angle, resembling the roof of a building. Reflection from the two 90° faces returns an image that is flipped laterally across the axis where the faces meet. The first large scale use of a roof pentaprism may have been in binoculars, like the Pentaprisma Binocle 7×24 made by Hensoldt & Söhne (Wetzlar) introduced in 1900. An earlier version of the binoculars (1897) used a flat pentaprism attached to a right-angle prism with a roof (like an Amici-roof prism). This arrangement was denied a patent in Germany, due to a conflict with a Zeiss patent (DE77086, which used a Porro-prism), however was granted a patent in Great Britain (GB15806, 1898). The newer version of 1900 had a dialytic (split) optical system where the pentaprism had a roof edge (Figure 5).

Fig.5: Hensoldt & Söhne’s ‘Pentaprism binoculars’ (1900)

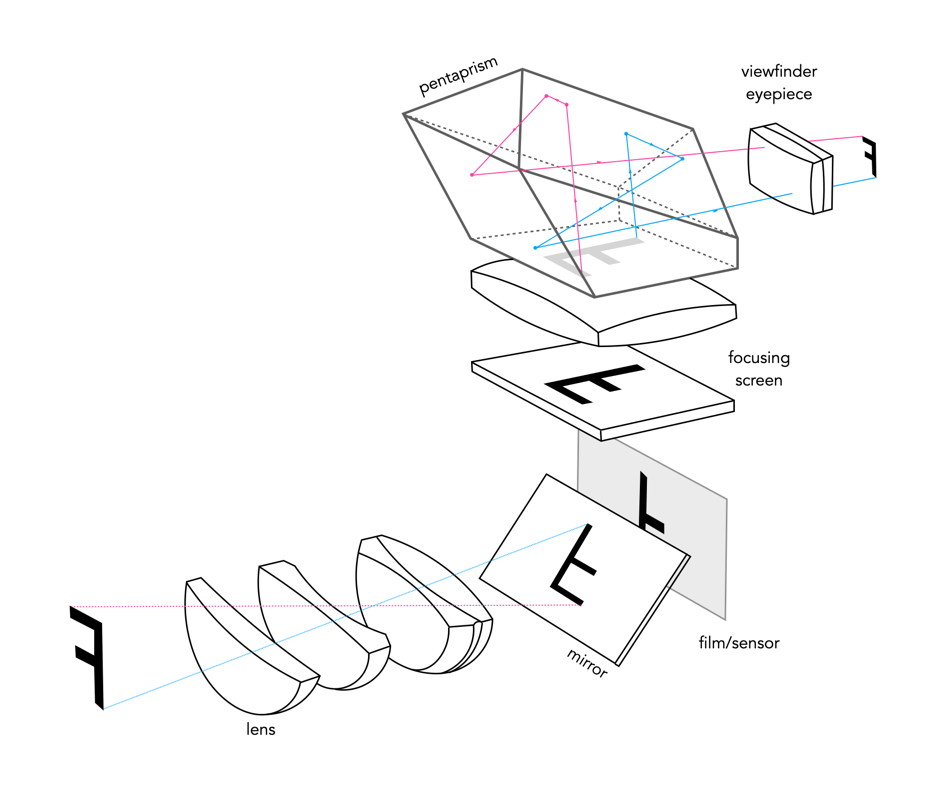
In an eye-level SLR, the roof pentaprism is inserted between the focusing screen and the viewing eyepiece. The roof pentaprism, by introducing extra reflecting surfaces, shows the object both upright and with the right and left sides in their proper place. The bottom surface of the pentaprism may form the focusing screen, or the latter may be positioned directly below the prism. The focusing screen may be of several different kinds, including plain ground glass, to various combinations of clear glass, ground glass, or micro-prism focus finder.

Fig.6: An example of light passing through a roof-pentaprism

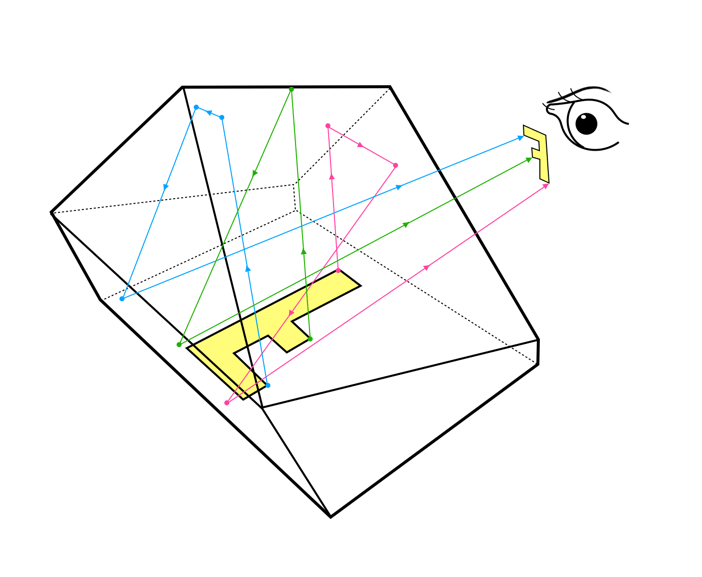
The light passing through a roof-pentaprism undergoes three separate reflections in order that the image is seen both right way up and right way round. The image enters the prism right way up, but laterally reversed, so that as the image must be turned again through 90° to allow it to be viewed at eye level, it must be reflected twice to keep it right way up. The third reflection has no effect on the vertical aspect of the image but it merely used to reverse the image laterally so that it is seen right way round.

Fig.7: Image passage through an SLR camera using a roof-pentaprism

The basic history of the pentaprism as it relates to the SLR can be found in a separate post. But a summary is provided below. A timeline of early SLR pentaprisms:

  • 1933 − Kurt Staudinger issued a patent for a reflex device, i.e. a penta-mirror
  • 1937 − Zeiss Ikon (Germany) begins work on the Syntax, a camera with a pentaprism. Patents exist for the concept, but the prototypes, ca. 1944 were destroyed during the war.
  • 1948 (Sept) − First commercially produced SLR with a roofed pentaprism, the Rectaflex (Italy). An earlier 1947 prototype used a flat pentaprism.
  • 1949 (Sept) − Zeiss Ikon (GDR) introduces the Contax S, the second SLR with a pentaprism, essentially recycling the Syntax.
  • 1949 − ALPA introduces the ALPA Prisma Reflex, a pentaprism with a 45° view. ALPA would not introduce a normal perpendicular view until the Model 6c (1960).
  • 1952 (Sept) − Wrayflex receive a patent for an SLR with a “pentagonal prism” which was never produced. The first Wrayflex with a pentaprism was the Wrayflex II (1959).
  • 1955 − The first Japanese SLR with a pentaprism, the Miranda T.

Note that a pentaprism is different to a penta-mirror, which instead of a glass prism uses three mirrors to perform the same task. Using a glass prism has definite benefits over mirrors. Changes in light direction in a prism is based on the notion of total reflection, which means reflectances of close to 100% can be achieved, while silver mirrors lose at least 10% to absorption losses. A glass prism is also better because the refractive index of glass causes a shortening of the light path.

Notes:

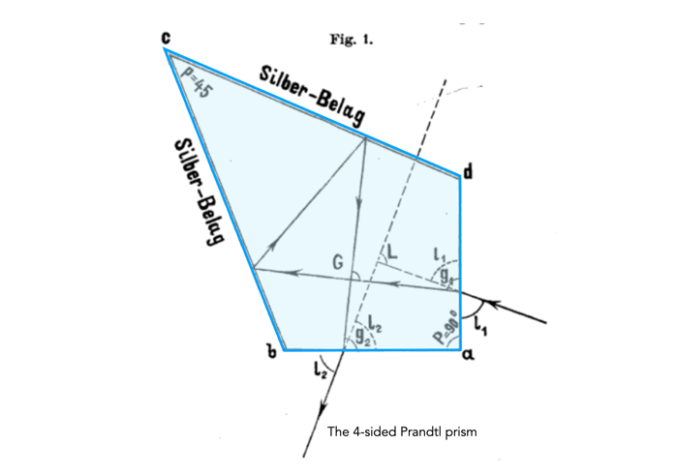
  • Goulier’s prism is sometimes known as the Prandl prism (or even the Goulier-Prandl prism), and is often cited as such, particularly in German literature. Now a cursory search will find very little, but digging a little deeper finds a paper published in the German journal Zeitschrift für Vermessungswesen (Journal of Surveying) in 1890, by an Alexander Prandtl [2]. Prandtl (1840-1896) was a professor at the Royal Bavarian Central Agricultural School in Weihenstephan specializing in dairy farming. But the paper describes a 4-sided prism, similar to Goulier’s prism except the extra side between the two surfaces meeting at 45° is missing. The other issue is the fact that Goulier’s prism was described 26 years previously. Prandtl’s real claim to fame was developing the first continuously operating milk centrifuge.
  • Hensoldt & Söhne created their first product, a rangefinder using a roof prism in 1892. The company would go on to develop the Hensoldt roof prism (DE180644, 1905) which required no mirroring, and had no axis offset, allowing for straight binoculars. In 1938 the Carl Zeiss Foundation would take a majority share in Hensoldt. It is entirely possible that this mechanism formed the basis of the work done on the Zeiss Syntax SLR in the late 1930s and early 1940s.
Fig.8: A depiction of the Prandtl prism (adapted from [2]).

Further reading:

  1. Barnard, F.A.P/, “Prism Telemeter”, Report on Machinery and Processes of The Industrial Arts and Apparatus of the Exact Science, p.589-592 (1869)
  2. Prandtl, A., “Ein neues Instrument zum Abstecken von rechten Winkeln” (A new instrument for marking out right angles), Zeitschrift für Vermessungswesen, 19, pp.462-467 (1890)

Updated: November 27, 2025.

Smartphones and digital cameras are like chalk and cheese

The internet is full of articles suggesting smartphone cameras are better than actual digital cameras. Sure the smartphone market is booming, and they do take good pictures, but it’s really not possible to accurately compare them to digital cameras. It’s like saying to an astronomer that they could get the same quality astronomical image using a full-frame or medium format camera?

In late 2022 the worlds largest digital camera was unveiled at SLAC National Accelerator Laboratory in California. By the end of 2024 it will be installed at the Vera C. Rubin Observatory in Chile, and will be used in a 10-year project called the Legacy Survey of Space and Time to help unlock the mysteries of the universe. The composite sensor is comprised of 189 individual 16MP sensors, each 42mm2 in size, for a total resolution of 3.2 gigapixels. It’s largest lens has a diameter of 1.57m. Overall the focal length is 10.31m, with a speed of f/1.23. The camera will take 200,000 pictures per year.

This camera is massive. The individual photosites are 10×10μm in size – and large photosites mean that an abundance of light can be captured in such a ultra-low light environment (the sensors will be able to spot objects 100 million times dimmer than those visible to the naked eye). You could never achieve this with any sort of medium format 100MP 44×33mm camera… it’s just not possible. So why then do people still harp on about 12MP smartphone cameras being able to produce the same quality image as a 46MP DSLR?

Researchers at SLAC National Accelerator Laboratory are nearly done with the LSST Camera, the world’s largest digital camera ever built for astronomy. Roughly the size of a small car and weighing in at three tons, the camera features a five foot wide front lens and a 3,200 megapixel sensor that will be cooled to 100°C to reduce noise. Once complete and in place atop the Vera C. Rubin Observatory’s Simonyi Survey Telescope in Chile, the camera will survey the southern night sky for a decade, creating a trove of data that scientists will pore over to better understand some of the universe’s biggest mysteries, including the nature of dark energy and dark matter. (Jacqueline Ramseyer Orrell/SLAC National Accelerator Laboratory)

✽ Note that the size of the effective aperture on a smartphone lens such as the wide-angle 6.86mm (f/1.78) on the iPhone 14 Pro Max is 3.85mm. From a full-frame equivalency point-of-view, this is a 24mm lens with a speed of f/6.3. No one produces 24mm FF lenses with such a slow speed, but as an example, a Sony 24mm f/2.8 has an effective aperture of 8.57mm. Small lenses just aren’t as effective at capturing light – it’s basic physics. Of course the other big issue with smartphone cameras is that the lens elements are mostly constructed of moulded plastic (as opposed to glass).

So you want to upgrade from a smartphone camera?

Most people who use smartphones have little, if any, idea about things like aperture and shutter speed. They just use their smartphone camera to take pictures, and tend to ignore functional specifics. Settings are whatever the smartphone deems appropriate for the situation. For example clicking on ×0.5 in the Camera app on a modern iPhone will get you an image automatically taken with the ultra-wide camera. Yes you have some control over things, or more control when using a 3rd-party app, but generally these things don’t matter to most people. The future will bring more AI to smartphone cameras to produce so-called “perfect” photos – and if you like point-and-click photography, that’s fine. But sometimes that’s just not enough.

So what happens when you are intrigued enough to upgrade from a smartphone to a “real” digital camera? Should you run out and buy a full-frame (FF), or should you opt instead for a compact camera? To figure out what you really need, you have to first determine why you want to upgrade. Is it because you want to learn more about photography, or perhaps you want better control of the pictures you take? Or because you feel hamstrung using smartphone a camera and want more megapixels, better optics, or just a better way of taking pictures. Regardless of what people say, a smartphone camera will never provide the same sort of control, or image quality of a dedicated camera. There are many reasons for this, but the big ones are optics, storage space, and battery life. But this isn’t a post about that, here I want to consider options for “upgrading” from a smartphone camera (I’ll cover those in a separate post).

Upgrading from a smartphone to a compactsome specs.

Once you have figured out why, then we move onto what sort of photography you will be focusing on. Do you just want a camera for better travel photographs, or are you interested in landscapes? Or perhaps macro-photography? At this stage it is best to make a list of things you would like to achieve with a digital camera. Some of these things will help you narrow down the type of camera is best for you. For instance if you like street photography, then the best camera might be a compact camera like the Ricoh GRIII/IIIx, or the Fujifilm X100V. Compact cameras offer several advantages over smartphones – a larger sensor is the most obvious benefit, while physical controls and ergonomics offer a more tactile shooting experience. Most compact cameras now also use touchscreen interfaces, making them very accessible. These cameras generally have a fixed focal length lens, and a sensor somewhere between 20-24MP (which is more than adequate). Compact and inconspicuous cameras are perfect for street photography – the last thing you want as a street photographer is lugging around a huge hunk of a camera – it makes you stick out like a sore thumb.

Some of the benefits of digital cameras

If you want a better camera for travel, then a compact is good as well, as are crop-sensor cameras. Here cameras with mirrorless APS-C sensors have become popular, like the Fuji-series of cameras. Cameras for travel have to be versatile, compact and light – the new Fujifilm X-S20 weighs only 491g (without lens) – add a general purpose Fujifilm XF 23mm lens at 180g, and you get a total of 671g (and frankly you don’t need to travel with a cornucopia of lenses). You could also go for a smaller Micro-Four-Thirds sized sensor, which provides a camera with an even smaller form-factor. Now you could even go for a full-frame (FF) sensor, but I would not really recommend it for people upgrading from a smartphone. They are generally heavy, ostentatious (for travel anyway), and are not a good fit for novice photographers. Learn on something smaller before deciding on whether you really need a FF (or buy an inexpensive, older FF camera). Then there are those that want a more specialized set-up for landscapes, macro, sport or wildlife. As these types of photography are much more specialized, requiring specialized lenses, I would not jump straight into them. They can be expensive, and often need a good amount of experience to be used in an effective manner.

Choosing a camera is about what you are interested in photographing, budget, future expandability (if that is important), camera ergonomics (it has to feel right to use, or you will hate using it), diversity of lenses, and a myriad of other things. Decisions on choosing a camera are often made based on sensor size, or ultimately megapixels, but upgrading should not be purely about megapixels. Most good cameras have around 24-26 megapixels, which is more than adequate. You don’t need 40 megapixels – really, you don’t. Choice of sensor size, Micro-Four-Thirds (MFT)/APS-C/FF, is often a factor of the type of photography a person is interested in. Every different camera sensor has its own advantages and disadvantages.

If you want to delve into the world of real cameras, it doesn’t have to be expensive. Start with a used camera, with a single, versatile lens. You can add other lenses as required, and even add vintage lenses from 35mm film cameras. For instance you can readily purchase vintage telephoto lenses for very little $. There are an abundance of them out there. They require manual focusing (that’s a good skill to learn), but it’s a good way to find out if you like wildlife photography before going out and spending thousands of $. There is no need to run out and buy the latest and greatest. When everything is taken into consideration, upgrading from a smartphone camera to an actual digital camera allows for increased flexibility and enhanced artistic opportunities.

Schwalberg on Henri Cartier-Bresson

“He practices his own special brand of outside-looking-in photography. He roams he world with a Leica. About 90 percent of his pictures are made with 50-mm normal-focus lenses. He never poses. He never arranges. If observed, he instantly breaks off action. He adds no photographic lighting, but uses light exactly as he finds it. He eschews every specialized optical effect, from limited depth of field to ultra-wide-angle vision. In effect, he is the theoretically ideal photographer who sees without being seen, records without impinging upon his subjects.”

Bob Schwalberg, “Cartier-Bresson Today”, Popular Photography, 60(5), P.108 (1967)

Vintage cameras – The mirror returns!

One of the biggest problems with early SLR camera’s was the fact that the mirror did not return to it’s position after the shutter was released, leaving a black void in the viewfinder. To facilitate this one had to wind on the next frame. Consider the pre-WW2 Exakta Kine, a purely waist-level camera. When the shutter release was pressed, spring action caused the mirror to fly upwards just before the shutter travelled. The Contax S used the same system. There were two issues with this: (i) the potential for the mirror action to cause jarring, making sharp images problematic, and (ii) once the shutter-release was pressed, the finder goes black, the the image disappeared (preventing the photographer from seeing the scene at the instant of the exposure, or after it). All this changed with the appearance of the instant return mirror. Many attribute this to the Asahi Asahiflex IIb camera in 1954.

However in reality the instant return mirror was the brainchild of Hungarian inventor and photographer Jenő Dulovits (1903-1972). He patented the worlds first eye-level SLR viewfinder in Hungary on August 23, 1943 [1]. The lead to the first camera sporting this new feature, the Duflex (DUlovits reFLEX). Because at the time the use of a pentaprism was deemed too expensive, the camera used a Porro prism – an arrangement of mirrors that would bring the light beams in through the lens, then reflected via mirrors upwards to meet the eye. Working prototypes were built at Gamma in Budapest in 1944, with the first camera put on the market in 1949 (hence why the camera is known as the Gamma Duflex).

Fig.1: The Duflex mirror system (Porro prism) and the instant return mirror

Production lasted roughly a year with circa 550 units being produced (according to historian Zoltan Fejer – Hungarian Cameras, Budapest 2001). In all likelihood production ceased due to pressure from the Soviets – manufacture of Exaktas, Practicas etc. in East Germany, and Russian Zeniths likely meant that competition from a Hungarian camera maker was not wanted. However this decision likely set back their own camera designs by a decade. However Dulovits invention likely paved the way for future enhancement that would lead to Asahi’s commercially successful cameras, starting with the Asahi Asahiflex IIb. As Bob Schwalberg put it:

“A single-lens reflex innovation deserving special applause is the Asahi Optical Co.’s instant-return mirror, which flips up and out of the way just before exposure, and immediately snaps back to focusing position after the shutter has closed. … By eliminating the characteristic reflex blackout, the doubly-sprung Asahi mirror permits the photographer to continue focusing and/or framing without the interruption of having first to transport the film as in traditional reflex-cameras.”

Bob Schwalberg, “35-mm Today: Onward and Upward! Part II”, 42(2) pp.12 (Feb.1958)

✽ Dulovits camera patents appear on the website of the Hungarian Intellectual Property Office. Outside of Hungary, the only patents available are for his soft effect lenses. The camera actually heralded other firsts, including internal automatic diaphragm control, and a metal focal plane curtain shutter.

Note: The first quick return reflex mirror is sometimes attributed to the KW Praktiflex, which debuted in 1939. However in the Praktiflex the mirror is raised as the shutter release is pressed, and falls back under gravity when the button is released, i.e. not really an instant return mirror, more of a shutter-release-actuated mirror.

Further reading:

  1. Jenő Dulovits, No.167464 (D-5859), “Eye-level SLR camera”, (Aug.23, 1943)

    Why are superfast aperture lenses so big?

    A 50mm lens is always a 50mm right? They are in terms of focal length, but shouldn’t they all have similar dimensions? So why are lenses with super/ultra-wide apertures sometimes so much larger, and hence so much more expensive?

    If there has been one notable change in the evolution of lenses, it has been the gradual move towards larger (faster) apertures. The craze for superfast lenses began in Japan in the 1950s, with Fujinon introducing the first f/1.2 5cm lens in 1954. After the initial fervour, it seems like the need for these lenses with large apertures disappeared, only reappearing in the past decade while at the same time moving into the realm of sub-f/1 ultrafasts. There are many advantages to ultra wide aperture lenses, but basically fast lenses let in a lot of light, and more light is good. The simple reason why bigger aperture equals bigger lens is more often than not to do with the need for more glass. It was no different with historical superfast lenses. The Canon 50mm f/0.95 which debuted in 1961 was 605g.

    A comparison of the two Fujifilm 50mm lenses – f/1.0 versus f/2.0 showing the physical differences

    Lenses are designed with the maximum aperture in mind. For example, a 50mm f/2.8 lens only needs an aperture with a maximum opening of 17.8mm (50/2.8), however a 50mm f/1.4 will need a maximum aperture opening of 35.7mm (note that these apertures are based on the diameter of the entrance pupil). For example consider the following two Fujifilm 50mm lenses – the “average” f/2.0 and the 2-stop faster f/1.0:

    • Fujifilm XF 50mm f/1.0 R WR – 845g, L103.5mm, ⌀87mm, 12/9 elements
    • Fujifilm XD 50mm f/2.0 R WR – 200g, L59mm, ⌀60mm, 9/6 elements

    The f/1.0 is over four times as heavy as the f/2.0, and almost double the length. To get an f/2.0 on a 50mm lens you only need a 25mm aperture opening, however with a f/1.0 lens, you theoretically need a 50mm opening (aperture of the entrance pupil). Now some basic math of the surface area (SA) of an aperture circle will provide a SA of 491mm2 for the f/2.0, but a whopping 1963mm2 for the f/1.0, so roughly four times as much area which allows light to pass through fully open. Equating this to glass probably means that at least four times as much glass is needed for some of the elements in the f/1.0 lens. There is no way around this – large apertures need large glass. As the aperture of a lens increases, all of the lenses have to be scaled up to achieve the desired optical outcome.

    The massive scale of the Fujifilm XF 50mm on a camera (the X-T5). The lens has a diameter of 87mm, and the inner opening of the mount is only 44mm.

    Larger aperture lenses also have more specialized glass in them, like with aspheric and low dispersion elements. But companies don’t just add more glass to make money – complex designs are supposed to overcome many of the limitations that are present in ultra-wide aperture lenses. Unlike their historical predecessors, modern superfast lenses have overcome many of the earlier lens deficiencies. For example in vintage superfast lenses, the lens wide-open was never as sharp as could be expected. Newer lens on the other hand are just as sharp wide open as they are stopped down to a smaller aperture.

    Now not all super/ultra-wide aperture lenses are heavy and large. There are a number of 3rd-party lenses that are quite the opposite – reasonable size, and not too heavy (and invariably cheaper). But there is no such thing as a free lunch – there is always some sort of trade-off between price, size and optical quality. For example the Meike 50mm f/0.95 is only 420g, and it’s lens configuration is 7 elements in 5 groups. However fully open it is said to exhibit a good amount of chromatic aberration, some barrel distortion, and some vignetting. There is no perfect lens (but the Fuji f/1.0 comes pretty close).

    ✿ A fast lens is one with a wide maximum aperture. Superfast lenses are typically f/1.0-1.2, and ultrafast lenses are sub-f/1.0.

    Further reading:

    How SLRs changed the camera landscape

    “The triggering mechanism that released a flood of new lens designs was the emergence of the 35-mm SLR as a practical, rapid, and flexible camera during the mid-1950s. Then the Contax S from East Germany introduced eyelevel camera operation by incorporating a pentaprism for the first time, and the Asahiflex II from Japan ushered in the instant-return reflex mirror. Once these two features were combined with the gradually evolved auto-diaphragm, the 35-mm SLR became the vehicle for most of the new and interesting lens design.”

    Norman Goldberg, “The Miracle of Modern Lenses”, The Best of Popular Photography (1979)

    Superfast lenses – the Fujinon 5cm f/1.2

    In the 1950s, the Japanese camera industry was at war, and the prize was super-fast lenses. There were several manufacturers involved in this race – Zunow, Nippon Kogaku, Konishiroku and Fujinon. Although the ultimate target was likely the German optical industry. The Fujinon 5cm f/1.2 was to appear in 1954. It was built in the Leica LTM screw mount (800 pieces), the Nikon S rangefinder mount (50 pieces) and the Contax S mount.

    The lens was designed by Fuji designer Ryoichi Doi. The lens is said to have been based on the Solinon 5cm f/1.5, which was also designed by Doi and patented in 1948 (J#191,452). The lens was based on Sonnar design, and the next step was to push it to f/1.3 using conventional glass. This was followed by a prototype f/1.2 with 9 elements, and finally the production 8-element design. Six of the eight lens optics were high speed lenses. These lenses used four types of new types of glass with low refractive index and high dispersion, the aim being to minimize flare caused by aberrations and achieve high-contrast imaging. The lens was designed to ensure ample light reached the edges of the frame, having a front lens diameter was 51.5mm, and the rear lens diameter was 28mm.

    A 1959 price list shows that this lens sold for US$299.50. Today the price of this lens is anywhere north of $20K. Too few were manufactured to make this lens the least bit affordable.

    The term “crop-sensor” has become a bit nonsensical

    The term “crop-sensor” doesn’t make much sense anymore, if it ever did. I understand why it evolved, because a term was needed to collectively describe smaller-than-35mm sized sensors (crop means to clip or prune, i.e. make smaller). That is, if it’s not 36×24mm in size it’s a crop-sensor. However it’s also sometimes used to describe medium-format sensors, even though they are larger than 36×24mm. In reality non-35mm sensors do provide an image which is “cropped” in terms of comparison with a full-frame sensor, but taken in isolation they are sensors unto themselves.

    The problem lies with the notion that 36×24mm constitutes a “full-frame”, which only exists as such because manufacturers decided to continue using the concept from 35mm film SLR’s. It is true that 35mm was the core film standard for decades, but that was constrained largely by the power of 35mm film. Even half-frame cameras (18×24mm, basically APS-C size) used the same 35mm film. In the digital realm there are no constraints on a physical medium, yet we are still wholly focused on 36×24mm.

    Remember, there were sub-full-frame sensors before the first true 36×24mm sensor appeared. Full-frame evolved in part because it made it easier to transition film-based lenses to digital. In all likelihood in the early days there were advantages to full-frame over its smaller brethren, however two decades later we live in a different world. “Crop” sensors should no longer be treated as sub-par players in the camera world. Yet it is this full-frame mantra that sees people ignore the benefits of smaller sensors. Yes, there are benefits to full-frame sensors, but there are also inherent drawbacks. It is the same with the concept of equivalency. We say a 33mm APS-C lens is “equivalent” to a 50mm full-frame. But why? Because some people started the trend of relating everything back to what is essentially a 35mm film format. But does there even need to be a connection between different sensors?

    Image showing all APS-C, micro-four thirds  and full-frame cameras.
Sensor equality
    What about some sensor equality?

    The reason “crop” sensors have continued to evolve is because they are much cheaper to produce, and being smaller, the cameras themselves have a reduced footprint. Lenses also require less glass, making them lighter, and less expensive to manufacture. Maybe instead of using “crop-sensor”, we should just acknowledge the sensors exactly as they are: Medium, APS-C, and MFT, and change full-frame to be “35mm” format instead. So when someone talks about a 35mm sensor, they are effectively talking about a full-frame. All it takes is a little education.

    Old versus smarter advertising which puts the emphasis on the angle-of-view. In this case an Fuji APS-C lens – rather than focusing on 16mm, it focuses instead on the horizontal AOV, i.e. 74 degrees. It could also designate that the lens is a wide angle lens.

    Using the term-crop sensor also does more harm than good, because it results in more terms: equivalency and crop-factor which are used in the context of focal length, AOV, and even ISO. People get easily confused and then think that a lens with a focal length of 50mm on an APS-C camera is not the same as one on a FF camera. Focal lengths don’t change, a lens that is 50mm is always 50mm. What changes is the Angle-of-View (AOV). A larger sensor gives a wider AOV, whereas a smaller sensor gives a narrower AOV. So while the 50mm lens on the FF camera has a horizontal AOV of 39.6°, the one on the APS-C camera sees only 27°.

    It would be easier not to have to talk about a sensor in terms of another sensor. But even though terms like “crop-sensor” and “crop-factor” are nonsensical, in all likelihood the industry won’t change the way they perceive non-35mm sensors anytime soon. I have previously described how we could alleviate the term crop-factor as it relates to lenses, identifying lenses based on their AOV rather than purely by their focal length. This works because nearly all lenses are designed for a particular sensor, i.e. you’re not going to buy a MFT lens for an APS-C camera.

    From photosites to pixels (iv) – the demosaicing process

    The funny thing about the photosites on a sensor is that they are mostly designed to pick up one colour, due to the specific colour filter associated with with photosite. Therefore a normal sensor does not have photosites which contain full RGB information.

    To create an image from a photosite matrix it is first necessary to perform a task called demosaicing (or demosaiking, or debayering). Demosaicing separates the red, green, and blue elements of the Bayer image into three distinct R, G, and B components. Note a colouring filtering mechanism other than Bayer may be used. The problem is that each of these layers is sparse – the green layer contains 50% green pixels, and the remainder are empty. The red and blue layers only contain 25% of red and blue pixels respectively. Values for the empty pixels are then determined using some form of interpolation algorithm. The result is an RGB image containing three layers representing red, green and blue components for each pixel in the image.

    A basic demosaicing process

    There are a myriad of differing interpolation algorithms, some which may be specific to certain manufacturers (and potentially proprietary). Some are quite simple, such as bilinear interpolation, while others like bicubic interpolation, spline interpolation, and Lanczos resampling are more complex. These methods produce reasonable results in homogeneous regions of an image, but can be susceptible to artifacts near edges. This leads to more sophisticated algorithms such as Adaptive Homogeneity-Directed, and Aliasing Minimization and Zipper Elimination (AMaZE).

    An example of bilinear interpolation is shown in the figure below (note that no cameras actually use bilinear interpolation for demosaicing, but it offers a simple example to show what happens). For example extracting the red component from the photosite matrix leaves a lot of pixels with no red information. These empty reds are interpolated from existing red information in the following manner: where there was previously a green pixel, red is interpolated as the average of the two neighbouring red pixels; and where there was previously a blue pixel, red is interpolated as the average of the four (diagonal) neighbouring red pixels. This way the “empty” pixels in the red layer are interpolated. In the green layer every empty pixel is simply the average of the neighbouring four green pixels. The blue layer is similar to the red layer.

    One of the simplest interpolation algorithms, bilinear interpolation.

    ❂ The only camera sensors that don’t use this principle are the Foveon-type sensors which have three separate layers of photodetectors (R,G,B). So stacked the sensor creates a full-colour pixel when processed, without the need for demosaicing. Sigma has been working on a full-frame Foveon sensor for years, but there are a number of issues still to be dealt with including colour accuracy.