Lenses allow light to be focused on a film/sensor, but not all that incident light that enters a lens gets to the target. Some of this light is reflected or absorbed by the lens. For example, lens materials absorb a certain amount of the light that is incident on its surfaces and passing through the substrate. There are a number of factors that affect light transmission rates: glass quality, quality of coatings, optical construction, and number of lenses.
Light transmittance (LT) is the term for the actual amount of light that makes it to the film/sensor, i.e. the percentage of light that goes through an optical instrument, often expressed as the light transmission rate. What this means, is that a lens with a maximum aperture of f/1.2 could potentially transmit less light, which could be equivalent to say f/1.4 in terms of brightness. The latter number is what is often referred to as a “T-stop”, or Transmission-stop, which is basically an adjusted f-stop that takes into account this light loss. So an f-stop is essentially a “theoretical” measurement, whereas a t-stop is an actual measurement that is tested when the lens is calibrated.
In the classic book Applied Photographic Optics, Sidney Ray describes two lenses. The first is a 4-element Zeiss Tessar f/3.5, with six air-glass surfaces and one cemented surface with a total glass thickness of 24mm. It has measured transmittance’s of 0.717, 0.99 and 0.941 respectively, gave a total transmittance of 0.66, and a loss of 34%. The second is an 8-surface Zeiss Biotar f/1.5, with three cemented surfaces, and a 72mm thickness, with transmittance’s of 0.642, 0.97 and 0.80 gave a total transmittance of only 0.45, a loss of 55%. But these are vintage lenses.
In reality very few manufacturers describe the actual LT of their lenses, possibly because it would reflect somewhat negatively, especially as it relates to lens speed. You will find that the only lenses that cite T-stops consistently are cinematographic lenses. For example, the Fujinon MK18-55mm is a cinematic lens with a speed of T2.9, describing the amount of light that the camera sensor is truly receiving. The actual aperture in a classic sense is f/2.75.
One characteristic of digital cameras which is more often than not ignored in reviews is their usability. Now usability in this context looks at how easy it is to use a camera. There are two levels of usability in a digital-camera. The first has to do with the usability of the software, i.e. generally how easy is it to navigate through the menu, and find things. The second has to do with physically operating the camera, e.g. how the camera is held, how the physical controls are laid out, etc. In the age of film cameras, the layout of buttons and levers was pretty much consistent for most cameras, often constrained by the physical mechanisms inside the camera. When film cameras started to gain more electronics, usability started to become more of an issue.
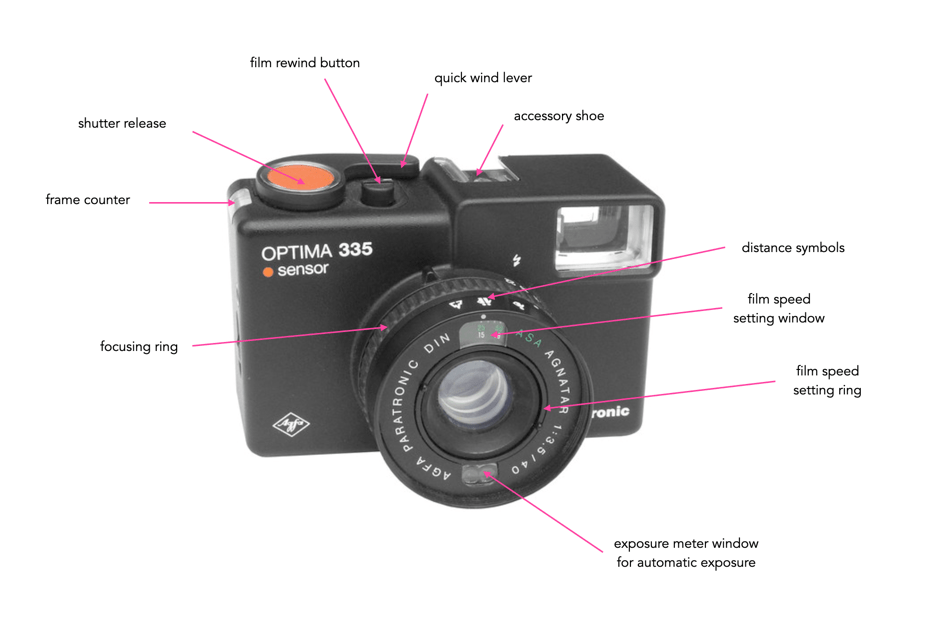
The simplest compact 35mm film cameras were exactly that – simple. As a good example, consider the AGFA Optima 335. It was aesthetically beautiful, and had a minimal number of controls. Using it involved (i) loading the film; (ii) setting the film speed (both done once for each roll); (iii) setting the distance; (vi) pointing the camera at the scene; and (v) pushing the shutter release. Obviously it was an automatic exposure camera, but everything was in the right place.
Fig.1: The AGFA Optima 335 with its simple system
When things started to move away from manual controls, which let’s face it were basically (i) film speed, (ii) shutter speed, (iii) lens aperture, and (iv) lens focusing, things started to gets more challenging from a usability perspective. The more features added, the more physical controls, or electronic menus a camera needed. It’s the reason people tend to like vintage film cameras like the Pentax Spotmatic. There is just so little involved in taking a picture.
Fig.2: Holding the Ricoh GRIII, a small camera with minimalistic usability
Digital cameras may be the worst from a usability perspective. Usability is sometimes ignored because “generic” reviews tend to concentrate on the “fancy” features of a camera, and neglect usability. You need to go to blog-based reviews by photographers who have actually used cameras in real-world settings to get a real idea about a camera’s usability. Note that if you are unsure about a camera, it is really important to go to a store and actually handle it, to get a real feel as to whether or not it is comfortable and intuitive to use. Sometimes it is the little things that make a camera not feel quite right. The awkwardness of a particular button, the ease of deleting an image, signage too small to read, or an annoying viewfinder.
The first issue to consider is physical “usability”, or comfort – basically how the camera “feels” in your hands. Does it require two hands to hold, or is one fine? Is there enough room on the camera to actually grip it? Is the camera the right size from the perspective of your hands? Some people have large sized hands, and find it uncomfortable to hold a small camera with manipulate small controls. Conversely, people with small hands might find it wearisome holding up a heavy full-frame camera with a heavy lens. Is the camera body a “block” or does it have a grip? Grips make it much easier to grasp a camera, particularly a larger one. Some camera manufacturers provide camera grips as accessories, or perhaps there is one made by a third-party if it is a popular camera. Like gloves, one size does not fit all.
Usability also has to do with size, and weight and that’s where sensor size plays a role. Full-frame cameras are the largest of the regular format cameras (i.e. smaller than medium format), and together with their lenses are generally heavy and large. Compact cameras are small and light. Depending on its use, the size and weight of a camera can play a large role in how useable it is. For example travelling with a full-frame camera and all its lens accoutrements by air, and on public transport can be back-breaking, yet travelling with it in a car and using a tripod, maybe not so much. A compact camera can easily be slipped into a pocket and weigh next to nothing. Size and weight issues also translate to lenses. Large full-frame lenses can be heavy, because they require more glass. Although most camera manufacturers provide various choices when it comes to lens sizes, with appropriate tradeoffs in image quality.
Next there are those characteristics of a camera related to its use. Is there a viewfinder, and is it comfortable to press your eye up against? Is the shutter-release button comfortable to use? What is the screen like – does it pivot and tilt? Is the image crisp? Does it provide a reasonably good rendition of the colours in the image? What about the physical controls? Is it easy to delete an image? Is there a macro function with easy accessibility? Are the controls accessible, even when taking a picture?
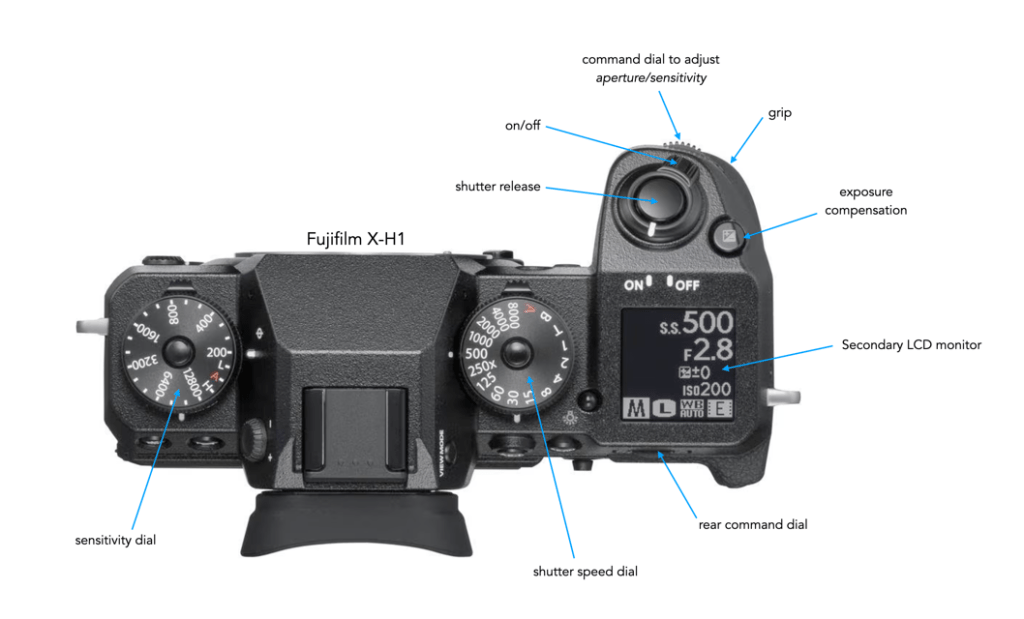
Fig.3: The layout of the top of the Fujifilm X-H1
Consider the layout of the top of a Fujifilm X-H1 shown in Figure 3. The camera body is large, and hence a grip is provided on the right-hand side. The shutter release button is located in an optimal position, surrounding by readily accessible controls, i.e. shutter speed control, etc. The secondary LCD monitor also provides a good summary of current setting on the top of the camera, in addition to the rear screen. The fact that there are physical controls for sensitivity (aka ISO, but a better term because it’s not really the same as film ISO), and shutter speed makes it much easier to adjust them, as opposed to a button, and having to rely on watching a screen.
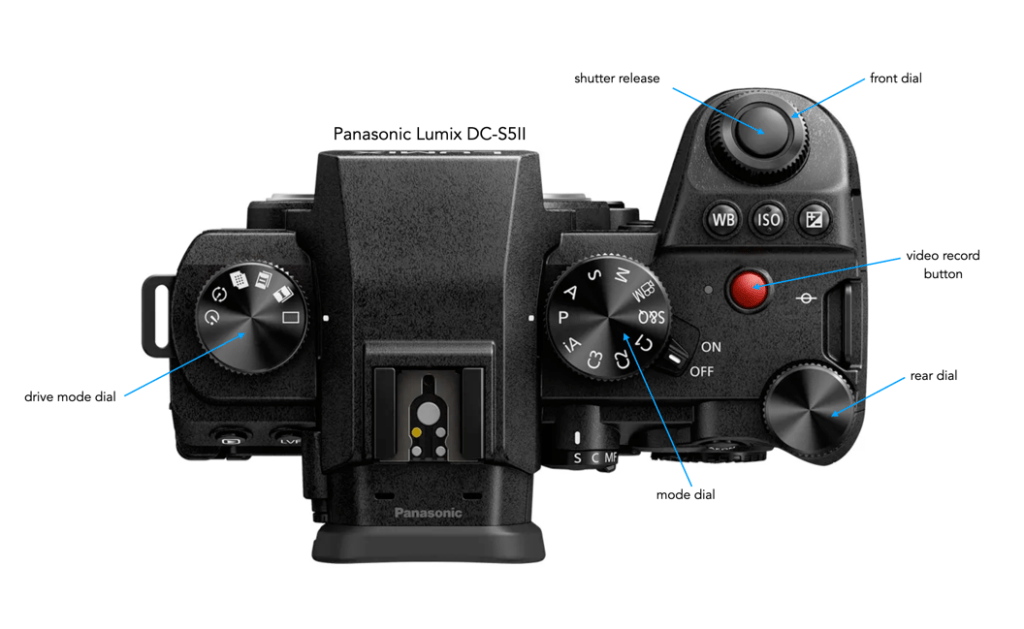
Cameras from other manufacturers often may lack these basic controls, opting instead for a more customizable top configuration, as shown for the Panasonic Lumix DC-S5II in Figure 4. In place of the shutter speed dial, there is mode dial, and a drive mode dial in place of the sensitivity dial. The Fuji requires WB (white balance) to be modified in-menu, whereas the Panasonic provides a dedicated button. The shutter speed and aperture can be modified on the Panasonic based on mode setting, using the front and rear dials. So two different approaches to functional usability – some people may prefer one over the other. From my own perspective, I prefer to have shutter speed and sensitivity readily accessible as marked controls. Changing camera mode or even drive mode is something I don’t do that often (I won’t get into the nitty gritty of specific camera usability).
Fig.4: The layout of the top of the Panasonic Lumix DC-S5II
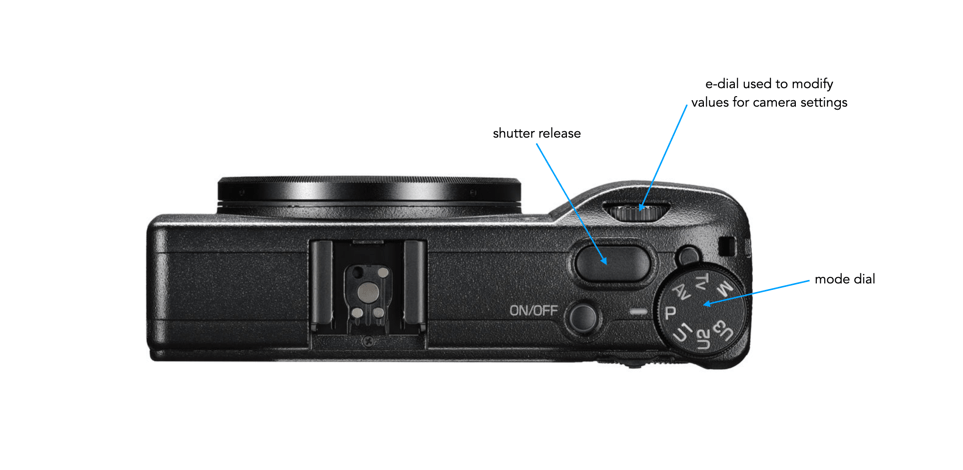
In comparison, a more compact camera, like the Ricoh GR III will have little in the way of external controls on the top, with most changes actuated via the menu or back-buttons (e.g. Macro, WB). These types of cameras are commonly used for street photography where setting may not change that often. It is much more of a minimalist approach to usability.
Fig.5: The layout of the top of the Ricoh GRIII
Usability also extends to the lens. Does the lens have a physical means of switching to manual mode? Is the focusing mechanism smooth (in manual mode). Is it easy to attach filters? How heavy is the lens? Will it be comfortable to lug the lens around all day? Then there is also the camera mount. You may want to attach vintage lenses which have different mounts, and hence need a converter. Is there a converter from camera-X to lens-Y? What about the tripod mount? Is it in the centre of the camera or bias to one side? Then there is maybe the biggest elephant in the room – battery life? Usability of a camera plummets if one battery charge only takes 200 photos. This means you will need to carry more batteries, which means more weight. Is the charger small and easy to pack anywhere?
Last but not least there is the software usability side of things. This really is a category unto itself. Menu screens are usually very small, and can be quite cluttered, even if some care has been taken in designing the actual menu. By what means does one interacts with the screen, i.e. button or touch. What does the screen show, and what does it let you manipulate. Is is customizable? Does changing a simple thing require you to delve into the menu system? Do you need to carry the manual just to access the maze of menus to change something?
There are many different facets to usability, and choosing a digital camera based on its usability characteristics is often ignored with users opting instead for the more “tangible” features of a digital camera, i.e. megapixels, lens selection, brand, cost etc. And while the interaction with a camera is a very individual experience, not every camera will offer a perfect usability experience for every person.
“Say what you will about the undoubted advantages of other focal lengths, no lens can handle so many different subjects and situations as satisfactorily as the good old reliable 50-mm. Unless the photographer is working on a specific idea, or is faced with some special problem demanding something markedly longer or shorter, the 50 gives a frame that’s neither too tight for most indoor work, nor too loose for general outdoor shooting. If there is no lens for all seasons, at least there is one for most situations, and this is the versatile 50.”
Bob Schwalberg, “The shifty fifty”, Popular Photography, pp.73-75,118,119 (Sep., 1970)
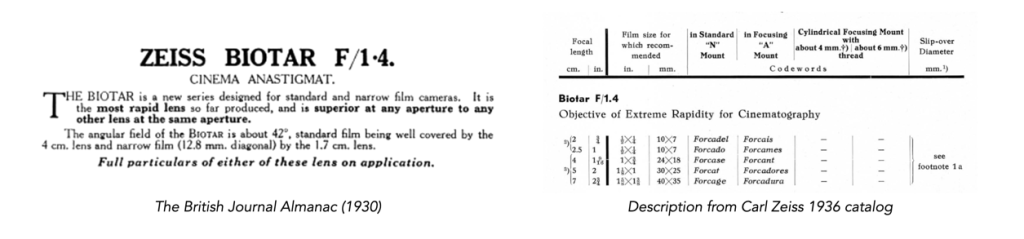
On the heals of the Biotar 75mm f/1.5, I came across a posting for a Biotar 70mm f/1.4 in a Leica L39 mount. Was this a real lens? The serial number of the lens is 2620709, and it was selling for ca. C$78K. The serial number suggests it was produced in 1939.
This is a strange lens because there is very little information regarding its provenance. CollectiBlend suggests only 116 lenses were produced between 1929 and 1939. Most seem like they have been adapted to mounts such as M42. The early 1930s Zeiss catalogs do specify a 70mm f/1.4 lens, however it is for cinematographic work, specifically recommended for 40×35mm format. By the late 1930s they were also being advertised for miniature, i.e. 35mm cameras. This was however not advertised for use with either Contax 35mm camera offered by Zeiss-Ikon, which advertised a 85mm as a portrait lens.
Early brochure information on the Biotar f/1.4
According to the catalogs of the period, there were a series of f/1.4 Biotars, in 2cm, 2.5cm, 4cm, and 5cm focal lengths in addition to the 7cm (70mm). The Biotar initially played virtually no role at all for still image cameras. In fact one of the most numerous Biotars produced at that time was the Biotar 2.5cm f/1.4 which went into production in1928. By the end of WW2, just over 1,300 units had been manufactured, most of which were delivered to Bell & Howell or Kodak, but also to Siemens, among others. The Biotar 4cm f/1.4 was created as a medium focal length for 18×24mm standard film cameras – the format used in 35mm cine cameras.
Dating based on serial numbers: 2620709 (1939) and 950044 (1929-30)
Now I have seen three different versions of this lens, none of which really meshes with the descriptions found in early catalogs – here the lenses are cited to a mount diameter of 60mm, and come in either an “N” mount (for cameras with bellows extensions), or an “A” mount (for folding and other hand cameras). The few lenses available today are in the form of re-housed optics, i.e. the lens has been adapted at come point to fit mounts like the Leica mount. Some of these lenses were made for “miniature” cameras, and so some may actually have native LTM mounts.
Not every fast vintage lens is a 50mm. Sometimes others are fast in relation to their focal length, like the Carl Zeiss BIotar 75mm f/1.5, considered by some to be the original ‘King of Bokeh’. The lens has a reputation for creating an incredible picture, which can be partially attributed to its ability to produce amazing bokeh, which was not exactly something that was mainstream in the mid-decades of the 20th century.
The Biotar lenses were designed in 1927 by Willi Merté (1889-1948) for cine cameras (Patent No. DE485,798). Merté continued developing the Biotar lenses, and in 1938 introduced the Biotar 75. Construction was complete by April 1938, and the lens went into production in February 1939. It was quite radical for the time, especially considering that all calculations for these systems were performed manually, i.e. by humans. It is often the reason very few of these lenses changed their specifications. The lens is a 6-element, 4-group, Double-Gauss optical design.
The first copies were made for cinematography, followed shortly after for Ihagee’s 35mm Kine Exakta. The advent of WWII meant that few lenses were sold, and those sales were likely restricted to lens enthusiasts who could afford them. Based on the available literature, it doesn’t seem like any were exported from Germany. In 1943, competition arrived in the form of the Leitz Summarex 85mm f/1.5. The design was a 7/6, but was prone to flaring, and heavier, at 700g to the Zeiss’s 500g. Post-war more competition in the German market resulted in the Meyer-Optik Görlitz Primoplan 75mm f/1.9; the Enna-Werke Ennaston-Lithagon 85mm f/1.5, and the Carl Zeiss Jena 85mm f/2 Sonnar. By the mid 1950s there was also competition originating from Japan.
“The ultra-light intensity of the 75mm ‘Night Lens’ ensures adequate exposures even under the most adverse lighting conditions, i.e. theatre, circus, cabaret, and night life. As this particular lens is more than three times as fast as the 2.8 lens, successful pictures can be obtained in towns and cities, illuminated only by normal street lighting.”
Exakta Varex IIa brochure, 1958
The three Biotar 75mm variants
There are three known variants of this lens. The first pre-war variant is known as the “skinny” Biotar 75. Introduced in 1938, this version has a thin, compact barrel. It was supposedly made of brass with a chrome-plated finish (although it is likely this changed to aluminum during the war). This lens were predominantly made for the EXA mount (not surprising considering the Exakta was the prominent 35mm SLR of the period). Early versions did not have an anti-reflection coating on the glass surface, which could cause flare when shooting against the light. Coatings, marked with a red “T”, began to be applied during the war (possibly for the military).
Carl Zeiss Jena Biotar 75mm f/1.5 Ver.1
After the war, Zeiss-Ikon was to release the Contax S, which used the M42 screw mount. Zeiss redesigned many of their lenses to take on the M42 mount. This resulted in the second version of the lens, produced between 1946 and 1952. This lens made use of lanthanum-containing Schott glass for its lens elements. This version was made in East Germany. Starting with this model, aluminum was used for the lens barrel to reduce weight. Additionally, the minimum aperture has been changed to allow up to f/22. In this variant, mounts for M42, Leica (L39), and Praktina were added, and it was compatible with at least five types of mounts, including those for Exakta and Contax. All have the “T” coating, although it may not be marked with a red “T”. Around 1950 markings were changed from 7.5cm to 75mm. The distance scale is a single one, which is very easy to read.
Carl Zeiss Jena Biotar 75mm f/1.5 Ver.2
The third version of the lens was produced from 1952-1968, as is known as the “fat” Biotar 75. This version has a solid barrel with a knurled/scalloped focus ring, a double distance scale, i.e. numbers on either side. The diaphragm is now preset, and the minimum aperture is back to f/16.
Carl Zeiss Jena Biotar 75mm f/1.5 Ver.3
The lens had various names over the 1950’s based on where it was sold. The lens was known as Nachtobjektiv Jena B (Night-lines Jena B), Zeiss-Biotar, “Jena B”, or just Biotar.
The lens is truly a pivotal design, it was not until new types of glass were designed, and the advent of computer-aided optical development that further progress could be achieved, ultimately leading to the Zeiss Pancolar 75mm f/1.4 in the mid-1960s. The 75mm lens itself would not really feature in the future of lenses, supplanted by the 80mm and 85mm focal lengths. Over its 30 years in existence, only roughly 20,000 copies were made. Supposedly they were made in very small batches (100-200) due to the nature of the lens – the optical elements required large pieces of flawless glass.
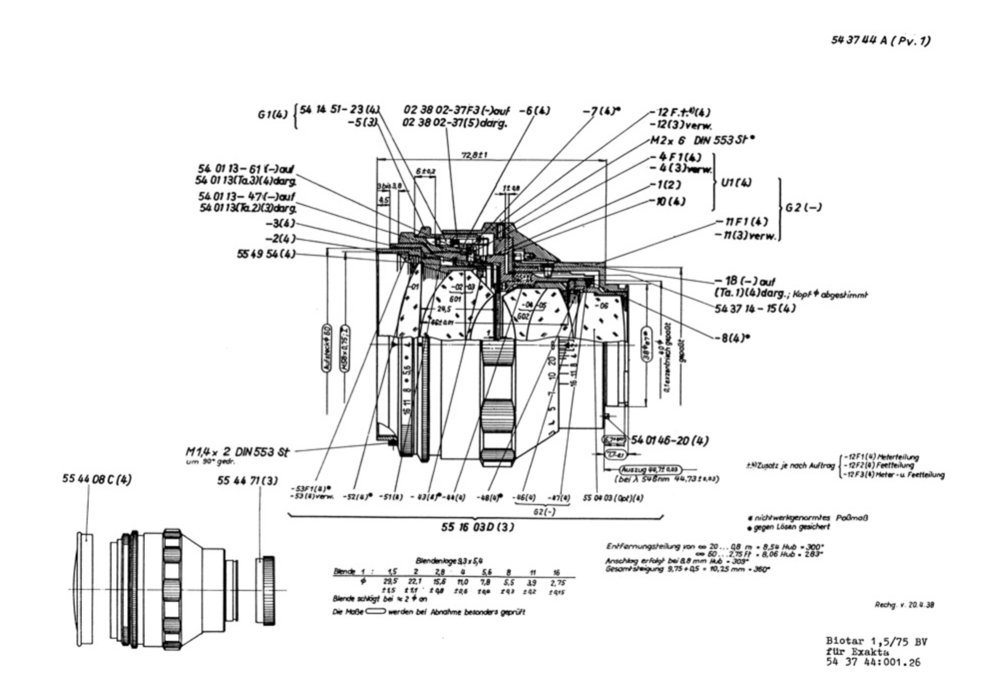
Zeiss specs for the “fat” version
In the early 1950s, the lens sold in the USA as a “high speed lens”, for around US$216, which is US$2,500 in 2023 based on inflation. In Germany in 1953, this lens sold for DM596 (which when converted was cheaper than in the USA (US$141). Today these lenses sell anywhere from US$2000-6000+ depending on condition, and variant. An alternative, which honestly costs a whole lot less, is the modern Biotar 75 f1.5 II, from Meyer Optik Görlitz (it sells for €1400, ca. C$2000).
NB: You can always tell when a Zeiss lens was manufactured from the serial number.
What do I truly hate about DSLRs? Menus. Particularly menus I need to consult for ISO settings and/or white balance. Buttons marked ISO and WB with direct access do me fine. But what do I really want? A comfy, rugged, gem-like compact, four-control, digital Leica 1(A). You can leave off all the ornamental stuff. That’s not too much to ask, is it?
Herbert Keppler, Like a Leica (Popular Photography, August 2007, pp.50-51)
A long-focus lens is a lens that has a focal length longer than the diagonal measure of the film or sensor. A telephoto lens is a sub-category, whereby a lens contains a group of elements that allow the physical length of the lens to be shorter than the focal length. Therefore all telephotos are long-focus lenses, but not all long-focus lenses are telephotos.
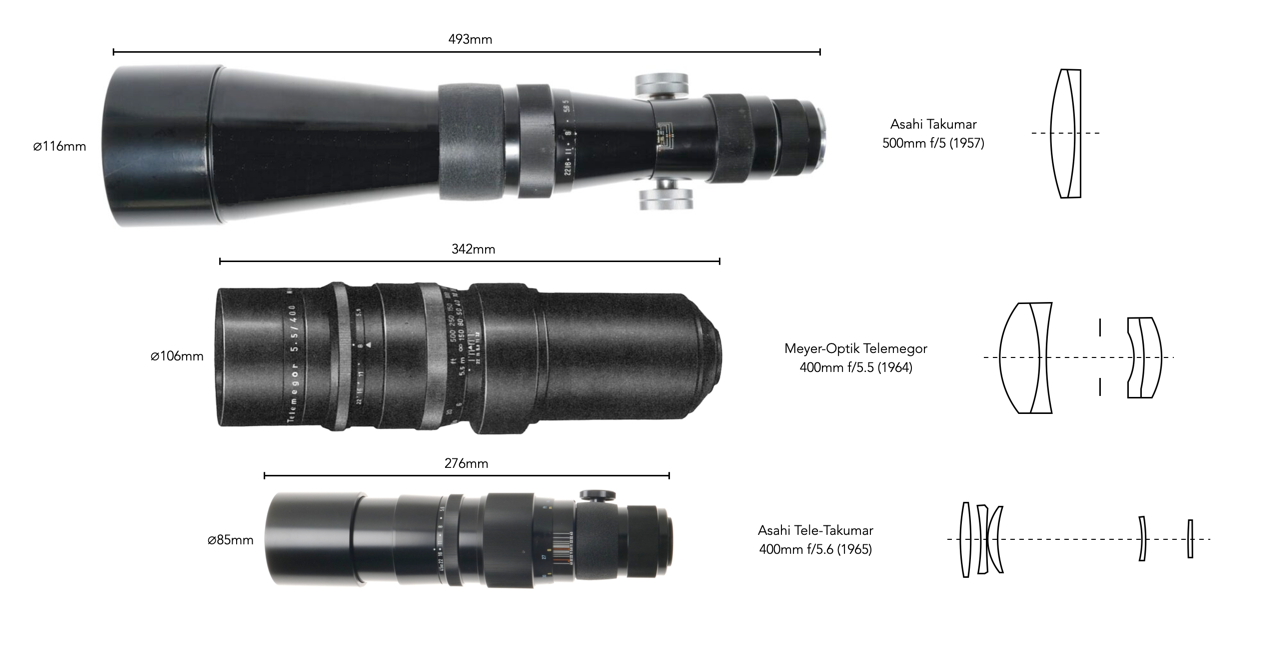
The most important difference between a long-focus lens of conventional construction and a telephoto lens of the same focal length lies in the overall length of the lens. Thus, a conventional 400mm lens will be positioned roughly 400mm away from the film, and will be fitted in a lens barrel approaching 400mm in length. Many of the lenses produced by companies such as Tewe were long focus lenses. A telephoto with a focal length of 400mm, on the other hand, may be as little as 300mm in length, and will be usually much lighter in weight than the conventional lens.
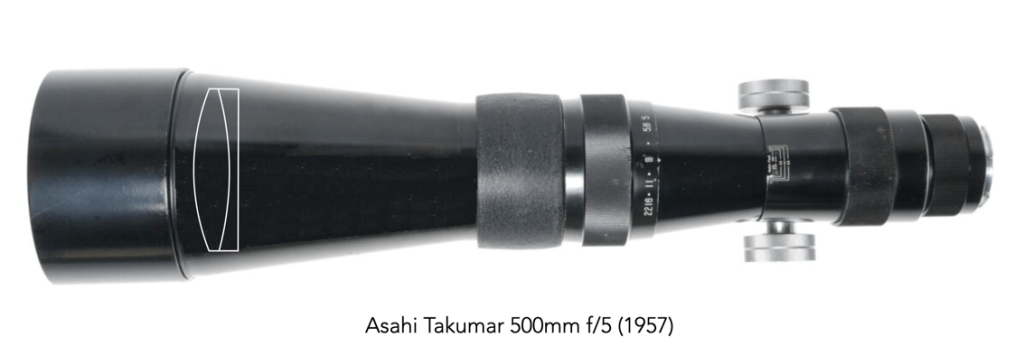
A tale of three different 400mm long focus lenses. The Telemegor and Tele_Takumar are telephoto lenses, the Asahi Takumar 500mm is a pure long-focus lens.
The reduced length of a telephoto is derived by using a more “complex” optical design. One tremendous advantage of the telephoto construction is that it permits the use of lenses of very great focal length – lenses which would be impossibly heavy and inconvenient if the normal construction were used. Historically, long focus lenses, with focal lengths up to 2000mm, were often so big that it was customary to support the lens on a sturdy tripod.
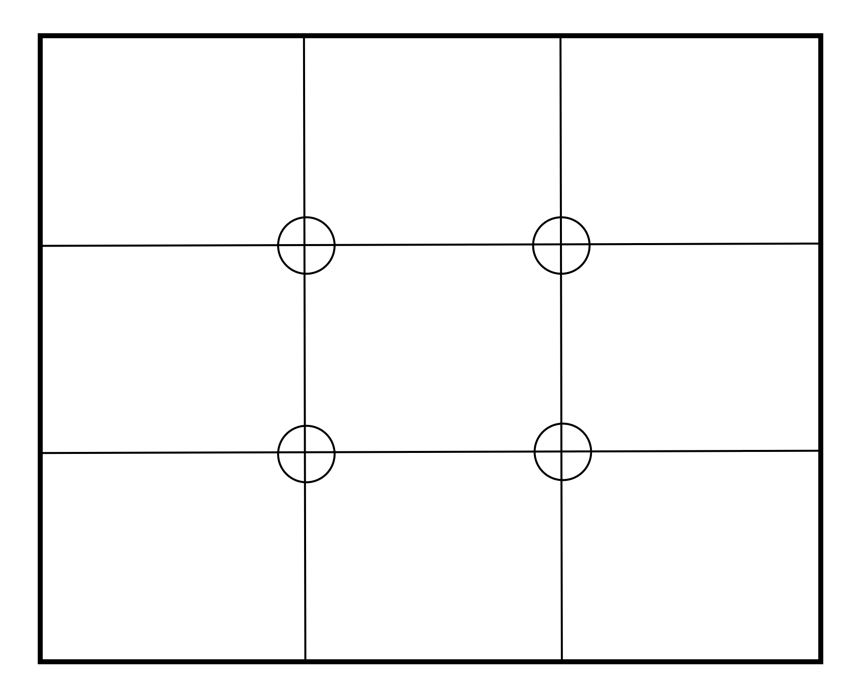
The “Rule of Thirds” (ROT) is a concept used for the composition of a photograph. It states that the centre of interest in a photograph should be placed at any one of the four intersections of four imaginary lines, two of which bisect the frame horizontally, and two of which bisect it vertically, dividing the picture into thirds each way. It’s main goal is to move the subject out of the centre of the image, because having the subject to one side produces visual interest.
Fig.1: The “Rule of Thirds” grid
But this idea did not originate in photography, but rather art, i.e. painting. In 1783 Sir Joshua Reynolds taught at the Royal Academy of Arts in London, mentioning in his discourses how a painting works best when the use of light and dark has a ratio of approximately ⅓ : ⅔. It is described in a book entitled “Remarks on rural scenery : with twenty etchings of cottages, from nature : and some observations and precepts relative to the pictoresque“, by John Thomas Smith and Joseph Downes in 1797, where is it first defined.
Two distinct, equal lights, should never appear in the same picture : One should be principal, and the rest sub-ordinate, both in dimension and degree : Unequal parts and gradations lead the attention easily from part to part, while parts of equal appearance hold it awkardly suspended, as if unable to determine which of those parts is to be considered as the subordinate. “And ” to give the utmost force and solidity to your work, some part of ” the picture should be as light, and some as dark as possible: ” These two extremes are then to be harmonized and reconciled ” to each other.”
Analogous to this “Rule of thirds”, ( if I may be allowed so to call it ) I have presumed to think that, in connecting or in breaking the various lines of a picture, it would likewise be a good rule to do it, in general, by a similar scheme of proportion ; for example, in a design of landscape, to determine the sky at about two-thirds ; or else at about one-third, so that the material objects might occupy the other two : Again, two thirds of one element, ( as of water ) to one third of another element ( as of land ) ; and then both together to make but one third of the picture, of which the two other thirds should go for the sky and serial perspectives.
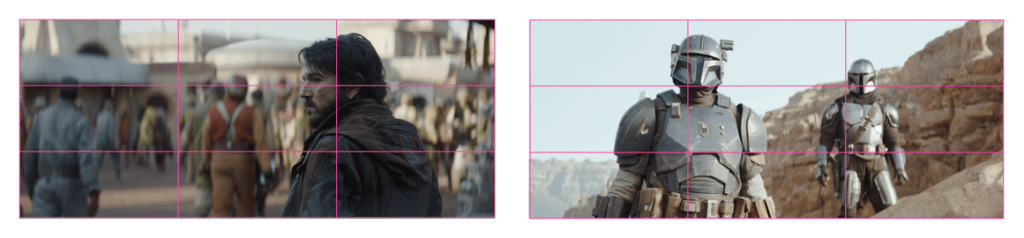
How it got to photography is somewhat mystical. Search for it in books of the mid-20th century, and you won’t find it. For example The Amateur Photographer’s Handbook, by Aaron Sussman, published for about four decades from 1941 on wards does not mention it. It is possible that it transitioned from the cinematic industry where it is commonly used [1]. Consider the examples shown in Figure 2. In the left image, the character clearly is framed in the right third of the frame, whilst in the right image the background and foreground characters are framed at opposite sides of the intersecting lines.
Fig.2: Use of “Rule of Thirds” in cinematography
By the 1980s it was often mentioned in passing as a mean of composition, but the past two decades has seen it blossom online, both for use in still photography and video. You can commonly find it being used as the composition guides overlaid on screens on cameras as a means to help with composition.
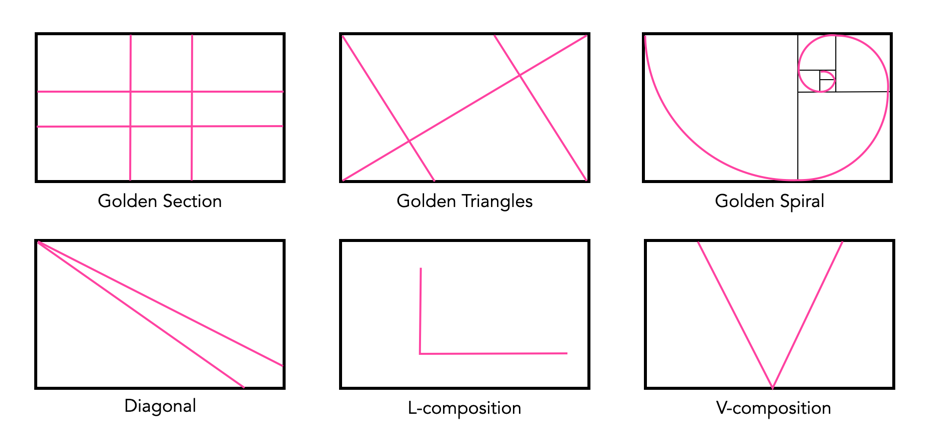
But is it the most optimal means of composition? Hardly. The rule of thirds is not mandatory and when the composition demands it, it can and should be violated. In reality it shouldn’t even be perceived a rule, but rather a guideline. Some photographers believe that an over reliance on this method of composition can lead to boring photographs. Of course the “rule of thirds” isn’t the only method of composition, indeed there are numerous others, some of which are shown in Figure 3. The best composition method is the one that best suits the particular scene being photographed.
Lenses are funny. Lenses with small focal lengths usually contain a lot of glass, conversely those with long focal lengths contain very little. Why is this the case? Shouldn’t telephoto lenses be filled with optical elements? The answer is no, and it’s because of the nature of how telephoto lenses, or in this case long-focus lenses, work – vintage telephoto lenses are not all built in the same way.
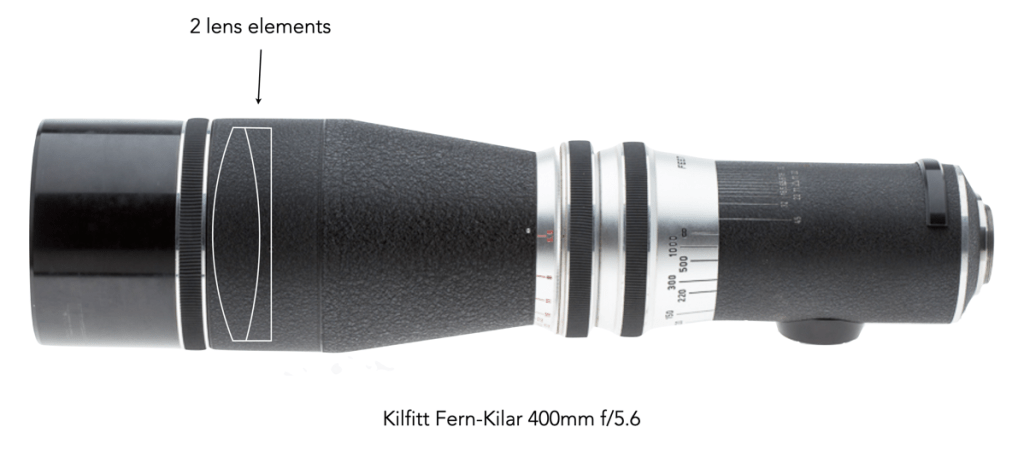
The famous 400mm lens from “Rear Window” only has two lens elements.
There are some vintage long-focus lenses that have a mere two elements – many of these lenses have extremely long focal lengths. These two-element lenses were often cemented together, positioned in front of the diaphragm, with very little in the way of anything else in the lens barrel. Simple lenses of the type are capable of excellent definition if the field is restricted to a few degrees from the axis and the aperture is not too great.
This type of 2-element lens was made by a number of different manufacturers: