Choosing lenses for travel

I previously covered choosing a camera for travel, now I thought I would provide some insight into choosing lenses for travel, in the context of an amateur photographer. There are many varied opinions on this travel photography, although I have to believe some come from photographers who aren’t really amateurs. This post speaks more to the traveller, who I consider distinctly different to the tourist. The tourist is a person who is just there to take photographs, with little interest in knowing the story behind the objects in the scene. They just care that they photographed the scene. The traveller is intrinsically interested in what they photograph. There are many forms of tourist ranging from the person who takes photos with an iPad to that annoying person who is fully decking out with a full-frame camera with the largest zoom lens available.

Travel photography, at least for the amateur, can suffer from what is commonly known as overpacking. You think you are going to need a bunch of lenses and accessories, and you end up with a bag overstuffed with gear. From my own experiences, you never end up using half of it. More important may be a couple of lenses for the large camera, and a secondary pocket-size camera, something like a Ricoh GR III. This ancillary camera is perfectly suited to street photography because it is designed to do just that, in a more discrete way (and offers macro as well). But back to the lenses. The reality is that you likely only need 1-2 lenses, or if you prefer zooms, a single lens.

The best travel combo is a normal and an ultra-wide lens

When you travel, you are trying to replicate in photographs what you see with your eyes. This means a normal lens, something in the range 40-55mm (or 26-36mm for APS-C), which provides roughly the same perspective as you see with your own eyes. A normal lens is good because it is inconspicuous, often quite compact, and quite adaptable to street photography. The faster normal’s also have the added benefit of performing well in low-light conditions, for example museums where flashes are often prohibited. For example with the Fuji-X system, a good choice might be a 35mm f/2 R WR, which provides a low-cost, weather-resistant normal lens (US$400, 170g), or the faster 33mm f/1.4 R LM WR (US$800, 360g).

Fig.1: Choices for ultra-wide and normal lenses (Fuji-X)

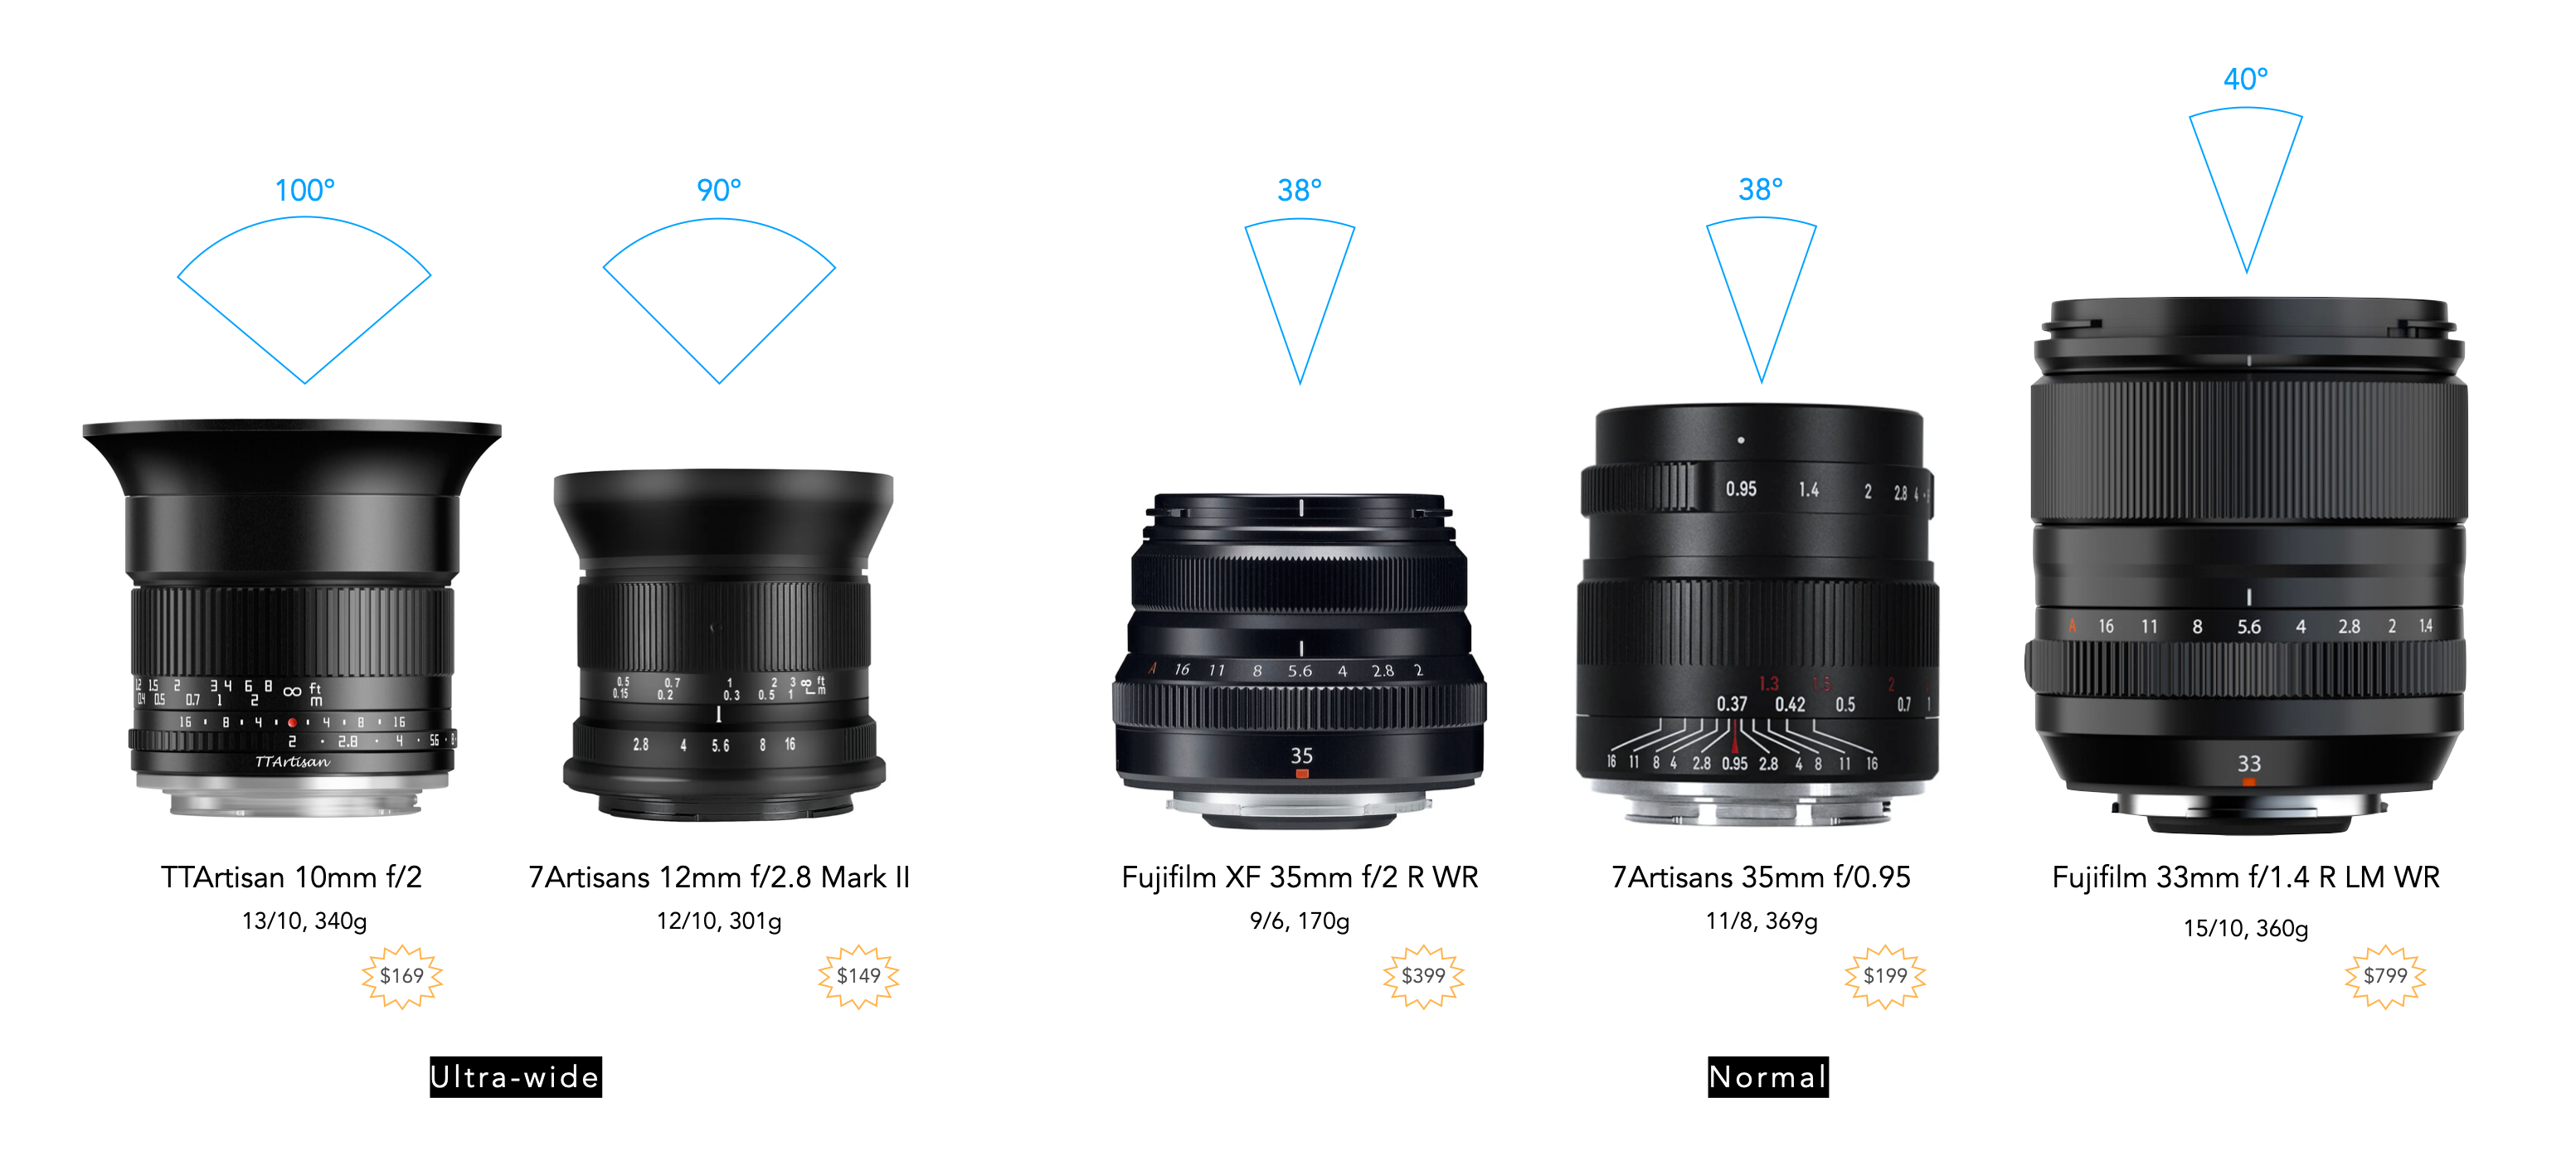
Travel general involves scenes that are expansive, whether that is natural landscapes, streetscapes or simply photographing in tight spaces. The best lenses replicating this immersive experience in photographic form is an ultra-wide-angle lens. There are many situations, especially in older cities, where an ultra-wide angle lens helps transform a simple street into a dramatic scene. This means lenses in the range of 15−20mm (10−13mm for APS-C). Some Fuji-X choices for normal and ultra-wide lenses are shown in Figure 1.

Here are some of the things to consider when choosing a lens for travel photography:

  • weather-resistance − Not every day is sunny when travelling, so having some protection against moisture and dust is a good idea.
  • auto-focus + manual focus − Auto-focus makes taking photography easier, especially as the window for taking a shot can be limited. It’s also nice to have some control over more artistic shots with the option of manual focus.
  • a reasonable large aperture, good for low-light − Nobody wants to lug a flash around when touring, as it can be somewhat invasive.
  • compact enough to fit in a pocket − For a secondary lens, it’s handy just top be able to fit it in a pocket, or small bag.

This isn’t the telephoto you’re looking for

Some will argue that a telephoto while travelling is a must-have, helping to capture scenes that are physically out of reach, I would argue the opposite. On most trips, telephoto lenses just aren’t needed. They might be great for a safari, but traipsing through the alps, or the streets of Rome, there is little need for a telephoto. There may be some shots you won’t get, particularly those in the distance, but frankly travel is about immersing yourself in the immediate surroundings. There wouldn’t be much point in taking a photo of a Roman statue from a distance.

A zoom lens for those who want a single lens

For those who prefer a single lens, then the answer might be a zoom lens. Firstly, avoid the superzoom lens – these are cover everything from wide to ultra-telephoto providing a broad range of focal lengths. These offer exceptional flexibility, but at the expense of being heavy, which can impact travel portability. In addition they often just aren’t wide enough. For example Tamron makes a 18-300mm lens for Fuji-X cameras (f/3.5-f/6.3), which covers everything really – in terms of FF this is 27-450mm. That’s a *lot* of lens. But the lens is 620g, which is heavy, well heavier than I would want to lug around everyday, and at f/3.5 it is kind-of slow. Besides which, based on the previous discussion, there is little need for a telephoto zoom when travelling.

Fig.2: Choices for ultra-wide and normal zoom lenses (Fuji-X).

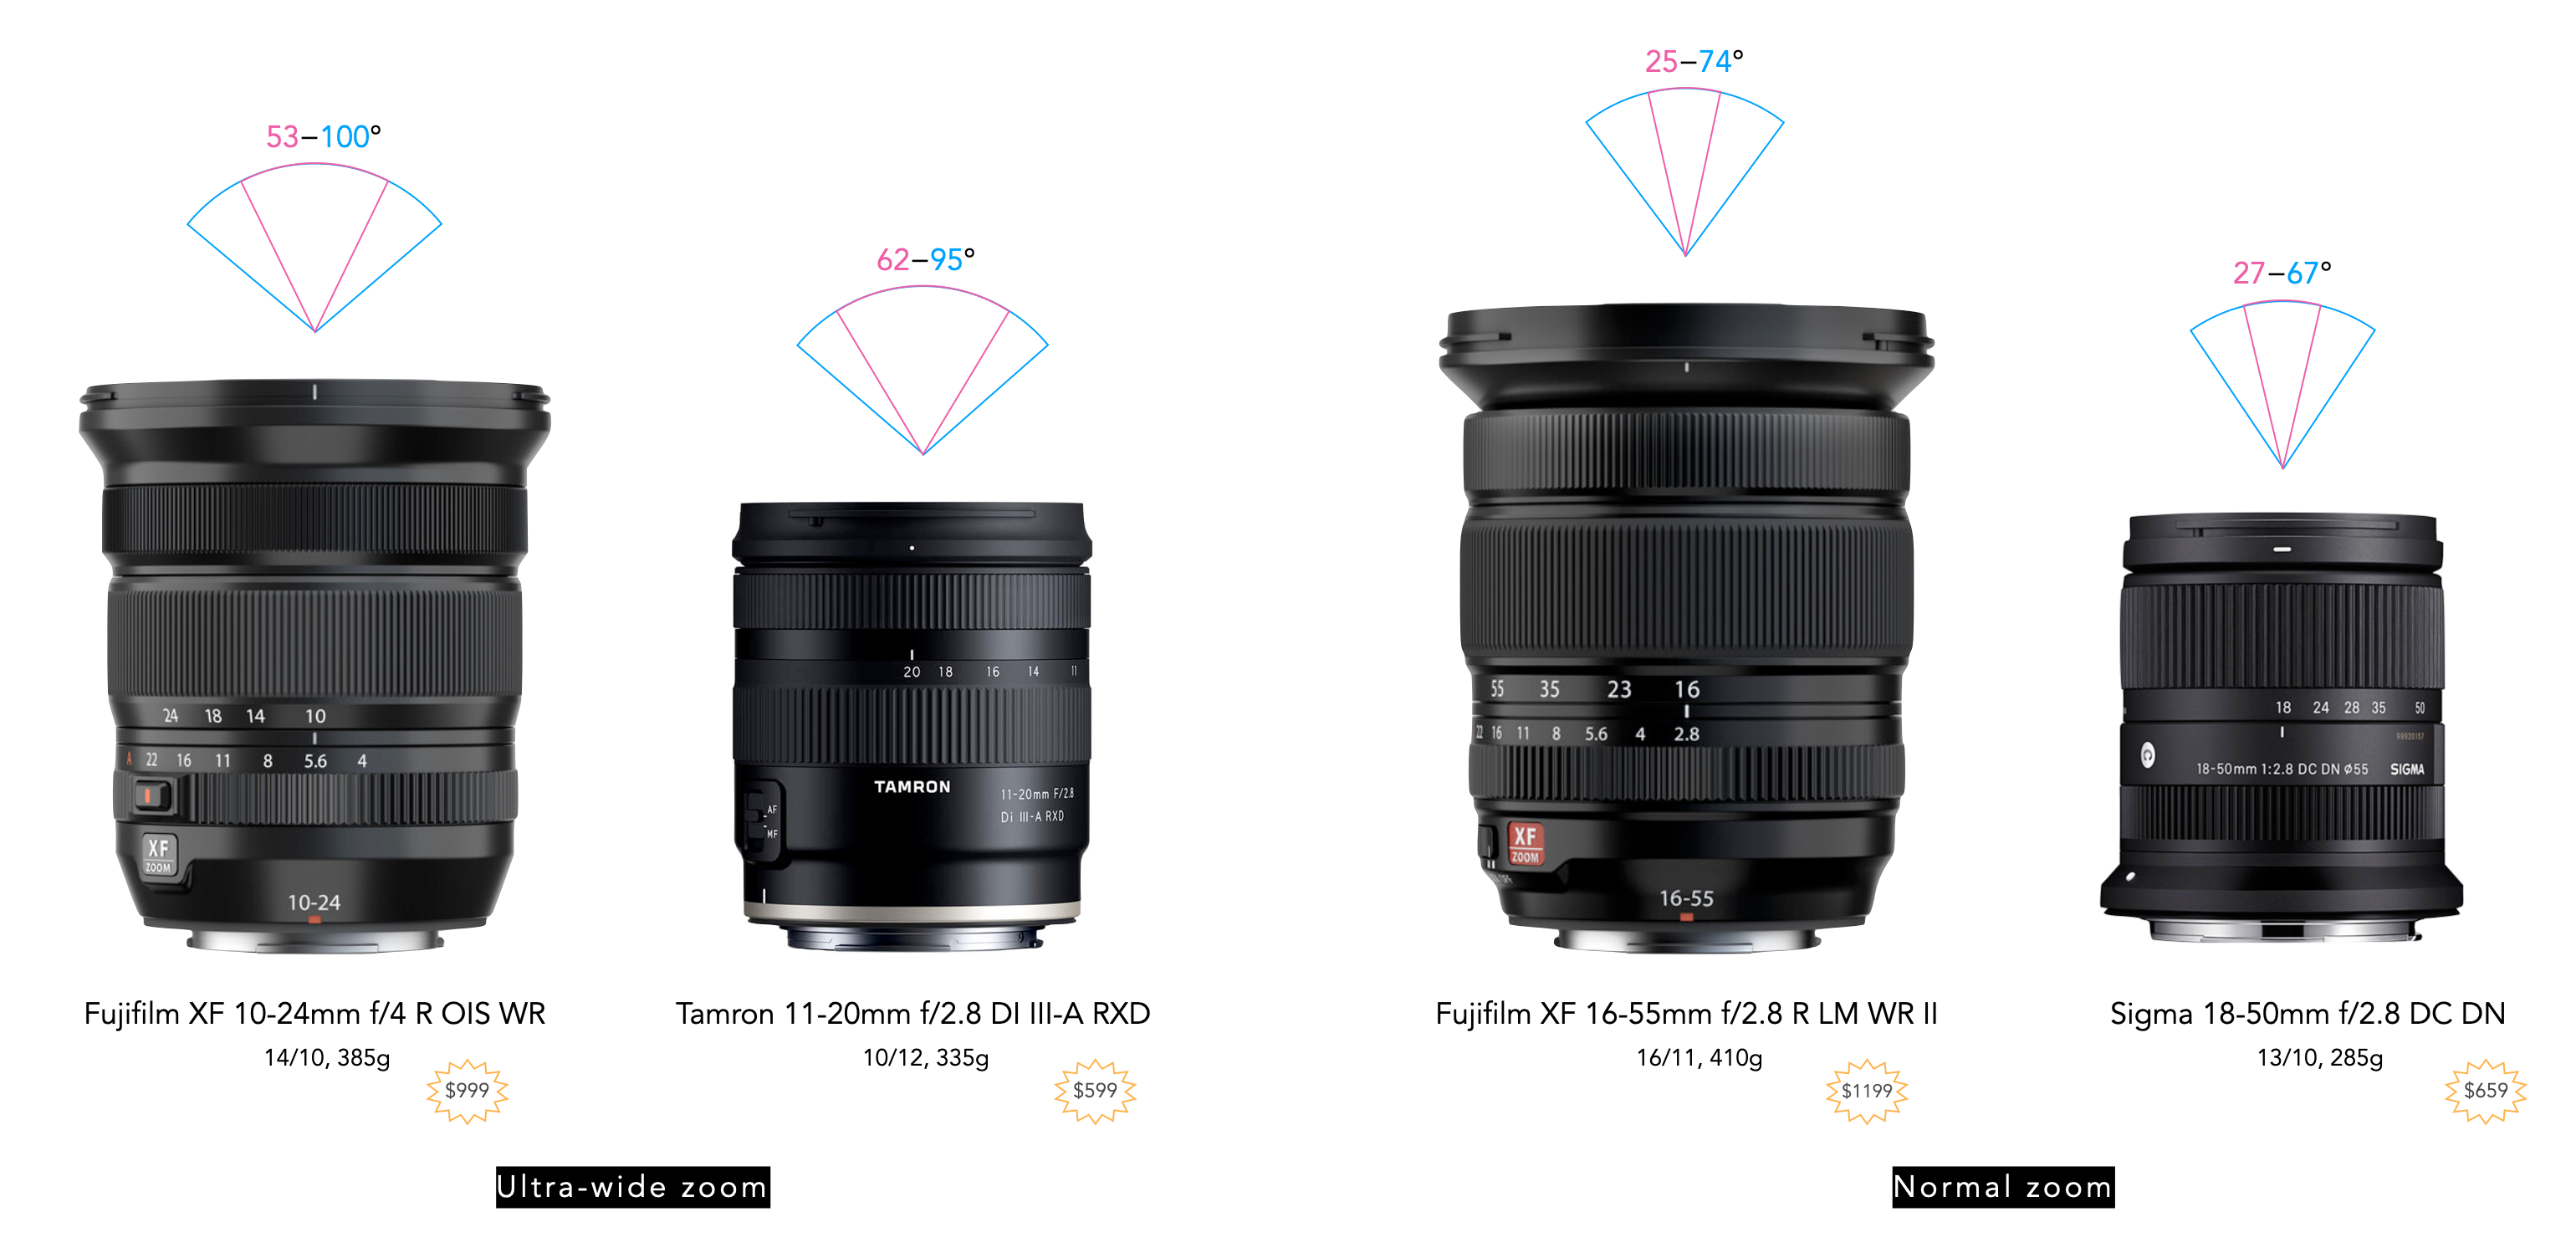
If you only want a zoom lens, stick to one which encompasses wide, normal, and perhaps portrait – for Fuji this would be something like a 16-55mm (24-82.5mm FF), considered by some to be the “Swiss Army Knife” of lenses. Or perhaps the lighter, less expensive Sigma 18-50mm (27-75mm FF). Figure 2 shows a series of potential zooms for Fuji-X, all of which are autofocus (generally for Fuji-X, the only autofocus lenses are restricted to Fujifilm, Sigma and Tamron lenses).

Artisanal lenses

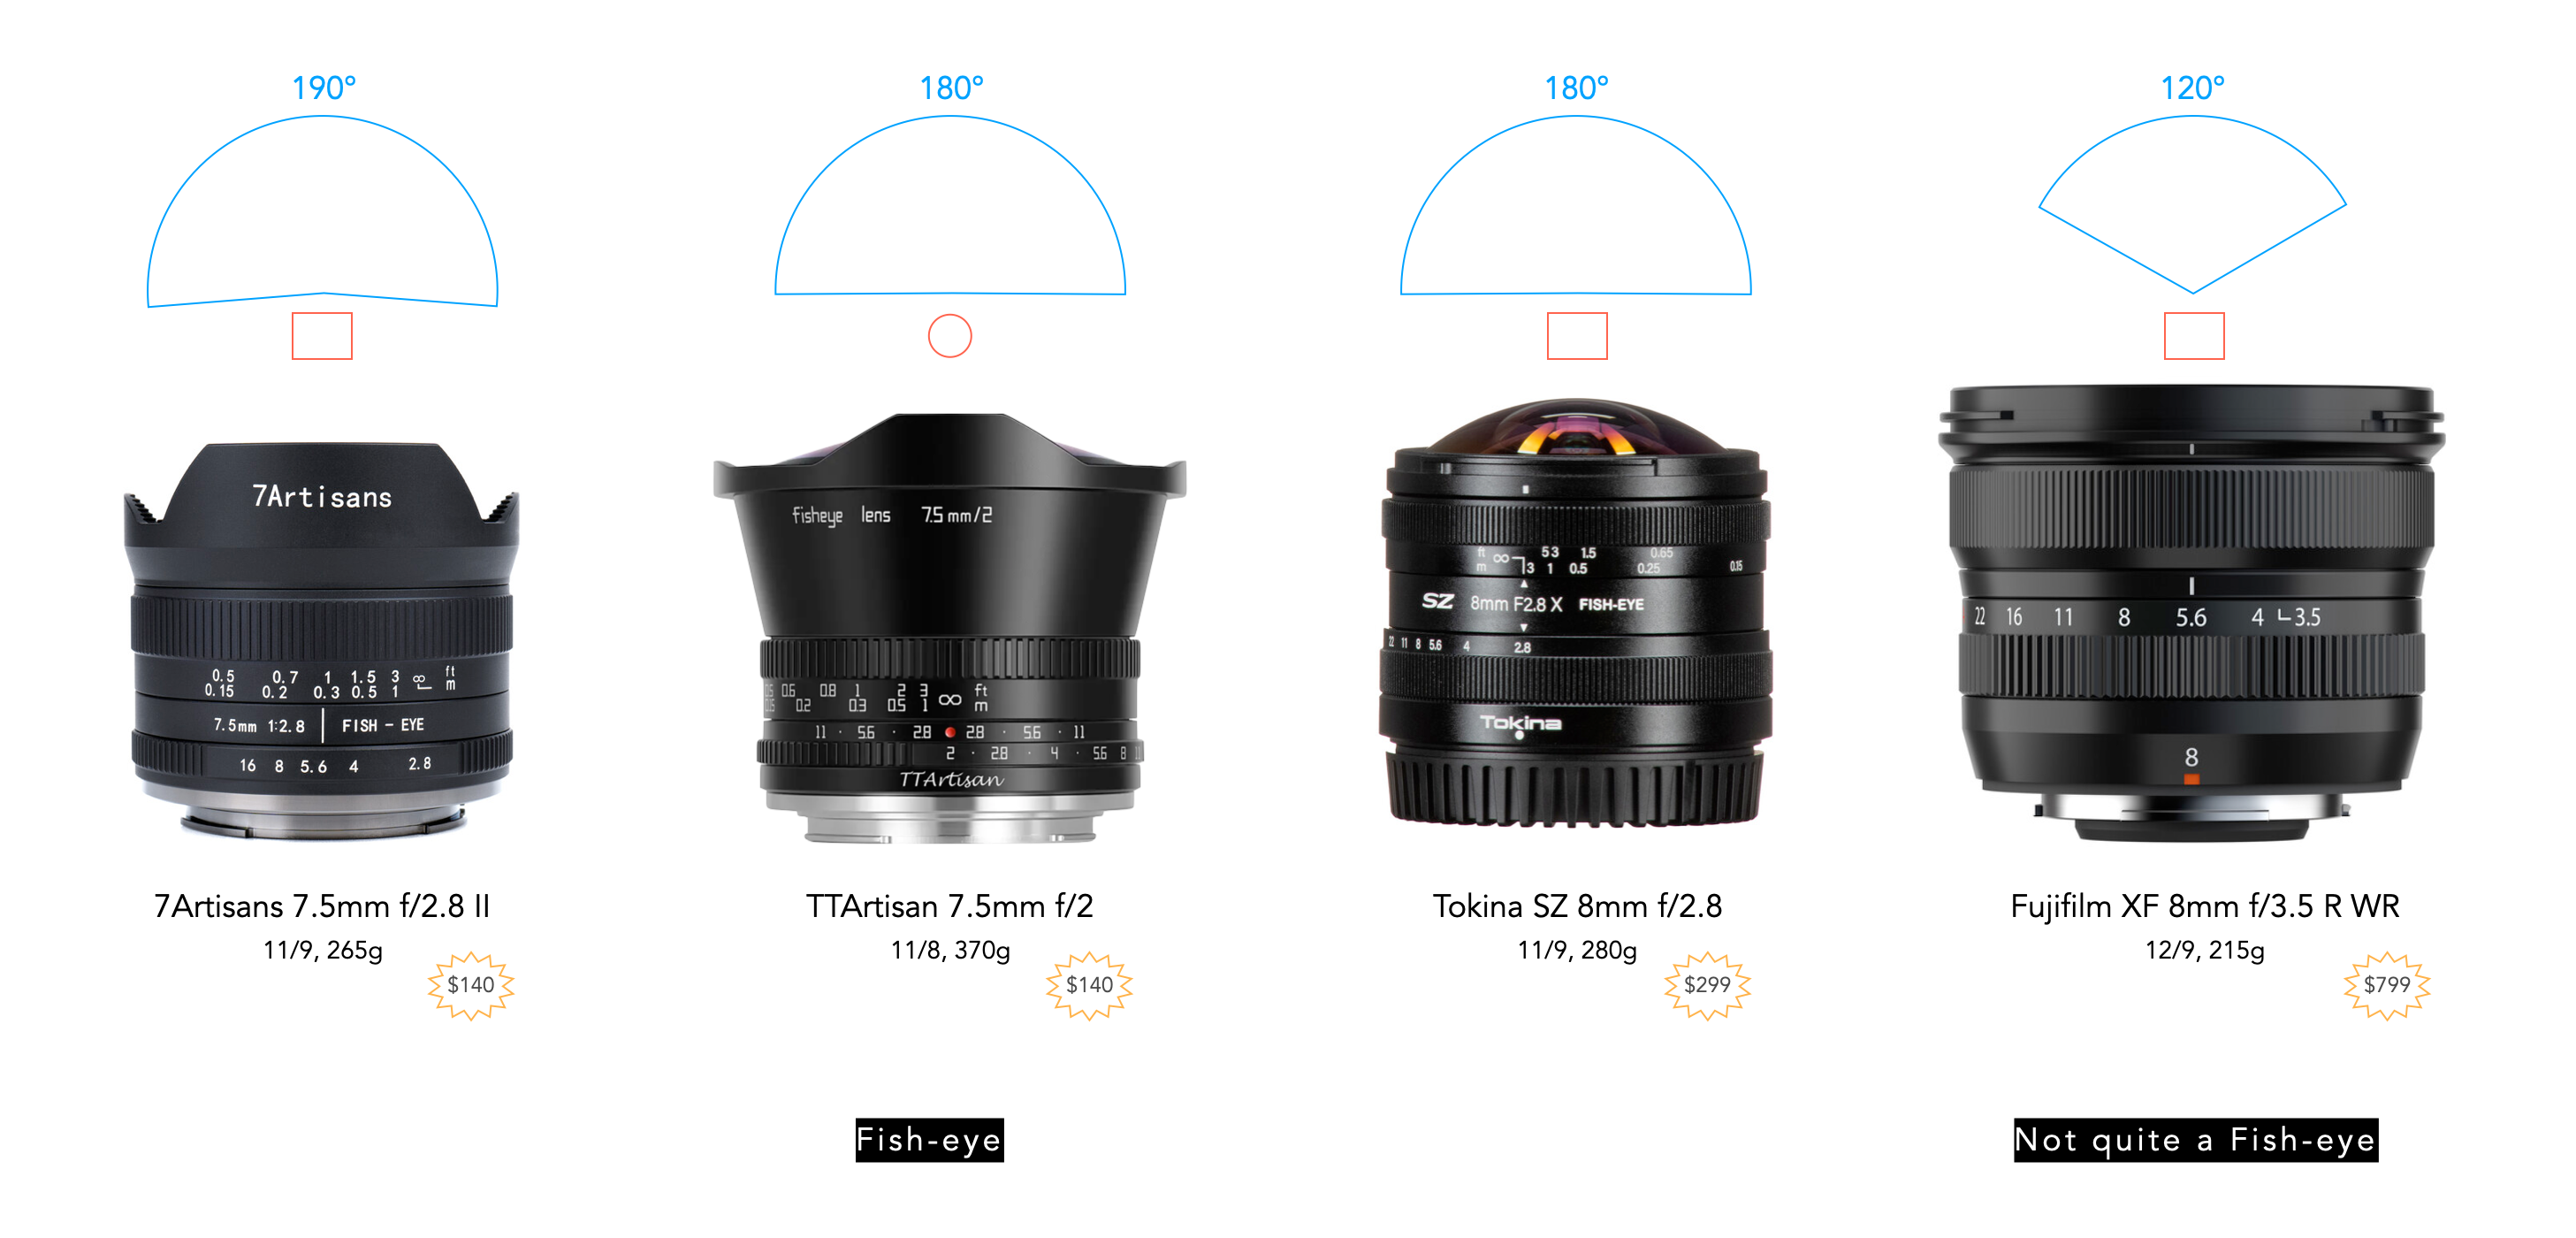
Another interesting lens to take along is a fish-eye lens, allowing for the creation of whimsical and fun travel photographs. A fish-eye is the wider alternative to the ultra-wide, and generally comes in a circular, or diagonal format. Both these formats generally exhibit some form of distortion, hence the reason they are usually used in a more artistic way. They are also perfect for photographing large, cavernous spaces, i.e. those whose grandeur would not be represented clearly by any other lens, e.g. cathedral ceilings. What about distortion? Consider it part of the art. Figure 3 shows some fish-eye choices for Fuji-X.

Fig.3: Choices for fish-eye lenses (Fuji-X)

The final choice?

In many cases you will end up using a single lens for 80-90% of the time. What that lens is, is really up to the needs of the photographer. What if you had to choose only one lens to take long on your travels? Some people photograph an entire trip entirely using a 35mm lens (APS-C 23mm), others may choose a versatile zoom. Or perhaps the best option is to compact zoom, and a wide aperture normal, e.g. 35mm f/1.4 (APS-C). A 35mm lens (23mm APS-C) is suitable for most landscapes, and covers most aspects of daily life encountered in street photography. For example the Fujifilm 23mm f/2 R WR is compact, lightweight, and has a horizontal AOV of 55°, which is reasonable. On the downside, low-light situations aren’t fantastic, and close-up shots can be soft. But it is weather resistant, less expensive than one of Fuji’s top lenses, and is fast to focus. Everything is a compromise.

Many people will push native lenses only, e.g. Fujifilm – it’s not necessary, there are many good 3rd party lenses, the only caveat being that many are manual focus only.

N.B. Prices are in US$, and AOV’s shown in the figures are always horizontal.

Further reading:

Travel photography − Shoot now, discard later?

The 1950s heralded the golden age of travel photography. There was an abundance of camera options due initially to the emergence of East Germany as a powerhouse of inexpensive 35mm cameras, followed shortly afterwards by Japan, but also non-SLR cameras – and the travel revolution had begun. That’s not to say film was necessarily cheap – in 1955 you could buy three rolls of 20 exp. 35mm Kodachrome for about US$5.50 (usually this cheaper price was without processing). To put this into context, a loaf of bread was about US$0.12. Yet when people travelled, for example to Europe, the average length of a trip was about 50 days, at a cost of $1300 (1950), so in all likelihood for those who could afford it, film was a minor expense.

Anyone who knows someone who was an amateur photographer during the heyday of 35mm knows that they often took a lot of photos when travelling. Photos of people, photos of places, and things they saw along the way. Some turned out, others not so much. Why? Because you may never be able to retake a given situation, and because the situation of the travel photographer usually finds themselves in – a very limited time to shoot. You may never come back to the same place (and regardless it will have changed). However travel photography was still limited for the amateur photographer due to inexperience – this often resulted in photos that were out-of-focus, or had parts cut off (maybe sometimes made worse by camera manufacturers who made automatic cameras seem flawless). You never knew exactly what you were going to get until the film had been processed.

A collage of pictures from a trip to Norway
On a trip to Norway I took some 2000 pictures with iPhone and Olympus camera combined (and sometimes I still can’t find that elusive photo I never took).

With digital photography we have another dilemma – you can take hundreds (or even thousands) of photographs, because it is possible. There is no material limit beyond the capacity of a memory card, and that can easily be augmented with other cards. With the proliferation of intelligent cameras, the amateur photographer can focus more on content, and perhaps a little less on the technicalities of taking a photo. Travel photography has become a “shoot now, discard later” venture. But is quantity bad? This may be less about producing a safety net of good photographs, and more about shooting all you want to.

Well known Japanese street photographer Daido Moriyama is the type of photographer that has always believed that quality only comes with quantity. He is known to take 36 exposures in less than 100m of street photography.

“As I’ve said countless times before, my photography is all about quantity. I take lots of shots. Digital cameras are just so amazingly convenient. There’s no film to keep changing, and you just point the camera where you like… Of course, the batteries are a bit of a bother, but relatively speaking…”

Moriyama, How I Take Photographs (2019, p.78)

In the glory days of film, professional photographers would take roll after roll of film, from which only five or ten shots may be used to complete a story. This wasn’t really possible for the amateur film photographer, due to inexperience, cost, and equipment limitations. With digital many of these limitations have disappeared. For some people it is sometimes hard to take a large number of photographs. Sometimes it just doesn’t feel right, but things change over time when you realize that the photo you are looking for was one you never shot. Shooting copious frames in digital costs nothing from a storage perspective. Sometimes it is just finding the balance between quantity and art.

Shooting photos from an aircraft

Taking photos from a train is not that hard. Taking photos from the window of a plane is trickier for a number of reasons. Firstly, you can’t really wander the aisles of a plane looking for the best vantage point, and secondly, there are very few good photos to be had at 35,000 feet.

There are of course some technical issues, the biggest one being aircraft windows. Plane windows are technically made up of three panes: (i) an outer pane flush with the outside fuselage, (ii) an inner pane (which has a little hole in it), and (iii) a thinner, non-structural plastic pane called a scratch pane. The scratch pane is the part passengers can touch, and inadvertently scratch. And the windows are not made of glass, but rather a type of plexiglass known as “stretched acrylic” (the flight deck windshields are made with glass-faced acrylic). These windows are not ideal to look through, because they are never perfectly clear.

An aerial view of Laval on approach to Pierre-Elliott Trudeau Int. Airport in Montreal. Taken from a De Havilland Canada Dash 8 aircraft which was banking. iPhone 5 (4.12mm; f/2.4; 1/531).

Second is the aircraft itself. In smaller planes windows are often located closer to the centre-line of the plane, so views of the ground are better. The larger the plane, the higher up the windows are on the aircraft’s curved fuselage (largely due to the cargo space below).

Example vertical angles of view for a 35mm lens on an APS-C camera on different aircraft.

Here are some tips for shooting photographs from a plane:

⦿ Plan ahead − This means studying the route – what scenic sites will you be passing over? For example the Icelandair flight from Toronto to Keflavik (ICE604) typically flies over southern Greenland, around 5am (local time) – which from May to August is around sunrise. Sunrise and sunset are great times to try and take a shot – shots of cloud and sky by themselves aren’t exactly inspiring. It might also be good to check weather conditions along the route.

⦿ Choose a seat − With the route and time of day in mind, decide on where you want your window seat. Sitting on the wrong side of the plane at the wrong time of day, might result in you shooting into the glare of the sun. Use an airline seat map to help guide your choice, noting that the type of plane will make a difference in where you want to sit. Optimally, a seat in the fore or aft of the plane is preferable, avoiding over-the-wing seats. However in a turboprop aircraft the wings are less of an issue because they are typically above the window. In some planes the aft of the wing can be problematic because of jet exhaust blurring parts of the image.

⦿ Select an appropriate camera/lens − Smaller is often better when it comes to cameras. So a compact camera, or even smartphones are both good choices because they are both accessible and unobtrusive, and frankly using a DSLR is likely gross overkill. A wide lens is typically best – the longer the lens the more susceptible it is to vibration and turbulence, even with good IBIS. You can experiment with UV and ND filters, but avoid polarizing filters. The plexiglass panel in the window in combination with the polarizing filter actually produces an effect called birefringement, which creates a rainbow effect in an image.

⦿ Make sure the window is clean − Always make sure to clean the scratch pane before take-off – the fewer smudges you have to shoot through the better. The scratch panes may never be perfect, because they tend to take a lot of abuse.

A little bit of art, flying into Montreal. iPhone 5 (4.12mm; f/2.4; 1/343). The lens on the iPhone 5 is roughly equivalent to a 30mm on a full-frame.

⦿ Hold the camera close − You can reduce the effect of scratches etc. by placing the lens as close to the window as possible (but not directly on the window, unless you use a rubber lens hood).

⦿ Choose settings − Faster is better when it comes to shutter speeds, e.g. 1/600 to 1/2000. The further away the object being photographed, the more lenient you can be with shutter speed. A mid-range aperture like f/8 is also quite appropriate – sharpness is all relative when shooting through three panels of plexiglass. If using a smartphone cameras, the camera will handle all the settings.

⦿ Use manual focus − Sometimes the window can be a bit hazy, and this can interfere with auto-focus. Switching to manual focus usually works quite well, making sure to focus at infinity.

The best “aerial” photographs come at landing time, or when a plane is close enough to the ground to provide an aerial view. I’ve taken some great photographs of Montreal from a smaller plane, and even on the approach to Keflavik (Iceland). What to photograph? That really depends on whether you want to take some artisanal/experimental shots, or aerial shots of landscapes. Some people like to take pictures of the wings, and that makes a lot of sense given that it helps put some shots into context. The image shown below wouldn’t be that interesting if it weren’t for the plane’s curved wingtip. Clouds are also interesting, particularly if seen from above, as are human incursions on the landscape e.g. farms, and natural wonders like rivers.

Approaching Keflavik, Iceland. iPhone 6s (4.12mm; f/2.2; 1/950).

Aerial shots can be plagued by a aerial haze, which imparts a gray layer on the image. During the day, the shorter wavelengths of light (blues and violets) are scattered by the gasses in the atmosphere. Light is also reflected by particulates in the atmosphere which results in hazy skies. This can be reduced by using a UV filter, or in post-processing. Reflections can also be an issue, especially if it is dark outside – lights within the cabin will reflect back towards the camera from the three sheets of plexiglass. And no flight is smooth – engine vibration, and air turbulence will make it difficult to achieve long exposures.

The original aerial shot of Iceland with a nice layer of gray haze. (iPhone 6s; 4.12mm; f/2.2; 1/999).
The image modified with some contrast stretching, and enhancement of the blue colour channel.

At the end of the day, there is no guarantee for good photographs shooting through a window. There is every chance that some images may be soft, especially around the edges, or condensation/ice may build-up on the window, thwarting an notion of taking “good” pictures. It might be that the plane is shrouded in clouds the whole way through the journey. The best advice is to take lots of photos, and experiment.

Above the clouds (iPhone 6s; 4.12mm; f/2.2; 1/746).

If you are interested in taking photographs from a small plane, such as the tours offered by Sea to Sky Air in Squamish BC, then you will need a few more tips, and I have provided some resources below. For anyone wanting to visit Iceland, check out my post Visiting Iceland? – Beware of the glaciers.

Further reading:

Shooting photos from a train

Someday you might be in a situation one day where you will need to take photographs through a window. For example travelling on one of the many of the worlds great rail journeys, which often provide scenery which is impossible to see otherwise. Rail trips that are specifically touted as being “scenic journeys” will often have an observation car with large windows, panoramic windows that take in a view of the sky as well, or an open-air carriage, like that found on the Northern Explorer from Auckland to Wellington (in New Zealand). The problem is that not all trains offer a glass-free interface between you and the scenery.

The biggest problem with photographing through windows is that glass (or perspex) is usually not that clean, often plagued by dust and dirt, things about which you can do little or nothing (well you can clean the inside, but not the outside). If it isn’t in a filmy layer of dirt, or a streak, there is likely very little to worry about. Since you will be focusing on distant objects when shooting from a moving train, nearby dirt specks likely will be of little worry, as they will barely show on a photograph. This becomes more problematic in direct sunlight which can emphasize dirt, streaky panes, and dust smears. Obviously, the best thing to do is to try and find a piece of glass that is pretty clear to shoot through. There may be a chance that there are also windows that can be opened.

A shot of a river along from the Bergen Line west of Myrdal (Olympus E-M5Mark II, 12mm, f/2.8, 1/1000)

Another two issues when shooting through glass are reflections and glare, but they can be alleviated by placing the lens hood directly up near the glass (but don’t press the lens against the glass because that can transfer vibrations from the train to your camera). Select a reasonably sized aperture which will reduce the impact caused by details from the glass (e.g. dirt), but not too large as it might impact depth-of-field. Note that the best results will be achieved using manual focus. Shooting through glass (or even wire mesh), the auto-focus can be misled by the surface and may not focus beyond. Autofocus can also take a while to focus, which can lead to you missing the shot. Trains generally move fast, so if you hesitate you loose the shot.

Glare due to the sun peaking out from behind the clouds directly at the window. Bergen Line (Olympus E-M5Mark II, 12mm, f/3.5, 1/1000)
Whoops, pushed the shutter at the wrong moment – nice photo if it wasn’t for the pole. Bergen Line (Olympus E-M5Mark II, 12mm, f/6.3, 1/400)

Here are some general tips:

  • Use continuous shooting mode, because it allows taking many photos at once which in turn means a few may produce really good photographs.
  • Use a polarizing filter to cut some of the reflections.
  • Use fast shutter speeds (and shutter-priority) to compensate for the train’s movement and vibration. Start with 1/500 for distant subjects, and 1/1000 to 1/2000 for nearby ones. Direction matters as well, so moving towards or away from a subject (rather than crossing laterally in front of it) usually allows for a lower shutter speed.
  • Use a wide-angle lens, since the short focal length helps to minimize movement.
  • An overcast sky is better than sunshine or rain. Too much sun will produce shadows and reflections, and rain will end up creating an artistic distortion effect when you shoot through the window.
  • Do research before the train trip to find notable sights, especially where the train may curl itself on a tight curve.
  • There will always be some form of blur in the image. The closer to the horizon, the less blur there is, because the train is moving slower with respect to distance closer to the horizon (i.e. motion parallax).
Running rapids alongside the Flåm Railway (Olympus E-M5Mark II, 12mm, f/2.8, 1/400)

Train speed also plays a factor, both in the shutter speed settings, and timing shots. The Norwegian Flåm Railway which travels between Myrdal and Flåm is an extremely scenic journey (if you can ignore the hoards of tourists). The train journey takes about 60 minutes and travels at a leisurely 40kph along the 20.2 kilometres. Conversely the Bergen Line, all 493km from Oslo to Bergen, the train will travel an average of 70kph.

View of a train on a slight curve, Flåm Railway (Olympus E-M5Mark II, 12mm, f/2.8, 1/800)
Windows that open on the Flåmsbana, Flåm Railway (iPhone 6s, 4.15mm, f/2.2, 1/192)

It is possible to successfully take pictures through glass on a moving vehicle. The caveat is of course that there has to be good scenes to take photos of. For most of the VIA rail trip from Toronto to Montreal, there isn’t a lot to see because the railway line sits level to the surrounding area, and passes through somewhat monotonous scenery (the train travels at 100kph). Some of the best photographs can actually be taken approaching Montreal, when the train slows down. Conversely, train trips like those in Norway offer a richness of photographic scenery. Just remember not to forget those who ride on the train as well.

Don’t forget the human story side to a train journey (Olympus E-M5Mark II, 12mm, f/2.8, 1/800)

Choosing a camera for travel

Many people buy a camera for taking photographs when travelling. Yeah sure, you could use a smartphone, but it won’t provide you with the flexibility of a real camera. Really. Smartphones are restricted to having small sensors (with tiny photosites), a low-power flash, and uber-poor battery life. While they have improved in recent years, offering quite incredible technology inside their limited form factor, they will never replace dedicated cameras. Conversely, you don’t have to carry around a huge DSLR sporting a cumbersome 28-400 zoom lens.

There are so many posts out there which are titled something like “best travel camera 2022”, it’s almost overwhelming. Many of the cameras reviewed in these posts have never really been tested in any sort of real setting (if at all). So below I’m going to outline some of the more important things to consider when choosing a travel camera? Note that this is a list of things to think about, not a definitive and in-depth interpretation of requirements for cameras used for taking travel photos. Note that this discussion related to digital – choosing a good analog cameras for travel is another thing altogether.

What will you be snapping? − buildings? people? close-up shots of flowers?

Budget − Of course how much you want to spend is a real issue. Good cameras aren’t cheap, but spending a reasonable amount on a camera means that it should last you years. You want a good balance of the items described below. If your budget is limited, go for a compact camera of some sort.

Compactness − The first choice from the camera perspective may be whether you want something that will fit in a pocket, a small bag (e.g. mirrorless), or a complete camera backpack (e.g. full-frame, which I would avoid). For a compact, you could go with one that has a zoom, but honestly a fixed focal length works extremely well. Good examples include the Ricoh GRIII (24.3MP, 18.3mm (28mm equiv.) f/2 lens) and Fujifilm X100V (26.1MP, 23mm (35mm equiv.) f/2 lens, 4K video). Because of their size, compacts sometimes have to sacrifice one feature for another. You also don’t want a compact that has too many dials – their real benefit is being able to point-and-shoot.

Mirrorless cameras are smaller than full-frame cameras because they don’t need to fit a mirror inside – they use a digital viewfinder instead of an optical one. They have a compact size, and provide good image quality. The downside is that they generally have smaller sensors, like APS-C and MFT. I normally opt for both a compact pocket camera, and a mirrorless. Some are better suited to some situations, e.g. compact cameras are much less conspicuous in indoor environs, and places like subways – that’s why they are so good for street photography. More compactness = enhanced portability.

Resilience − When you travel, there is often very little time to worry about whether or not a camera is going to get banged up. Cameras made of metal are obviously somewhat heavier, but offer much better survivability if a camer is accidentally dropped, or banged against something. A camera constructed with a body made of magnesium alloy is both durable and lightweight. It is both corrosion resistant and can handle extremes in temperature well. A magnesium alloy body has less chance of cracking as opposed to a polycarbonate body.

Weather resistance − You can never predict weather, anywhere. Some places are rainy or drizzly, others environs are dry and may have particles of stuff blowing in the air. Obviously you’re not going to take photos in pouring rain, but dust and dirt are often a bigger concern. My Ricoh GRIII is not weather sealed, which seems somewhat crazy when you consider it is a street camera, but there are always tradeoffs that have to be considered. In the case of the GRIII, adding weather sealing would have resulted in less flexibility on lens barrel construction, button/dial layout, and heat dissipation. My Fuji X-H1 on the other hand is weather resistent. Of course you should also choose lenses which are weather resistent. If weather resistance is important, be sure to read up on the specifics for a camera. For example the Fuji X100V is deemed to be weather-sealed, but the lens is not. To achieve this you have to buy an adapter, and add a filter.

Weight − How much are you willing to lug about on a daily basis when travelling? You don’t want to choose a camera that is going to give you back or shoulder pain. Larger format cameras like full-frame are heavier, and have heavier, larger lenses. If choosing a camera with interchangeable lenses, you also have to consider their weight, and the weight of batteries, and anything else you want to carry. There are even differences between compact cameras, e.g. the GRIII is 257g, versus the X100V at 478g, 85% more.

Lenses − If you choose an interchangeable lens camera, then the next thing to do is choose some lenses… a topic which deserves numerous posts on its own. The question is what will you be photographing? In general it is easy to narrow the scope of lenses which are good for travelling because some just aren’t practical. Telephoto for example – there are few cases where one will need a telephoto when travelling, unless the scope of the travelling involves nature photography. Same with macro lenses, and fisheye lenses (which really aren’t practical at the best of times). In an ideal world the most practical lenses are in the 24-35mm (full-frame equivalent) range. I think prime lenses are best, but short-range zooms work quite well too. I would avoid long-range zooms, because you will always use the smaller focal lengths, and long-range zooms are heavy.

Batteries − Camera batteries should have a reasonably good use-time. Using camera features, and taking lots of photos will generally have an impact on battery life. For example using image stabilization a lot, being connected to wi-fi, or turning the camera on and off a lot will run down the battery. There are other things to consider as well. For example most batteries run down quicker in colder environs. Full-frame cameras are bigger, and therefore have a longer battery life than cropped-sensor cameras. Also determine if the camera just comes charging in-camera, you will likely need to buy an external charger. Some battery chargers are also slow. Ideally always carry extra batteries no matter what the manufacturer claims.

Use − What is the camera’s main use during travelling? Street-photography? Vlogging? Landscapes (for poster-sized prints)? Or perhaps just simple travel snapshots. If the latter, then a compact will work superbly. If you want to have the flexibility of different lenses, then a mirrorless camera makes the most sense.

Video − Do you plan to take videos on the trip? If yes, then what sort of capabilities are you looking for? Most cameras produce video in HD1080p, and some have 4K capability. Some cameras limit the length of a video. If you plan to use the camera mostly for video, choose one specced out for that purpose.

Stabilization − Many cameras now offer some form of image stabilization, which basically means that the camera compensates for rudimentary camera shake due to hand-holding the camera, and keeping the camera steady in low-light situations. This is more important for travel photography because it is cumbersome to lug around a tripod, and many places, like the Arche de Triumph won’t allow the use of tripods. Some compacts like the Ricoh RGIII do have stabilization, whereas others like the Fuji X100V do not.

The best way of choosing a camera is to first make a list of all the things you want from the camera. Then try and find some cameras which match those specifications. Then see how those cameras stack up against the considerations outlined above. Narrow down the list. When you have about three candidates, start looking at reviews.

I tend to stay away from the generic “big-box” style reviews of cameras, especially those who use the term “best of YEAR” in the title. I instead pivot towards bloggers who write gear reviews – they often own, have rented, or are loaned the cameras, and offer an exceptional insight into a cameras pros and cons, and provide actual photographs. Usually you can find bloggers that specialize in specific types of photography, e.g. street, travel, video. For example, for the Ricoh GRIII, here are some blog reviews worth considering (if anything they provide insight into what to look for in a review):

Lastly, don’t worry about what professional photographers carry when travelling. Chances are they are on assignment, and carry an array of cameras and related equipment.