Camera gear that amateur photographers should avoid

There is a lot of information about photography on the internet, and honestly for the beginner it can be overwhelming. The task of deciding on a digital camera is hard enough without content creators prattling on about things you probably don’t need. Here are a few pieces of gear to steer clear of – from the pure perspective of the amateur photographer.

Full-frame cameras − The ubiquitous dSLR, or “digital SLR” is an extension of 35mm film cameras, hence the reference to “full-frame” (sensors are 36×24mm). They have been the mainstay of professional photographers for the past two decades. But they are not something that an amateur photographer should even consider. They are large, heavy, and prohibitively expensive. The size alone makes them inconvenient for things like long-term travel. In an age of mirrorless cameras with good APS-C sensors they honestly just don’t make a lot of sense. Even the big manufacturers such as Nikon have shifted their emphasis away from dSLRs. There are situations where dSLRs are more of an advantage – low light, a larger sensor, wildlife an sports photographer, none of which are really the concern of the amateur photographer.
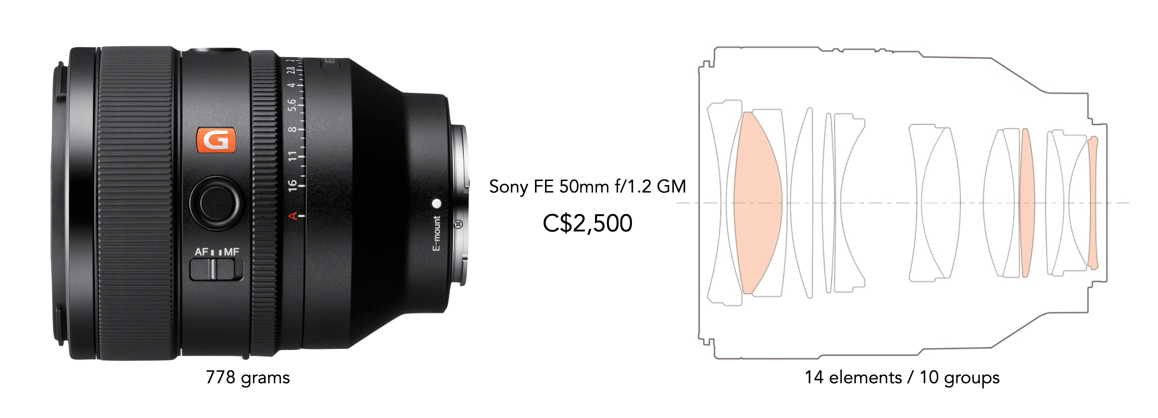
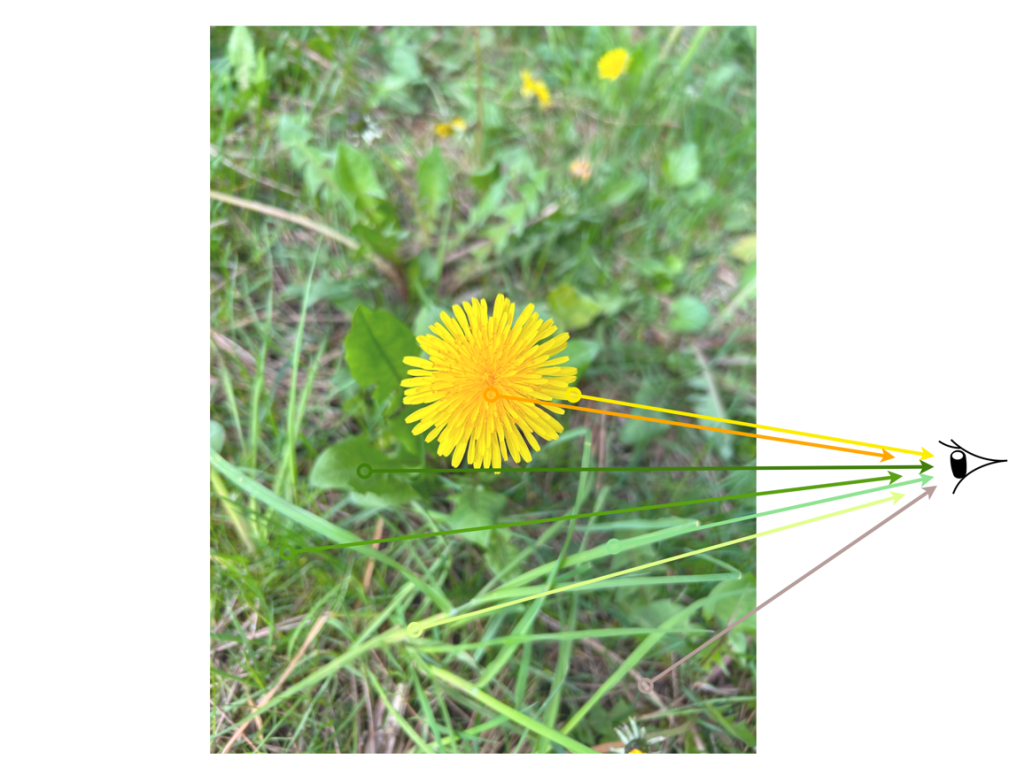
This Sony 50mm lens is fast, but it is too much lens for the beginner

Fast lenses − What is a fast lens? I would probably categorize it as a lens with a speed faster than f/1.8 up to f/1.2. They contain a lot of glass, are heavy, and expensive. But frankly most people don’t need these lenses. They are perfect for people who shoot a lot at night, or in low-light settings, but slower lenses can also be used in these scenarios. (I wrote a whole post on whether you Should you buy a superfast lens?, and Are modern ultrafast lenses useful?)
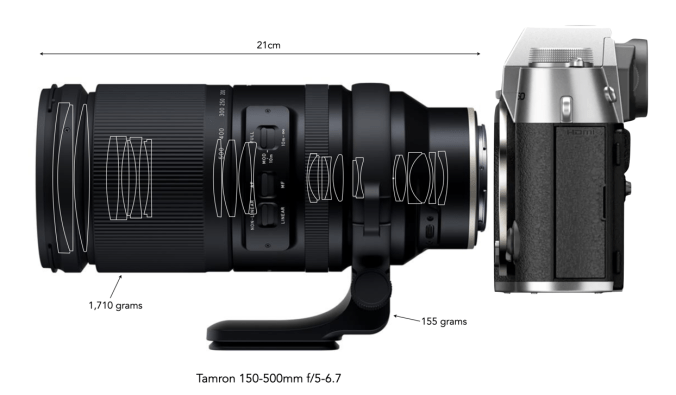
Super telephoto zooms − The zooms offer focal lengths like 100-500mm, and are very versatile, just not for the beginner. It’s tempting to consider, but not actually that useful unless you have a specific need, i.e. sports and wildlife photography. In many cases it is just too much zoom. For example landscape photography doesn’t always gel well with focal lengths beyond say 200mm, because there is a tendency to loose perspective, which is the whole point of many landscapes. The other problems are pretty obvious – size and weight. Of course here there is another benefit of mirrorless APS-C cameras, smaller zooms. The Tamron 150-500mm lens for Fuji-X seems amazing (225-750mm eq.), but it contains 25 elements, and weighs 1.71kg – try lugging that around for an extended period!

The Tamron 150-500mm super telephoto zoom – a behemoth for amateurs

Filters − There are a lot of really good filters which do things like reduce glare, and unwanted reflections, and correct or enhance colours. For example polarizing filters are useful when shooting landscapes in sunny locales, they darken skies, and make colours stand out more. Neutral density filters reduce light hitting the sensor, but doesn’t affect image colours. But it may be best to focus on taking good photographs, and conquering exposure before adding filters into the fray. P.S. UV filters are basically pointless because most sensors aggressively filter UV light. Save the filters for when you gain a little experience.

Tripods − Most people do not need a tripod. They are super useful for taking stills at home, or when you need to use a super-slow shutter speed, but otherwise they are a bit of a door-stop. They are not at all useful for travel, and overall just aren’t worth the effort. The only ones that can be somewhat useful are the mini variety such as the Manfrotto PIXI (but honestly avoid the Gorilla-type flexible tripods).

Camera body upgrades − Avoid the trap of upgrading your camera body every 1-2 years. A camera body should last a good amount of years, so there really is no need to consistently upgrade. If you are at the point of considering which camera to buy, save some money and buy an older version of the camera. The reality is that technology has plateaued somewhat in digital cameras, and there isn’t going to be much difference between two or three generations of a camera (except the price). Advanced features aren’t that useful if you are still grappling with the basics.

A light meter − If you have a film camera, then a light meter might be a must. But in the case of digital cameras, having a dedicated light meter may not be necessary. Good ones are expensive, and take up room. It’s easier to trust the light meter in the camera, or for film cameras use a light meter app such as Light Meter Ultra.

Lenses you don’t need − It’s hard not to want all the lenses that photographers review online. They look cool, and it would be fun to play with them right? Especially the myriad of inexpensive lenses now on offer. But here’s the thing, most of them you won’t use on a regular basis. Fish-eye lenses are a good example. They are fun and creative because they provide an ultra-wide view of the world. But the caveat is that reasonably priced ones are typically manual focus, and there are very few applications (unless it is a rectilinear fish-eye). There is probably a good reason that manufacturers like Fuji don’t have any fish-eye lenses.

Photography can get to be an expensive hobby, and buying things you don’t need can be a slippery slope. Many of these things I learned the hard way. Buying lenses that I thought I would need, but ended up sitting on a shelf. Think of it this way – every piece of gear that you buy should solve a problem of some sort, but not just a 1-2 instances, a problem you encounter a lot. If you are really interested in a lens, then try and rent the lens before buying to actually see if it is as useful as you think.

Ultimately a new lens or any other gear doesn’t replace the need for knowledge and experience, or frankly will it help you do something if you don’t really know what you are doing.

Travel photography − Shoot now, discard later?

The 1950s heralded the golden age of travel photography. There was an abundance of camera options due initially to the emergence of East Germany as a powerhouse of inexpensive 35mm cameras, followed shortly afterwards by Japan, but also non-SLR cameras – and the travel revolution had begun. That’s not to say film was necessarily cheap – in 1955 you could buy three rolls of 20 exp. 35mm Kodachrome for about US$5.50 (usually this cheaper price was without processing). To put this into context, a loaf of bread was about US$0.12. Yet when people travelled, for example to Europe, the average length of a trip was about 50 days, at a cost of $1300 (1950), so in all likelihood for those who could afford it, film was a minor expense.

Anyone who knows someone who was an amateur photographer during the heyday of 35mm knows that they often took a lot of photos when travelling. Photos of people, photos of places, and things they saw along the way. Some turned out, others not so much. Why? Because you may never be able to retake a given situation, and because the situation of the travel photographer usually finds themselves in – a very limited time to shoot. You may never come back to the same place (and regardless it will have changed). However travel photography was still limited for the amateur photographer due to inexperience – this often resulted in photos that were out-of-focus, or had parts cut off (maybe sometimes made worse by camera manufacturers who made automatic cameras seem flawless). You never knew exactly what you were going to get until the film had been processed.

A collage of pictures from a trip to Norway
On a trip to Norway I took some 2000 pictures with iPhone and Olympus camera combined (and sometimes I still can’t find that elusive photo I never took).

With digital photography we have another dilemma – you can take hundreds (or even thousands) of photographs, because it is possible. There is no material limit beyond the capacity of a memory card, and that can easily be augmented with other cards. With the proliferation of intelligent cameras, the amateur photographer can focus more on content, and perhaps a little less on the technicalities of taking a photo. Travel photography has become a “shoot now, discard later” venture. But is quantity bad? This may be less about producing a safety net of good photographs, and more about shooting all you want to.

Well known Japanese street photographer Daido Moriyama is the type of photographer that has always believed that quality only comes with quantity. He is known to take 36 exposures in less than 100m of street photography.

“As I’ve said countless times before, my photography is all about quantity. I take lots of shots. Digital cameras are just so amazingly convenient. There’s no film to keep changing, and you just point the camera where you like… Of course, the batteries are a bit of a bother, but relatively speaking…”

Moriyama, How I Take Photographs (2019, p.78)

In the glory days of film, professional photographers would take roll after roll of film, from which only five or ten shots may be used to complete a story. This wasn’t really possible for the amateur film photographer, due to inexperience, cost, and equipment limitations. With digital many of these limitations have disappeared. For some people it is sometimes hard to take a large number of photographs. Sometimes it just doesn’t feel right, but things change over time when you realize that the photo you are looking for was one you never shot. Shooting copious frames in digital costs nothing from a storage perspective. Sometimes it is just finding the balance between quantity and art.

Why do we take photographs?

Do we ever stop to question why we take photographs? There are many reasons of course. Here are some of the main ones. Note that some photographs may span more than one category.

To convey objective information − These may be the easiest type of photographs to take, because they are of the documentary type. This might include photographs of a dish to illustrate a recipe, or portray the architectural details of a vintage door, or even artistic differences between fire hydrants.

Documenting a drink in a cafe
or a huge bunny in Montreal

To accurately reproduce natural or human-made objects or scenes − Not quiet the same a the documentary image, which is a clear interpretation of one specific thing. The reproductive image is more concerned with a general representation. A good example are landscapes.

Reproducing a treeless landscape in Norway…
…or canned tomatoes in an Italian grocery

To represent a memory of people, places or things − This type of photograph is focused more on emotion, to provide a sense of nostalgia of experiences past.

A memory of Peggy’s Cove…
…or eating brown cheese

To embody a design or pattern − Some pictures are taken to describe some mathematical entity, or pattern. For example Fibonacci spirals in plants, perspectives of buildings, texture of bark on trees. Some of these are human-made, others natural, but design is always paramount.

A carving pattern on a Norwegian wooden chest…
…or mottled stained glass in the Montreal Metro

To interpret the manner in which humans interact with their environments − An interpretive record of a segment of human life, and activity that is interesting. This could be things like travel, sports, historical experiences, etc.

Living on a lake (a Crannog in Scotland)…
…or travelling on a train in Norway

Cameras tell “constructive” lies

A camera either tells a lie, or does not tell a lie. It may seem somewhat confusing, but it is all a matter of perspective.

The camera, being a machine, cannot really lie because the picture it is taking is what it is designed to take. Therefore every unmanipulated photograph, no matter its context is essentially true. This includes the use of things like film simulations – if the settings in a Fujifilm camera are modified to take a photograph using a simulation to mimic Kodak Porta 400 film, then the picture produced is true. On the other hand, the human eye, being subject to the interpretation of the brain often sees things differently from the camera lens with the result being that what the camera perceives as true, appears as false. In other words, it is the human eye that lies, or deceives us. Therefore to make the cameras rendition correspond closer to the humans perception, a photographer may have to force a camera to effectively tell a lie. The resulting picture then is a constructive lie, because the lie serves a constructive purpose.

Consider as an example, cars driving down a road. Since your eyes can follow the cars in transit, you can perceive them in the form of sharp images, while understanding that the cars are actually moving. A camera, using the appropriate fast shutter speed, will freeze the scene, effectively giving the erroneous impression that the cars on the road are standing still. There is no real difference between a picture of the cars in motion, or standing still. Motion can be rendered in the photograph with blur – using a slow shutter speed will cause a slight blur in the rendering of the picture. The eye does not see this blur in real life, so the photograph would not be true, but rather a constructive lie. The resulting image is much more descriptive of the scene.

The constructive lie and moving cars

Another example of a constructive lie deals with the colour temperature of a scene. The lighting in a scene may not create the most optimal scene from a visual perspective, perhaps due to the temperature of the light source, resulting in what is known as a colour cast. As a result a photographer may modify the temperature by means of a white balancing setting to the point where the eye perceives it as “normal”. For example a scene lit by a tungsten light would have an orange hue. A photograph taken of this scene would have a corresponding colour cast, which would be rejected by the brain as seeming “unnatural”, because colour memory makes us see things in the same light as a sunlit scene. This is another case where the photograph of the scene is “true”, and the corrected version is false – constructive lie.

The constructive lie and the ‘keystone effect’

The third example is the classic one where tall building appear somewhat skewed, leaning back into the scene – what is known as the keystone effect. This convergence of parallel lines is a perfectly natural example of perspective, which is perfectly acceptable in the horizontal plane, e.g. railway tracks, but seemingly deplorable in the vertical plane. Converging lines are easy to fix, either by means of the tilt-shift lens, or using software (some cameras have this built-in), with the resulting image being a constructive lie as opposed to the seeing the building as it really appears.

Photographing large objects in the landscape

Photographing large objects in the landscape can be tricky. Some are near impossible, for example bridges. An exceptional example is the Landwasser Viaduct, part of the Rhaetian Railway in Graubünden, Switzerland. The best possible shot is taken from the valley beneath, preferably with a train crossing the viaduct, but that’s not a shot possible for everybody, because most people are on the train, and therefore won’t get anywhere near the perspective of a ground shot. It’s the same with many of these famous bridges, and viaducts. Some, like the Glenfinnan Viaduct, often known as “The Harry Potter Bridge“, are easier to photograph (there are some good instructions to help find the most optimal spots). Not to say that the Landwasser Viaduct can’t be photographed, there are also good commentaries on doing that as well.

Dunnotarr Castle in Scotland. Although the castle itself is not a “large” object, it becomes large when combined with the headland. If it wasn’t perched on a rocky headland, the resulting image would be quite flat, however the combination of man-made and natural features gives the photograph a great deal of depth.

While train journeys are fun, actually photographing things from the train doesn’t always produce the images people expect. It’s the same with large objects of any sort. Sometimes the best images these days are taken using drones, because they are able to take in the whole landscape. But not everyone has a drone available, and in some places they have actually cracked down on them over the past few years. landscape scenes in Iceland are monumental when taken from a drone… these are perspectives of features like waterfalls that just can’t be achieved any other way. But at nearly every major tourist site in Iceland, you will see ‘No Drone’ signs, e.g. Gullfoss waterfall.

So if you are interested in photographing a large natural, or man-made object, what’s the best approach? There are two good methods. Firstly, shooting from a distance, to provide an overall outlook. This involves finding the best position that allows for an uninterrupted view, and makes an interesting shot. Secondly, shooting up-close, providing a near perspective of the object, photographing just a portion of the structure and bringing things like texture and intricate detailing into play. Describing an object visually should never be just a one-perspective deal. It should incorporate different granularity of details, which help describe the object as a whole. You also want to be cognizant that you don’t just create the same picture that the masses do.

The Culloden Viaduct from a distance.
A perspective view.

As a case in point, consider these photographs of Culloden Viaduct, just east of Inverness, Scotland. This is an easy viaduct to get both a distant shot, and close shots, as a road goes directly underneath the southern portion of the viaduct. There are many options here, shooting it from the distance to provide an overall viewpoint of the viaduct, or from one end to provide a perspective. The viaduct is a long linear feature, which means distance shots make it appear small in relation to the rest of the photograph. The photograph also feels “flat”, something that can be partially fixed by shooting from an elevated position (which is above the feature being photographed, and hence the value of drone-based photography). A perspective view will often allow the scale of the structure to be included, in addition to a more 3D feel.

The interplay of arches
A close-up view of the arches

Close-up shots will fail to show the viaduct in its entirety, but will instead portray more architectural details, in this case, the design of the arches. It also provides more of a three-dimensional perspective of the viaduct than long-distance shots. it is the arches that make this viaduct interesting, and a distance shot will not do them justice. A close-up view exposes the tapered structure of the piers, and the precise nature of the arches. You can even goes as far as taking shots of individual components of an object to illustrate things like texture, and interplay of materials.

P.S. Naturally, aerial shots acquire with a drone do provide much more of a perspective of an object in the context of its surroundings, but that isn’t always realistic for the average photographer.

Should the “rule of thirds” be broken?

The “Rule of Thirds” (ROT) is a concept used for the composition of a photograph. It states that the centre of interest in a photograph should be placed at any one of the four intersections of four imaginary lines, two of which bisect the frame horizontally, and two of which bisect it vertically, dividing the picture into thirds each way. It’s main goal is to move the subject out of the centre of the image, because having the subject to one side produces visual interest.

Fig.1: The “Rule of Thirds” grid

But this idea did not originate in photography, but rather art, i.e. painting. In 1783 Sir Joshua Reynolds taught at the Royal Academy of Arts in London, mentioning in his discourses how a painting works best when the use of light and dark has a ratio of approximately ⅓ : ⅔. It is described in a book entitled “Remarks on rural scenery : with twenty etchings of cottages, from nature : and some observations and precepts relative to the pictoresque“, by John Thomas Smith and Joseph Downes in 1797, where is it first defined.

Two distinct, equal lights, should never appear in the same picture : One should be principal, and the rest sub-ordinate, both in dimension and degree : Unequal parts and gradations lead the attention easily from part to part, while parts of equal appearance hold it awkardly suspended, as if unable to determine which of those parts is to be considered as the subordinate. “And ” to give the utmost force and solidity to your work, some part of ” the picture should be as light, and some as dark as possible: ” These two extremes are then to be harmonized and reconciled ” to each other.”

Analogous to this “Rule of thirds”, ( if I may be allowed so to call it ) I have presumed to think that, in connecting or in breaking the various lines of a picture, it would likewise be a good rule to do it, in general, by a similar scheme of proportion ; for example, in a design of landscape, to determine the sky at about two-thirds ; or else at about one-third, so that the material objects might occupy the other two : Again, two thirds of one element, ( as of water ) to one third of another element ( as of land ) ; and then both together to make but one third of the picture, of which the two other thirds should go for the sky and serial perspectives.

How it got to photography is somewhat mystical. Search for it in books of the mid-20th century, and you won’t find it. For example The Amateur Photographer’s Handbook, by Aaron Sussman, published for about four decades from 1941 on wards does not mention it. It is possible that it transitioned from the cinematic industry where it is commonly used [1]. Consider the examples shown in Figure 2. In the left image, the character clearly is framed in the right third of the frame, whilst in the right image the background and foreground characters are framed at opposite sides of the intersecting lines.

Fig.2: Use of “Rule of Thirds” in cinematography

By the 1980s it was often mentioned in passing as a mean of composition, but the past two decades has seen it blossom online, both for use in still photography and video. You can commonly find it being used as the composition guides overlaid on screens on cameras as a means to help with composition.

But is it the most optimal means of composition? Hardly. The rule of thirds is not mandatory and when the composition demands it, it can and should be violated. In reality it shouldn’t even be perceived a rule, but rather a guideline. Some photographers believe that an over reliance on this method of composition can lead to boring photographs. Of course the “rule of thirds” isn’t the only method of composition, indeed there are numerous others, some of which are shown in Figure 3. The best composition method is the one that best suits the particular scene being photographed.

Fig.3: Alternative methods of composition

Further reading

  1. What is the Rule of Thirds? How to use this technique to capture dynamic images (2023)
  2. Filmmaking 101: What Is the Rule of Thirds & How Filmmakers Use It (and break it) (2021)
  3. Why The Golden Ratio Is Better Than The Rule Of Thirds (2022)

Feininger on motion

In contrast to “moving pictures”, every single photograph, even the most violent action shot, is a “still”. Nothing that happens in time and space − a change, a motion − can be photographed instantaneously without stripping it of its most outstanding quality : movement, the element of time . . . . No ordinary action shot can “reproduce” an action, because it reduces change and movement − the basis of all action − to a standstill, freezing it into immobility. . . . In photographing action, more than anywhere else in still photography, we must rely on “symbols” and on “translation”, if we are to capture the essence of that action in a “still”.

Feininger on Photography (1949)

How natural light and meaningful darkness tell a story

Have you ever been somewhere, and want to take a photograph, and there just isn’t much natural light, or perhaps the light is only coming from a single source, such as a window? Are you tempted to use a flash? Well don’t even think about it, because doing so takes away from the story of what you are photographing. Usually this sort of scenario manifests itself inside historical buildings where there just isn’t much natural light, and in context, no artificial light. Think anything before electric lighting – houses, castles, outbuildings, etc. Photography in historical buildings can be burdened by a lack of light – but that’s how they were when inhabited.

I photograph mostly using natural light. I don’t like using a flash, because ultimately there are certain qualities of natural light that enhance the colours and aesthetics of an object or scene. I find flash light too harsh, even when used with diffusers. But that’s just me. Below is an image from the attic space of a building at the Voss Folkemuseum in Norway. The room contained some beds, and storage chests, so obviously it was used as a bedroom. The light streaming through the window is enough to bathe the room with enough light to show its use (typically windows would only have been installed where the light would be most concentrated, in this case south-facing). Notice the spinning wheel next to the window where the light is most concentrated?

An attic space in a building at the Voss Folkemuseum in Voss, Norway.

A lack of light often tells a story. It shows you what the space really was like for those who inhabited it long ago. Before the advent of electricity, most buildings relied on natural light during the day, and perhaps candle-light at night. Windows were small because glass was inherently expensive, and the more glass one had, the more heat that was lost in winter. If you were documenting a scene in a more archival manner, you might naturally flood the scene with artificial light of a sort, but historical photography should not be harshly lit.

Many historic buildings were built at a time of very little beyond natural light and candles. The light today is that very same light, and to bath it with artificial light would be unnatural. These nooks and crannies were never meant to be bathed in complete light. Consider the images below, taken at different folke-museums in Norway. The images are of cooking fires inside historic buildings, which had no openings except in the roof. The one from the Norsk Folkemuseum is Saga-Stau, a replica of an open-hearth house from about 3000 years ago.

The inside of an open-hearth house at the Norsk Folkemuseum
Eldhus (house with fireplace and bakehouse) at Voss Folkemuseum

On a bright sunny day, dark spaces are bathed in whatever available light is able to seep through every opening. In a dark space this light can often appear harsh, blinding window openings to the point where there is little cognition of the scene beyond the window. Yet it also tends to produce shards of light puncturing into a space. On clouded days, the light can be more muted. In the image below of the living space, the light coming through the window is harsh enough to produce highlight clipping of both the window frame and part of the table. However the light adds a sense of Norwegian Hygge to the entire scene. To light this scene with a flash would simply reduce the scene to a series of artifacts, rather than a slice of history.

An indoor scene at the Voss Folkemuseum.

Moriyama on the power of photographs

“Of course, in the instant you press the shutter button, a memory of the image flashes across your mind, together with the various things you’re thinking about in that moment – aesthetic considerations, concepts, desires. But whatever’s in the photograph stands completely independent of those thoughts. That is what remains – and it’s completely independent. That is what calls to you years, maybe decades later. “Hey! What do you think?” That’s what’s so amazing. that’s why photography is so powerful.”

Daido Moriyama How I Take Photographs, Takeshi Nakamoto (2019)

Colour (photography) is all about the light

Photography in the 21st century is interesting because of all the fuss made about megapixels and sharp glass. But none of the tools of photography matter unless you have an innate understanding of light. For it is light that makes a picture. Without light, the camera is blind, capable of producing only dark unrecognizable images. Sure, artificial light could be used, but photography is mostly about natural light. It is light that provides colour, helps interpret contrast, determines brightness and darkness, and also tone, mood, and atmosphere. However in our everyday lives, light is often taken somewhat fore granted.

One of the most important facets of light is colour. Colour begins and ends with light; without light, i.e. in darkness, there is no colour. Light is an attribute of a big family of “waves” that starts with wavelengths of several thousand kilometres, including the likes of radio waves, heat radiation, infrared and ultraviolet waves, and X rays, and ends with gamma radiation of radium and cosmic rays with wavelengths so short that they have to be measured in fractions of a millionth part of a millimeter. Visible light is of course that part of the spectrum which the human eyes are sensitive to, ca. 400-700nm. For example the wavelength representing the colour green has values in the range 500-570nm.

The visible light spectrum

It is this visible light that builds the colour picture in our minds, or indeed that which we take with a camera. An object will be perceived as a certain colour because it absorbs some colours (or wavelengths) and reflects others. The colours that are reflected are the ones we see. For example the dandelion in the image below looks yellow because the yellow petals in the flower have absorbed all wavelengths of colour except yellow, which is the only colour reflected. If only pure red light were shone onto the dandelion, it would appear black, because the red would be absorbed and there would be no yellow light to be reflected. Remember, light is simply a wave with a specific wavelength or a mixture of wavelengths; it has no colour in and of itself. So technically, there is really no such thing as yellow light, rather, there is light with a wavelength of about 590nm that appears yellow. Similarly, the grass in the image reflects green light.

The colours we see are reflected wavelengths that are interpreted by our visual system.

The colour we interpret will also be different based on the time of day, lighting, and many other factors. Another thing to consider with light is its colour temperature. Colour temperature uses numerical values in degrees Kelvin to measure the colour characteristics of a light source on a spectrum ranging from warm (orange) colours to cool (blue) colours. For example natural daylight has a temperature of about 5000 Kelvin, whereas sunrise/sunset can be around 3200K. Light bulbs on the other hand can range anywhere from 2700K to 6500K. A light source that is 2700K is considered “warm” and generally emits more wavelengths of red, whereas a 6500K light is said to be “cool white” since it emits more blue wavelengths of light.

We see many colours as one, building up a picture.

Q: How many colours exist in the visible spectrum?
A: Technically, none. This is because the visible spectrum is light, with a wavelength (or frequency), not colour per se. Colour is a subjective, conscious experience which exists in our minds. Of course there might be an infinite number of wavelengths of light, but humans are limited in the number they can interpret.

Q: Why is the visible spectrum described in terms of 7 colours?
A: We tend to break the visible spectrum down into seven colours: red, orange, yellow, green, blue, indigo, and violet. Passing a ray of white light through a glass prism, splits it into seven constituent colours, but these are somewhat arbitrary as light comes as a continuum, with smooth transitions between colours (it was Isaac Newton that first divided the spectrum into 6, then 7 named colours). There are now several different interpretations of how spectral colours have been categorized. Some modern ones have dropped indigo, or have replaced it with cyan.

Q: How is reflected light interpreted as colour?
A: Reflected light is interpreted by both camera sensors, film, and the human eye by filtering the light, to interpret the light in terms of the three primary colours: red, green, and blue (see: The basics of colour perception).