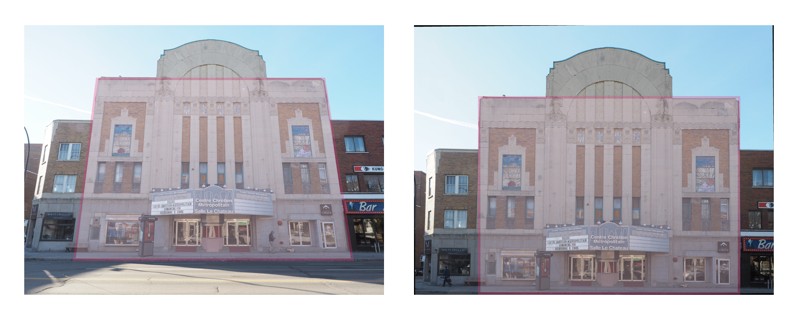
The Olympus OM-D EM5 Mark IIhas a completely cool feature they call keystone compensation. It’s a kind-of weird name – but dig a little deeper and you run into the keystone effect which is the apparent distortion of an image caused by projecting it onto an angled surface. It basically makes a square look like a trapezoid, which is the shape of an architectural stone known as a keystone. Now normally when you take a photograph of a building, this effect comes into play. Reducing the keystone effect is called keystone correction. There are special lenses that remove this distortion, i.e. tilt-shift lenses. Now Olympus has introduced an algorithm which compensates for the keystone effect. Here is an example of keystone correction (distortion is shown as the opaque pink region).
Keystone correction before (left) and after (right)
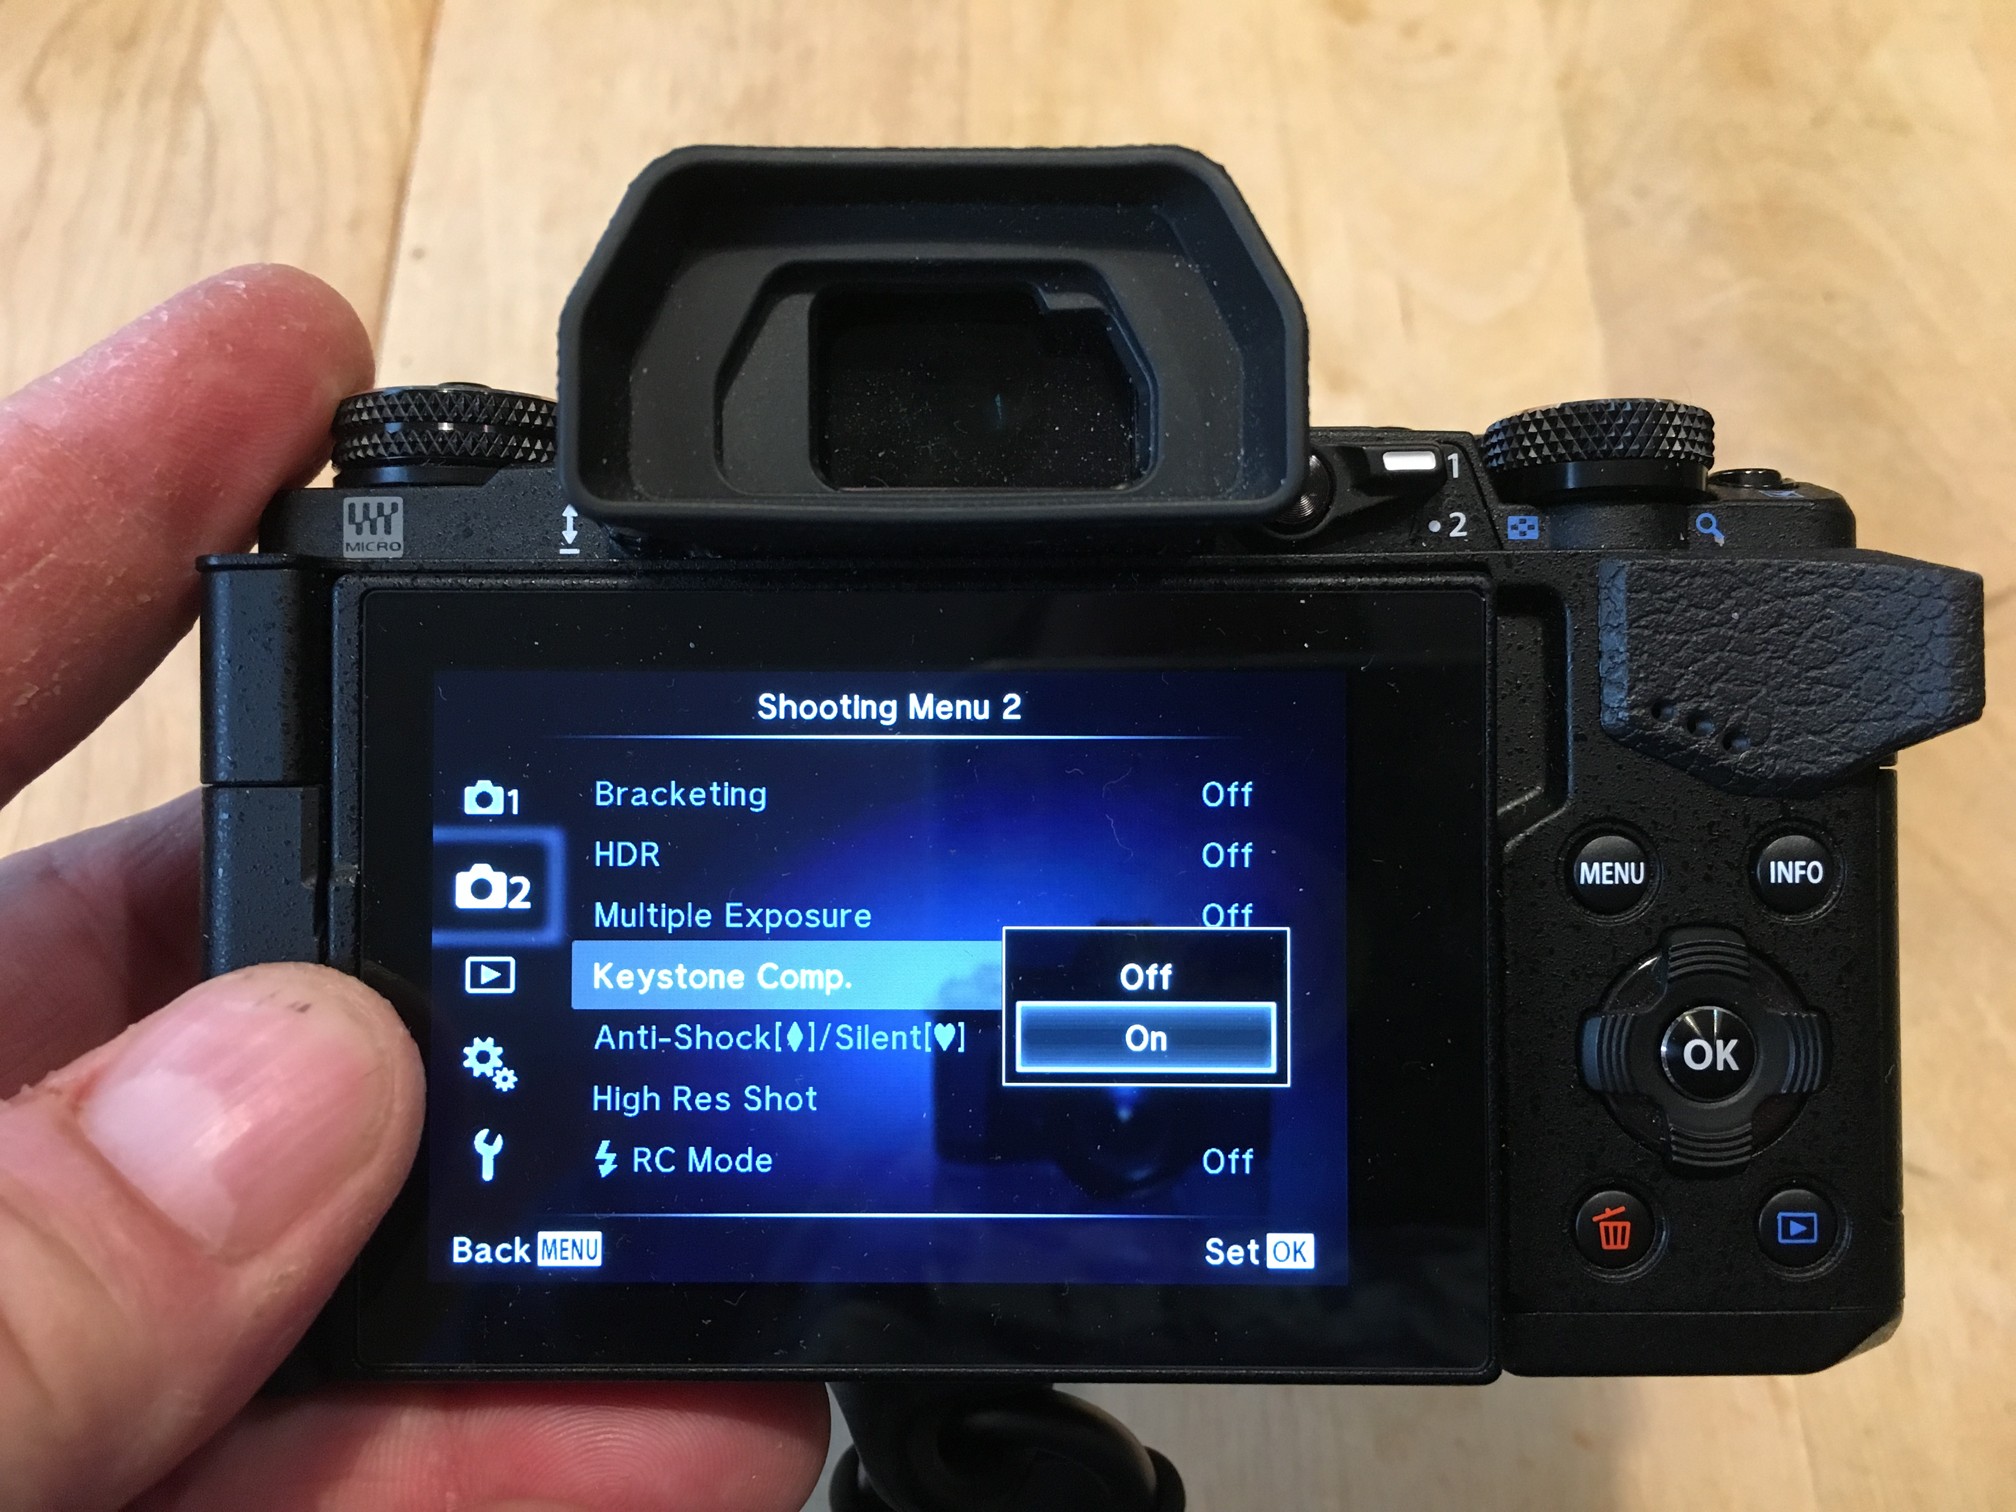
Olympus has introduced an algorithm on some of their cameras (e.g. EM5ii) which compensates for the keystone effect. First, you have to enable Keystone Correction in “Shooting Menu 2”.
Turning on keystone correction on an Olympus EM-5(ii)
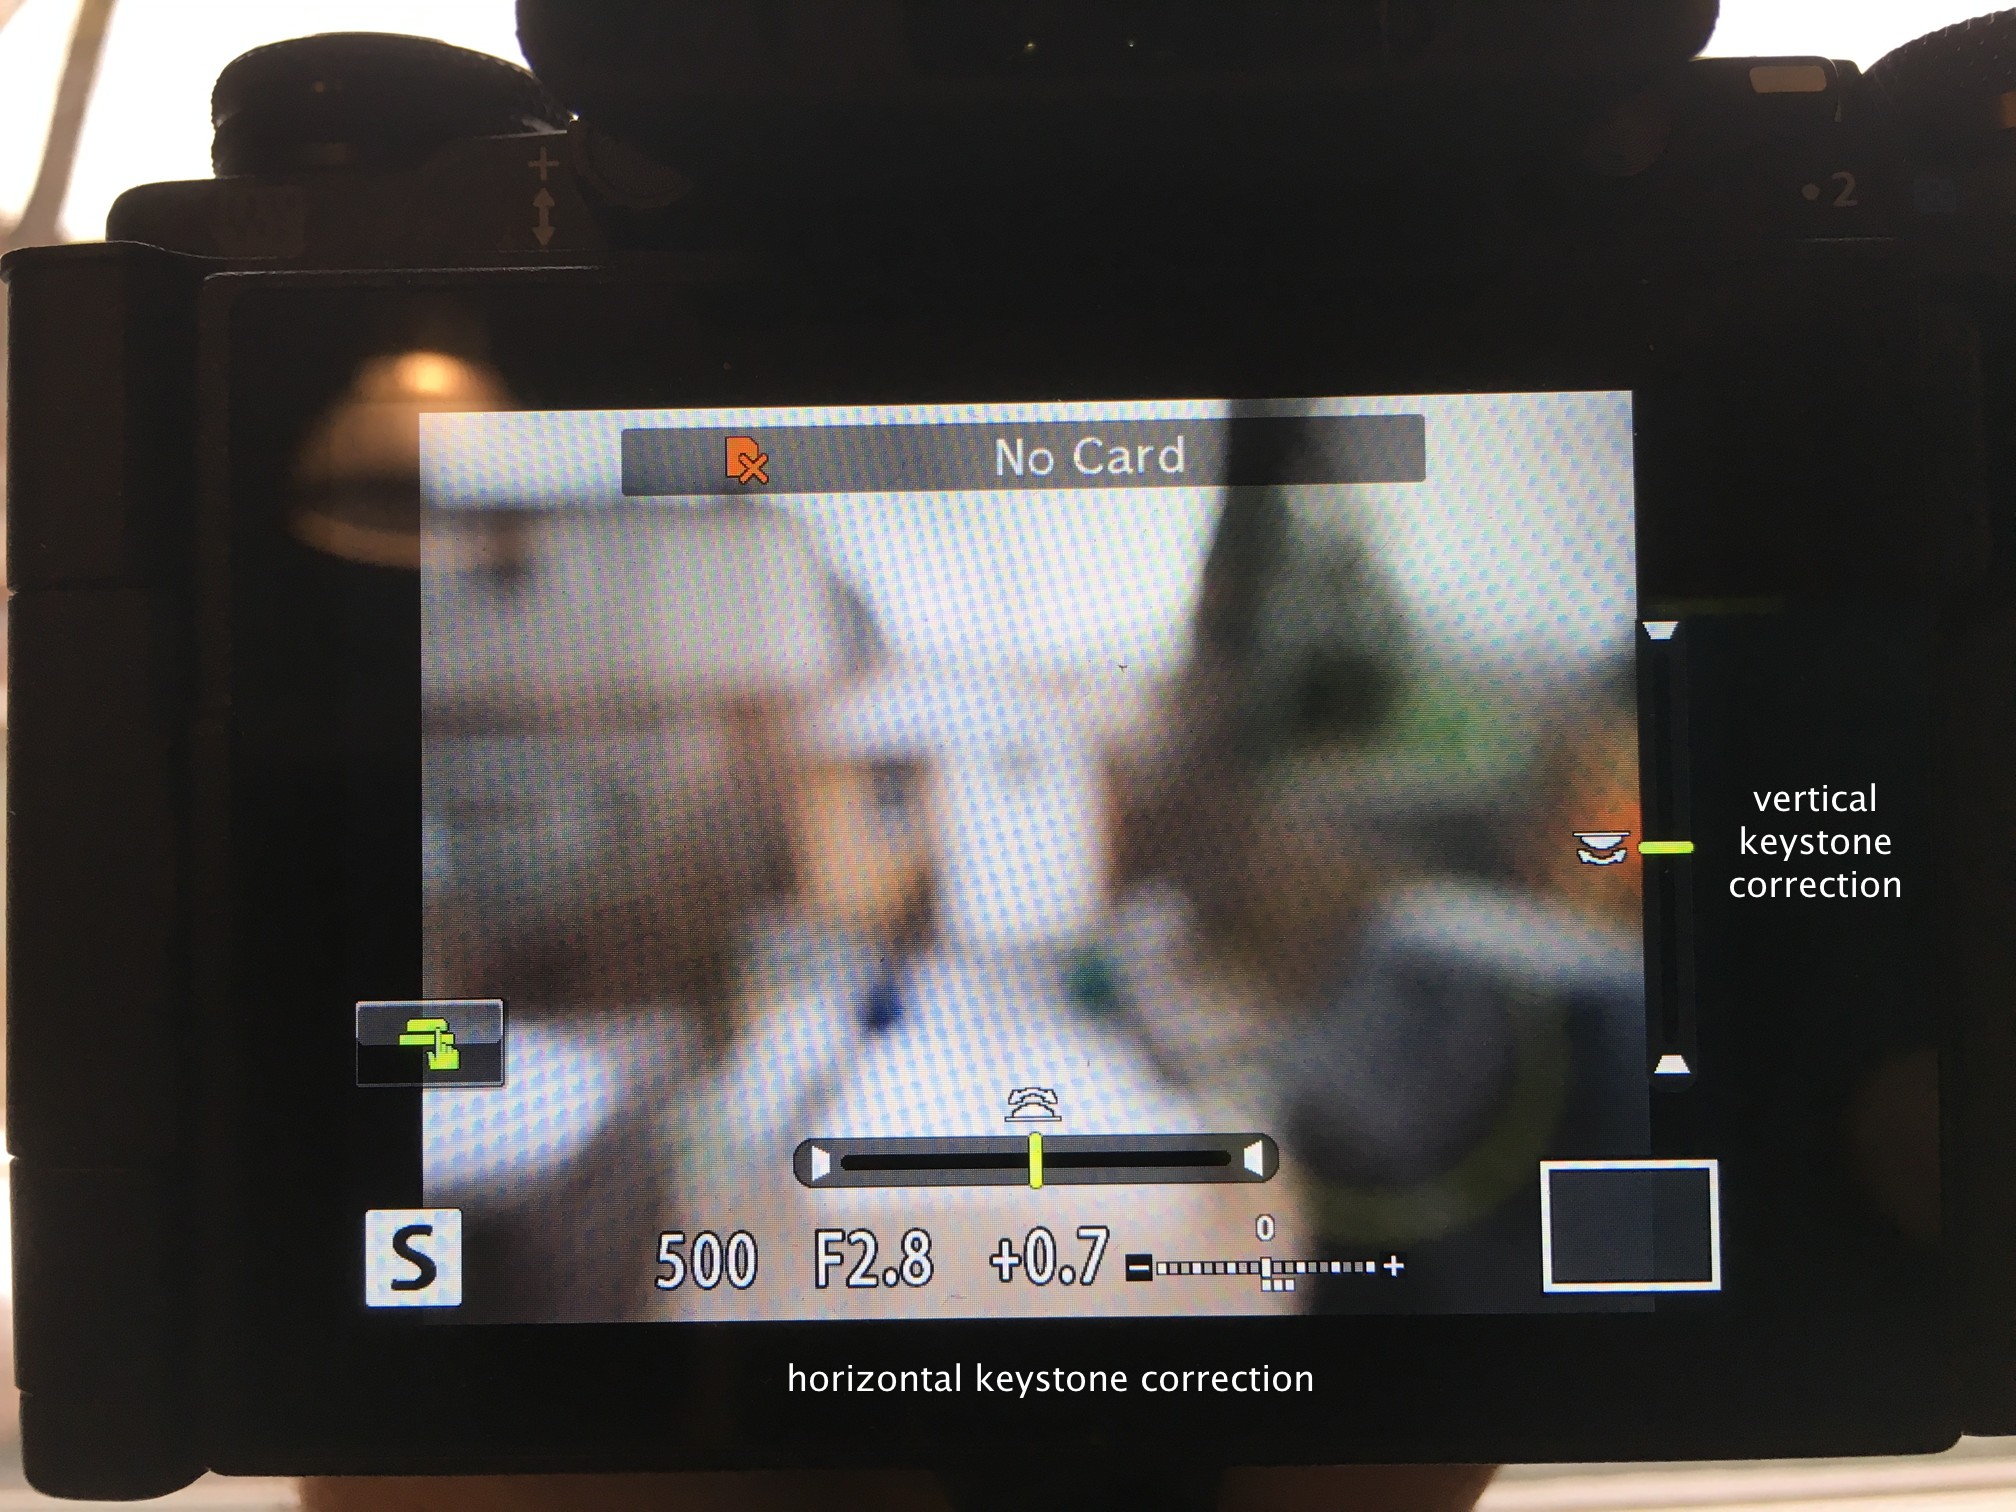
Then it’s a simple matter of using the front or rear dial for correction. The front dial is used to horizontal correction, and the rear dial is used for vertical correction. Note that it doesn’t allow for both types of keystone compensation to be used at the same time. If you decide to change from vertical to horizontal correction, you have to reset the vertical component to 0. Frame the shot and adjust the effect in the display using the front and rear dial. Select the area to be recorded using the directions buttons (surrounding the OK button).
Keystone correction screen
The only trick is using the INFObutton to switch between keystone compensation and making adjustments to exposure compensation. In fact if you are using keystone correction often, I would program it into one of the function buttons.
Keystone Compensation mode enables keystone distortion to be corrected when shooting architecture and product photography without resorting to tilt-shift lenses or post-processing corrections in Photoshop.
So in the final post in this series we will look at the adage that a 50mm lens is a “normal” lens because it equates to the eyes view of things. Or is it 43mm… or 35mm? Again a bunch of number seem to exist on the net, and it’s hard to decipher what the real answer is. Maybe there is no real answer, and we should stop comparing eyes to cameras? But for arguments sake let’s look at the situation in a different way by asking what lens focal length most closely replicates the Angle Of View (AOV) of the human visual system (HVS).
One common idea floating around is that the “normal” length of a lens is 43mm because a “full-frame” film, or sensor is 24×36mm in size, and if you calculate the length of the diagonal you get 43.3mm. Is this meaningful? Unlikely. You can calculate the various AOVs for each of the dimensions using the formula: 2 arctan(d/2f); where d is the dimension, and f is the focal length. So for the 24×36mm frame with a 50mm lens, for the diagonal we get: 2 arctan(43.3/(2×50) = 46.8°. This diagonal AOV is the one most commonly cited with lenses, but probably not the right one because few people think about a diagonal AOV. A horizontal one is more common, using d=36mm. Now we get 39.6°.
So now let’s consider the AOV of the HVS. The normal AOV of the HVS assuming binocular vision constraints of roughly 120° (H) by 135° (V), but the reality is that our AOV with respect to targeted vision is probably only 60° horizontally and 10-15° vertically from a point of focus. Of the horizontal vision, likely only 30° is focused. Let’s be conservative and assume 60°.
So a 50mm lens is not close. What about a 35mm lens? This would end up with a horizontal AOV of 54.4°, which is honestly a little closer. A 31mm lens gives us roughly 60°. A 68mm gives us the 30° of focused vision. What about if we wanted a lens AOV equivalent for the binocular 120° horizontal view? We would need a 10.5mm lens, which is starting to get a little fish-eyed.
There is in reality, no single answer. It really depends on how much of the viewable region of the HVS you want to include.
So now we have looked at the number of overall pixels, and the acuity of pixels throughout that region. If you have read the last two posts, you, like me, might surmise that there is no possibility of associating a value with the resolution of the eye. And you would probably be right, because on top of everything else there are a number of factors which affect visual acuity.
Refractive errors – Causes defocus at the retina, blurring out fine detail and sharp edges. A good example is myopia (short-sightedness).
Size of pupil – Pupils act like camera apertures, allowing light into the eye. Large pupils allow more light in, possibly affecting resolution by aberrations in the eye.
Illumination of the background – Less light means a lower visual acuity. As cones are the acuity masters, low light reduces their capabilities.
Area of retina stimulated – Visual acuity is greatest in the fovea. At 2.5 degrees from the point the eyes are fixated upon, there is approximately a 50% loss in visual acuity.
Eye movement – The eyes move, like all the time (e.g. your head doesn’t move when reading a book).
Complicated right? So what is the answer? We have looked at how non-uniform acuity may affect the resolution of the human eye. The last piece of the puzzle (maybe?) in trying to approximate the resolution of the human eye is the shape of our visual scope. When we view something, what is the “shape of the picture” being created. On a digital camera it is a rectangle. Not so with the human visual system. Because of the non-uniformity of acuity, the shape of the region being “captured” really depends on the application. If you are viewing a landscape vista, you are looking at an overall scene, whereas reading a book, the “capture area” is quite narrow (although the overall shape of information being input is the same, peripheral areas are seemingly ignored, because the fovea is concentrating on processing the words being read). To provide a sense of the visual field of binocular vision, here is an image from a 1964 NASA report, Bioastronautics Data Book:
This diagram shows the normal field of view of a pair of human eyes. The central white portion represents the region seen by both eyes. The dashed portions, right and left, represent the regions seen by the right and left eyes, respectively. The cut-off by the brows, cheeks, and nose is shown by the black area. Head and eyes are motionless in this case. Not quite, but almost an ellipse. But you can see how this complicates things even further when trying to approximate resolution. Instead of a rectangular field-of-view of 135°×190°, assume the shape of an ellipse, which gives (95*67.5)*π = 20145, which converts to 72.5 megapixels for 1 arc minute sized pixels – which is marginally lower than the 75 megapixels of the bounding rectangle.
So what’s the answer? What *is* the resolution of the human eye? If you wanted a number to represent the eyes pixelation, I would verge on the conservative side, and give the resolution of the eye a relatively low number, and by this I mean using the 1 arc minute acuity value, and estimating the “resolution” of the human visual system at somewhere around 100 megapixels. This likely factors in some sort of compromise for the region of the fovea with high acuity, and the remainder of the field of view with low resolution. It may also take into account the fact that the human vision system operates more like streaming video than it does a photograph. Can the eye be compared to a camera? No, it’s far too complicated trying to decipher a quantitative value for an organic structure comprised 80% gelatinous tissue.
Maybe some mysteries of the world should remain just that.
Have you ever wondered why lenses are round, and photographs rectilinear? Obviously square lenses would not work, but why not round photographs? Well, lenses do indeed produce a circular image, however the quality of this image with respect to sharpness and brightness is not at all uniform. It is sharpest and brightest near the centre of the lens, becoming progressively less sharp and bright towards the outer edge of the circle. This deterioration is due to factors such as lens aberrations which become more pronounced towards the edges of the image. In terms of the photograph, only the inner, portion of the circular image should be used, hence why photographs are rectangular, or historically more square (before 35mm film).
Basically for lenses on a particular sensor, the diameter of the circle has to be larger than the diagonal of the frame. The example below shows a Full Frame 24mm×36mm sensor and its associated image circle with a diameter of 43.27mm.
This basically means that the image sensor only makes use of roughly 59% of the image circle (the sensor is 864mm², the image circle 1470mm²). Using a circular fisheye lens, or one that is smaller than the sensor, will result in a circular image. For example, using a small 16mm cinematographic lens on a full frame sensor.
In some cases, such in the case of the Leica D-LUX 6, the camera allows swapping between a bunch of aspect ratios: 16:9, 4:3, 3:2, and 1:1. This camera has a 1/1.7″ sensor (crop factor of 4.6). The actual sensor size is 3678 x 2745 pixels.
The greatest misconception about photography is that the camera is “all seeing”. But as we previously explored the camera does lie. The majority of photographs are lies because they don’t have any basis in fact. First and foremost, photographs are 2D representations of 3D scenes, so do not capture the world as it truly is. Black and white photographs are monochromatic representations of a coloured reality, and “frozen” stills represent moving objects. Yet every photograph is a true rendition of a subject/object/scene at one particular moment in time. This is something of a paradox – everything visible in the cameras field of view is authentic, but it lacks the intricate qualities of the real scene. You can take a picture of a sunrise on a beach, but there will be missing the factors that make it a memorable scene – the wind blowing (sure video can capture this), the smell of the sea, the warmth of the first rays of the sun, the feel of the sand on the beach. The camera then produces a lie, in so much as it only tells a portion of a story, or distorts it in some manner. A difference exists between a photograph, and the subject/scene it depicts. It is a snapshot in time, nothing more.
Conversely, the camera allows us to capture things the human eye cannot perceive. It allows differences in viewing angles – a fisheye lens can see 180° in extremes, and although the human eyes can perceive 120° individually, dual eye overlap is only about 120°, and of that the central angle of view is only about 40-60°. Our peripheral vision is only good enough for sensing motion, and huge objects. Camera’s are also capable of stopping motion – human eyes can’t, we have no ability to slow down a video, or “freeze” motion. Therefore the cameras ability to lie can be beneficial, producing images that are more effectual than the actual experience.
Examples include far-away scenes that the human eye is incapable of perceiving, yet a telephoto lens can show quite distinctly. Another is high speed photography of an egg being dropped on a hard surface, where each frame represents milliseconds in time, yet clearly depicts each facet of the egg hitting the surface with clarity the human eye is incapable of. Or, an image where blur and unsharpness (or bokeh), have been used with great effect to isolate a quality of a particular subject/object (human eyes don’t actively perceive the unsharp regions of our vision). In all these cases the subject/object is shown in a way different to how the eye would perceive them, and in many cases the photograph contains information that is lost to the human eye. Of course a photograph can also hide information. A photograph of a small village in a valley may veil the fact that a large expressway lies behind the photographer – the viewer of the photograph sees only a secluded village.
In the previous post, from a pure pixel viewpoint, we got a mixed bag of numbers to represent the human eye in terms of megapixels. One of the caveats was that not all pixels are created equal. A sensor in a camera has a certain resolution, and each pixel has the same visual acuity – whether a pixel becomes sharp or blurry is dependent on characteristics such as the lens, and depth-of-field. The human eye does not have a uniform acuity.
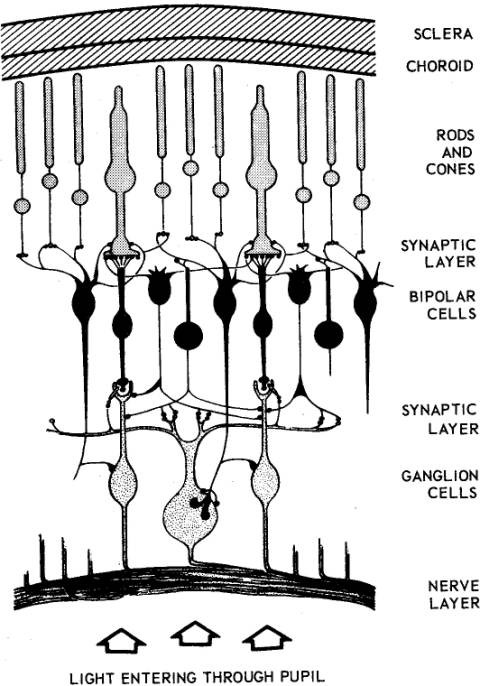
But resolution is about more than just how many pixels – it is about determining fine details. As noted in the last post, the information from the rods in coupled together, whereas the information from each cone has a direct link to the ganglion cells. Cones are therefore extremely important in vision, because without them we would view everything as we do in our peripheral vision, oh and without colour (people who can’t see colour have a condition called achromatopsia).
Cones are however, not uniformly distributed throughout the retina – they are packed more tightly in the centre of the eyes visual field, in a place known as the fovea. So how does this effect the resolution of the eye? The fovea (which means pit), or fovea centralis, is located in the centre of a region known as the macula lutea, a small oval region located exactly in the centre of the posterior portion of the retina. The macula lutea is 4.5-5.5mm in diameter, and the fovea lies directly in the centre. The arrangement of these components of the retina is shown below.
The fovea has a diameter of 1.5mm (although it varies slightly based on the study), and a field of view of approximately 5°. Therefore the fovea has an area of approximately 1.77mm². The fovea has roughly 158,000 cones per mm ² (see note). The density in the remainder of the retina is 9,000 cones per mm². So, the resolution of the human eye is much greater in the centre, than on the periphery. This high density of cones is achieved by decreasing the diameter of the cone outer segments such that foveal cones resemble rods in their appearance. The increased density of cones in the fovea is accompanied by a decrease in the density of rods. Within the fovea is a region called the foveola which has a diameter of about 0.3mm, and a field of view of 1° – this region contains only cones. The figure below (from 1935) shows the density of rods and cones in the retina.
Adapted from Osterberg, G., “Topography of the layer of rods and cones in the retina”, Acta Opthalmologica, 6, pp.1-103 (1935).
The fovea has the highest visual acuity in the eye. Why? One reason may be the concentration of colour-sensitive cones. Most photoreceptors in the retina are located behind retinal blood vessels and cells which absorb light before it reaches the photoreceptor cells. The fovea lacks the supporting cells and blood vessels, and only contains photoreceptors. This means that visual acuity is sharpest there, and drops significantly moving away from this central region.
For example pick a paragraph of text, and stare at a word in the middle of it. The visual stimulus in the middle of the field of view falls in the fovea and is in the sharpest focus. Without moving your eye, notice that the words on the periphery of the paragraph are not in complete focus. The images in the peripheral vision have a “blurred” appearance, and the words cannot be clearly identified (although we can’t see this properly, obviously). The eyes receive data from a field of view of 190-200°, but acuity of most of that range is quite poor. If you view the word from approximately 50cm away, then the field of view is about ±2.2cm from the word – beyond that things get fuzzier. Note that each eye obviously has its own fovea, but when you focus on a point both fovea overlap, but the resolution doesn’t increase.
The restriction of highest acuity vision to the fovea is the main reason we spend so much time moving our eyes (and heads) around. From a processing perspective, the fovea represents 1% of the retina, but the brains visual cortex devotes 50% of its computation to input from the fovea. So in the fovea, resolution is equivalent of a TIFF, whereas elsewhere it’s a JPEG. So, if the sharpest and most brilliantly coloured human vision comes from the fovea, what is its resolution?
Again this is a somewhat loaded question, but let’s attempt it anyway. If the fovea has a field of view of 5°, and assuming a circular region, we can create a circular region with a radius 2.5 degrees = 19.635 degrees2, and 60×60 = 3600 arcmin2/degree2. Assume a “pixel” acuity of 0.3×0.3=0.09 arcmin2. This gives us 19.635*3600 / 0.09 = 785,400 pixels. Even if we round up we get a resolution of about 1MP for the fovea. And honestly, the actual point of highest acuity may be even smaller than that – if we considered the foveola, we’re looking at a mere 125,000 pixels.
NOTE Note: There are many studies relating to the size of the fovea, and the density of photoreceptors, given that each human is a distinct being, there is no one exact number.
Jonas, J.B., Schneider, U., Naumann, G.O.H., “Count and density of human retinal photoreceptors”, Graefe’s Archive for Clinical and Experimental Ophthalmology, 230(6), pp.505-510 (1992).
A lot of visual technology such as digital cameras, and even TVs are based on megapixels, or rather the millions of pixels in a sensor/screen. What is the resolution of the human eye? It’s not an easy question to answer, because there are a number of facets to the concept of resolution, and the human eye is not analogous to a camera sensor. It might be better to ask how many pixels would be needed to make an image on a “screen” large enough to fill our entire field of view, so that when we look at it we can’t detect pixelation.
Truthfully, we may never really be able to put an exact number on the resolution of the human visual system – the eyes are organic, not digital. Human vision is made possible by the presence of photoreceptors in the retina. These photoreceptors, of which there are over 120 million in each eye, convert electromagnetic radiation into neural signals. The photoreceptors consist of rods and cones. Rods (which are rod shaped) provide scotopicvision, are responsible for low-light vision, and are achromatic. Cones (which are con shaped) provide photopicvision, are active at high levels of illumination, and are capable of colour vision. There are roughly 6-7 million cones, and nearly 120-125 million rods.
But how many [mega] pixels is this equivalent to? An easy guess of pixel resolution might be 125 -130 megapixels. Maybe. But then many rods are attached to bipolar cells providing for a low resolution, whereas cones each have their own bipolar cell. The bipolar cells strive to transmit signals from the photoreceptors to the ganglion cells. So there may be way less than 120 million rods providing actual information (sort-of like taking a bunch of grayscale pixels in an image and averaging their values to create an uber-pixel). So that’s not a fruitful number.
A few years ago Roger M. Clark of Clark Vision performed a calculation, assuming a field of view of 120° by 120°, and an acuity of 0.3 arc minutes. The result? He calculated that the human eye has a resolution of 576 megapixels. The calculation is simple enough:
(120 × 120 × 60 × 60) / (0.3 × 0.3) =576,000,000
The value 60 is the number of arc-minutes per degree, and the 0.3 arcmin² is essentially the “pixel” size. A square degree is then 60×60 arc-minutes, and contains 40,000 “pixels”. Seems like a huge number. But, as Clark notes, the human eye is not a digital camera. We don’t take snapshots (more’s the pity), and our vision system is more like a video stream. We also have two eyes, providing stereoscopic and binocular vision with the ability of depth perception. So there are many more factors than available in a simple sensor. For example, we typically move our eyes around, and our brain probably assembles a higher resolution image than is possible using our photoreceptors (similar I would imagine to how a high-megapixel image is created by a digital camera, slightly moving the sensor, and combining the shifted images).
The issue here may actually be the pixel size. In optimal viewing conditions the human eye can resolve detail as small as 0.59 arc minutes per line pair, which equates to 0.3 arc minutes. This number comes from a study from 1897 – “Die Abhängigkeit der Sehschärfe von der Beleuchtungsintensität”, written by Arthur König (translated roughly to “The Dependence of Visual Acuity on the Illumination Intensity”). A more recent study from 1990 (Curcio90) suggests a value of 77 cycles per degree. To convert this to arc-minutes per cycle, we first divide 1 by 77 and then multiply by 60 = 0.779. Two pixels define a cycle, so 0.779/2 = 0.3895, or 0.39. Now if we use 0.39×0.39 arcmin as the pixel size, we get 6.57 pixels per arcmin², versus 11.11 pixels when the acuity is 0.3. This vastly changes the value calculated to 341megapixels (60% of the previous calculation).
Clark’s calculation using 120° is also conservative, as the eyes field of view is roughly 155° horizontally, and 135° vertically. If we used these constraints we would get 837 megapixels (0.3), or 495 megapixels (0.39). The pixel size of 0.3 arcmin² is optimal viewing – but about 75% of the population have 20/20 vision, both with and without corrective measures. 20/20 vision implies an acuity of 1 arc minute, which means a pixel size of 1×1 arcmin². This could mean a simple 75 megapixels. There are three other factors which complicate this: (i) these calculations assume uniform optimal acuity, which is very rarely the case, (ii) vision is binocular, not monocular, and (iii) the field of view is likely not a rectangle.
For binocular vision, assuming each eye has a horizontal field of view of 155°, and there is an overlap of 120° (120° of vision from each eye is binocular, remaining 35° in each eye is monocular). This results in an overall horizontal field of view of 190°, meaning if we use 190°, and 1 arc minute acuity we get a combined total vision of 92 megapixels. If we change acuity to 0.3 we get over 1 gigapixel. Quite a range.
All these calculations are mere musings – there are far too many variables to consider in trying to calculate a generic number to represent the megapixel equivalent of the human visual system. The numbers I have calculated are approximations only to show the broad range of possibilities based solely on a few simple assumptions. In the next couple of posts we’ll look at some of the complicating factors, such as the concept of uniform acuity.
I calved this blog off from my other blog craftofcoding.wordpress.com, because I really felt that it was the right time to have a blog dedicated to the craft of visual imagery. I have worked in image processing for many years, but more in the throes of academia, and never in a fulfilling manner. I have always had an interest in photography, and dabbled in film photography while at university during the 80’s. But film processing got too expensive, and it just didn’t feel like the right medium for me. I abandoned taking analog photographs and instead turned to image processing, when the only really digital media was scanned images. With the advent of digital cameras, I returned to photography, mainly due to the simplicity in obtaining photographs – there was no need to wait to see how a picture had turned out, it was instantaneous. I bought my first digital camera in 2002, a 2MP Olympus point-and-shoot.
The past 20 years have seen vast improvements in digital capture technology, photographs with incredible resolution, precision optics, super-fast autofocus etc. But something was still missing. There was something about the character of analog photographs that just can’t be replicated in digital. Some might relate this to their aesthetically appealing aberrations. Why were Instagram filters so popular? Why were people adding the same sort of image defects we were always trying to remove in image processing? What’s the dal with bokeh? Then the ah-ha moment, when the two worlds of analog and digital collide.
Last year I bought a Voigtländer 25mm manual focus prime lens for my M43 Olympus EM5(ii). After so many years of auto-everything, you tend to forget about the photographic skills you learn doing things manually, like focusing. Therein I decided to move the clock backwards and integrate the use of vintage lenses with my digital cameras. There was also a part of me that was beginning to wonder whether many image processing tasks I had spent years exploring had any intrinsic value. Instead I decided to move down another path, and view image processing from a more aesthetic viewpoint.
A depanneur in Montreal (clockwise from top-left): Original 9MP image; increased image saturation; converted to B&W, and scaled to 1/64th the size.
This blog will explore the history of vintage lenses, their integration with digital cameras, basic image processing techniques, and aspects of digital photography. It will also look at some of the more esoteric aspects of the visual world, like the cameras perspective of the human eye.