The whole “compact” thing

There was a time when the compact camera had quite a market. These cameras sat somewhere between the larger sensor cameras (full-frame/APS-C), and tiny sensor “pocket” cameras. The tiny sensor cameras died off with the evolution of the smartphone. Nowadays there aren’t many compacts left, perhaps victims to the success of the smartphone cameras, or to the success of mirrorless. Contenders now include the Ricoh GR series, the Fujifilm X100V, and Sony RX100. A mirrorless offers almost the same form factor with interchangeable lenses, and more features. Compacts often try to do too much, and maybe that is a function of modern technology where smaller does not mean reduced functional capacity. Many compacts do nothing at all particularly well, but maybe they were never meant to. They offer too many controls to be simple, but too few to show versatility. They are often built by trying to cram too much technology into the one thing that unifies them all – space. For a compact camera should be exactly that, compact. If they are compact, it is unlikely they will win awards for ergonomics. Compact cameras with small footprints, may not fit into everyone’s hands comfortably.

Compact cameras are exceptional for the purposes of street photography. The best example of this is legendary Japanese street photographer Daidō Moriyama. He has used Ricoh compacts for years, from the early GR film series to the digital GR.

“The GR has been my favorite since it was a film camera. Because I’m so used to it, I felt comfortable with the new GR III immediately. When I shoot with a 28mm fixed lens machine, I remember my old days. Comfortable enough to take photographs to your heart’s content. For my street photography, the camera must be compact and light-weighted.”

Daidō Moriyama

But here’s the thing, I don’t buy a compact to be the pinnacle of cameras. The job of the compact is to be compact. It should offer a good amount of features, but obviously cannot offer them all. The role of the compact in my life is simple – pocketable, easy to use, small, inconspicuous. It’s for that reason, my GR III sits around the kitchen for photographing recipes, or slips into a pocket for a walk about town. It’s small, compact, and oh so discreet. You can get into trouble in places like transit systems using mirrorless cameras because they seem too professional, but compacts? Compacts scream inconspicuous.

Comparing some features of the Ricoh GR III (compact) against the Fuji X-H1 (mirrorless). Both have the same 24MP APS-C sensor and IBIS.

It is of course impossible to find the perfect camera – it doesn’t exist. Compact cameras are even less so, but the modern ones offers a good amount of technology and convenience. The Ricoh GR III for example offers image stabilization, and snappy focus, at the expense of loosing the flash (not something I use much anyways), not a great battery life (carry an extra), and no weather sealing (not that big a deal). It’s low-light performance is impressive, and I don’t need much more than a 28mm equivalent lens. It’s role is street-photography, or kitchen-photography, or back-up travel camera, for taking photographs in those places where photography is technically “not allowed”. It also offers a 24MP APS-C sensor, which is more pixels than anyone needs. In fact these cameras could likely get even better if we ditched some of the onboard shrot. Compacts don’t necessarily need 4K video, or 300-point AF tracking. The more features, and customization, the more the likelihood that you will loose track of what is going on.

Prosversatility – Fills a niche between smartphones and mirrorless cameras.
macro – Many provide some sort of capacity to take close-up photos.
small – Unobtrusive, and lightweight, making them easy to carry.
automatic – No fiddling with settings and missing the shot.
Conslimited control – Lacks low-level controls found in interchangeable lens cameras.
low-light – Often not well suited to low-light conditions.
fixed lens – Not as flexible as interchangeable lens cameras.
battery – Shorter battery life because of the smaller battery.
Pros and cons of compact cameras

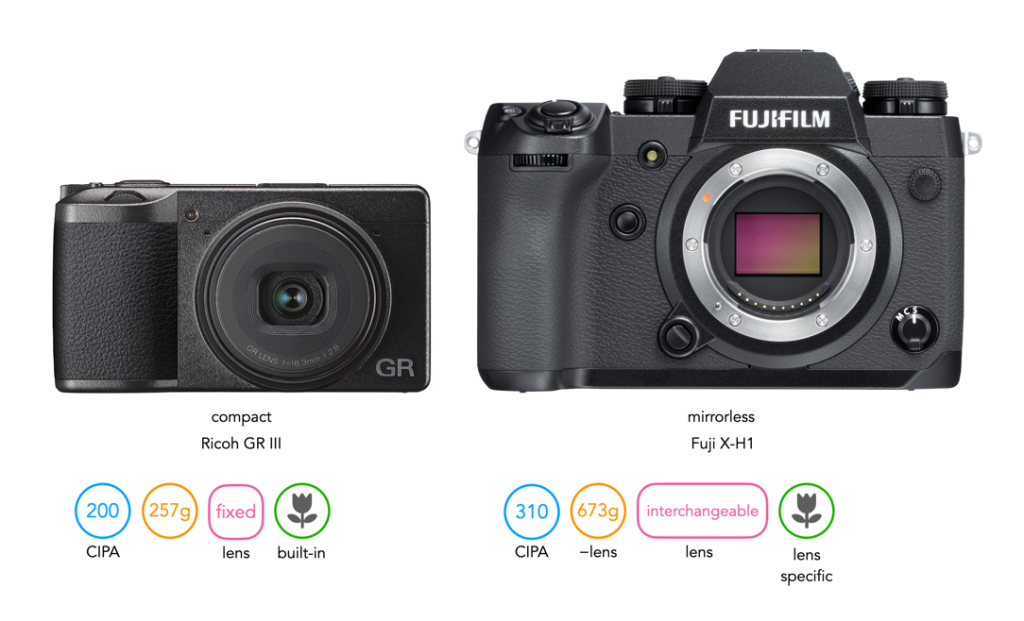
This is the fourth compact I’ve owned. The first was a Canon Powershot G9, then the Fuji X10, followed by the Leica D-Lux6 (likely the only Leica I will ever own). The Ricoh GR III provides me with the same sensor size as my Fuji X-H1, but is much easier to take some places when travelling, and provides much more in the way of versatility than does my iPhone 14, and twice the resolution.

Further reading:

Are modern ultrafast lenses useful?

Very few high-end camera companies have delved into the sub-f/1.2 genre of lenses, even for digital. The likes of Canon and Nikon have played that game before, in the 1960s, and are too practical to make that mistake again. The only ultrafast lens produced by a camera manufacturer is the Leica Noctilux-M 50mm f/0.95 Asph. Made for digital cameras, it has been in production since 2008. But at US$13K it is hardly a lens for the masses.

“The reason to buy a high-speed lens is to allow shooting in low-light situations or with short shutter speeds. Your photos may not be super-sharp, but at least you get a picture. If you need the high speed, then this f/1.4 lens or an f/1.2 version are the ones to have. However, if you can accept a speed of f/2, which is still plenty fast, then the slower lens is sharper. As an added benefit, the f/2 lens will be less costly than a faster one.”

G.H. Smith, Camera Lenses: From box camera to digital, SPIE (2006)

If you compare the inside of a modern digital lens versus its vintage analog compatriot, the first thing you might notice it the extreme complexity found in the modern lens. Consider the two lenses shown below. The Nikon AI Nikkor 50mm f/1.2 hailing from 1978 has 7 elements in 6 groups. Spring forward to 2020, and the Nikon Nikkor X 50mm f/1.2 S has a mind-blowing 17 elements in 15 groups. It’s also almost three times the weight of its predecessor. Is the image better? That is really in the eyes of the beholder.

Of the dedicated, high-end, lens companies only Voigtländer really stands out. They make lenses for a number of varied camera mounts. For Micro-Four Thirds (MFT) they actually offer a range of f/0.95 aspherical lenses, 10.5mm (21mm), 17.5mm (35mm), 25mm (50mm), 42.5mm (85mm), and 60mm (120mm). There is even a faster f/0.8 29mm (58mm) lens. These in reality are made for crop-sensors, with their full-frame equivalents more in the line of f/1.9. If one were to create a MFT equivalent of the Noctilux-M 50mm f/0.95, you would need something along the lines of a f/0.5. There are also third-party companies producing “inexpensive” ultrafast lenses (often by means of innovative lens designs). For example the Venus Optics Laowa, TTArtisan, Mitakon Zhongyi Speedmaster, Meike, 7artisans all have f/0.95 optics in various focal lengths, and sensors sizes. In 2022 TTArtisan introduced an f/0.95 35mm lens for APS-C for US$200.

But I do wonder why there is such interest in f/0.95 lenses? Dreamy bokeh? Why not just make f/1.0 lenses? I mean there isn’t that much difference between f/0.95 and f/1.0 – like 1/7th of a stop. I imagine it’s a marketing spiel, just like I imagine it was for Canon when they introduced their 50mm f/0.95 lens back in 1961. It’s a gimmick in the same way that items that cost $1.99 are perceived as cheaper than those marked $2. Why not go even further? I mean Voigtländer do have their f/0.8 29mm (58mm) super aspherical for MFT, which they toute as a world first (as of 2021), and introduce in their literature as the “conqueror of the night”. It’s not the fastest 35mm lens every made either, that honour goes to the Carl Zeiss Planar 50mm f/0.7.

There are limits to what lens speed will do for photography. An f/0.95 lens already has a very small depth of field, so small it makes it hard to focus. Many of these lenses may not even be that usable fully open, requiring them to be stopped down to f/2 before any semblance of usability is invoked. Sure, great for low-light but how often does anyone need that? Too many people use these lenses just for the bokeh effect, but that’s another story altogether. Somebody must be buying the Leica lens, as they are still making it. Likely more people are buying the cheaper lenses, just to experiment with. Check out this review of the TTArtisan 50mm f/0.95 by Dustin Abbott, who describes one of the pros as being “fun in low light”, and ultimately maybe that’s how we should view these ultrafast lenses, for fun, creative photography.

P.S. I do own a MFT f/0.95, more by happenstance than anything else. A few years back I bought the original Voigtländer 25mm f/0.95 (used, not new) for my Olympus MFT camera. It’s an incredibly solid lens, but it’s shallow DOF does make it tricky to focus.

Choosing the right digital lens can be challenging

Choosing a digital camera, and a sensor size is one thing, but I think the thing that really stumps people is choosing the most appropriate lenses to use. Of course for the amateur photographer, what the lens will be used for may be the most important consideration. Travel? Landscapes? Street photography? The task is always made easier if there are some constraints on the number of lenses available. For example the range of lenses available for Micro-Four-Thirds, or even Fuji-X cameras has always been a little bit constrained, well until recently with the expansion of 3rd-party lenses.

So how do you choose the right lens? Like vintage lenses, digital lenses are principally chosen based on focal length (which advocates their use), and speed, i.e. aperture size. In addition there is cost, and “extras” such as weather sealing, and stabilization. The problem comes with the variety of lenses available – consider the long list of Fuji-X lenses, many of which are 3rd-party. Which one should you choose? Do you choose a prime or a zoom, a Fujifilm, or a third-party? Do you need an 8mm APS-C lens? Would 13mm be better? What about 16mm? Is manual focus okay, or would you prefer auto-focus? It’s not easy, even with the myriad of videos reviewing lenses.

I’ll concentrate on Fuji-X here, because it’s at the heart of my current lens dilemma (my camera is a Fujifilm X-H1). Now my photography is a mixed bag of street, landscape, architecture and travel. I currently have the 23mm f/2 R WR (which is a FF 35mm equiv.). Now I’m looking to expand, primarily a wide-angle lens. Here are some of the typical focal lengths for Fuji-X (APS-C sensor), and their applications. Measurements in ( ) represent the full-frame equivalences.

  • 50-56mm (75-85mm) – Good for portraiture.
  • 33-35mm (50-53mm) – Good for general photography, portraiture and cityscapes.
  • 23mm (35mm) – The upper end of the wide spectrum, provides more scene than the 33mm, but without the distortion of wider focal lengths. Good for street photography.
  • 18mm (28mm) – The standard choice for landscapes (and sometimes architecture), providing a relatively wide angle of view, without introducing obvious distortions.
  • 14-16mm (21-24mm) – The common lower end of the wide spectrum, good for very broad landscapes. Can include some noticeable perspective distortion, especially if the camera is tilted.

Beyond that we begin to move into the ultra-wide focal lenses, of which there seem to be quite a number. 11-13mm (16-20mm) lenses encompass more of the scene than can be seen with normal vision, so there is an innate sense of exaggerated perspective. Subjects close to the camera appear quite large, with the relative size of more distant subjects reducing quickly with distance. These lenses can be ideal for photography where the distortion does not impact the aesthetics of the image.

Various Fuji (APS-C) lenses and their associated angles of view. (Photo taken from Belvédère Kondiaronk lookout on Mont Royal, Montreal)

In reality, going down this rabbit hole has led me towards the 16mm, and possibly something like a 33-35mm. I have enough vintage lenses to cover the 50mm+ spectrum, and this makes sense as I don’t envision using them that often. And I’m going to stick with prime lenses. Some people really like zoom lenses because of the flexibility they allow, but I find I always seem to stick to one focal length – the 12-40mm on my Olympus camera used when travelling is perpetually set at 12mm (24mm). There are other compromises as well – weight can be an issue, as well as slower apertures.

Choosing a digital lens is challenging, especially for the hobbyist photographer. There are a lot of options, regardless of the sensor. Even Micro Four Thirds also has a long list of lenses. If someone is unsure, then I suggest starting with lenses from the camera manufacturer. As to focal length, choose a lens that provides the most optimal angle-of-view for the application you are most interested in. For example, if you shoot with an APS-C camera, and your focus is street photography, then a 23mm (35mm) lens is the most optimal solution.

Why 24-26 megapixels is just about right

When cameras were analog, people cared about resolving power – but of film. Nobody purchased a camera based on resolution because that was contained in the film (and different films have different resolutions). So you purchased a new camera only when you wanted to upgrade features. Analog cameras focused on the tools needed to capture an optimal scene on film. Digital cameras on the other hand focus on megapixels, and the technology to capture photons with photosites, and convert these to pixels. So megapixels are often the name of the game – the first criteria cited when speculation of a new camera arises.

Since the inception of digital sensors, the number of photosites crammed onto various sensor sizes has steadily increased (while at the same time the size of those photosites has decreased). Yet we are now reaching what some could argue is a megapixel balance-point, where the benefits of a jump in megapixels may no longer be that obvious. Is 40 megapixels inherently better than 24? Sure a 40MP image has more pixels, 1.7 times more pixels. But we have to question at what point is there too many pixels? At what point does the pendulum start to swing towards overkill? Is 24MP just about right?

First let’s consider what is lost with more pixels. More pixels means more photosites on a sensor. Cramming more photosites on a sensor will invariably result in smaller photosites (assuming the sensor dimensions do not change). Small photosites mean less light. That’s why 24MB is different on each of MFT, APS-C and full-frame sensors – more space means larger photosites, and better ability in situations such as low-light. Even with computational processing, smaller photosites still suffer from things like increased noise. The larger the sensor, the larger the images produced by the camera, and the greater the post-processing time. There are pros and cons to everything.

Fig.1: Fig: Compare a 24 megapixel image against devices that can view it.

There is also something lost from the perspective of aesthetics. Pictures should not be singularly about resolution, and sharp content. The more pixels you add to an image, there has to be come sort of impact on the aesthetics of an image. Perhaps a sense of hyper-realism? Images that seem excessively digital? Sure some people will like the the highly digital look, with uber saturated colour, and sharp detail. But the downside is that these images tend to lack something from an aesthetic appeal.

Many photographers who long for more resolution are professionals. People who may crop their images, or work on images such as architectural shots or complex landscapes that may require more resolution. Most people however don’t crop their images, and few people make poster-sized prints, so there is little or no need for more resolution. For people that just use photos in a digital context, there is little or no gain. The largest monitor resolution available is 8K, i.e. 7680×4320 pixels, or roughly 33MP, so a 40MP image wouldn’t even display to full resolution (but a 24MP image would). This is aptly illustrated in Figure 1.

Many high-resolution photographs live digitally, and the resolution plays little or no role in how the image is perceived. 24MP is more than sufficient to produce a 24×36 inch print, because nobody needs to pixel-peep a poster. A 24×36” poster has a minimum viewing distance of 65 inches – which at 150dpi, would require a 20MP image.

The overall verdict? Few people need 40MP, and fewer still will need 100MP. It may be fun to look at a 50MP image, but in all practical sense it’s not much better than a 24MP. Resolutions of 24-26MP (still) provide exceptional resolution for many photographic needs. It’s great for magazine spreads (max 300dpi), and fine art prints. So unless you are printing huge posters, it is a perfectly fine resolution for a camera sensor.

Where did the term “full-frame” originate?

Why are digital cameras with sensors the same size as 35mm SLR’s, i.e. 36×24mm, called full-frame cameras? This is somewhat of a strange concept considering that unlike film, where the 35mm dominated the SLR genre, digital cameras did not originate with 35mm film-equivalent sized sensors. In fact for many years, until the release of the first digital SLRs, camera sensors were of the sub-35mm or “crop-sensor” type. It was not until spring 2002 the first full-frame digital SLR appeared, the 6MP Contax Digital N. It was followed shortly after by the 11.1MP Canon EOS-1Ds. It wouldn’t be until 2007 that Nikon offered its first full-frame-camera, the D3. In all likelihood, the appearance of a sensor equivalent in size to 35mm film was in part because the industry wished to maintain the existing standard, allowing the use of standard lenses, and the existing 35mm hierarchy.

One of the first occurrences of the term “full-frame” as it related to digital, may have been in the advertising literature for Canon’s EOS-1Ds.

“A full-frame CMOS sensor – manufactured by Canon – with an imaging area of 24 x 36mm, the same dimensions used by full-frame 35mm SLRs. It has 11.1 million effective pixels with a maximum resolution of 4,064 x 2,704 pixels.”

Canon EOS-1Ds User Manual, 2002

By the mid 2000’s digital cameras using “crop-sensors” like APS-C had become standard, but the rise of 35mm DSLRs may have triggered a need to re-align the market place towards the legacy of 35mm film. As most early digital cameras used sensors that were smaller than 36×24mm, the term “full-frame” was likely used to differentiate it from smaller sized sensors. But the term has other connotations.

  • It is used in the context of fish-eye lenses to denote an image which covered the full 35mm film frame, as opposed to fish-eye lenses which just manifested as a circle.
  • It is used to denote the use of the entire film frame. For example when film APS-C appeared in 1996, the cameras were able to take a number of differing formats: C, H, and P. H is considered the “full-frame” format with a 9:16 aspect ratio, while P is the panoramic format (1:3), and C the classic 35mm aspect ratio (2:3).

In any case, the term “full-frame” is intrinsically linked to the format of 35mm film cameras. The question is whether or not this term is even relevant anymore?

The whole full-frame “equivalence” thing

There is a lot of talk on the internet about the “equivalency” of crop-sensors relative to full-frame sensors – often in an attempt to somehow rationalize things in the context of the ubiquitous 35mm film frame size (36×24mm). Usually equivalence involves the use of the cringe-worthy “crop-factor”, which is just a numeric value which compares the dimensions of one sensor against those of another. For example a camera with an APS-C sensor, e.g. Fuji-X, has a sensor size of 23.5×15.6mm which when compared with a full-frame (FF) sensor gives a crop-factor of approximately 1.5. The crop-factor is calculated by dividing the diagonal of the FF sensor by that of the crop-sensor, in the case of the example 43.42/28.21 = 1.53.

Fig.1: Relative sensor sizes and associated crop-factors.

Easy right? But this only really only matters if you want to know what the full-frame equivalent of a crop-sensor lens is. For example a 35mm lens has an angle of view of rough 37° (horizontal). If you want to compare this to a full-frame lens, you can multiply this by the crop-factor for APS-C sensors, so 35×1.5≈52.5mm. So an APS-C 35mm lens has a full-frame equivalency of 52.5mm which can be rounded to 50mm, the closest full-frame equivalent lens. Another reason equivalency might be important is perhaps you want to take similar looking photographs with two different cameras, i.e. two cameras with differing sensor sizes.

But these are the only real contexts where it is important – regardless of the sensor size, if you are not interested in comparing the sensor to that of a full-frame camera, equivalencies don’t matter. But what does equivalence mean? Well it has a number of contexts. Firstly there is the most commonly used situation – focal-length equivalence. This is most commonly used to relate how a lens attached to a crop-sensor camera behaves in terms of a full-frame sensor. It can be derived using the following equation:

Equivalent-FL = focal-length × crop-factor

The crop-factor in any case is more of a differential-factor which can be used to compare lenses on different sized sensors. Figure 2 illustrates two different systems with different sensor sizes, with two lenses that have an identical angle of view. To achieve the same angle of view on differently sized sensors, a different focal length is needed. A 25mm lens on a MFT sensor with a crop-factor of 2.0 gives the equivalent angle of view as a 50mm lens on a full-frame sensor.

Fig.2: Focal-length equivalence (AOV) between a Micro-Four-Thirds, and a full-frame sensor.

Focal length equivalency really just describes how a lens will behave on different sized sensors, with respect to angle-of-view (AOV). For example the image below illustrates the AOV photograph obtained when using a 24mm lens on three different sensors. A 24mm lens used on an APS-C sensor would produce an image equivalent to a full-frame 35mm lens, and the same lens used on a MFT sensor would produce an image equivalent to a full-frame 50mm lens.

Fig.3: The view of a 24mm lens on three different sensors.

When comparing a crop-sensor camera directly against a FF camera, in the context of reproducing a particular photograph, two other equivalencies come into play. The first is aperture equivalence. An aperture is just the size of the hole in the lens diaphragm that allows light to pass through. For example an aperture of f/1.4 on a 50mm lens means a maximum aperture size of 50mm/1.4 = 35.7mm. A 25mm f/1.8 MFT lens will not be equivalent to a 50mm f/1.8mm FF lens because the hole on the FF lens would be larger. To make the lenses equivalent from the perspective of aperture requires multiplying the aperture value by a crop factor:

Equivalent-Aperture = f-number × crop-factor

Figure 4 illustrates this – a 25mm lens used at f/1.4 on a MFT camera would be equivalent to using a 50mm with an aperture of f/2.8 on a full-frame camera.

Fig.4: Aperture equivalence between a 25mm MFT lens, and a 50mm full-frame lens.

The second is ISO equivalence, with a slightly more complication equation:

Equivalent-ISO = ISO × crop-factor²

Therefore a 35mm APS-C lens at f/5.6 and 800 ISO would be equivalent to a 50mm full frame lens at f/8 and 1800 ISO. Below is a sample set of equivalencies:

           Focal Length / F-stop = Aperture ∅ (ISO)
       MFT (×2.0): 25mm / f/2.8 = 8.9mm (200)
     APS-C (×1.5): 35mm / f/3.9 = 8.9mm (355)
Full-frame (×1.0): 50mm / f/5.6 = 8.9mm (800)
      6×6 (×0.55): 90mm / f/10.0 = 9.0mm (2600)

Confused? Yes, and so are many people. None of this is really that important, except to understand how a lens behaves will be different depending on the size of the sensor in the camera it is used on. Sometimes, focal-length equivalence isn’t even possible. There are full-frame lenses that just don’t have a cropped equivalent. For example a Sigma 14mm f/1.8 would need an APS-C equivalent of 9mm f/1.2, or a MFT equivalent of 7mm f/0.9. The bottom line is that if you only photography using a camera with an APS-C sensor, then how a 50mm lens behaves on that camera should be all that matters.

Shooting photos from an aircraft

Taking photos from a train is not that hard. Taking photos from the window of a plane is trickier for a number of reasons. Firstly, you can’t really wander the aisles of a plane looking for the best vantage point, and secondly, there are very few good photos to be had at 35,000 feet.

There are of course some technical issues, the biggest one being aircraft windows. Plane windows are technically made up of three panes: (i) an outer pane flush with the outside fuselage, (ii) an inner pane (which has a little hole in it), and (iii) a thinner, non-structural plastic pane called a scratch pane. The scratch pane is the part passengers can touch, and inadvertently scratch. And the windows are not made of glass, but rather a type of plexiglass known as “stretched acrylic” (the flight deck windshields are made with glass-faced acrylic). These windows are not ideal to look through, because they are never perfectly clear.

An aerial view of Laval on approach to Pierre-Elliott Trudeau Int. Airport in Montreal. Taken from a De Havilland Canada Dash 8 aircraft which was banking. iPhone 5 (4.12mm; f/2.4; 1/531).

Second is the aircraft itself. In smaller planes windows are often located closer to the centre-line of the plane, so views of the ground are better. The larger the plane, the higher up the windows are on the aircraft’s curved fuselage (largely due to the cargo space below).

Example vertical angles of view for a 35mm lens on an APS-C camera on different aircraft.

Here are some tips for shooting photographs from a plane:

⦿ Plan ahead − This means studying the route – what scenic sites will you be passing over? For example the Icelandair flight from Toronto to Keflavik (ICE604) typically flies over southern Greenland, around 5am (local time) – which from May to August is around sunrise. Sunrise and sunset are great times to try and take a shot – shots of cloud and sky by themselves aren’t exactly inspiring. It might also be good to check weather conditions along the route.

⦿ Choose a seat − With the route and time of day in mind, decide on where you want your window seat. Sitting on the wrong side of the plane at the wrong time of day, might result in you shooting into the glare of the sun. Use an airline seat map to help guide your choice, noting that the type of plane will make a difference in where you want to sit. Optimally, a seat in the fore or aft of the plane is preferable, avoiding over-the-wing seats. However in a turboprop aircraft the wings are less of an issue because they are typically above the window. In some planes the aft of the wing can be problematic because of jet exhaust blurring parts of the image.

⦿ Select an appropriate camera/lens − Smaller is often better when it comes to cameras. So a compact camera, or even smartphones are both good choices because they are both accessible and unobtrusive, and frankly using a DSLR is likely gross overkill. A wide lens is typically best – the longer the lens the more susceptible it is to vibration and turbulence, even with good IBIS. You can experiment with UV and ND filters, but avoid polarizing filters. The plexiglass panel in the window in combination with the polarizing filter actually produces an effect called birefringement, which creates a rainbow effect in an image.

⦿ Make sure the window is clean − Always make sure to clean the scratch pane before take-off – the fewer smudges you have to shoot through the better. The scratch panes may never be perfect, because they tend to take a lot of abuse.

A little bit of art, flying into Montreal. iPhone 5 (4.12mm; f/2.4; 1/343). The lens on the iPhone 5 is roughly equivalent to a 30mm on a full-frame.

⦿ Hold the camera close − You can reduce the effect of scratches etc. by placing the lens as close to the window as possible (but not directly on the window, unless you use a rubber lens hood).

⦿ Choose settings − Faster is better when it comes to shutter speeds, e.g. 1/600 to 1/2000. The further away the object being photographed, the more lenient you can be with shutter speed. A mid-range aperture like f/8 is also quite appropriate – sharpness is all relative when shooting through three panels of plexiglass. If using a smartphone cameras, the camera will handle all the settings.

⦿ Use manual focus − Sometimes the window can be a bit hazy, and this can interfere with auto-focus. Switching to manual focus usually works quite well, making sure to focus at infinity.

The best “aerial” photographs come at landing time, or when a plane is close enough to the ground to provide an aerial view. I’ve taken some great photographs of Montreal from a smaller plane, and even on the approach to Keflavik (Iceland). What to photograph? That really depends on whether you want to take some artisanal/experimental shots, or aerial shots of landscapes. Some people like to take pictures of the wings, and that makes a lot of sense given that it helps put some shots into context. The image shown below wouldn’t be that interesting if it weren’t for the plane’s curved wingtip. Clouds are also interesting, particularly if seen from above, as are human incursions on the landscape e.g. farms, and natural wonders like rivers.

Approaching Keflavik, Iceland. iPhone 6s (4.12mm; f/2.2; 1/950).

Aerial shots can be plagued by a aerial haze, which imparts a gray layer on the image. During the day, the shorter wavelengths of light (blues and violets) are scattered by the gasses in the atmosphere. Light is also reflected by particulates in the atmosphere which results in hazy skies. This can be reduced by using a UV filter, or in post-processing. Reflections can also be an issue, especially if it is dark outside – lights within the cabin will reflect back towards the camera from the three sheets of plexiglass. And no flight is smooth – engine vibration, and air turbulence will make it difficult to achieve long exposures.

The original aerial shot of Iceland with a nice layer of gray haze. (iPhone 6s; 4.12mm; f/2.2; 1/999).
The image modified with some contrast stretching, and enhancement of the blue colour channel.

At the end of the day, there is no guarantee for good photographs shooting through a window. There is every chance that some images may be soft, especially around the edges, or condensation/ice may build-up on the window, thwarting an notion of taking “good” pictures. It might be that the plane is shrouded in clouds the whole way through the journey. The best advice is to take lots of photos, and experiment.

Above the clouds (iPhone 6s; 4.12mm; f/2.2; 1/746).

If you are interested in taking photographs from a small plane, such as the tours offered by Sea to Sky Air in Squamish BC, then you will need a few more tips, and I have provided some resources below. For anyone wanting to visit Iceland, check out my post Visiting Iceland? – Beware of the glaciers.

Further reading:

Shooting photos from a train

Someday you might be in a situation one day where you will need to take photographs through a window. For example travelling on one of the many of the worlds great rail journeys, which often provide scenery which is impossible to see otherwise. Rail trips that are specifically touted as being “scenic journeys” will often have an observation car with large windows, panoramic windows that take in a view of the sky as well, or an open-air carriage, like that found on the Northern Explorer from Auckland to Wellington (in New Zealand). The problem is that not all trains offer a glass-free interface between you and the scenery.

The biggest problem with photographing through windows is that glass (or perspex) is usually not that clean, often plagued by dust and dirt, things about which you can do little or nothing (well you can clean the inside, but not the outside). If it isn’t in a filmy layer of dirt, or a streak, there is likely very little to worry about. Since you will be focusing on distant objects when shooting from a moving train, nearby dirt specks likely will be of little worry, as they will barely show on a photograph. This becomes more problematic in direct sunlight which can emphasize dirt, streaky panes, and dust smears. Obviously, the best thing to do is to try and find a piece of glass that is pretty clear to shoot through. There may be a chance that there are also windows that can be opened.

A shot of a river along from the Bergen Line west of Myrdal (Olympus E-M5Mark II, 12mm, f/2.8, 1/1000)

Another two issues when shooting through glass are reflections and glare, but they can be alleviated by placing the lens hood directly up near the glass (but don’t press the lens against the glass because that can transfer vibrations from the train to your camera). Select a reasonably sized aperture which will reduce the impact caused by details from the glass (e.g. dirt), but not too large as it might impact depth-of-field. Note that the best results will be achieved using manual focus. Shooting through glass (or even wire mesh), the auto-focus can be misled by the surface and may not focus beyond. Autofocus can also take a while to focus, which can lead to you missing the shot. Trains generally move fast, so if you hesitate you loose the shot.

Glare due to the sun peaking out from behind the clouds directly at the window. Bergen Line (Olympus E-M5Mark II, 12mm, f/3.5, 1/1000)
Whoops, pushed the shutter at the wrong moment – nice photo if it wasn’t for the pole. Bergen Line (Olympus E-M5Mark II, 12mm, f/6.3, 1/400)

Here are some general tips:

  • Use continuous shooting mode, because it allows taking many photos at once which in turn means a few may produce really good photographs.
  • Use a polarizing filter to cut some of the reflections.
  • Use fast shutter speeds (and shutter-priority) to compensate for the train’s movement and vibration. Start with 1/500 for distant subjects, and 1/1000 to 1/2000 for nearby ones. Direction matters as well, so moving towards or away from a subject (rather than crossing laterally in front of it) usually allows for a lower shutter speed.
  • Use a wide-angle lens, since the short focal length helps to minimize movement.
  • An overcast sky is better than sunshine or rain. Too much sun will produce shadows and reflections, and rain will end up creating an artistic distortion effect when you shoot through the window.
  • Do research before the train trip to find notable sights, especially where the train may curl itself on a tight curve.
  • There will always be some form of blur in the image. The closer to the horizon, the less blur there is, because the train is moving slower with respect to distance closer to the horizon (i.e. motion parallax).
Running rapids alongside the Flåm Railway (Olympus E-M5Mark II, 12mm, f/2.8, 1/400)

Train speed also plays a factor, both in the shutter speed settings, and timing shots. The Norwegian Flåm Railway which travels between Myrdal and Flåm is an extremely scenic journey (if you can ignore the hoards of tourists). The train journey takes about 60 minutes and travels at a leisurely 40kph along the 20.2 kilometres. Conversely the Bergen Line, all 493km from Oslo to Bergen, the train will travel an average of 70kph.

View of a train on a slight curve, Flåm Railway (Olympus E-M5Mark II, 12mm, f/2.8, 1/800)
Windows that open on the Flåmsbana, Flåm Railway (iPhone 6s, 4.15mm, f/2.2, 1/192)

It is possible to successfully take pictures through glass on a moving vehicle. The caveat is of course that there has to be good scenes to take photos of. For most of the VIA rail trip from Toronto to Montreal, there isn’t a lot to see because the railway line sits level to the surrounding area, and passes through somewhat monotonous scenery (the train travels at 100kph). Some of the best photographs can actually be taken approaching Montreal, when the train slows down. Conversely, train trips like those in Norway offer a richness of photographic scenery. Just remember not to forget those who ride on the train as well.

Don’t forget the human story side to a train journey (Olympus E-M5Mark II, 12mm, f/2.8, 1/800)

Choosing a camera for travel

Many people buy a camera for taking photographs when travelling. Yeah sure, you could use a smartphone, but it won’t provide you with the flexibility of a real camera. Really. Smartphones are restricted to having small sensors (with tiny photosites), a low-power flash, and uber-poor battery life. While they have improved in recent years, offering quite incredible technology inside their limited form factor, they will never replace dedicated cameras. Conversely, you don’t have to carry around a huge DSLR sporting a cumbersome 28-400 zoom lens.

There are so many posts out there which are titled something like “best travel camera 2022”, it’s almost overwhelming. Many of the cameras reviewed in these posts have never really been tested in any sort of real setting (if at all). So below I’m going to outline some of the more important things to consider when choosing a travel camera? Note that this is a list of things to think about, not a definitive and in-depth interpretation of requirements for cameras used for taking travel photos. Note that this discussion related to digital – choosing a good analog cameras for travel is another thing altogether.

What will you be snapping? − buildings? people? close-up shots of flowers?

Budget − Of course how much you want to spend is a real issue. Good cameras aren’t cheap, but spending a reasonable amount on a camera means that it should last you years. You want a good balance of the items described below. If your budget is limited, go for a compact camera of some sort.

Compactness − The first choice from the camera perspective may be whether you want something that will fit in a pocket, a small bag (e.g. mirrorless), or a complete camera backpack (e.g. full-frame, which I would avoid). For a compact, you could go with one that has a zoom, but honestly a fixed focal length works extremely well. Good examples include the Ricoh GRIII (24.3MP, 18.3mm (28mm equiv.) f/2 lens) and Fujifilm X100V (26.1MP, 23mm (35mm equiv.) f/2 lens, 4K video). Because of their size, compacts sometimes have to sacrifice one feature for another. You also don’t want a compact that has too many dials – their real benefit is being able to point-and-shoot.

Mirrorless cameras are smaller than full-frame cameras because they don’t need to fit a mirror inside – they use a digital viewfinder instead of an optical one. They have a compact size, and provide good image quality. The downside is that they generally have smaller sensors, like APS-C and MFT. I normally opt for both a compact pocket camera, and a mirrorless. Some are better suited to some situations, e.g. compact cameras are much less conspicuous in indoor environs, and places like subways – that’s why they are so good for street photography. More compactness = enhanced portability.

Resilience − When you travel, there is often very little time to worry about whether or not a camera is going to get banged up. Cameras made of metal are obviously somewhat heavier, but offer much better survivability if a camer is accidentally dropped, or banged against something. A camera constructed with a body made of magnesium alloy is both durable and lightweight. It is both corrosion resistant and can handle extremes in temperature well. A magnesium alloy body has less chance of cracking as opposed to a polycarbonate body.

Weather resistance − You can never predict weather, anywhere. Some places are rainy or drizzly, others environs are dry and may have particles of stuff blowing in the air. Obviously you’re not going to take photos in pouring rain, but dust and dirt are often a bigger concern. My Ricoh GRIII is not weather sealed, which seems somewhat crazy when you consider it is a street camera, but there are always tradeoffs that have to be considered. In the case of the GRIII, adding weather sealing would have resulted in less flexibility on lens barrel construction, button/dial layout, and heat dissipation. My Fuji X-H1 on the other hand is weather resistent. Of course you should also choose lenses which are weather resistent. If weather resistance is important, be sure to read up on the specifics for a camera. For example the Fuji X100V is deemed to be weather-sealed, but the lens is not. To achieve this you have to buy an adapter, and add a filter.

Weight − How much are you willing to lug about on a daily basis when travelling? You don’t want to choose a camera that is going to give you back or shoulder pain. Larger format cameras like full-frame are heavier, and have heavier, larger lenses. If choosing a camera with interchangeable lenses, you also have to consider their weight, and the weight of batteries, and anything else you want to carry. There are even differences between compact cameras, e.g. the GRIII is 257g, versus the X100V at 478g, 85% more.

Lenses − If you choose an interchangeable lens camera, then the next thing to do is choose some lenses… a topic which deserves numerous posts on its own. The question is what will you be photographing? In general it is easy to narrow the scope of lenses which are good for travelling because some just aren’t practical. Telephoto for example – there are few cases where one will need a telephoto when travelling, unless the scope of the travelling involves nature photography. Same with macro lenses, and fisheye lenses (which really aren’t practical at the best of times). In an ideal world the most practical lenses are in the 24-35mm (full-frame equivalent) range. I think prime lenses are best, but short-range zooms work quite well too. I would avoid long-range zooms, because you will always use the smaller focal lengths, and long-range zooms are heavy.

Batteries − Camera batteries should have a reasonably good use-time. Using camera features, and taking lots of photos will generally have an impact on battery life. For example using image stabilization a lot, being connected to wi-fi, or turning the camera on and off a lot will run down the battery. There are other things to consider as well. For example most batteries run down quicker in colder environs. Full-frame cameras are bigger, and therefore have a longer battery life than cropped-sensor cameras. Also determine if the camera just comes charging in-camera, you will likely need to buy an external charger. Some battery chargers are also slow. Ideally always carry extra batteries no matter what the manufacturer claims.

Use − What is the camera’s main use during travelling? Street-photography? Vlogging? Landscapes (for poster-sized prints)? Or perhaps just simple travel snapshots. If the latter, then a compact will work superbly. If you want to have the flexibility of different lenses, then a mirrorless camera makes the most sense.

Video − Do you plan to take videos on the trip? If yes, then what sort of capabilities are you looking for? Most cameras produce video in HD1080p, and some have 4K capability. Some cameras limit the length of a video. If you plan to use the camera mostly for video, choose one specced out for that purpose.

Stabilization − Many cameras now offer some form of image stabilization, which basically means that the camera compensates for rudimentary camera shake due to hand-holding the camera, and keeping the camera steady in low-light situations. This is more important for travel photography because it is cumbersome to lug around a tripod, and many places, like the Arche de Triumph won’t allow the use of tripods. Some compacts like the Ricoh RGIII do have stabilization, whereas others like the Fuji X100V do not.

The best way of choosing a camera is to first make a list of all the things you want from the camera. Then try and find some cameras which match those specifications. Then see how those cameras stack up against the considerations outlined above. Narrow down the list. When you have about three candidates, start looking at reviews.

I tend to stay away from the generic “big-box” style reviews of cameras, especially those who use the term “best of YEAR” in the title. I instead pivot towards bloggers who write gear reviews – they often own, have rented, or are loaned the cameras, and offer an exceptional insight into a cameras pros and cons, and provide actual photographs. Usually you can find bloggers that specialize in specific types of photography, e.g. street, travel, video. For example, for the Ricoh GRIII, here are some blog reviews worth considering (if anything they provide insight into what to look for in a review):

Lastly, don’t worry about what professional photographers carry when travelling. Chances are they are on assignment, and carry an array of cameras and related equipment.

Pixel peeping and why you should avoid it

In recent years there has been a lot of of hoopla about this idea of pixel peeping. But what is it? Pixel peeping is essentially magnifying an image until individual pixels are perceivable by the viewer. The concept has been around for many years, but was really restricted to those that post-process their images. In the pre-digital era, the closest photographers would come to pixel peeping was the use of a loupe to view negatives, and slides in greater detail. It is the evolution of digital cameras that spurned the widespread use of pixel peeping.

Fig.1: Peeping at the pixels

For some people, pixel-peeping just offers a vehicle for finding flaws, particularly in lenses. But here’s the thing, there is no such thing as a perfect lens. There will always be flaws. A zoomed in picture will contain noise, and grain, unsharp, and unfocused regions. But sometimes these are only a problem because they are being viewed at 800%. Yes, image quality is important, but if you spend all your time worrying about every single pixel, you will miss the broader context – photography is suppose to be fun.

Pixel-peeping is also limited by the resolution of the sensor, or put another way, some objects won’t look good when viewed at 1:1 at 16MP. They might look better at 24MP, and very good at 96MP, but a picture is the sum of all its pixels. My Ricoh GR III allows 16× zooming when viewing an image. Sometimes I use it just to find out it the detail has enough sharpness in close-up or macro shots. Beyond that I find little use for it. The reality is that in the field, there usually isn’t the time to deep dive into the pixel content of a 24MP image.

Of course apps allow diving down to the level of the individual pixels. There are some circumstances where it is appropriate to look this deep. For example viewing the subtle effects of changing settings such as noise reduction, or sharpening. Or perhaps viewing the effect of using a vintage lens on a digital camera, to check the validity of manual focusing. There are legitimate reasons. Pixel peeping on the whole is really only helpful for people who are developing or finetuning image processing algorithms.

Fig.2: Pixel peeping = meaningless detail

One of the problems with looking at pixels 1:1 is that a 24MP image was never meant to be viewed using the granularity of a pixel. Given the size of the image, and the distance it should be viewed at, micro-issues are all but trivial. The 16MP picture in Figure 2 shows pixel-peeping of one of the ducks under the steam engine. The entire picture has a lot of detail in it, but dig closer, and the detail goes away. That makes complete sense because there are not enough pixels to represent everything in complete detail. Pixel-peeping shows the ducks eye – but it’s not exactly that easy to decipher what it is?

People that pixel-peep are too obsessed with looking at small details, when they should be more concerned with the picture as a whole.