Prime vs. zoom lenses − Help with choosing a lens

Trying to choose between a zoom and a prime lens can be challenging, mainly because they probably shouldn’t be compared in the first place. Basically they offer different outcomes. A prime is almost a lens specialized for a particular task, whereas a zoom can be more of a “jack-of-all-trades”. There are also different types of each of these lenses. There are expensive fast primes, and less-expensive primes with a slower maximum aperture. There are also native primes from the camera manufacturer, and third-party primes. The same criteria can be applied to zoom lenses. Table 1 summarizes some of the key differences between prime and zoom lenses.

characteristicprimezoom
price+ simple build, less expensive− complex build, more expensive
aperture+ brighter, wider aperture (faster)
e.g. f/1.2 to f/2
− darker, narrower aperture (slower)
sharpness+ sharper images, fewer optical deficiencies− less sharpness, some distortion
versatility− less versatile+ more versatile
size and weight+ lighter and more compact
− have to carry more lenses
− bulkier and heavier
+ need to carry fewer lenses
Table 1: Key differences between prime and zoom

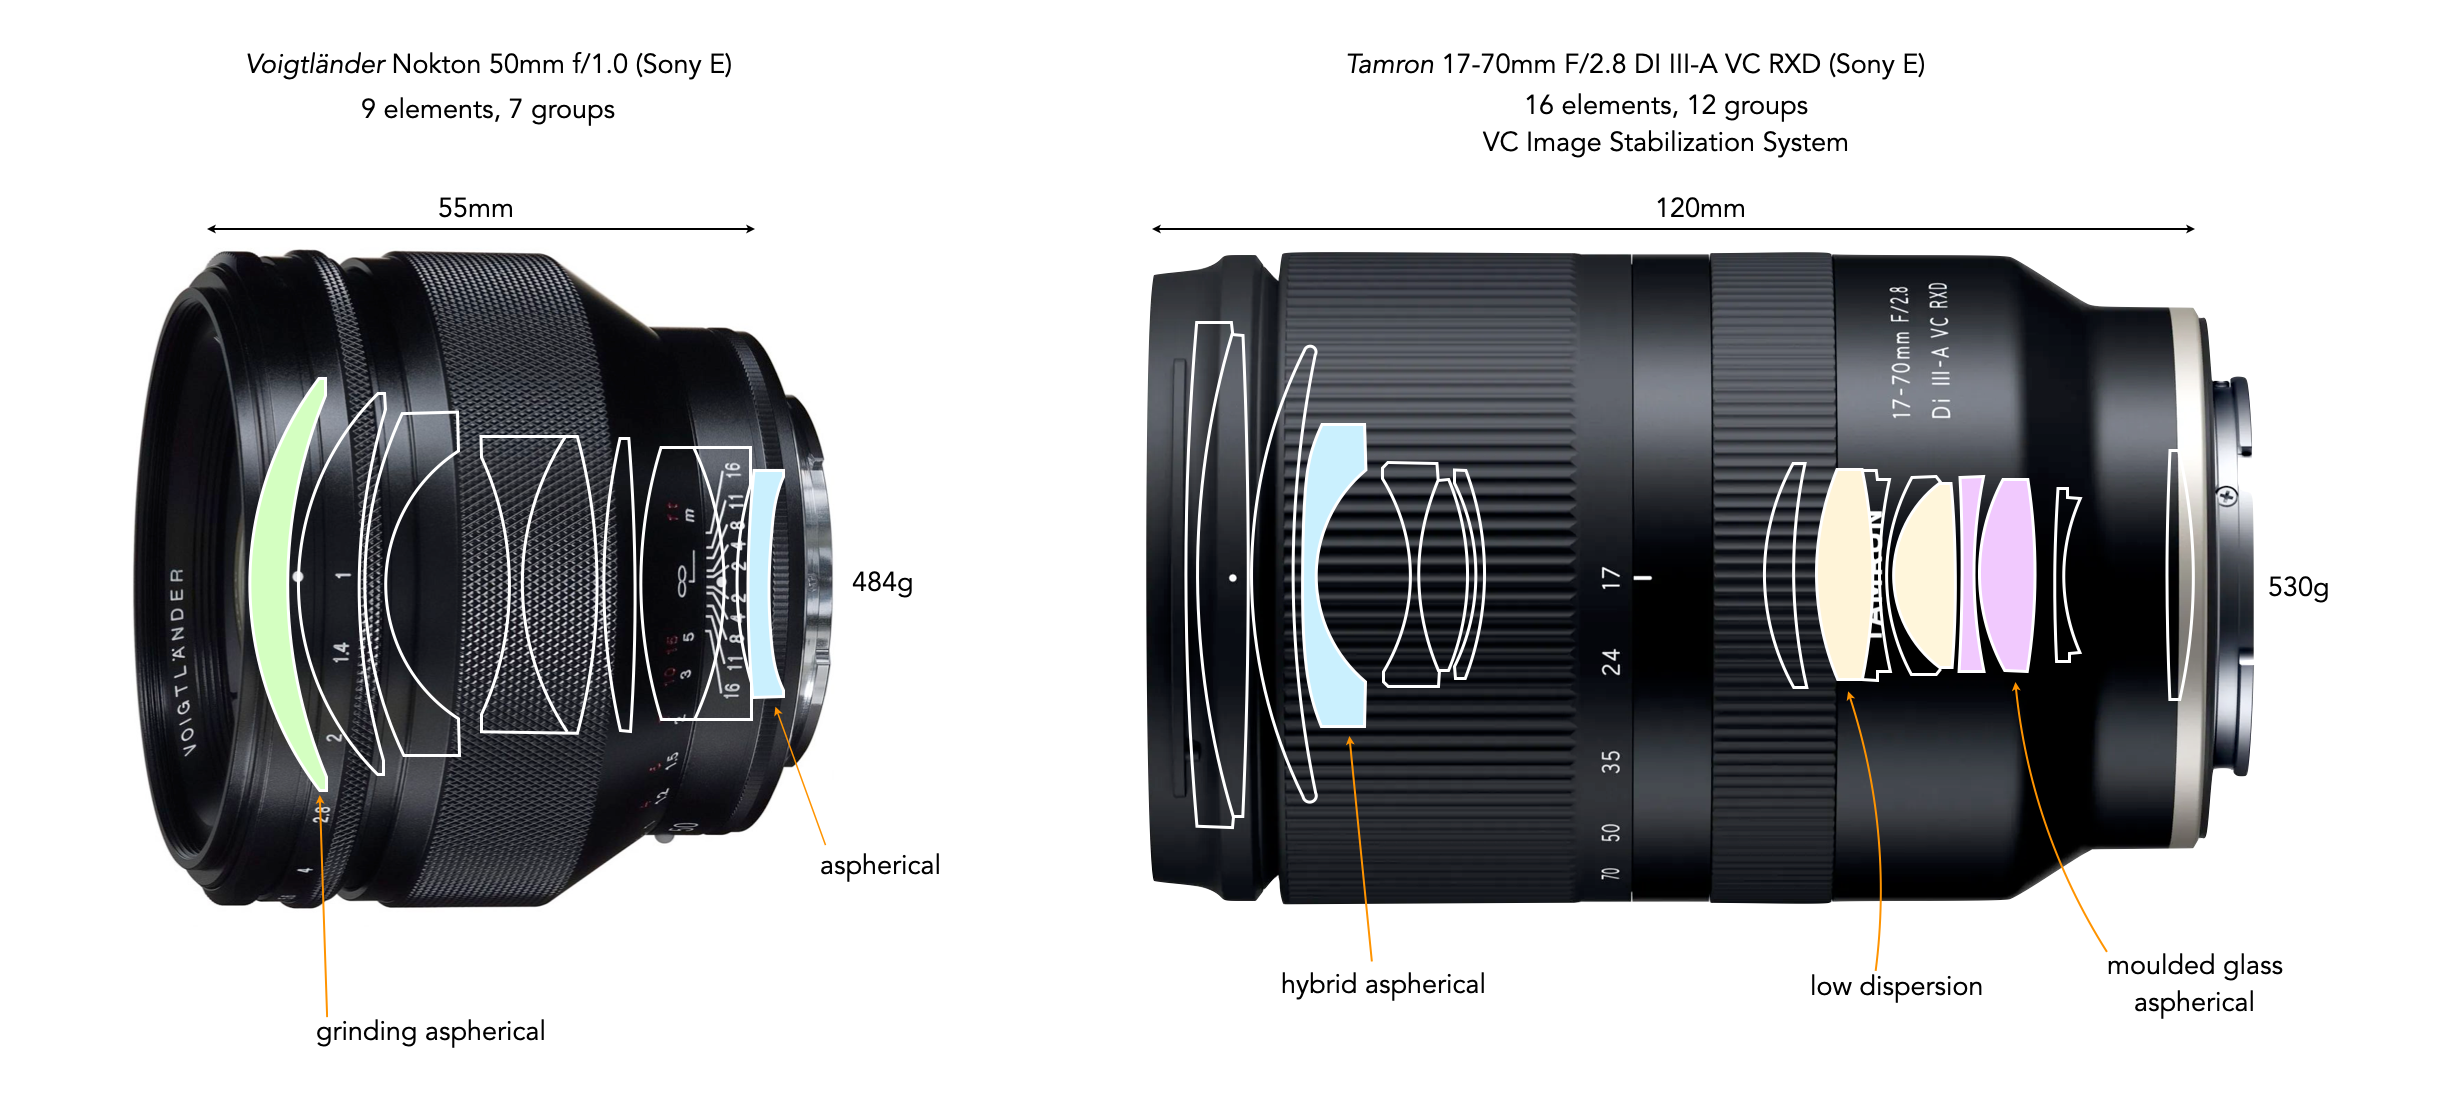
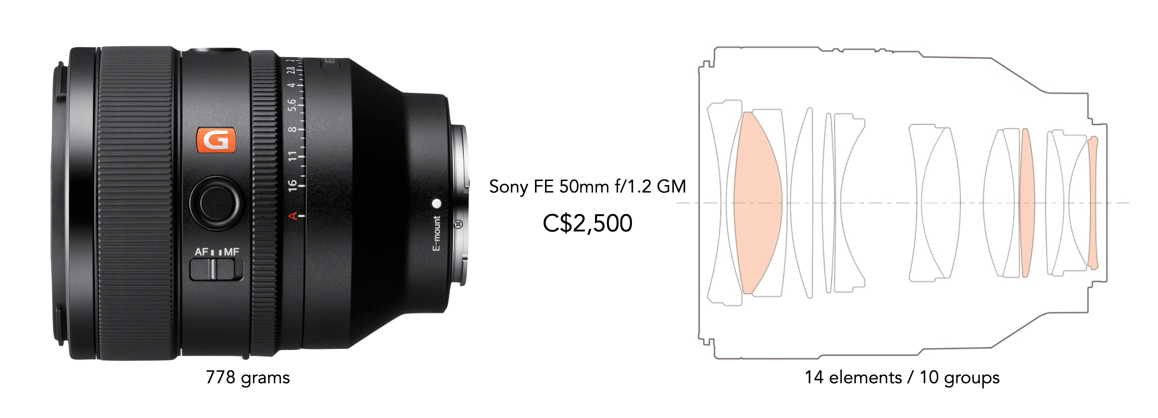
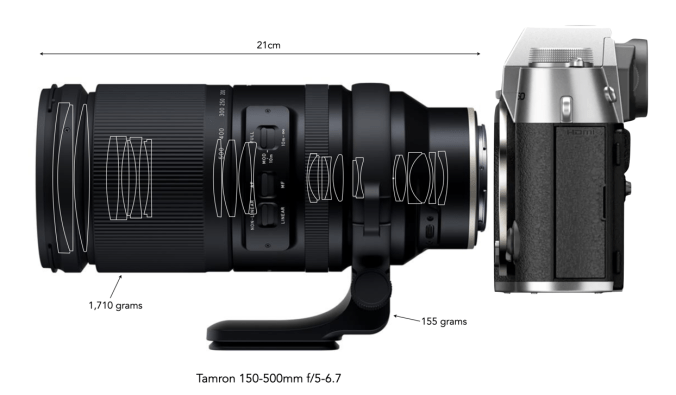
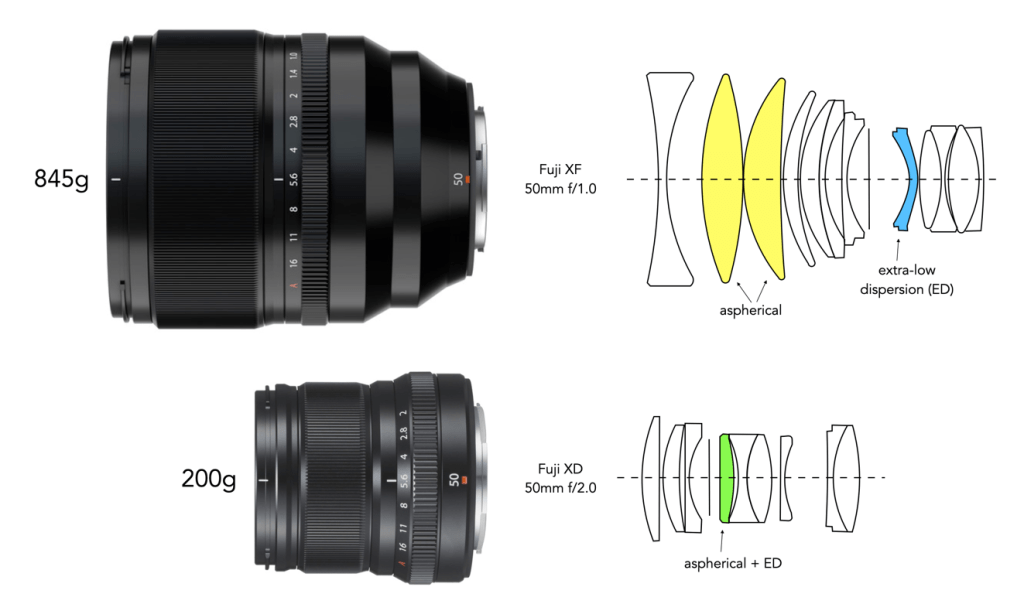
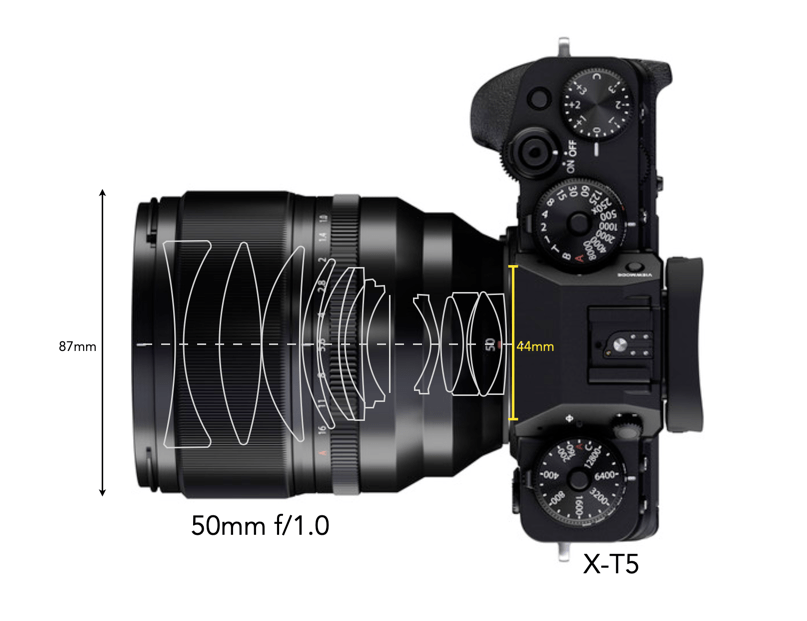
A zoom provides a level of flexibility that a prime does not, but this comes with some trade-offs. The first thing a zoom lens typically gives up is speed, i.e. how wide the aperture opens up. Prime lenses on the other hand are fast, and some are super-fast. Note that prime lenses are nearly always smaller and lighter than zooms. Many things influence the size and weight of a lens including whether it is a pro-grade lens (often contain more glass), or whether it has a large maximum aperture (again requiring a bigger lens with more glass). Every lens has its pros and cons.

Fig.1: A very basic schema for choosing a prime or zoom lens

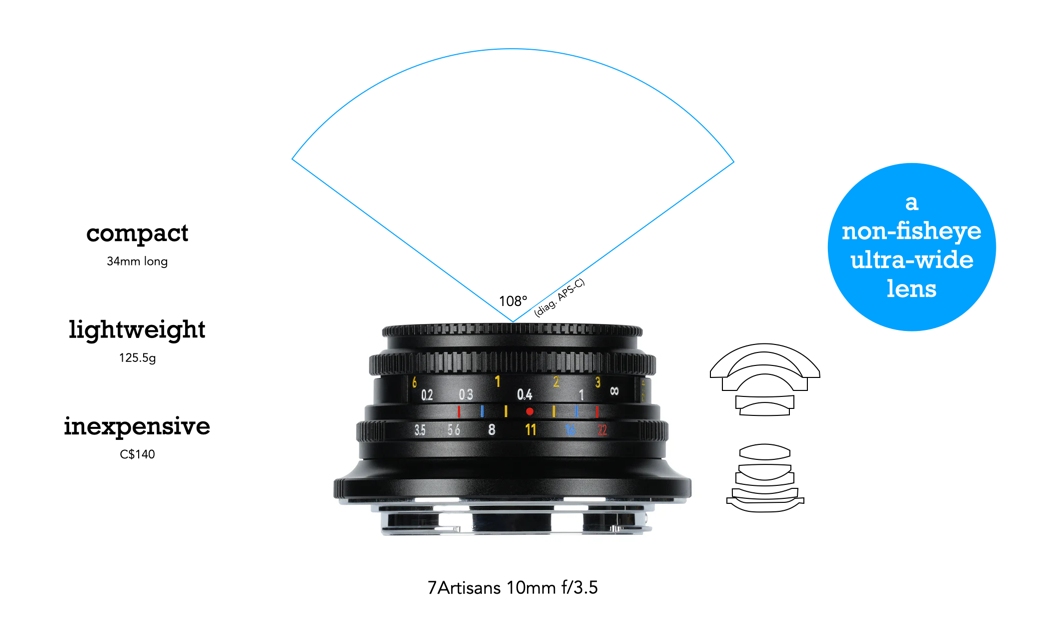
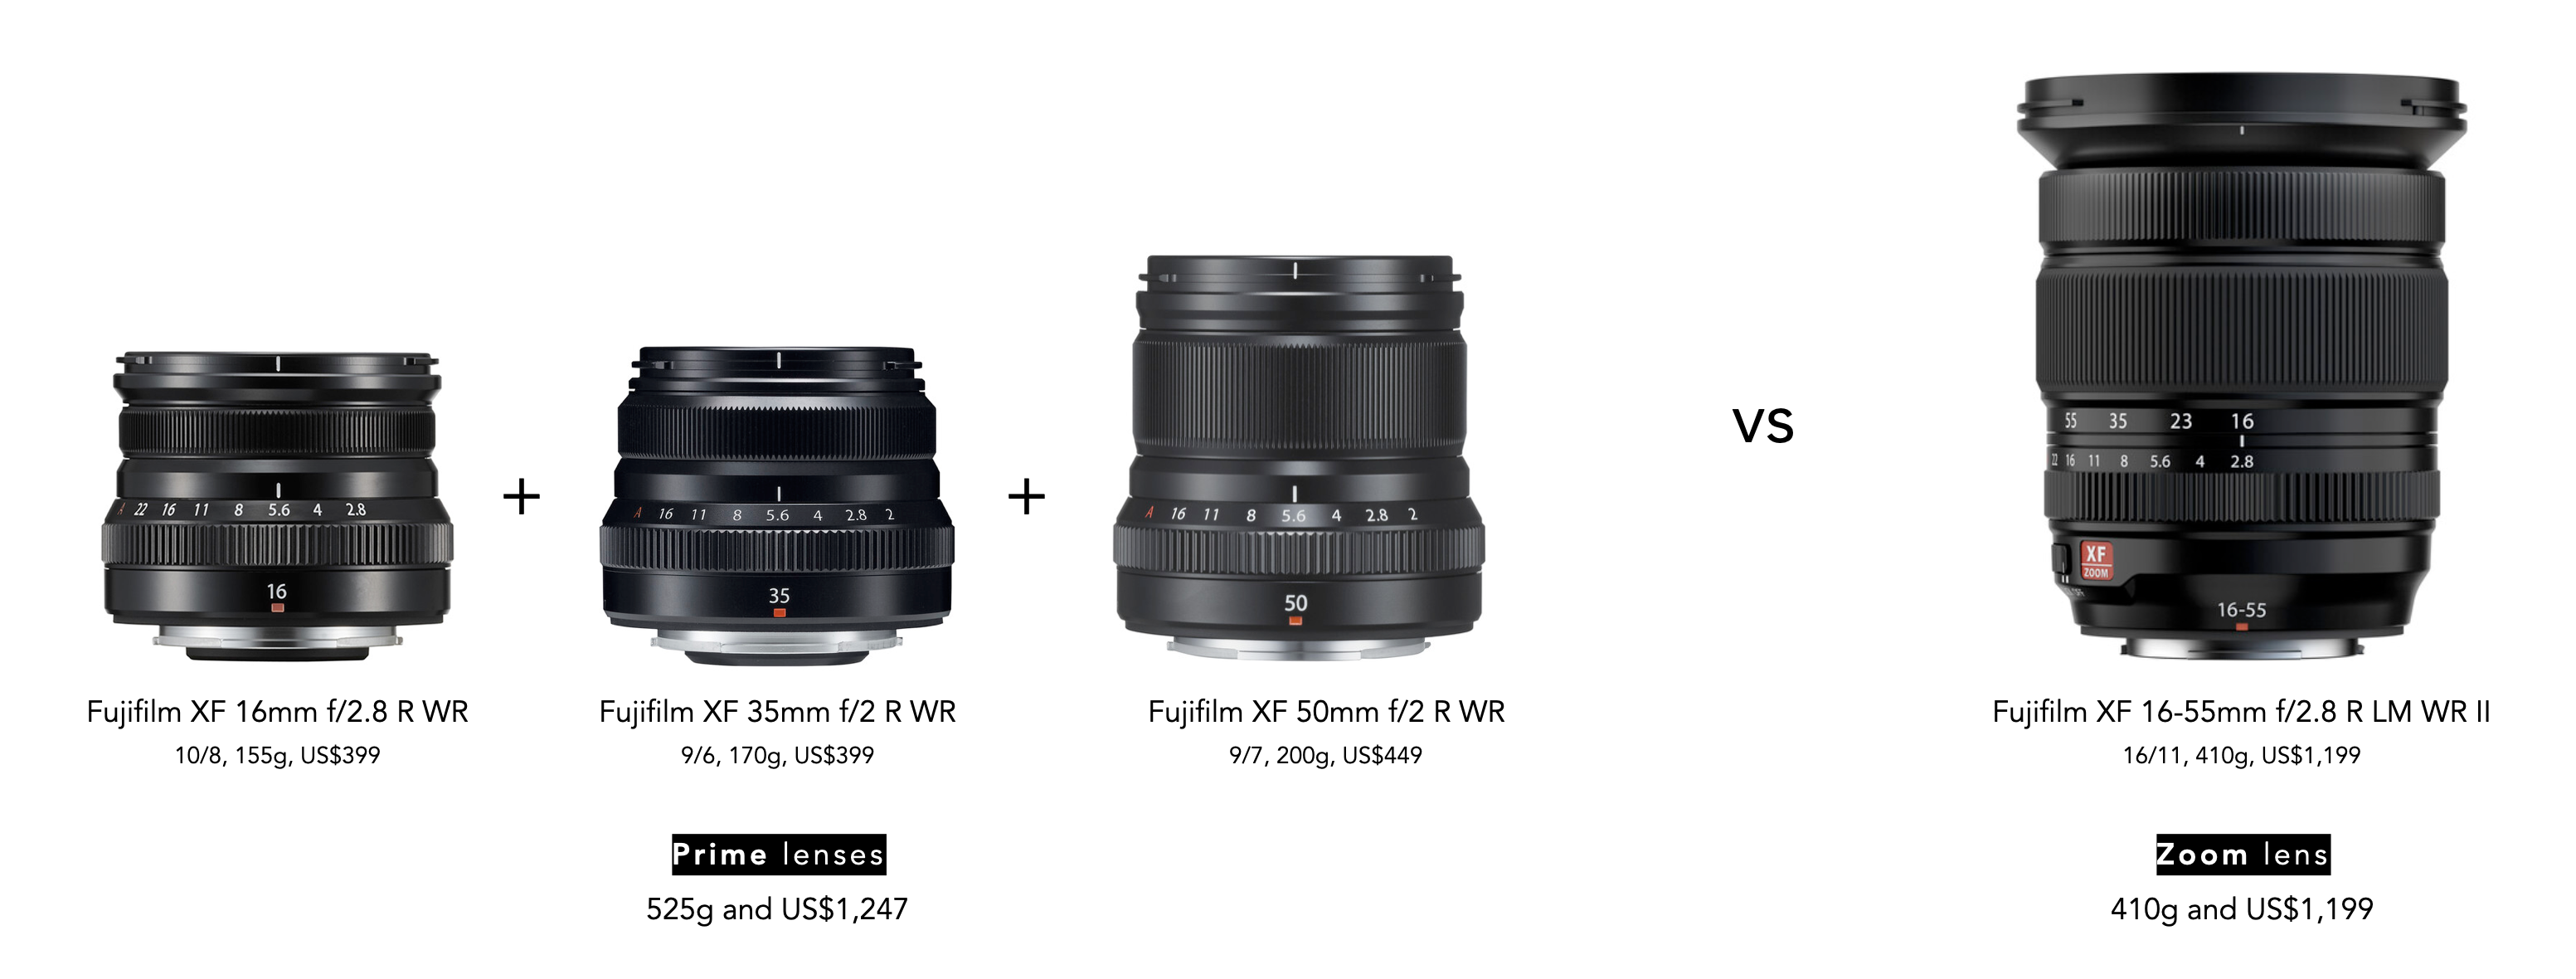
Despite the fact that prime lenses are often lauded for their specific nature, i.e. suited to one particular task, zoom lenses can also be categorized in this manner. For example someone might choose a 17-28mm full-frame lens for landscapes, providing some scope. In addition, although a good zoom lens may be more expensive than a prime, more prime lenses may be needed to equal the range of coverage, thereby leading to more cost. There are also some lenses that don’t work very well as a zoom, e.g. fish-eye lenses.

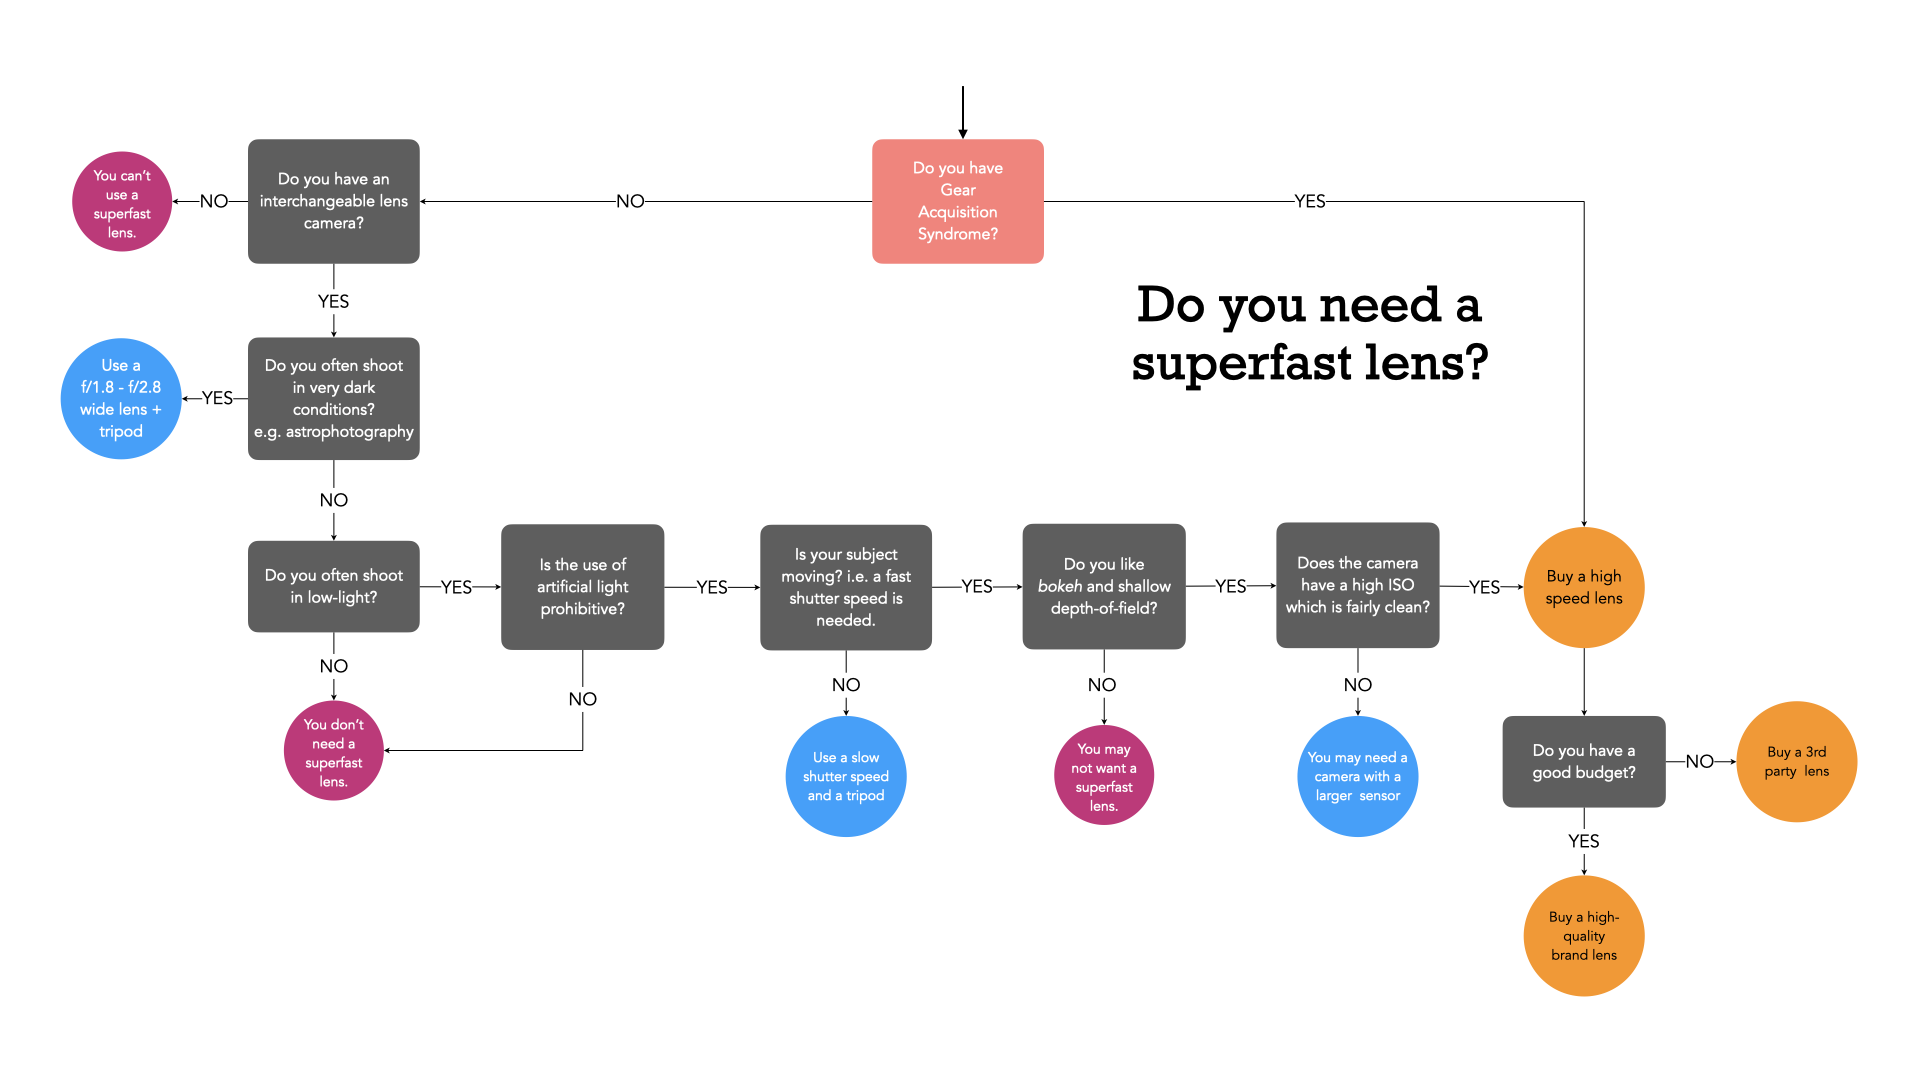
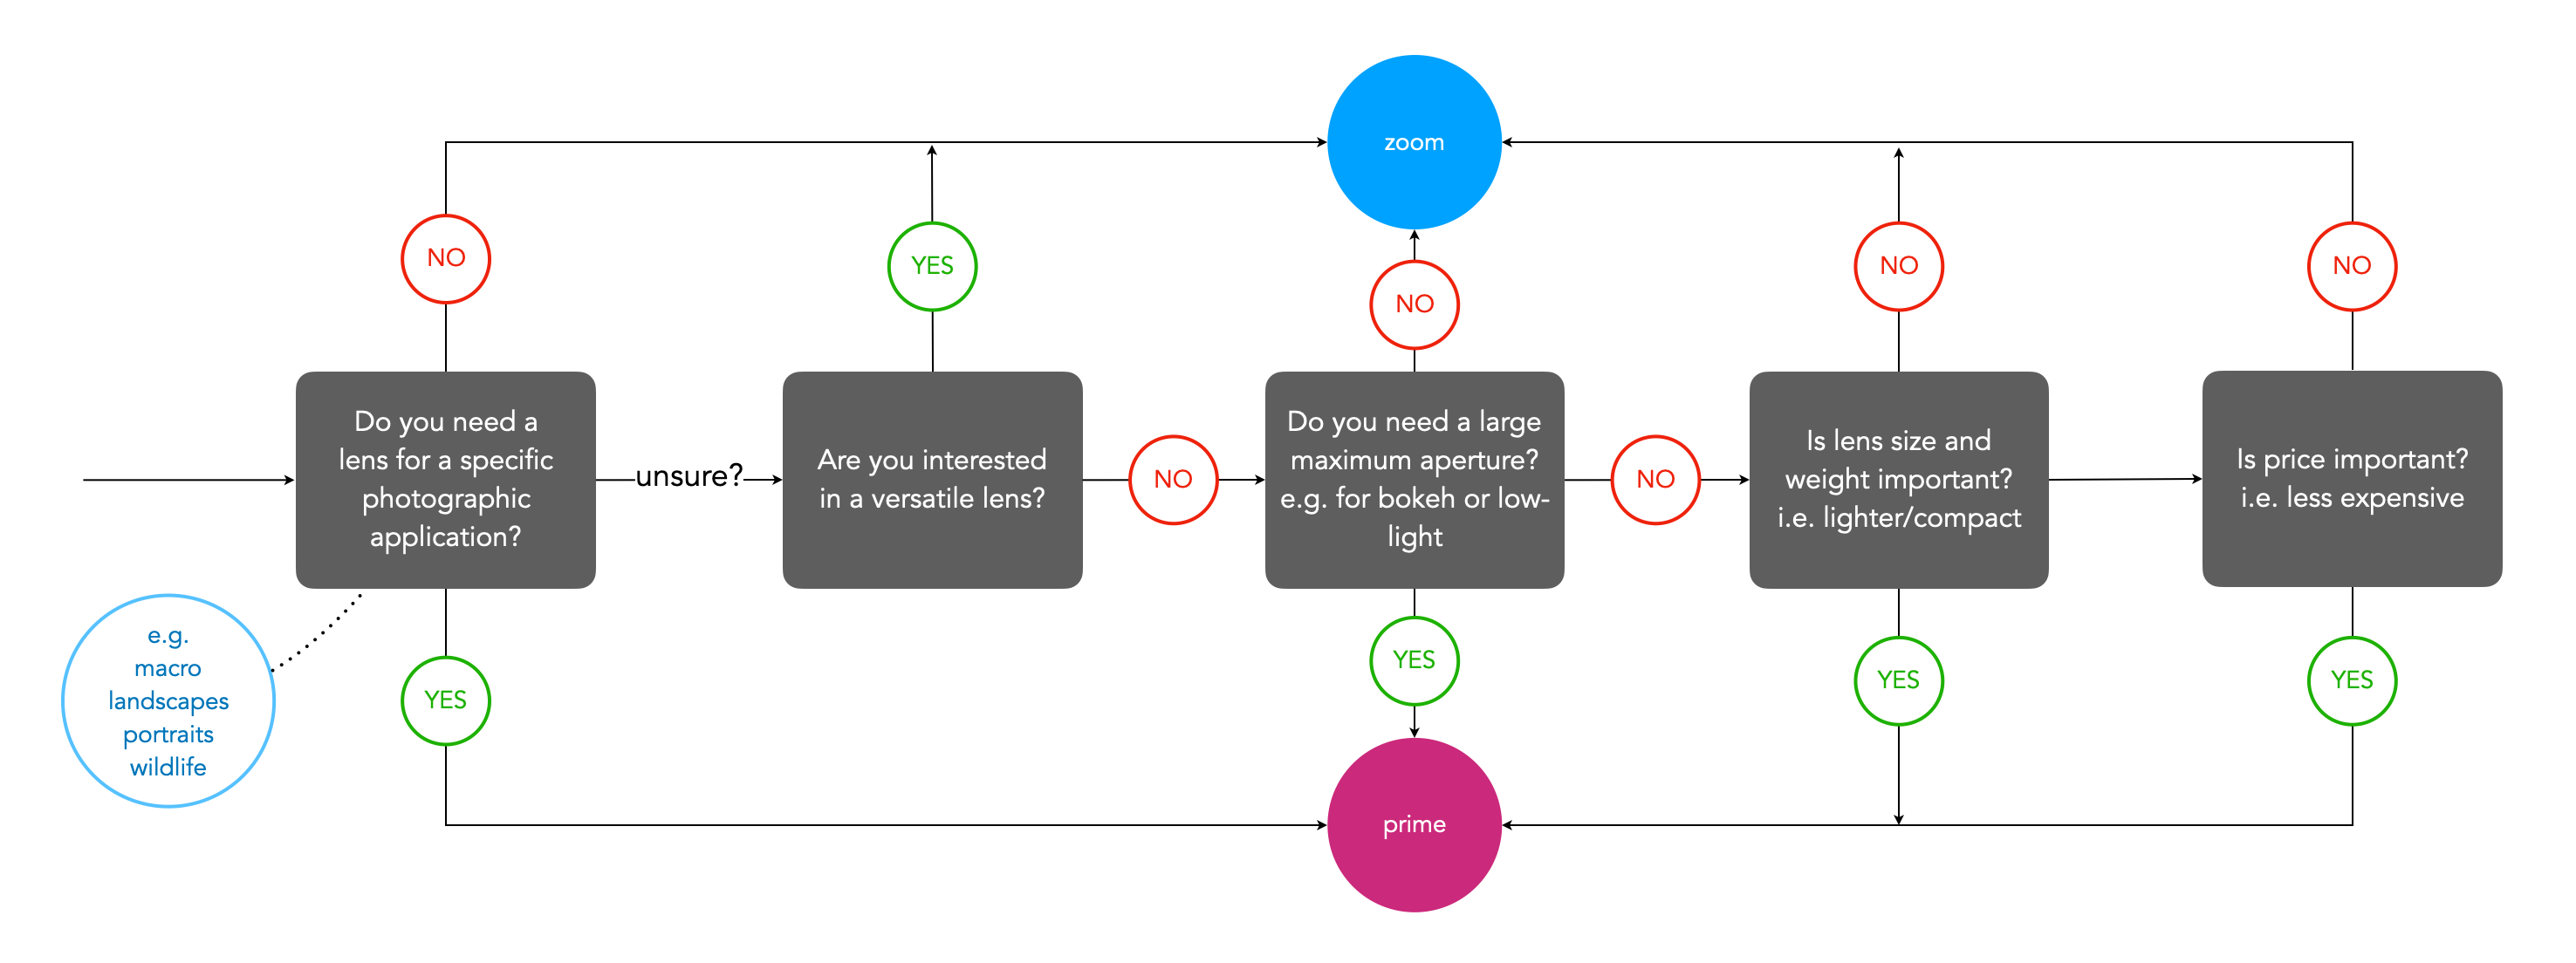
When selecting a prime lens it is often the case of deciding on an application, and then which lens meets all the criteria. For example, a trip to Iceland may warrant a wide-angle lens that is weatherproof (because the weather can change every 5 minutes in Iceland) − in this case something like a 24mm ultra-wide would be optimal. Alternatively, some photographers might opt for even a wider lens, e.g. 16/18mm due to the ‘largeness’ of the landscape. Choosing a zoom lens on the other hand can be a little more challenging. This is because there are often a variety of options. For example, choosing a 50mm prime means you get a 50mm lens, with perhaps the only variability being the speed (maximum aperture) of the lens. But there may be more than one option for choosing a particular zoom lens. Figure 2 shows a flowchart which considers some of the main factors to consider when choosing a zoom lens.

Fig.2: Factors to consider when choosing a zoom lens

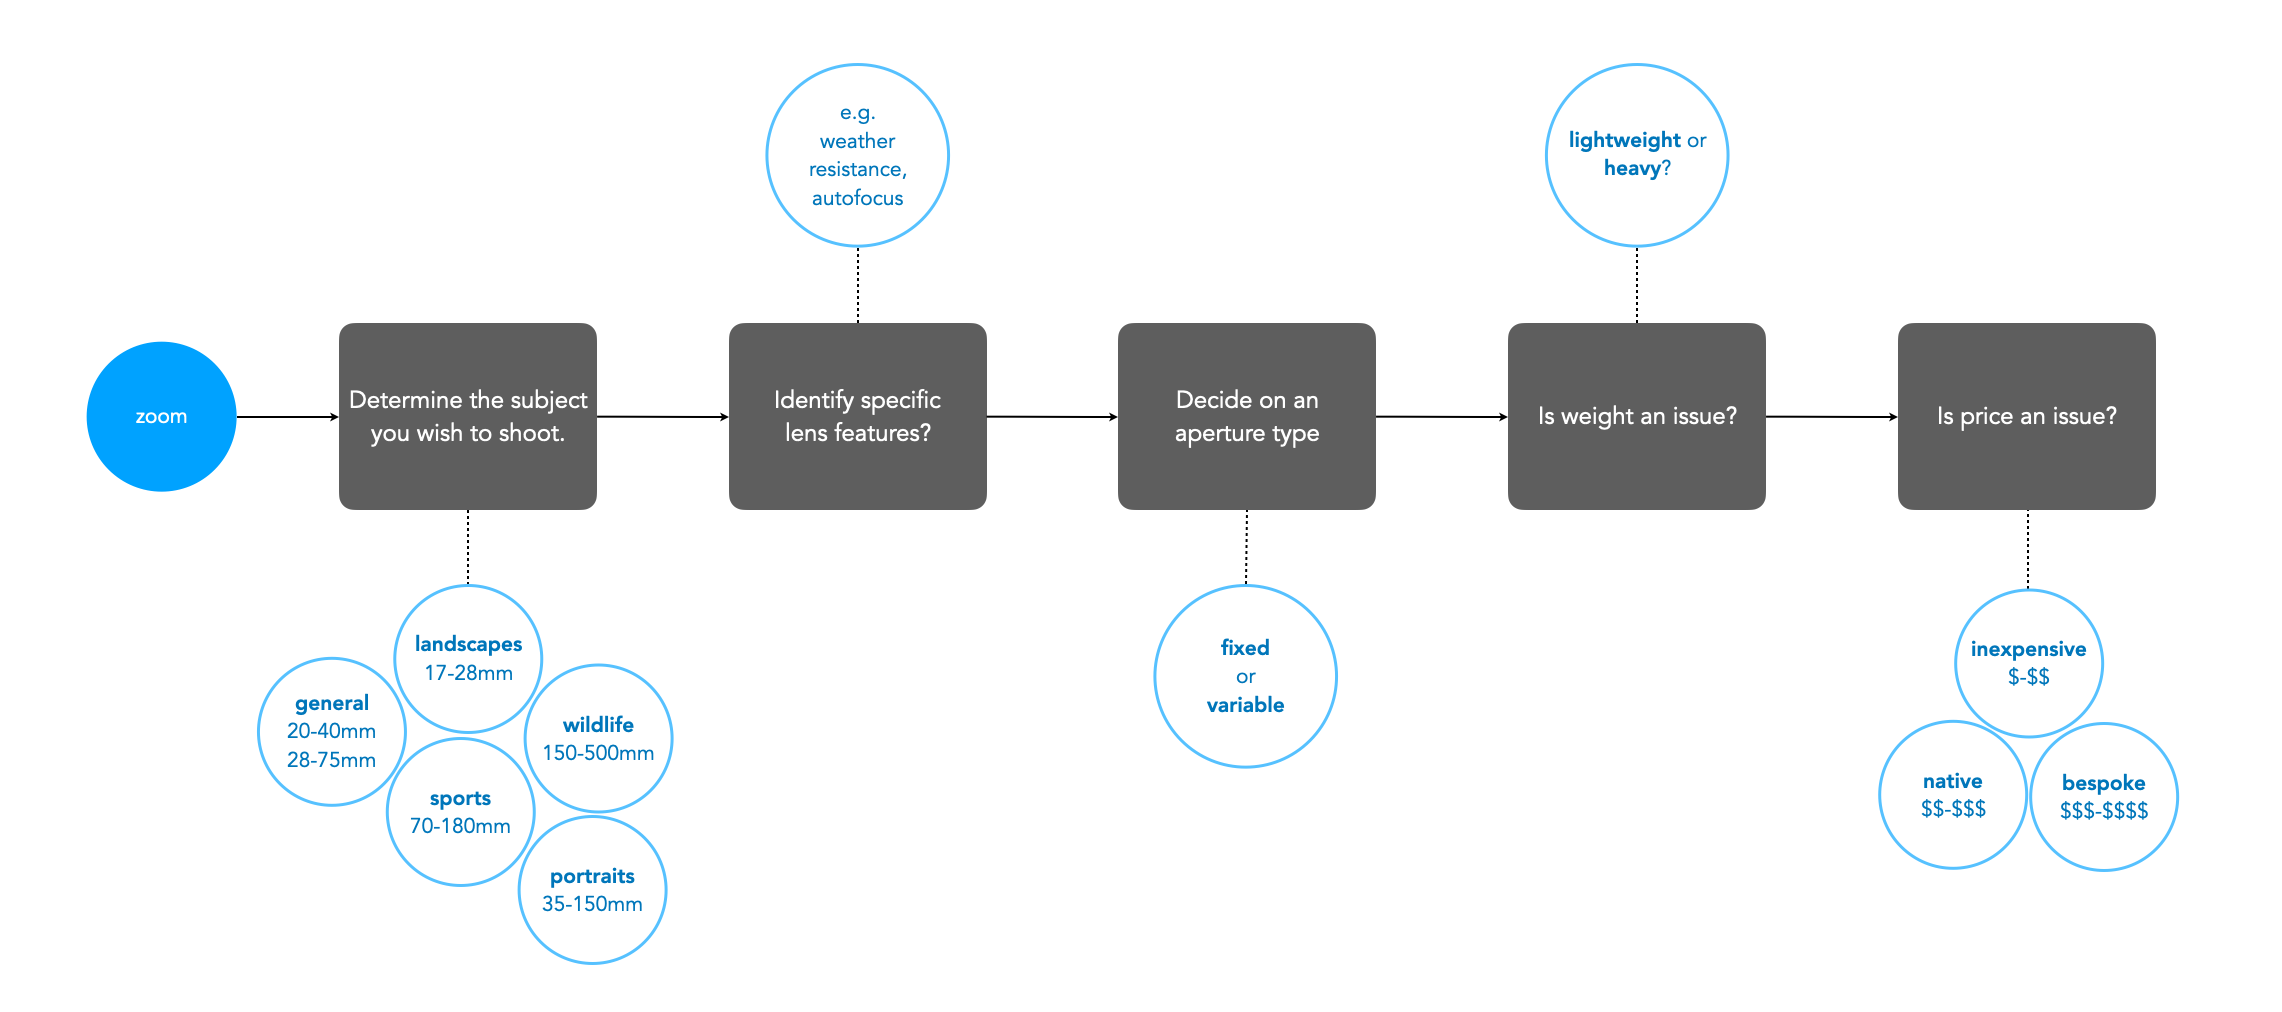
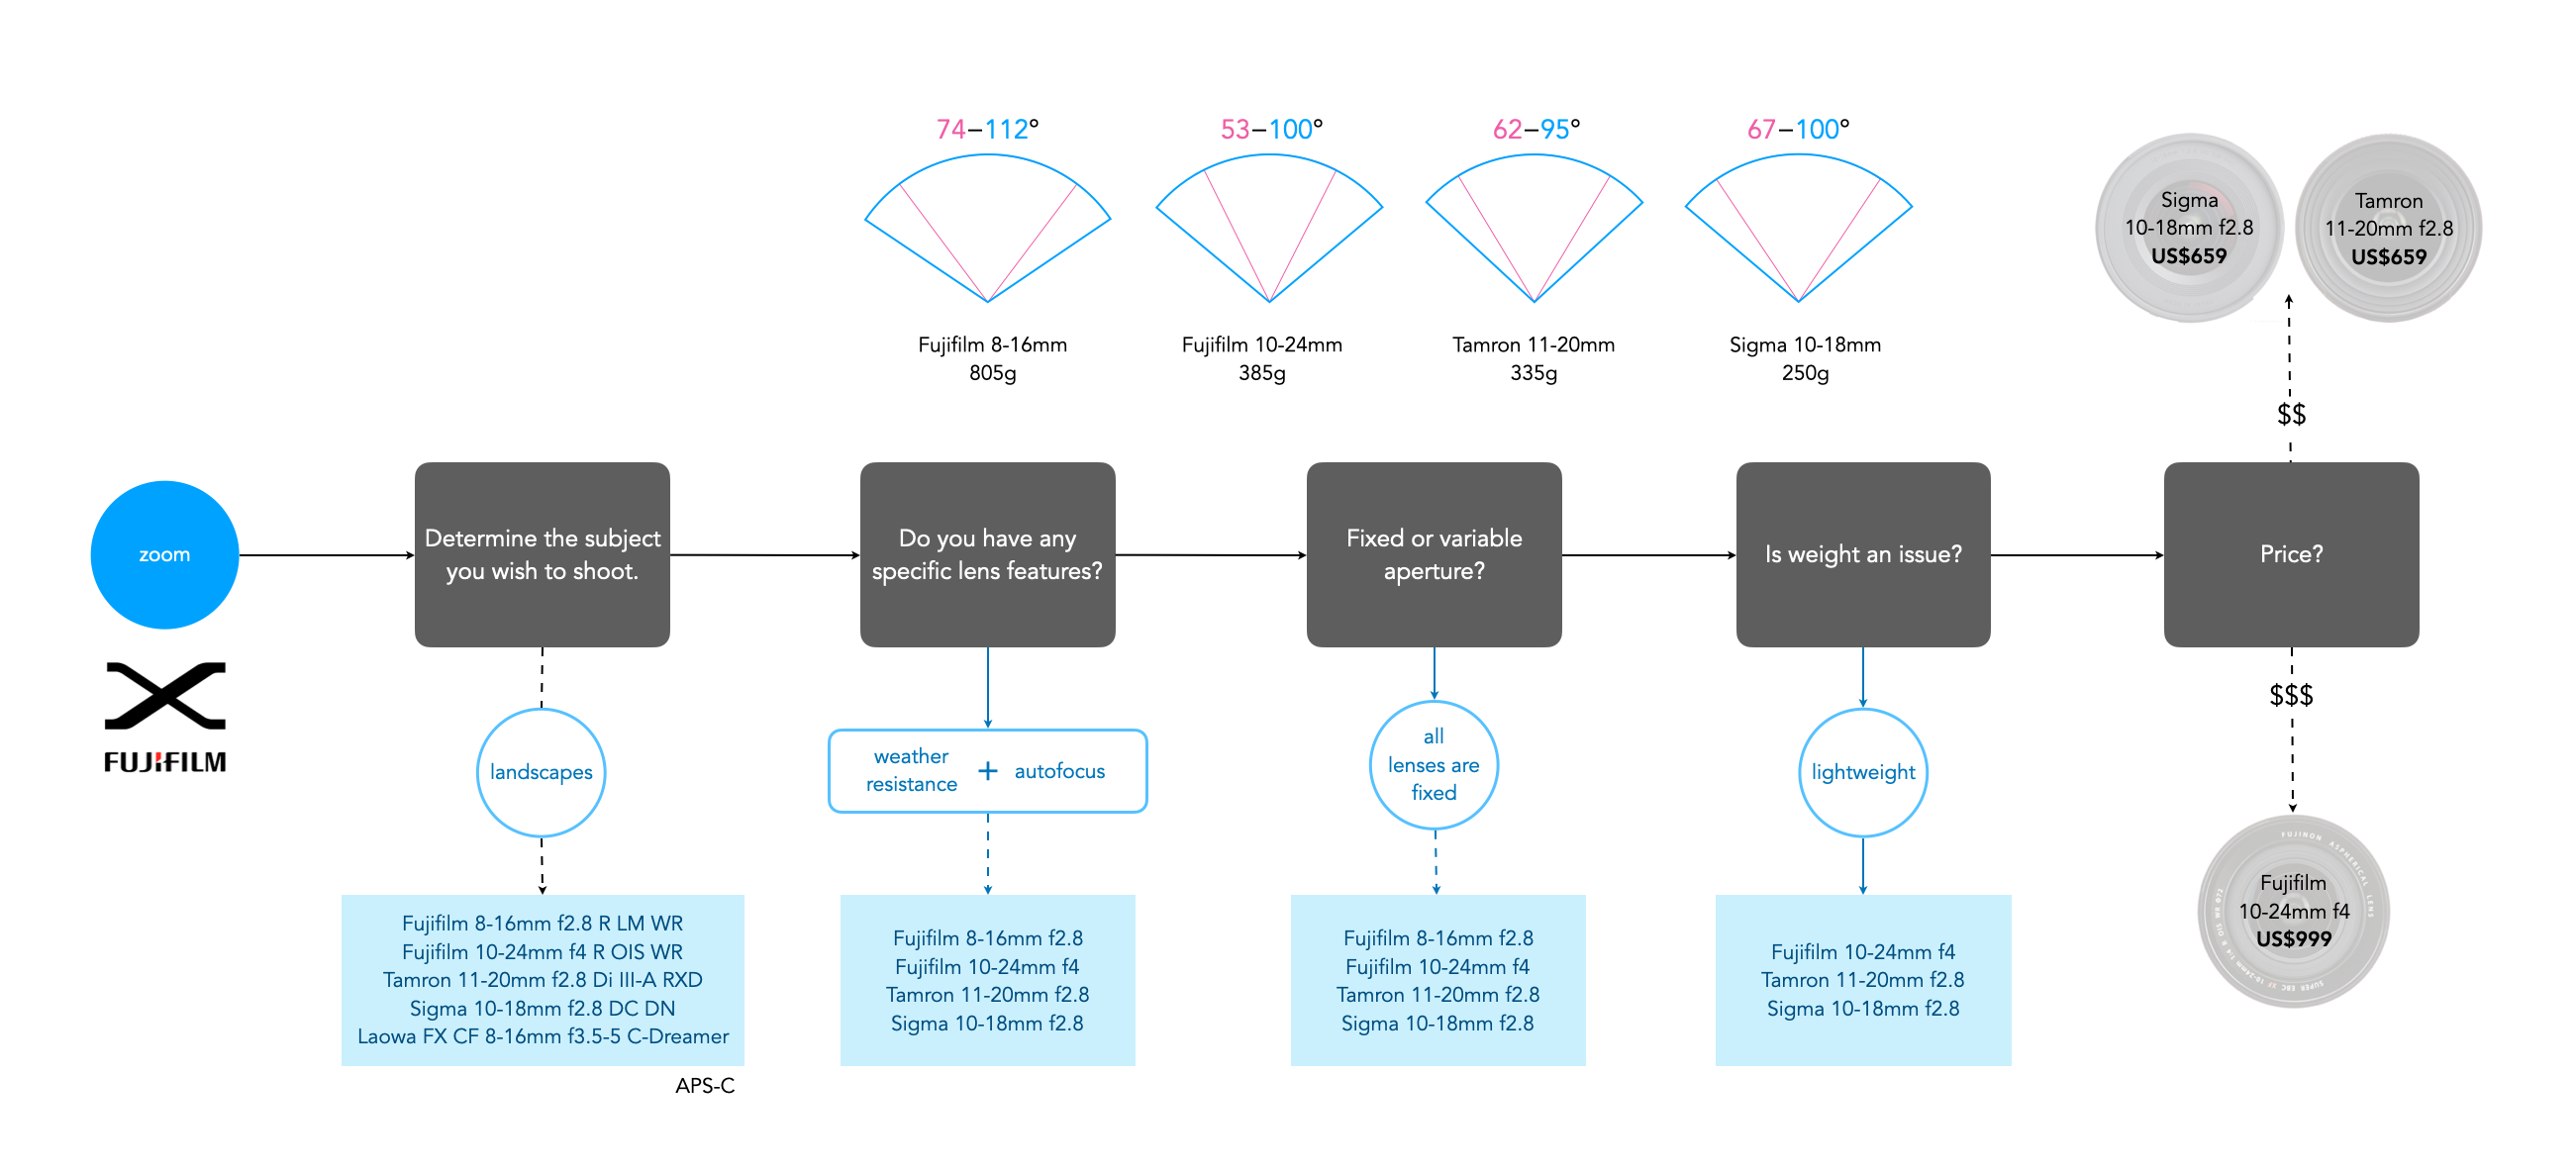
Figure 3 shows an example of choosing a wide zoom lens for a Fuji-X camera (APS-C), using the above factors. There isn’t that much difference between the lenses with respect to AOV (angle-of-view), but as each factor is considered, more lenses are filtered out. At the end only three of the five lenses satisfy the criteria considered, and then it comes down to price. If we were choosing this for the trip to Iceland then we might want the greatest flexibility in focal lengths, for example the Fujifilm 10-24mm (FF equivalent 15-36mm). If maximum aperture is an issue, then either the Tamron or Sigma are fine alternatives.

Fig.3: An example of choosing a Fuji (wide) zoom lens for landscape

There are some situations where one lens is just enough. Mountain enthusiast Jakub Cejpek talks about using the Fujifilm XF10-24mm/F4 on a mountain trek. He chose mirrorless for its ‘lightweight style’, and the 10-24mm lens for its versatility, knowing that changing lenses in impossible, ‘time is rare, and weather conditions are tough’.

Do you ✱need✱ a new lens?

Buying lenses can lead some to a phenomena known in many crafts as GAS, or Gear Acquisition Syndrome. In photography it refers to the compulsive need to buy more and more equipment, in particular, lenses.

How do you know if you have GAS? Well perhaps you have a bunch of lenses with overlapping focal lengths? Or a really expensive lens, such as an uber-fast f/1.2 lens that has sat on a shelf since the day you bought it? Do you have a tilt-shift or fish-eye lens that you used once or twice? Do you collect lenses from particular manufacturers just because you like things in sets? Then it’s likely that you are afflicted. This affliction may be worse if you have half a dozen camera bodies.

An inexpensive, fun, creative lens to shoot with.

It occurs because new lenses keep appearing, ones with new features, or just some sort of novelty (go on you really need that circular fish-eye, don’t you?). A lens that is just that little bit sharper, or even newer. Manufacturers often rely on lens GAS, because few people splurge out on a new camera body every year, but lenses, well that’s another matter altogether.

So how to decide when you need a lens? Here are some questions to ask yourself:

  • Do your current lenses inhibit your ability to be creative?
  • Is there a genre of photography you want to try which requires a new lens?
  • Will the lens be used more than once?
  • Is the lens affordable? (and is there more than one option)?

If you said yes to all the above, then it can probably be justified. Having said that, sometimes you just want a new lens, and there is certainly nothing wrong with that.

Prime vs. zoom lenses − Is one better than the other?

One of the biggest dilemmas for novice photographers when choosing a digital lens is whether you buy a prime or a zoom? This is an age old debate, probably dating back to the 1970s when zoom lenses started to make real inroads into the SLR lens market. Back then zoom lenses were at a major disadvantage from a quality perspective, but over time they have improved in quality, and proliferated in quantity. Here we look at the major differences between the two.

Fig.1: A comparison of a modern prime (50mm normal) versus a modern zoom lens (wide-to-short telephoto, 17-70mm), both full-frame.

Zoom lenses

A zoom lens is a lens designed with a variable focal length. This allows the lens to be modified to any focal length between the specified range, meaning the angle-of-view (AOV) of the lens will change with the focal length. For example 16-80mm means the lens is widest at 16mm, and at full zoom at 80mm. There are zoom lenses that are narrow in focus, e.g. wide-angle zooms where the zoom range covers wide-angle focal lengths, and there are others that are more broadly scoped, e.g. 17-300mm, covering wide-angle all the way through medium length telephoto. Some zooms have a fixed aperture, i.e. one maximum aperture, others have a variable aperture which changes with the focal length selected, e.g. a 28-60mm f/4-5.6 means that 28mm the aperture is f/4, while at 60mm the aperture is f/5.6.

Many cameras come standard with a kit lens which is typically a zoom. For example Fuji-X (APS-C) often pairs a 15-45mm zoom (f/3.5-5.6), with covers a horizontal AOV of 77.32° to 29.8° − wide angle to low-telephoto to cover from landscapes to portrait shots. Other Fuji cameras are paired with 16-80mm or even 18-120mm. Note that the downside to kit lens, is that they are typically of lower quality.

Pros:

  • Versatility − Zoom lenses offer a lot of flexibility, allowing the focal length to be changed on-the-fly (so there is no need to swap-out lenses). This makes them ideal for situations where there is a need to quickly adjust the framing.
  • Convenience − There is no need to carry multiple lenses to cover different focal lengths.
  • Discretion − A scene can be captured without having to get too close. Using one lens also means it may not be necessary to carry a camera bag.
  • Portability − A single zoom lens can replace 2-3 prime lenses. This means less weight to tote around, and less lens swapping, so although the zoom may weigh more, it may be less than the sum of primes.

Cons:

  • Optical quality − Zooms can sometimes be less sharp than primes because of their complex, variable nature. However the gap between the quality of zooms versus primes is narrowing. An expensive zoom is likely to have better optical quality than a cheap one.
  • Aperture − Professional zooms have a maximum aperture of around f/2.8, or even f/4, making them less than optimal for low-light situations, i.e. slow.
  • Price − Zoom lenses can be expensive, because the zoom mechanism and lens configuration can be complex. Kit zooms are cheap, the Fuji-X 15-45mm is around C$325. The Fuji-X 16-80mm is C$880. Wide zooms can be even more expensive with the Fuji 10-24mm going for C$1050.
  • Weight − Generally quality zooms can be heavier than primes because the lens body is physically larger, and there are more complex mechanisms inside, e.g. auto-focusing motors.
  • Lens selection − Some platforms do not offer that many zoom lenses. For example there are a lot of third-party lenses in the Fuji-X environment, however most are prime lenses (probably due to the lower cost). Apart from Fuji native zooms, the only real competitors are Sigma and Tamron.
three prime lens compared to an equivalent zoom lens
Fig.2: A comparison of a 16-55mm zoom lens with three ‘equivalent’ prime lenses to covert the same range of focal lengths (note that the closest to a 55mm prime is a 56mm f/1.2 which puts it outside the bounds of comparison from the perspective of aperture).

Prime lenses

A prime lens is a lens with a fixed focal length, meaning it cannot change. It has an AOV that is set, so making an object fill more of the frame requires getting closer to the subject. For example a 16mm Fuji-X prime offers a horizontal AOV of 73.74°, no more, no less. So to enlarge a subject and make it fill more of the frame, the camera has to be moved physically closer to it. To make a subject fit a frame, the camera must be moved away. In terms of prime lenses, a wide angle might be 28mm, a normal lens 50mm, and a portrait lens 85mm (full frame). In comparison a 28-85mm zoom lens offers all these focal lengths (and many in between) in a single lens. Prime lenses are typically fast, with maximum apertures of f/1.8, f/1.4 or even f/1.2 (or faster).

Pros:

  • Optical quality − Prime lenses are focused on one focal length, and as such often have better optics. This includes having a better depth of field, sharpness, and rendered bokeh. Better optics = better image.
  • Aperture − Prime lenses are faster than zoom lenses, i.e. they have larger maximum apertures than zooms. They can have apertures as wide as f/0.95, but typically they are between f/1.2 and f/2.8. This makes them better in low-light situations, and helps them produce a shallower depth-of-field. This often negates the need for a flash or high ISOs that can introduce noise.
  • Focusing speed − Auto-focusing generally works a little faster on prime lenses.
  • Price − Prime lenses have fewer moving parts and as such can be less expensive. The caveat here are specialty lenses, superfast lenses e.g. f/1.2, and super-telephoto lenses. Prime lenses have the same range of cheap “kit” to expensive high-end lenses, but often it is possible to purchase a good prime for a reasonable cost. Note that superfast lenses can be significantly more expensive than their f/1.8 counterparts.
  • Compactness/Weight − Many normal prime lenses are generally lighter and more compact than zoom lenses.
  • Bokeh − Wide apertures provide a shallow depth of field, which makes primes ideal for taking portraits and artistic shots containing the coveted background blur known as bokeh.

Cons:

  • Limited versatility − Prime lenses only have one focal length, so it might be necessary to carry more than one lens to cover a gamut of scenarios. Adjusting a composition will require moving towards or away from the subject.
  • Inconvenience − With prime lenses it may be necessary to carry multiple lenses to cover different focal lengths. This impacts how much needs to be carried in the field.
  • Discretion − Carrying more than one lens might require changing lenses on-the-fly, because different lenses may be used for different scenes. A camera bag might be a requirement.
  • Portability − While a zoom lenses can replace a number of prime lenses, working only with primes may require carrying 2-3 lenses with different focal lengths. This means more weight to tote around, and more lens swapping.
  • Weight − There are circumstances where primes can be heavy, e.g. super-fast lenses often require more glass, which makes them heavier than other primes, and telephoto lenses can be larger and heavier than telephoto zoom lenses.

Choosing between a prime and a zoom lens really depends on photographic priorities, i.e. what is needed in a particular situation. Zoom lenses can be hard to use well for the inexperienced photographer − e.g. they often stay in one position, and zoom to capture everything, versus using a prime lens where you are forced to move in order to gain photographic perspective. Every optical design has its strengths and weaknesses, but as a prime lens is optimized for a single focal length in many cases it has a greater capacity for fewer weaknesses and more strengths. This may include characteristics such as: image quality (contrast, sharpness, distortion, flare control), colour aberrations, lens speed, size and weight, focusing ability, focus shift, etc.

Are all prime lenses created equal?

The simple answer is no. One could argue that all 50mm lenses should do the same job, but from the perspective of image quality, nothing could be further from the truth. There are many reasons for this: the complexity of the optical formula, and its ability to keep optical deficiencies to a minimum, the quality of the glass, whether or not the housing is metal or plastic, whether or not the lens is automatic or manual… lots of things.

What I want to do in this post is provide some examples of how prime lenses differ (in the context of the Fuji-X system, although the same logic can be applied to any lens on any system). Let’s consider a series of lenses for the Fuji-X system with a focal length of 35mm, being the “normal” lens for APS-C size cameras, with a varied range of maximum-aperture values. The core characteristics are shown in Table 1, with the visual aspects such as lens design shown in Figure 1. Note that I have not included the sub-$100 category of cheap lenses, just because I don’t necessarily think they can be compared in the same manner (from the perspective of build-quality).

35mm (APS-C)Voigtländer Nokton f/0.9TTArtisan f/0.95Voigtländer Nokton f/1.2Fujifilm f/1.4 RFujifilm f/2.0 R WRMeyer Trioplan 35 f/2.8 II
aperturef/0.9f/0.95f/1.2f/1.5f/2.0f/2.8
aperture blades1210127912
weight492g250g196g187g170g270-300g
focusingmanualmanualmanualautomaticautomaticmanual
elements10/97/58/68/69/65
housingaluminummetalaluminumaluminumaluminumaluminum
country of originJapanChinaJapanJapanJapanGermany
priceC$2000C$300C$840C$800C$540€899
Table 1: Comparison of a series of Fuji-X compatible APS-C 35mm lenses

There are many things about these lenses that are very similar. The bodies are made of metal, they all weight roughly the same (except the Nokton f/0.9), the number of aperture blades is similar, and all bar the Fujifilm lenses use manual focus. Where they differentiate from a technical viewpoint is maximum aperture. From the perspective of design, most are based on some variant of the ubiquitous double-Gauss lens design. As shown in Figure 1, each lens is tailored to the specific “needs” of the manufacturer, augmented with specialized lens elements such as aspherical lenses.

The number one factor which differentiates lenses is usually price. Here native lenses are often more expensive than third-party ones, but not always. The most expensive lens comes from Voigtländer, the Nokton f/0.9, which is not surprising considering it has the largest maximum aperture, and is the most complex design, but also because Voigtländer is known for high precision optics. Voigtländer lenses are made by Cosina who make everything from scratch in its factories in Japan. For a slower lens there is the Nokton f/1.2 which is less than half the cost, but this is largely because of the lack of aspherical elements, and a simpler design.

Fig.1: Six types of 35mm lenses for Fuji-X

At the opposite end of the spectrum, is the TTArtisan f/0.95 lens which sells for C$300. Why the disparity? Likely less expensive manufacturing, or the lack of aspherical lenses. Many of these less expensive lenses seem to be based on older lens designs which have been improved in some manner. But the goal of Chinese lens manufacturers is to provide good quality optics at a reasonable price. Some of these cheaper lenses may also have some optical deficiencies, but this can be regarded as providing a “vintage” look in the way of creating images with character. For example sharpness at full aperture may not always be what one would expect. The TTArtisan 35mm f/0.95 has excellent bokeh, but does suffer from both vignetting on images with light corners, and lens flare at lower apertures.

Are these 35mm lenses created equal? Probably not, except perhaps in the context of providing the same angle-of-view. Their differences are varied, and can’t really be described in any meaningful way. We could compare them using 101 different tests, from measuring sharpness to the presence of optical artifacts such as chromatic aberration, but this is often a very qualitative endeavour. So which lens of this group is the best choice? Ultimately it comes down to budget, and personal preferences.

Note that this principle extrapolates out to most standard focal lengths.

Camera gear that amateur photographers should avoid

There is a lot of information about photography on the internet, and honestly for the beginner it can be overwhelming. The task of deciding on a digital camera is hard enough without content creators prattling on about things you probably don’t need. Here are a few pieces of gear to steer clear of – from the pure perspective of the amateur photographer.

Full-frame cameras − The ubiquitous dSLR, or “digital SLR” is an extension of 35mm film cameras, hence the reference to “full-frame” (sensors are 36×24mm). They have been the mainstay of professional photographers for the past two decades. But they are not something that an amateur photographer should even consider. They are large, heavy, and prohibitively expensive. The size alone makes them inconvenient for things like long-term travel. In an age of mirrorless cameras with good APS-C sensors they honestly just don’t make a lot of sense. Even the big manufacturers such as Nikon have shifted their emphasis away from dSLRs. There are situations where dSLRs are more of an advantage – low light, a larger sensor, wildlife an sports photographer, none of which are really the concern of the amateur photographer.

This Sony 50mm lens is fast, but it is too much lens for the beginner

Fast lenses − What is a fast lens? I would probably categorize it as a lens with a speed faster than f/1.8 up to f/1.2. They contain a lot of glass, are heavy, and expensive. But frankly most people don’t need these lenses. They are perfect for people who shoot a lot at night, or in low-light settings, but slower lenses can also be used in these scenarios. (I wrote a whole post on whether you Should you buy a superfast lens?, and Are modern ultrafast lenses useful?)

Super telephoto zooms − The zooms offer focal lengths like 100-500mm, and are very versatile, just not for the beginner. It’s tempting to consider, but not actually that useful unless you have a specific need, i.e. sports and wildlife photography. In many cases it is just too much zoom. For example landscape photography doesn’t always gel well with focal lengths beyond say 200mm, because there is a tendency to loose perspective, which is the whole point of many landscapes. The other problems are pretty obvious – size and weight. Of course here there is another benefit of mirrorless APS-C cameras, smaller zooms. The Tamron 150-500mm lens for Fuji-X seems amazing (225-750mm eq.), but it contains 25 elements, and weighs 1.71kg – try lugging that around for an extended period!

The Tamron 150-500mm super telephoto zoom – a behemoth for amateurs

Filters − There are a lot of really good filters which do things like reduce glare, and unwanted reflections, and correct or enhance colours. For example polarizing filters are useful when shooting landscapes in sunny locales, they darken skies, and make colours stand out more. Neutral density filters reduce light hitting the sensor, but doesn’t affect image colours. But it may be best to focus on taking good photographs, and conquering exposure before adding filters into the fray. P.S. UV filters are basically pointless because most sensors aggressively filter UV light. Save the filters for when you gain a little experience.

Tripods − Most people do not need a tripod. They are super useful for taking stills at home, or when you need to use a super-slow shutter speed, but otherwise they are a bit of a door-stop. They are not at all useful for travel, and overall just aren’t worth the effort. The only ones that can be somewhat useful are the mini variety such as the Manfrotto PIXI (but honestly avoid the Gorilla-type flexible tripods).

Camera body upgrades − Avoid the trap of upgrading your camera body every 1-2 years. A camera body should last a good amount of years, so there really is no need to consistently upgrade. If you are at the point of considering which camera to buy, save some money and buy an older version of the camera. The reality is that technology has plateaued somewhat in digital cameras, and there isn’t going to be much difference between two or three generations of a camera (except the price). Advanced features aren’t that useful if you are still grappling with the basics.

A light meter − If you have a film camera, then a light meter might be a must. But in the case of digital cameras, having a dedicated light meter may not be necessary. Good ones are expensive, and take up room. It’s easier to trust the light meter in the camera, or for film cameras use a light meter app such as Light Meter Ultra.

Lenses you don’t need − It’s hard not to want all the lenses that photographers review online. They look cool, and it would be fun to play with them right? Especially the myriad of inexpensive lenses now on offer. But here’s the thing, most of them you won’t use on a regular basis. Fish-eye lenses are a good example. They are fun and creative because they provide an ultra-wide view of the world. But the caveat is that reasonably priced ones are typically manual focus, and there are very few applications (unless it is a rectilinear fish-eye). There is probably a good reason that manufacturers like Fuji don’t have any fish-eye lenses.

Photography can get to be an expensive hobby, and buying things you don’t need can be a slippery slope. Many of these things I learned the hard way. Buying lenses that I thought I would need, but ended up sitting on a shelf. Think of it this way – every piece of gear that you buy should solve a problem of some sort, but not just a 1-2 instances, a problem you encounter a lot. If you are really interested in a lens, then try and rent the lens before buying to actually see if it is as useful as you think.

Ultimately a new lens or any other gear doesn’t replace the need for knowledge and experience, or frankly will it help you do something if you don’t really know what you are doing.

Converting colour images to grayscale

Digital cameras often provide one or more “monochrome” filters, essentially converting the colour image to grayscale (and perhaps adding some form of contrast etc.). How is this done? There are a number of ways, and each will produce a slightly different grayscale image.

All photographs are simulacra, imitations of a reality that is captured by a camera’s film or sensor, and converted to a physical representation. Take a colour photograph, and in most cases there will be some likeness between the colours shown in the picture, and the colours which occur in real life. This may not be perfect, because it is almost impossible to 100% accurately reproduce the colours of real life. Part of this has to do with each person’s intrinsic human visual system, and how it reproduces the colour in a scene. Another part has to do with the type of film/sensor used to acquire the image in the first place. But greens are green, and blues are blue.

Black-and-white images are in a realm of their own, because humans don’t visualize in achromatic terms. So what is a true grayscale equivalent of a colour image? The truth is there is no one single rendition. Though the term B&W derives from the world of achromatic films, even there there is no gold standard. Different films, and different cameras will present the same reality in different ways. There are various ways of acquiring a B&W picture. In an analog world there is film. In a digital world, one can choose a B&W film-simulation from a cameras repertoire of choices, or covert a colour image to B&W. No two cameras necessarily produce the same B&W image.

The conversion of an RGB colour image to a grayscale image involves computing the equivalent gray (or luminance) value Y, for each RGB pixel. There are many ways of converting a colour image to grayscale, and all will produce slightly different results.

  • Convert the colour image to the Lab colour space, and extract the Luminance channel.
  • Extract one of the RGB channels. The one closest is the Green channel.
  • Combine all three channels of the RGB colour space, using a particular weighted formula.
  • Convert the colour image to a colour space such as HSV or HSB, and extract the value or brightness components.
Examples of grayscale images produced using various methods – they may all seem the same, but there are actually subtle differences.

The lightness method

This averages the most prominent and least prominent colours.

Y = (max(R, G, B) + ,min(R, G, B)) / 2

The average method

The easiest way of calculating Y is by averaging the R, G, and B components.

Y = (R + G + B) / 3

Since we perceive red and green substantially brighter than blue, the resulting grayscale image will appear too dark in the red and green regions, and too light in the blue regions. A better approach is using a weighted sum of the colour components.

The weighted method

The weighted method weighs the red, green and blue according to their wavelengths. The weights most commonly used were created for encoding colour NTSC signals for analog television using the YUV colour model. The YUV color model represents the human perception of colour more closely than the standard RGB model used in computer graphics hardware. The Y component of the model provides a grayscale image:

Y = 0.299R + 0.587G + 0.114B

It is the same formula used in the conversion of RGB to YIQ, and YCbCr. According to this, red contributes approximately 30%, green 59% and blue 11%. Another common techniques is to converting RGB to a form of luminance using an equation like Rec 709 (ITU-BT.709), which is used on contemporary monitors.

Y = 0.2126R + 0.7152G + 0.0722B 

Note that while it may seem strange to use encodings developed for TV signals, they are optimized for linear RGB values. In some situations however, such as sRGB, the components are nonlinear.

Colour space components

Instead of using a weighted sum, it is also possible to use the “intensity” component of an alternate colour space, such as the value from HSV, brightness from HSB, or Luminance from the Lab colour space. This again involves converting from RGB to another colour space. This is the process most commonly used when there is some form of manipulation to be performed on a colour image via its grayscale component, e.g. luminance stretching.

Huelessness and desaturation ≠ gray

An RGB image is hueless, or gray, when the RGB components of each pixel are the same, i.e. R=G=B. Technically, rather than a grayscale image, this is a hueless colour image.

One of the simplest ways of removing colour from an image is desaturation. This effectively means that a colour image is converted to a colour space such as HSB (Hue-Saturation-Brightness), where the saturation value is effectively set to zero for all pixels. This pushes the hues towards gray. Setting it to zero is the similar to extracting the brightness component of the image. In many image manipulation apps, desaturation creates an image that appears to be grayscale, but it is not (it is still stored as an RGB image with R=G=B).


Ultimately the particular monochrome filter used by a camera strongly depends on the colour being absorbed by the photosites, because they do not work in monochrome space. In addition certain camera simulation recipes for monochrome digital images manipulate the grayscale image produced in some manner, e.g. increase contrast.

Should you buy a superfast lens?

A superfast lens, is one with a very large aperture, say f/1.2 to f/1.0 (whereas an ultrafast is typically sub-f/1.0). The craze for super-fast lenses began in Japan in the 1950s, with the Zunow 50mm f/1.1 appearing in 1953. There was a lull in the latter decades of the 20th century, but the last ten years has seen a resurgence of these uber-fast f/1.2 and larger aperture lenses. There is always a lot of hype about these lenses – they are expensive, and supposedly offer some sort of nirvanic photographic experience. The question is, should you spend the money to indulge in super-fastness? First let’s look at some aspects of super-fast lenses that make them attractive.

Do you need a superfast lens” ?

The faster the lens is, the more light it lets in

The larger the aperture, the more light that is let into the lens, and in photography, light is good. Moving from a f/1.8 to a f/1.2 lens provides 1.17 stops more light (where one stop doubles the light). For example a 50mm lens with a speed of f/1.8 has an effective aperture of 606mm2. Another 50mm lens with a speed of f/1.2 has an effective aperture of 1363mm2.

If we consider shooting at f/1.8 versus f/1.2, the larger aperture will mean the ability to shoot at faster shutter speeds – if we assume a constant ISO, then increasing the aperture by 1.17 stops means the difference between shooting at 1/500 at f/1.8 and 1/1250 at f/1.2. The second thing is that assuming the shutter speed is fixed, you can shoot at a lower ISO setting – e.g. at a shutter speed of 1/500 it means it means an ISO difference between 400 and 160. However modern sensors work really well at high ISO settings, so perhaps the advantage of a fast lens isn’t as critical?

Faster lenses produce better aesthetics

If it’s one thing that large aperture lenses are good at, it’s aesthetics. This is because the lower the f-number, the shallower the depth of field (DOF). Shallow DOF means a blurrier background, and theoretically better bokeh. However bokeh is a natural phenomena, and relies on the optical nature of the lens, the scene, the type of light, and distance to subject. In addition, a shallow DOF also means less of the image is in focus. It’s a double-edged sword.

Not all that glitters is gold

Of course super-fast lenses are not perfect. They have three things going against them – they are large, heavy, and expensive. They are large and heavy because of the increased amount of glass, and in auto-focus lenses, a larger focusing mechanism is required to deal with the extra glass. I have talked previously about why vintage super-fast lenses were so expensive, and in reality the same basic reasons can be attributed to super-fast digital lenses. For example the Fujifilm XF 50mm f/1.0 R WR lens sells for C$2,000, and is a whopping 845g in weight, almost dwarfing any Fuji camera it is attached to. The other issue with super-fast lenses has always been that they aren’t really that sharp until they are stopped down somewhat. The Fuji 50mm f/1.0 reviews well, but even then some reviewers note that it isn’t that sharp until stopped down to f/2.8 or smaller. But reviews are subjective, and so you really have to test the lens to see if it fits your needs.

Brand or third-party lens?

There is also the dilemma of which super/ultra fast lens to buy. There are a lot of 3rd-party lens manufacturers that produce these lenses at a reasonable cost. I mean you can buy the Meike 50mm f/0.95 for about C$400, or the TTArtisan 50mm f/1.2 for about C$140. The Meike actually gets really good reviews. The reality is that 3rd-party lenses offer a good quality for the price, even better than could be found on the vintage market. Of course the Fuji 50mm f/1.0 is in a class of its own, offering autofocus for a f/1.0 (most lenses of this speed are manual focus), and exceptional bokeh.

So should you buy a super-fast lens? Well, perhaps it boils down to whether you really need more light? This may mean you shoot a lot in low-light conditions, or in a case of the Fuji 50mm f/1.0, a superlative lens for portraiture. For a further foray into these lenses, check out “Are modern ultrafast lenses useful?“.

✿ The number of stops difference between two apertures A and B can be calculated by first finding C=A/B. The number of stops difference is then log(C)/log(sqrt(2)). So the difference between f/1.8 and f/1.2 is 1.17 stops.

Why are superfast aperture lenses so big?

A 50mm lens is always a 50mm right? They are in terms of focal length, but shouldn’t they all have similar dimensions? So why are lenses with super/ultra-wide apertures sometimes so much larger, and hence so much more expensive?

If there has been one notable change in the evolution of lenses, it has been the gradual move towards larger (faster) apertures. The craze for superfast lenses began in Japan in the 1950s, with Fujinon introducing the first f/1.2 5cm lens in 1954. After the initial fervour, it seems like the need for these lenses with large apertures disappeared, only reappearing in the past decade while at the same time moving into the realm of sub-f/1 ultrafasts. There are many advantages to ultra wide aperture lenses, but basically fast lenses let in a lot of light, and more light is good. The simple reason why bigger aperture equals bigger lens is more often than not to do with the need for more glass. It was no different with historical superfast lenses. The Canon 50mm f/0.95 which debuted in 1961 was 605g.

A comparison of the two Fujifilm 50mm lenses – f/1.0 versus f/2.0 showing the physical differences

Lenses are designed with the maximum aperture in mind. For example, a 50mm f/2.8 lens only needs an aperture with a maximum opening of 17.8mm (50/2.8), however a 50mm f/1.4 will need a maximum aperture opening of 35.7mm (note that these apertures are based on the diameter of the entrance pupil). For example consider the following two Fujifilm 50mm lenses – the “average” f/2.0 and the 2-stop faster f/1.0:

  • Fujifilm XF 50mm f/1.0 R WR – 845g, L103.5mm, ⌀87mm, 12/9 elements
  • Fujifilm XD 50mm f/2.0 R WR – 200g, L59mm, ⌀60mm, 9/6 elements

The f/1.0 is over four times as heavy as the f/2.0, and almost double the length. To get an f/2.0 on a 50mm lens you only need a 25mm aperture opening, however with a f/1.0 lens, you theoretically need a 50mm opening (aperture of the entrance pupil). Now some basic math of the surface area (SA) of an aperture circle will provide a SA of 491mm2 for the f/2.0, but a whopping 1963mm2 for the f/1.0, so roughly four times as much area which allows light to pass through fully open. Equating this to glass probably means that at least four times as much glass is needed for some of the elements in the f/1.0 lens. There is no way around this – large apertures need large glass. As the aperture of a lens increases, all of the lenses have to be scaled up to achieve the desired optical outcome.

The massive scale of the Fujifilm XF 50mm on a camera (the X-T5). The lens has a diameter of 87mm, and the inner opening of the mount is only 44mm.

Larger aperture lenses also have more specialized glass in them, like with aspheric and low dispersion elements. But companies don’t just add more glass to make money – complex designs are supposed to overcome many of the limitations that are present in ultra-wide aperture lenses. Unlike their historical predecessors, modern superfast lenses have overcome many of the earlier lens deficiencies. For example in vintage superfast lenses, the lens wide-open was never as sharp as could be expected. Newer lens on the other hand are just as sharp wide open as they are stopped down to a smaller aperture.

Now not all super/ultra-wide aperture lenses are heavy and large. There are a number of 3rd-party lenses that are quite the opposite – reasonable size, and not too heavy (and invariably cheaper). But there is no such thing as a free lunch – there is always some sort of trade-off between price, size and optical quality. For example the Meike 50mm f/0.95 is only 420g, and it’s lens configuration is 7 elements in 5 groups. However fully open it is said to exhibit a good amount of chromatic aberration, some barrel distortion, and some vignetting. There is no perfect lens (but the Fuji f/1.0 comes pretty close).

✿ A fast lens is one with a wide maximum aperture. Superfast lenses are typically f/1.0-1.2, and ultrafast lenses are sub-f/1.0.

Further reading:

From photosites to pixels (iv) – the demosaicing process

The funny thing about the photosites on a sensor is that they are mostly designed to pick up one colour, due to the specific colour filter associated with with photosite. Therefore a normal sensor does not have photosites which contain full RGB information.

To create an image from a photosite matrix it is first necessary to perform a task called demosaicing (or demosaiking, or debayering). Demosaicing separates the red, green, and blue elements of the Bayer image into three distinct R, G, and B components. Note a colouring filtering mechanism other than Bayer may be used. The problem is that each of these layers is sparse – the green layer contains 50% green pixels, and the remainder are empty. The red and blue layers only contain 25% of red and blue pixels respectively. Values for the empty pixels are then determined using some form of interpolation algorithm. The result is an RGB image containing three layers representing red, green and blue components for each pixel in the image.

A basic demosaicing process

There are a myriad of differing interpolation algorithms, some which may be specific to certain manufacturers (and potentially proprietary). Some are quite simple, such as bilinear interpolation, while others like bicubic interpolation, spline interpolation, and Lanczos resampling are more complex. These methods produce reasonable results in homogeneous regions of an image, but can be susceptible to artifacts near edges. This leads to more sophisticated algorithms such as Adaptive Homogeneity-Directed, and Aliasing Minimization and Zipper Elimination (AMaZE).

An example of bilinear interpolation is shown in the figure below (note that no cameras actually use bilinear interpolation for demosaicing, but it offers a simple example to show what happens). For example extracting the red component from the photosite matrix leaves a lot of pixels with no red information. These empty reds are interpolated from existing red information in the following manner: where there was previously a green pixel, red is interpolated as the average of the two neighbouring red pixels; and where there was previously a blue pixel, red is interpolated as the average of the four (diagonal) neighbouring red pixels. This way the “empty” pixels in the red layer are interpolated. In the green layer every empty pixel is simply the average of the neighbouring four green pixels. The blue layer is similar to the red layer.

One of the simplest interpolation algorithms, bilinear interpolation.

❂ The only camera sensors that don’t use this principle are the Foveon-type sensors which have three separate layers of photodetectors (R,G,B). So stacked the sensor creates a full-colour pixel when processed, without the need for demosaicing. Sigma has been working on a full-frame Foveon sensor for years, but there are a number of issues still to be dealt with including colour accuracy.

What is a mirrorless camera?

It is a camera without a mirror of course!
Next you’ll ask why a camera would ever need a mirror.

Over the last few years we have seen an increased use of the term “mirrorless” to describe cameras. But what does that mean? Well, 35mm SLR (Single Lens Reflex) film cameras all contained a reflex mirror. The mirror basically redirects the light (i.e. view) coming through the lens to the film by means of a pentaprism, to the optical viewfinder (OVF) – which is then viewed by the photographer. Without it, the photographer would have to view the scene by means of an offset window (like in a rangefinder camera, which were technically mirrorless). This basically means that the photographer sees what the lens sees. When the photographer presses the shutter-release button, the mirror swings out of the way, temporarily blocking the light from passing through the viewfinder, and instead allowing the light to pass through the opened shutter onto the film. This is depicted visually in Figure 1.

Fig.1: A cross-section of a 35mm SLR camera showing the mirror and optical viewfinder (OVF)

When DSLR (Digital Single Lens Reflex) cameras appeared they used similar technology. The problem is that this mirror, together with the digital electronics, meant that the cameras became larger than traditional film SLRs. The concept of mirrorless cameras appeared in 2008, with the introduction of the Micro-Four-Thirds system. The first mirrorless interchangeable lens camera was the Panasonic Lumix DMC-G1. It replaced the optical path of the OVF with an electronic viewfinder (EVF), making it possible to remove the mirror completely, hence reducing the size of cameras. The EVF shows the image that the sensor outputs, displaying the output on a small LCD or OLED screen.

Fig.2: DSLR versus a mirrorless camera. In the DLSR the light path to the OVF by means of the mirror is shown in blue. When the shutter-release button is pressed, the mirror retracts (pink mirror), and the light is allowed to pass through to the sensor (pink path).

As a result of nixing the mirror, mirrorless cameras are typically have fewer moving parts, and are slimmer than DSLRs, shortening the distance between the lens and the sensor. The loss of the mirror also means that it is easier to adapt vintage lenses for use on digital cameras. Some people still prefer using an OVF, because it is optical, and does not require as much battery-life as an EVF.

These days the only cameras still containing mirrors are usually full-frame DSLRs, and they are slowly disappearing, replaced by mirrorless cameras. Basically all recent crop-sensor cameras are mirrorless. DSLR sales continue to decline. Looking only at interchangeable lens cameras (ILC), according to CIPA, mirrorless cameras in 2022 made up 68.7% of all ILD units (4.07M versus 1.85M), and 85.8% of shipped value (out of 5.927 million units shipped).