Trying to choose between a zoom and a prime lens can be challenging, mainly because they probably shouldn’t be compared in the first place. Basically they offer different outcomes. A prime is almost a lens specialized for a particular task, whereas a zoom can be more of a “jack-of-all-trades”. There are also different types of each of these lenses. There are expensive fast primes, and less-expensive primes with a slower maximum aperture. There are also native primes from the camera manufacturer, and third-party primes. The same criteria can be applied to zoom lenses. Table 1 summarizes some of the key differences between prime and zoom lenses.
characteristic
prime
zoom
price
+ simple build, less expensive
− complex build, more expensive
aperture
+ brighter, wider aperture (faster) e.g. f/1.2 to f/2
− darker, narrower aperture (slower)
sharpness
+ sharper images, fewer optical deficiencies
− less sharpness, some distortion
versatility
− less versatile
+ more versatile
size and weight
+ lighter and more compact − have to carry more lenses
− bulkier and heavier + need to carry fewer lenses
Table 1: Key differences between prime and zoom
A zoom provides a level of flexibility that a prime does not, but this comes with some trade-offs. The first thing a zoom lens typically gives up is speed, i.e. how wide the aperture opens up. Prime lenses on the other hand are fast, and some are super-fast. Note that prime lenses are nearly always smaller and lighter than zooms. Many things influence the size and weight of a lens including whether it is a pro-grade lens (often contain more glass), or whether it has a large maximum aperture (again requiring a bigger lens with more glass). Every lens has its pros and cons.
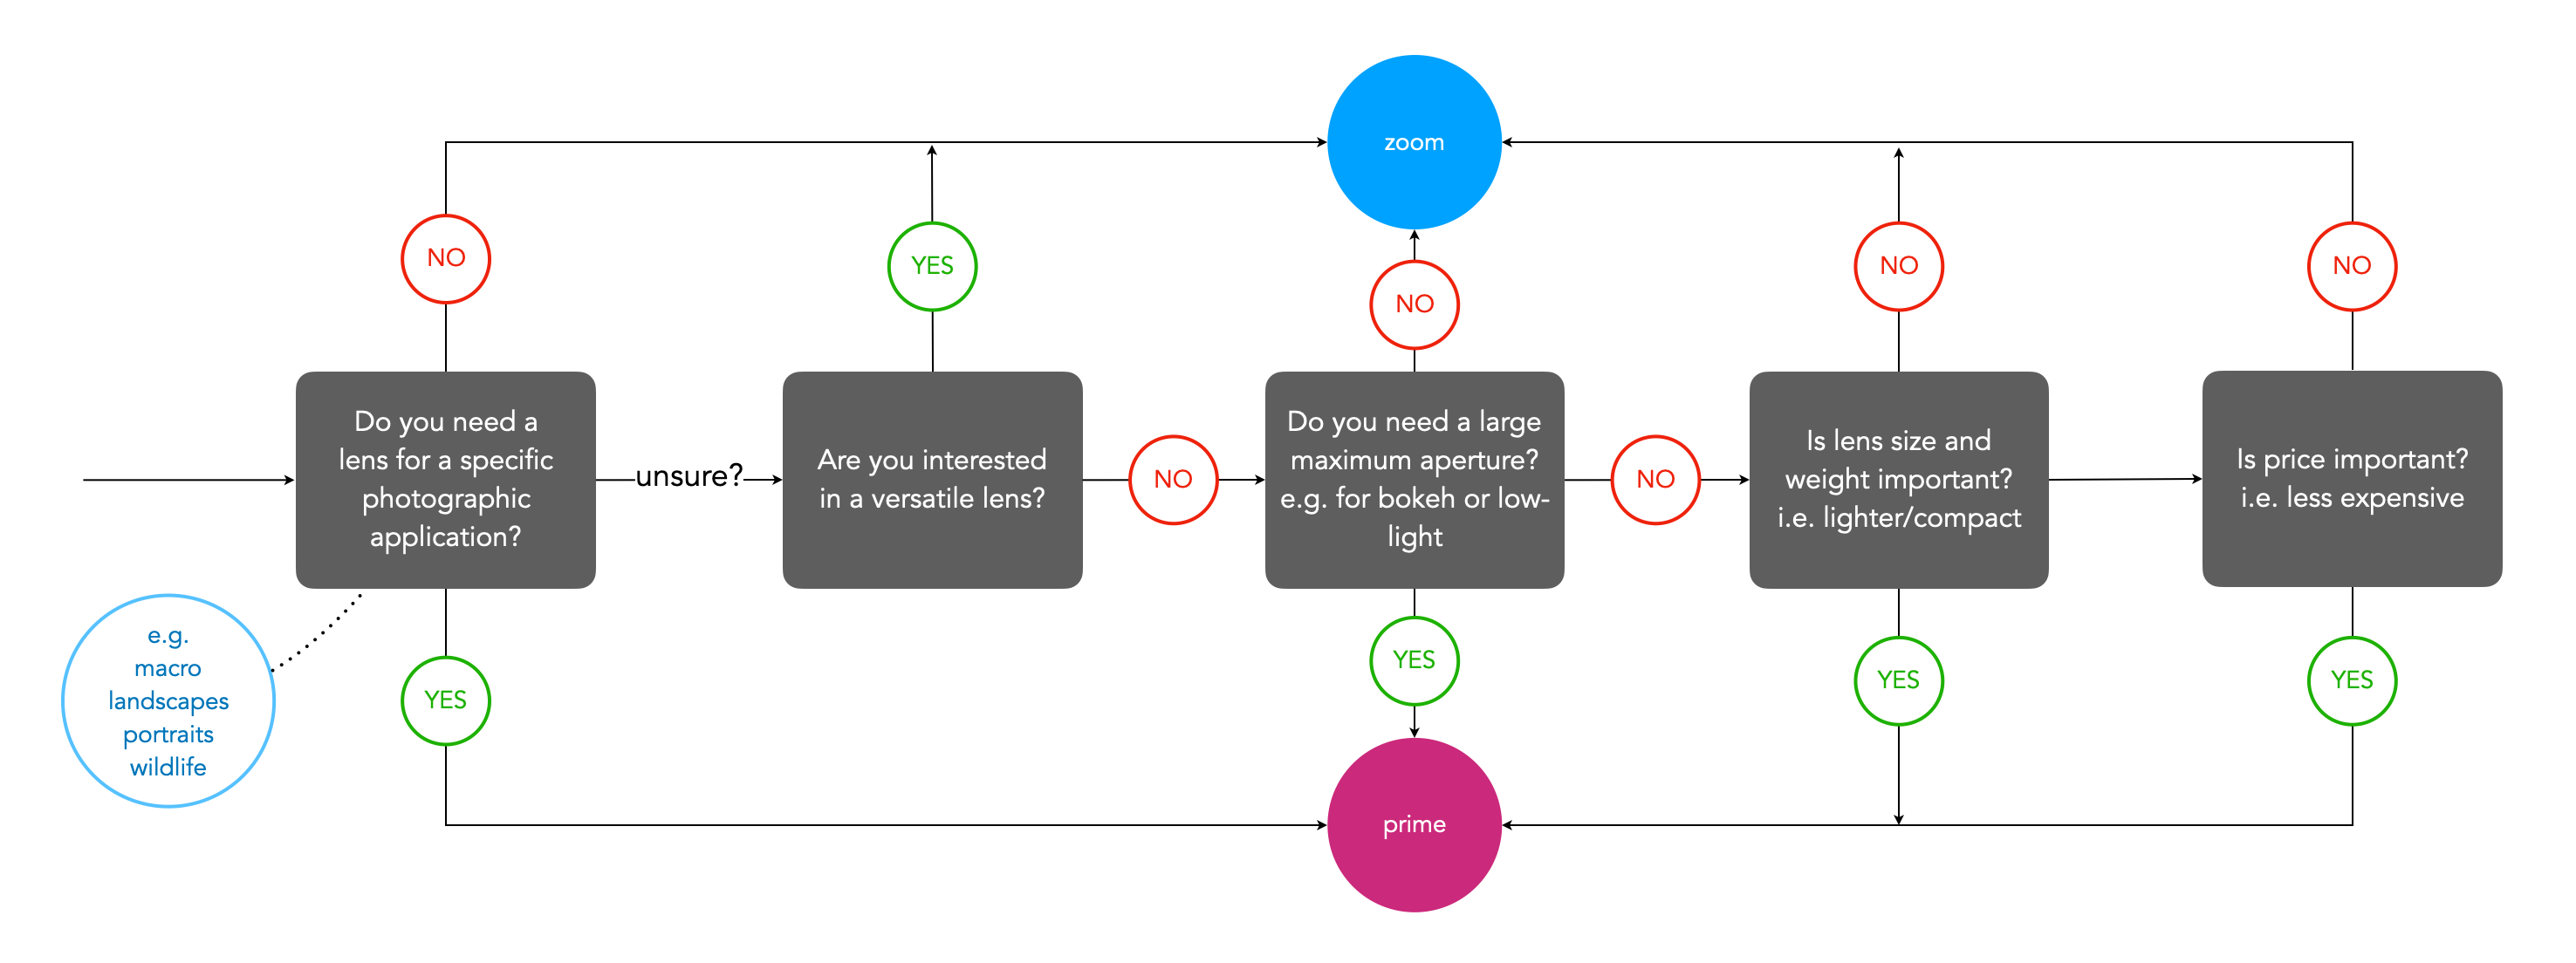
Fig.1: A very basic schema for choosing a prime or zoom lens
Despite the fact that prime lenses are often lauded for their specific nature, i.e. suited to one particular task, zoom lenses can also be categorized in this manner. For example someone might choose a 17-28mm full-frame lens for landscapes, providing some scope. In addition, although a good zoom lens may be more expensive than a prime, more prime lenses may be needed to equal the range of coverage, thereby leading to more cost. There are also some lenses that don’t work very well as a zoom, e.g. fish-eye lenses.
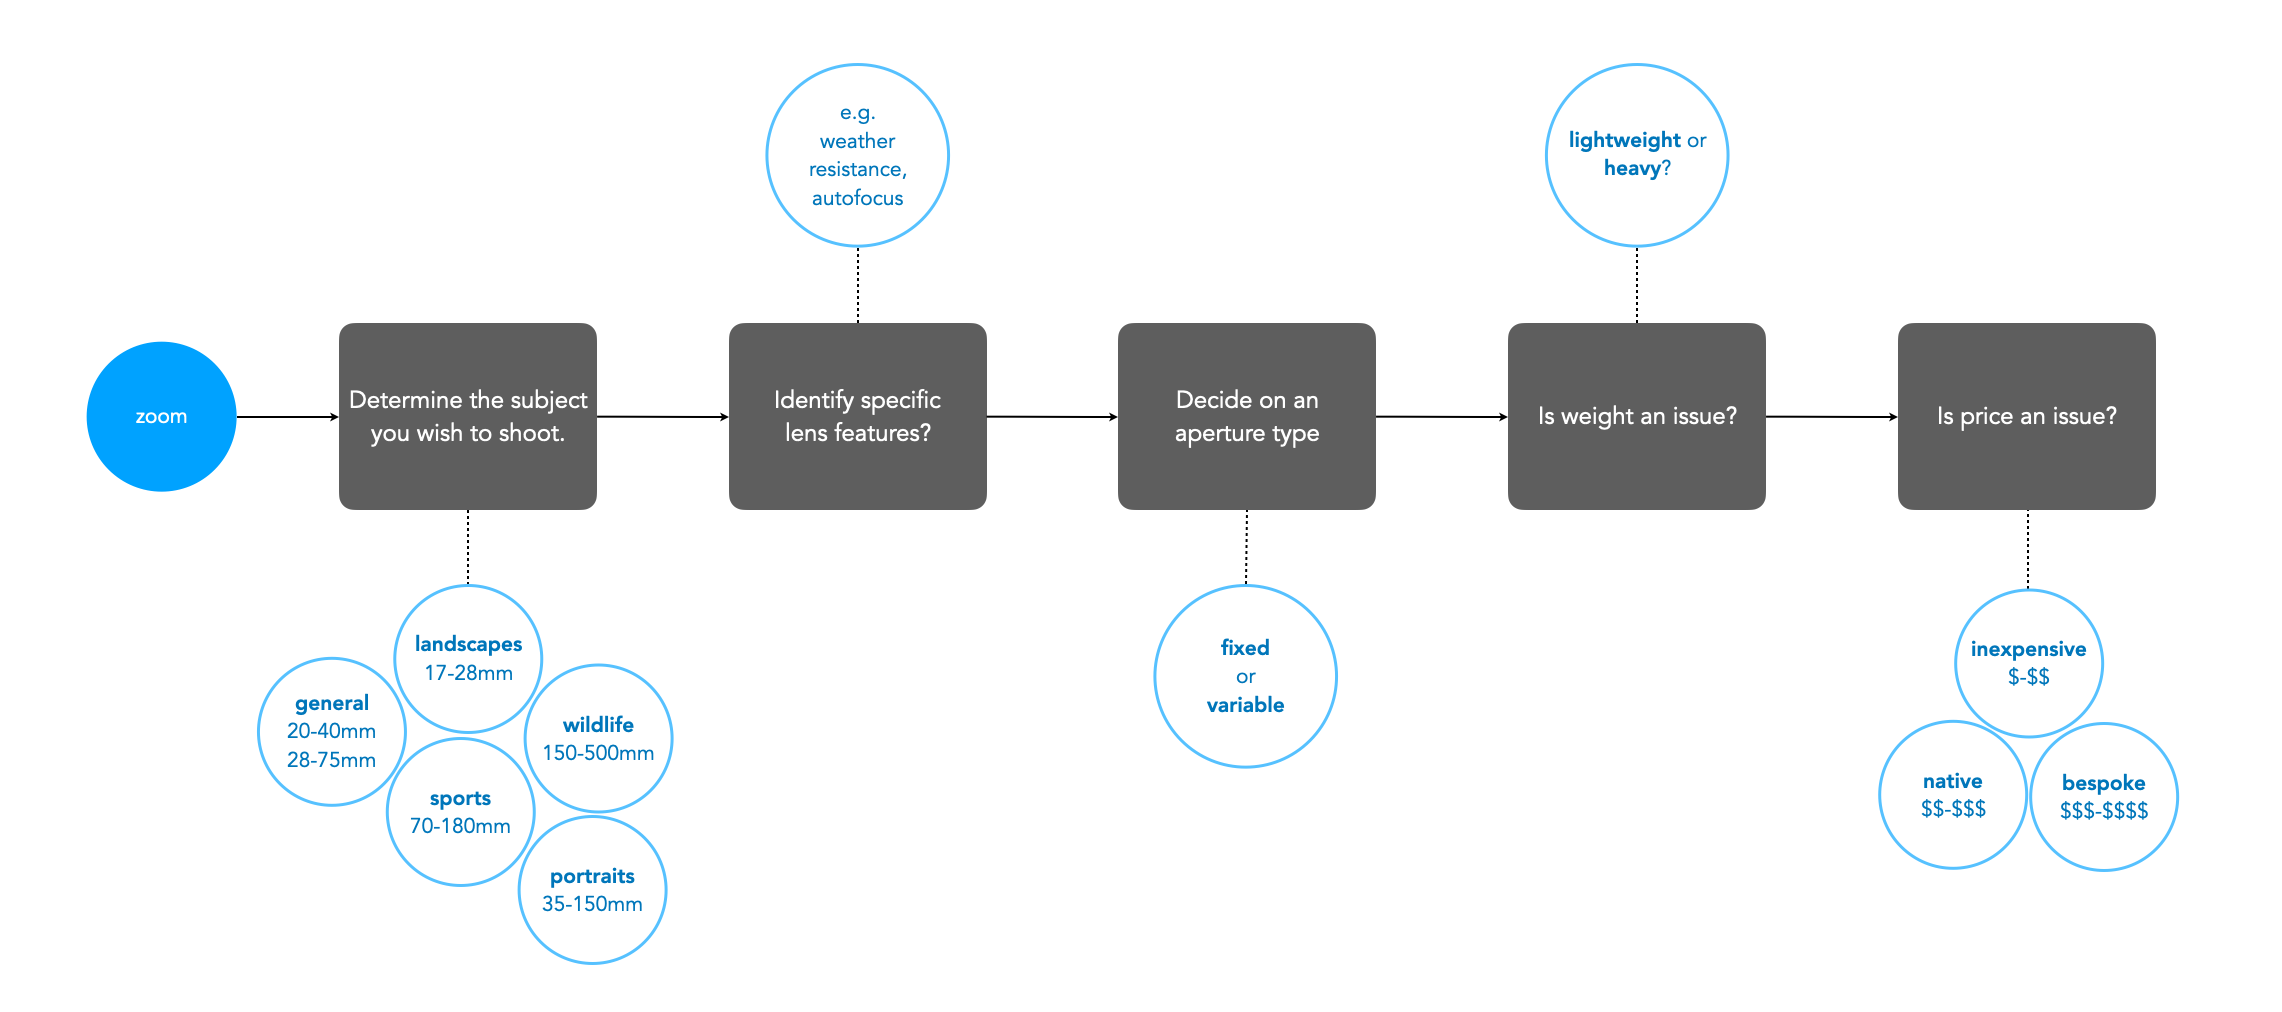
When selecting a prime lens it is often the case of deciding on an application, and then which lens meets all the criteria. For example, a trip to Iceland may warrant a wide-angle lens that is weatherproof (because the weather can change every 5 minutes in Iceland) − in this case something like a 24mm ultra-wide would be optimal. Alternatively, some photographers might opt for even a wider lens, e.g. 16/18mm due to the ‘largeness’ of the landscape. Choosing a zoom lens on the other hand can be a little more challenging. This is because there are often a variety of options. For example, choosing a 50mm prime means you get a 50mm lens, with perhaps the only variability being the speed (maximum aperture) of the lens. But there may be more than one option for choosing a particular zoom lens. Figure 2 shows a flowchart which considers some of the main factors to consider when choosing a zoom lens.
Fig.2: Factors to consider when choosing a zoom lens
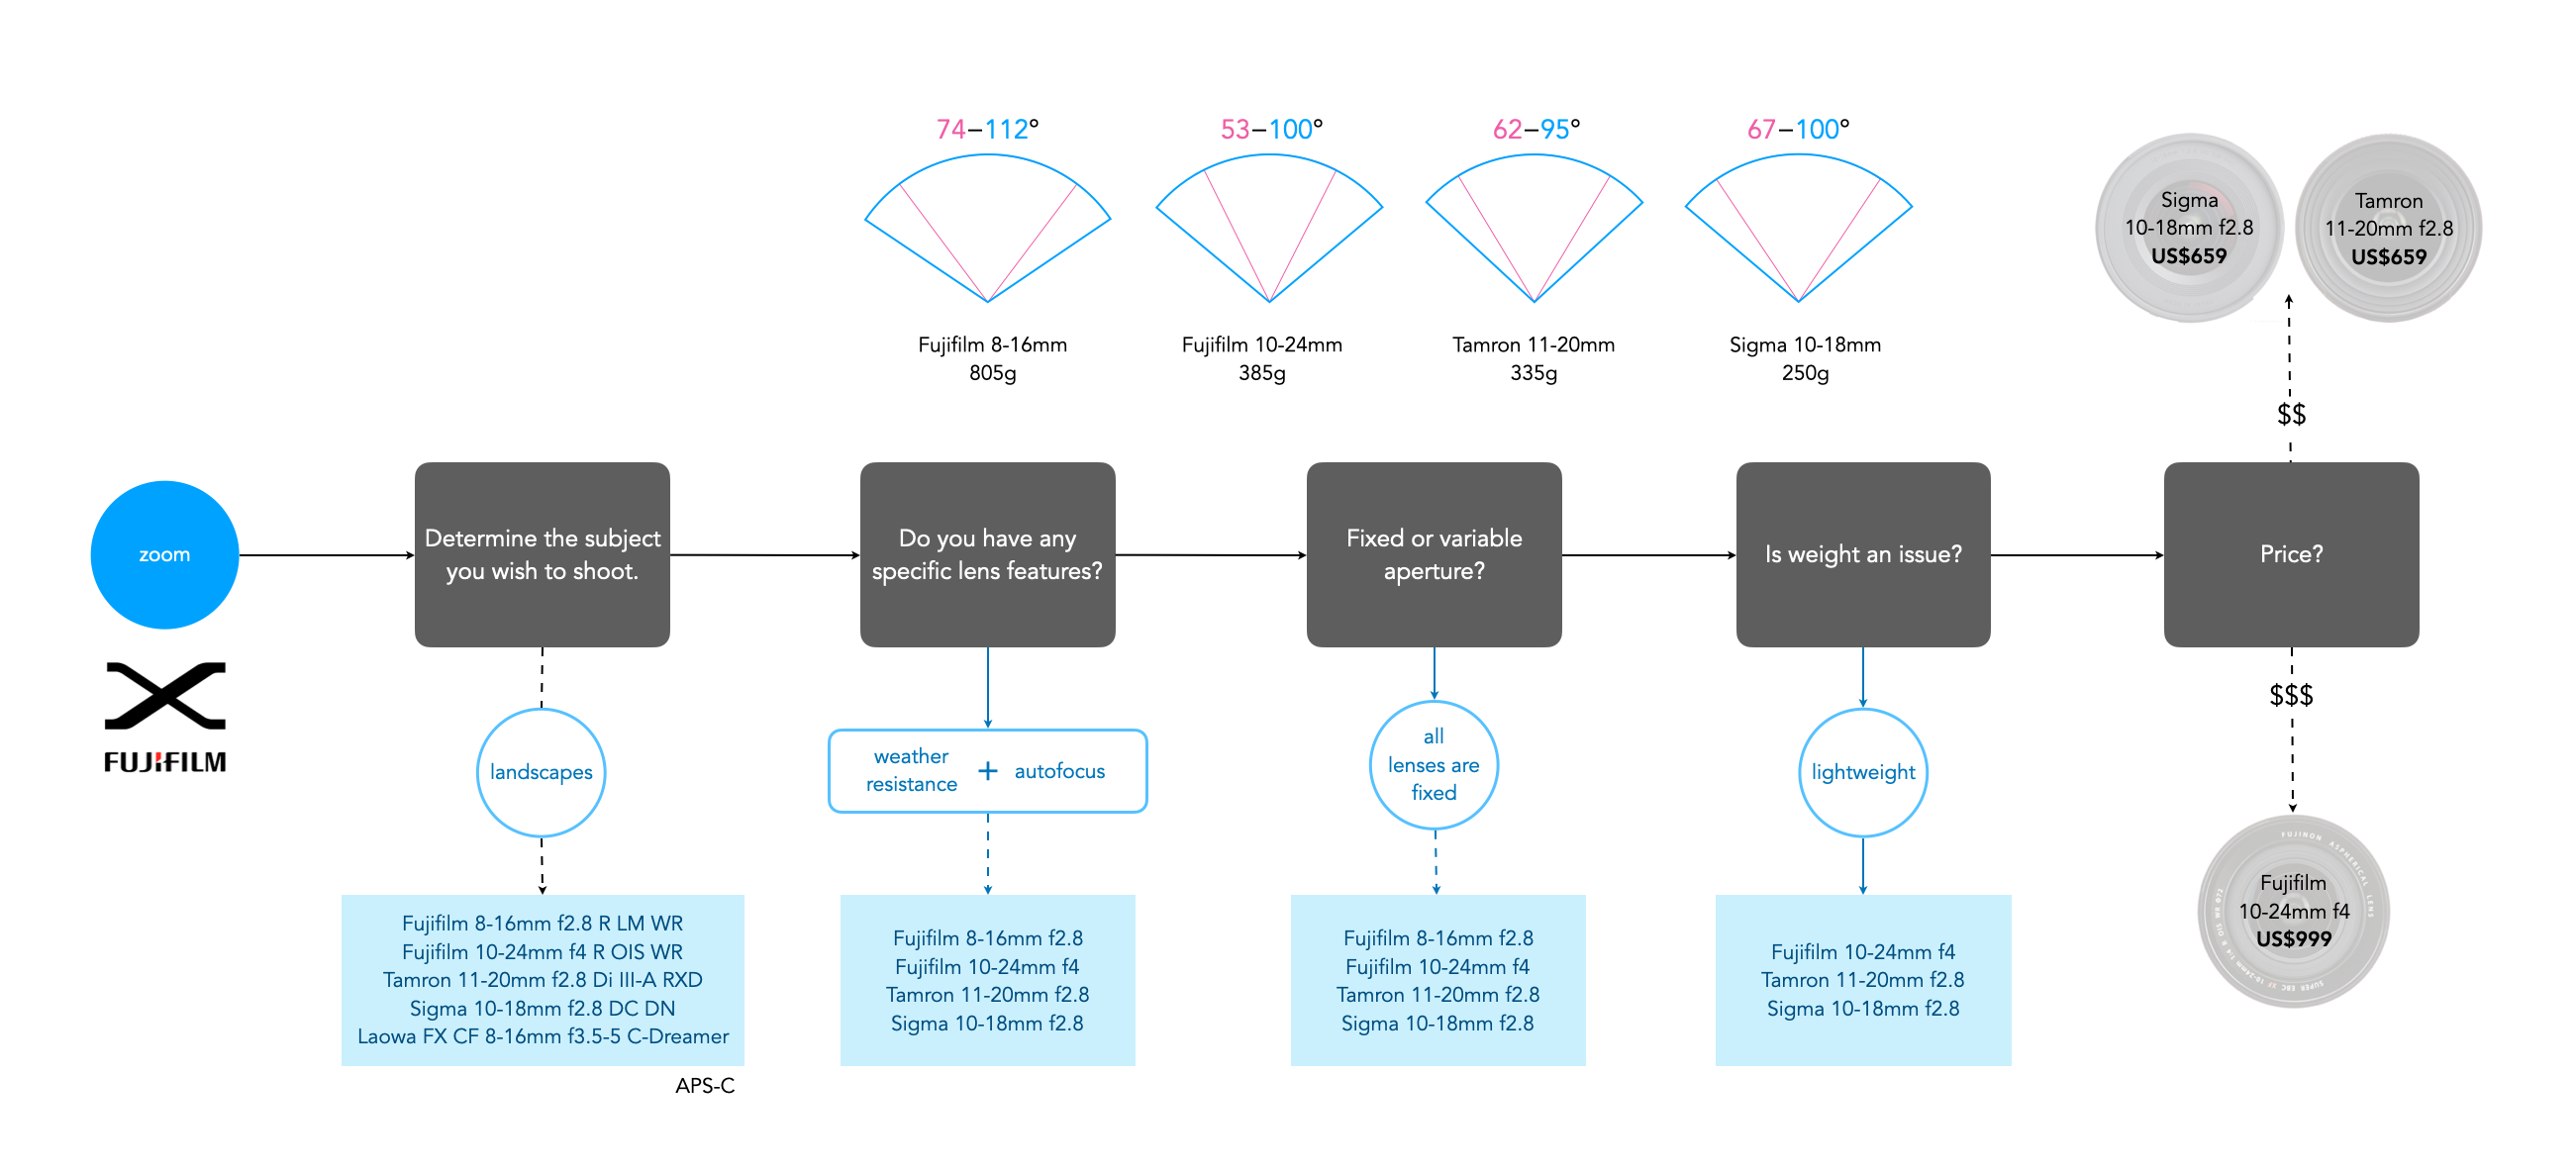
Figure 3 shows an example of choosing a wide zoom lens for a Fuji-X camera (APS-C), using the above factors. There isn’t that much difference between the lenses with respect to AOV (angle-of-view), but as each factor is considered, more lenses are filtered out. At the end only three of the five lenses satisfy the criteria considered, and then it comes down to price. If we were choosing this for the trip to Iceland then we might want the greatest flexibility in focal lengths, for example the Fujifilm 10-24mm (FF equivalent 15-36mm). If maximum aperture is an issue, then either the Tamron or Sigma are fine alternatives.
Fig.3: An example of choosing a Fuji (wide) zoom lens for landscape
There are some situations where one lens is just enough. Mountain enthusiast Jakub Cejpek talks about using the Fujifilm XF10-24mm/F4 on a mountain trek. He chose mirrorless for its ‘lightweight style’, and the 10-24mm lens for its versatility, knowing that changing lenses in impossible, ‘time is rare, and weather conditions are tough’.
One of the biggest dilemmas for novice photographers when choosing a digital lens is whether you buy a prime or a zoom? This is an age old debate, probably dating back to the 1970s when zoom lenses started to make real inroads into the SLR lens market. Back then zoom lenses were at a major disadvantage from a quality perspective, but over time they have improved in quality, and proliferated in quantity. Here we look at the major differences between the two.
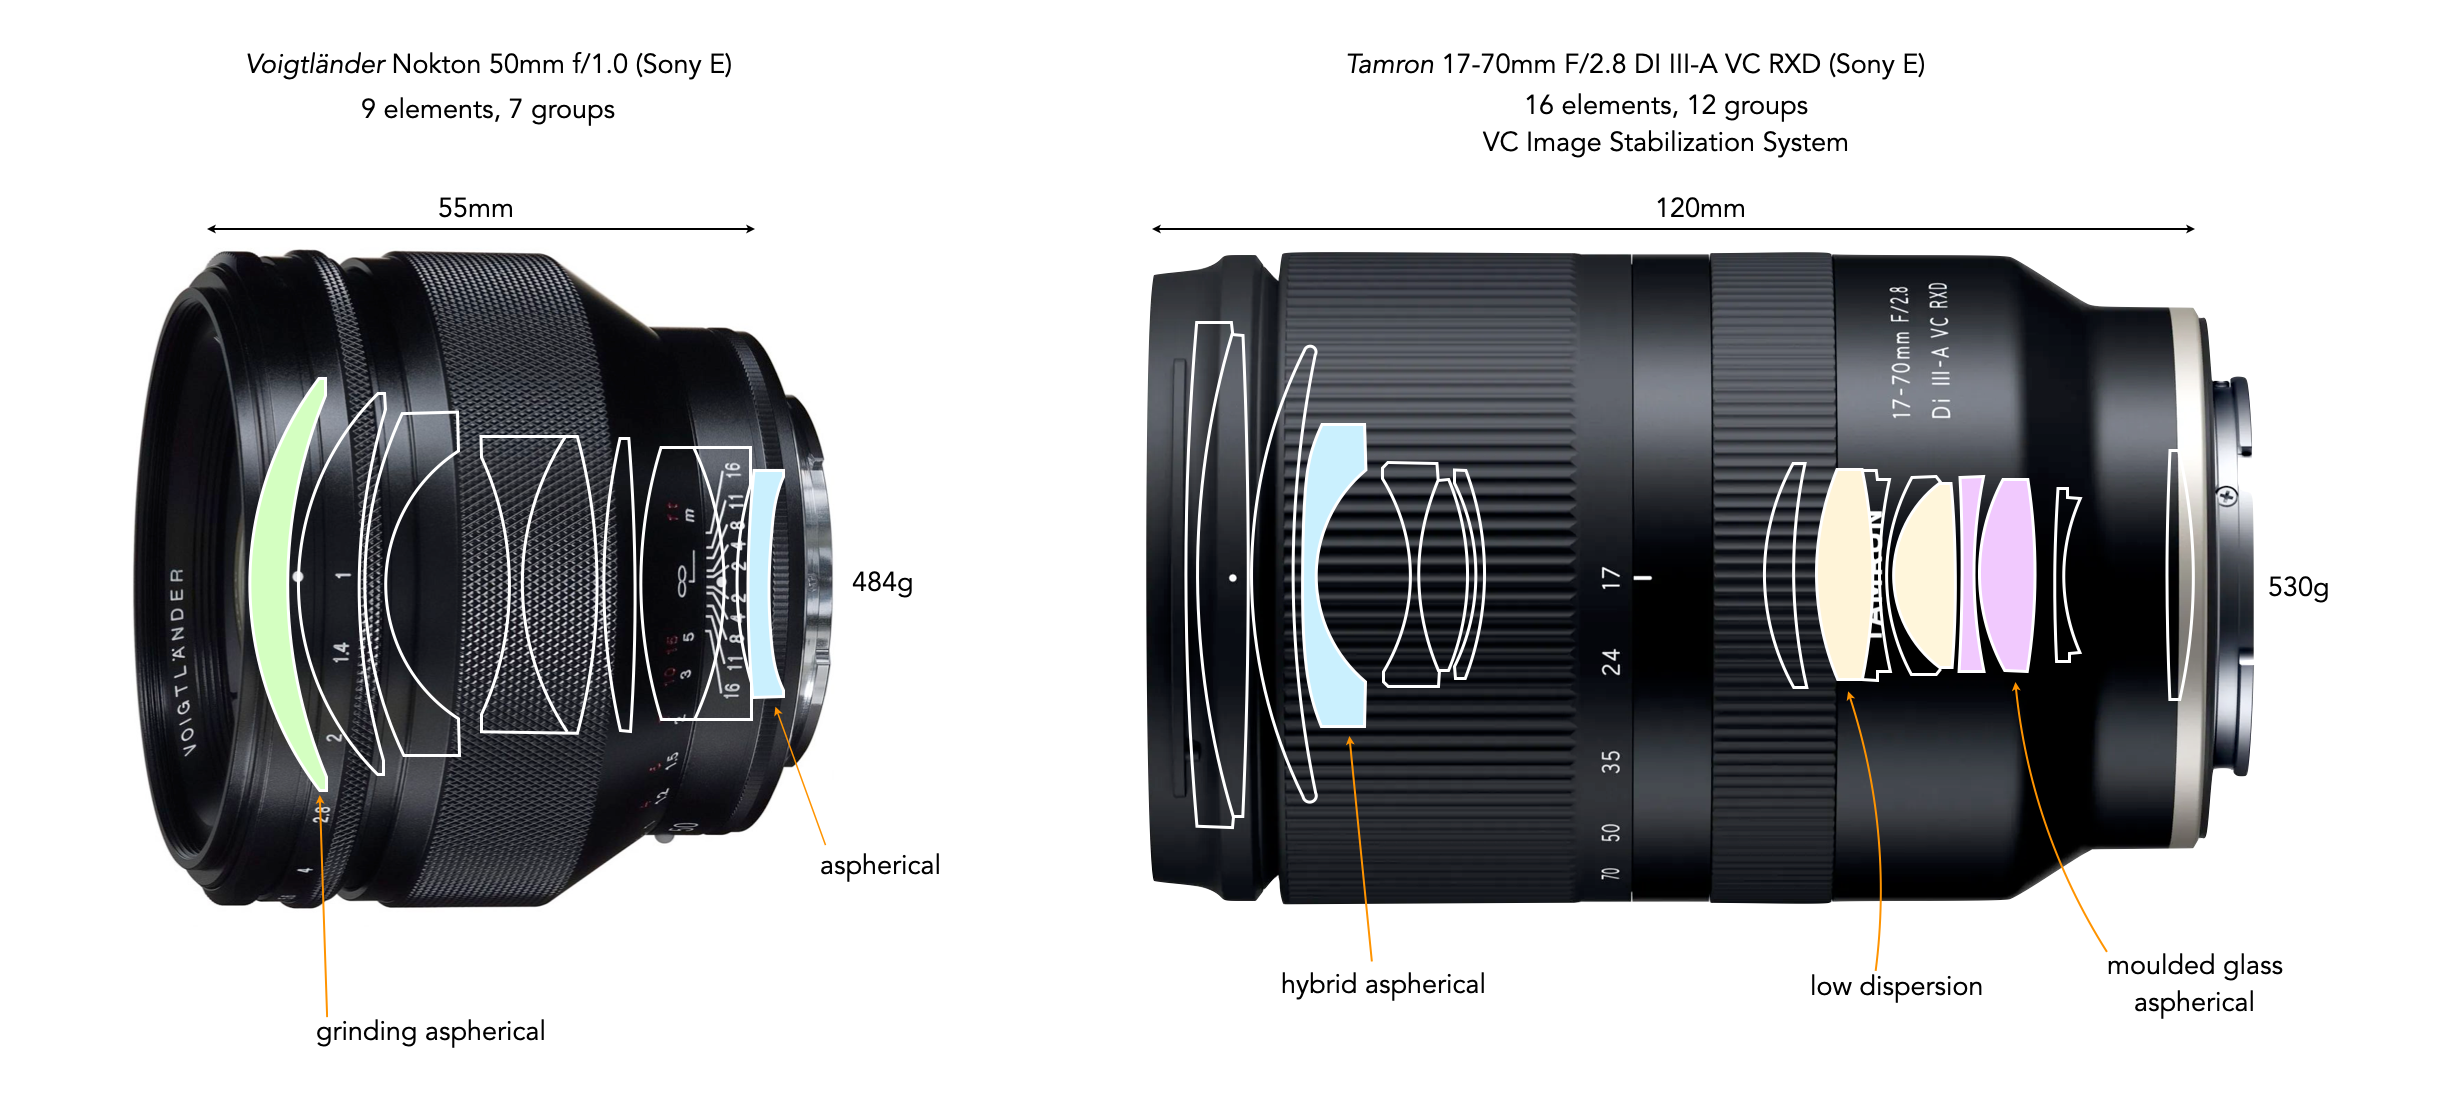
Fig.1: A comparison of a modern prime (50mm normal) versus a modern zoom lens (wide-to-short telephoto, 17-70mm), both full-frame.
Zoom lenses
A zoom lens is a lens designed with a variable focal length. This allows the lens to be modified to any focal length between the specified range, meaning the angle-of-view (AOV) of the lens will change with the focal length. For example 16-80mm means the lens is widest at 16mm, and at full zoom at 80mm. There are zoom lenses that are narrow in focus, e.g. wide-angle zooms where the zoom range covers wide-angle focal lengths, and there are others that are more broadly scoped, e.g. 17-300mm, covering wide-angle all the way through medium length telephoto. Some zooms have a fixed aperture, i.e. one maximum aperture, others have a variable aperture which changes with the focal length selected, e.g. a 28-60mm f/4-5.6 means that 28mm the aperture is f/4, while at 60mm the aperture is f/5.6.
Many cameras come standard with a kit lens which is typically a zoom. For example Fuji-X (APS-C) often pairs a 15-45mm zoom (f/3.5-5.6), with covers a horizontal AOV of 77.32° to 29.8° − wide angle to low-telephoto to cover from landscapes to portrait shots. Other Fuji cameras are paired with 16-80mm or even 18-120mm. Note that the downside to kit lens, is that they are typically of lower quality.
Pros:
Versatility − Zoom lenses offer a lot of flexibility, allowing the focal length to be changed on-the-fly (so there is no need to swap-out lenses). This makes them ideal for situations where there is a need to quickly adjust the framing.
Convenience − There is no need to carry multiple lenses to cover different focal lengths.
Discretion − A scene can be captured without having to get too close. Using one lens also means it may not be necessary to carry a camera bag.
Portability − A single zoom lens can replace 2-3 prime lenses. This means less weight to tote around, and less lens swapping, so although the zoom may weigh more, it may be less than the sum of primes.
Cons:
Opticalquality − Zooms can sometimes be less sharp than primes because of their complex, variable nature. However the gap between the quality of zooms versus primes is narrowing. An expensive zoom is likely to have better optical quality than a cheap one.
Aperture − Professional zooms have a maximum aperture of around f/2.8, or even f/4, making them less than optimal for low-light situations, i.e. slow.
Price − Zoom lenses can be expensive, because the zoom mechanism and lens configuration can be complex. Kit zooms are cheap, the Fuji-X 15-45mm is around C$325. The Fuji-X 16-80mm is C$880. Wide zooms can be even more expensive with the Fuji 10-24mm going for C$1050.
Weight − Generally quality zooms can be heavier than primes because the lens body is physically larger, and there are more complex mechanisms inside, e.g. auto-focusing motors.
Lens selection − Some platforms do not offer that many zoom lenses. For example there are a lot of third-party lenses in the Fuji-X environment, however most are prime lenses (probably due to the lower cost). Apart from Fuji native zooms, the only real competitors are Sigma and Tamron.
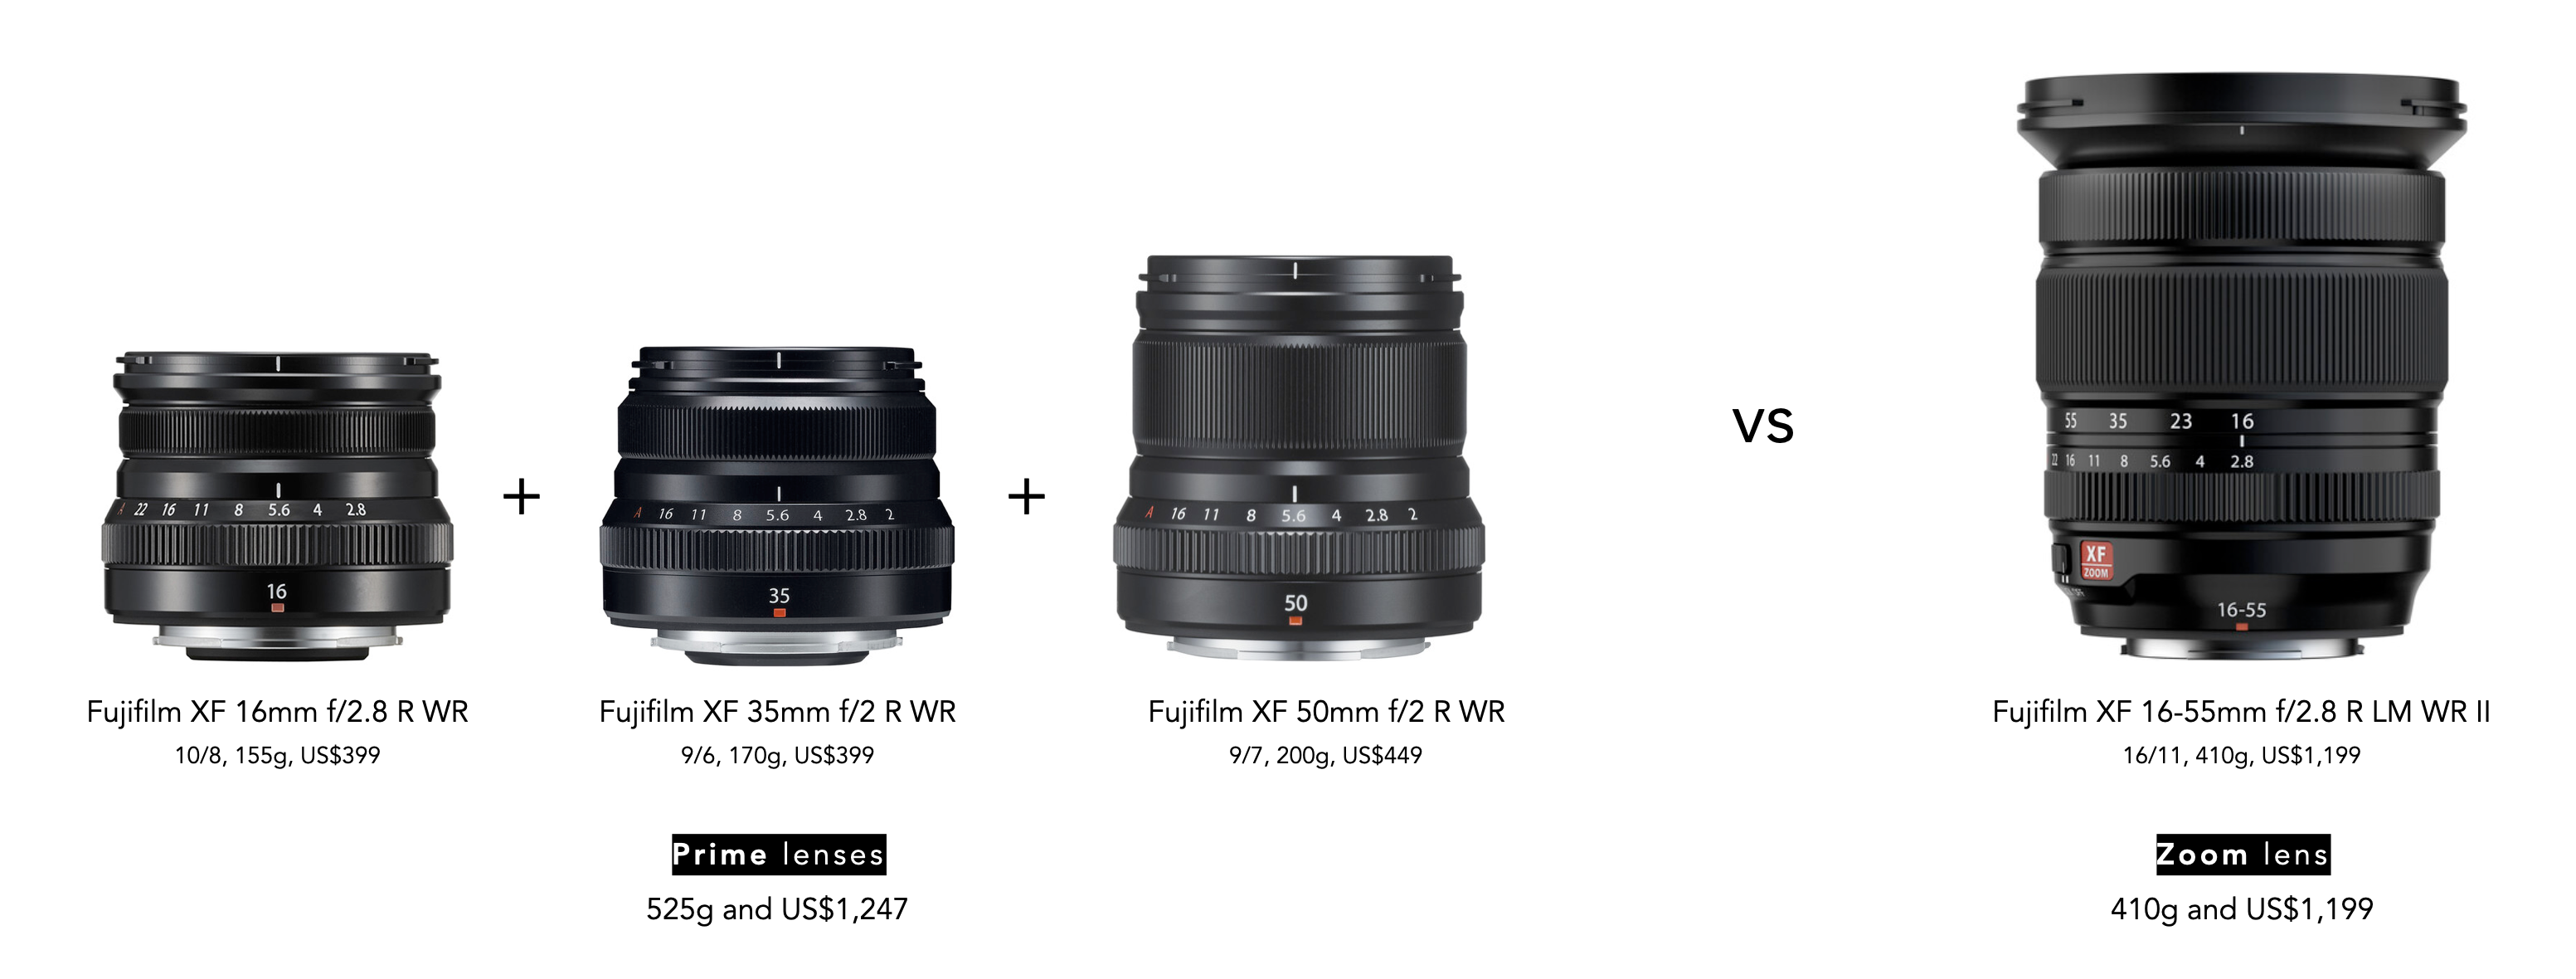
Fig.2: A comparison of a 16-55mm zoom lens with three ‘equivalent’ prime lenses to covert the same range of focal lengths (note that the closest to a 55mm prime is a 56mm f/1.2 which puts it outside the bounds of comparison from the perspective of aperture).
Prime lenses
A prime lens is a lens with a fixed focal length, meaning it cannot change. It has an AOV that is set, so making an object fill more of the frame requires getting closer to the subject. For example a 16mm Fuji-X prime offers a horizontal AOV of 73.74°, no more, no less. So to enlarge a subject and make it fill more of the frame, the camera has to be moved physically closer to it. To make a subject fit a frame, the camera must be moved away. In terms of prime lenses, a wide angle might be 28mm, a normal lens 50mm, and a portrait lens 85mm (full frame). In comparison a 28-85mm zoom lens offers all these focal lengths (and many in between) in a single lens. Prime lenses are typically fast, with maximum apertures of f/1.8, f/1.4 or even f/1.2 (or faster).
Pros:
Opticalquality − Prime lenses are focused on one focal length, and as such often have better optics. This includes having a better depth of field, sharpness, and rendered bokeh. Better optics = better image.
Aperture − Prime lenses are faster than zoom lenses, i.e. they have larger maximum apertures than zooms. They can have apertures as wide as f/0.95, but typically they are between f/1.2 and f/2.8. This makes them better in low-light situations, and helps them produce a shallower depth-of-field. This often negates the need for a flash or high ISOs that can introduce noise.
Focusing speed − Auto-focusing generally works a little faster on prime lenses.
Price − Prime lenses have fewer moving parts and as such can be less expensive. The caveat here are specialty lenses, superfast lenses e.g. f/1.2, and super-telephoto lenses. Prime lenses have the same range of cheap “kit” to expensive high-end lenses, but often it is possible to purchase a good prime for a reasonable cost. Note that superfast lenses can be significantly more expensive than their f/1.8 counterparts.
Compactness/Weight − Many normal prime lenses are generally lighter and more compact than zoom lenses.
Bokeh − Wide apertures provide a shallow depth of field, which makes primes ideal for taking portraits and artistic shots containing the coveted background blur known as bokeh.
Cons:
Limitedversatility − Prime lenses only have one focal length, so it might be necessary to carry more than one lens to cover a gamut of scenarios. Adjusting a composition will require moving towards or away from the subject.
Inconvenience − With prime lenses it may be necessary to carry multiple lenses to cover different focal lengths. This impacts how much needs to be carried in the field.
Discretion − Carrying more than one lens might require changing lenses on-the-fly, because different lenses may be used for different scenes. A camera bag might be a requirement.
Portability − While a zoom lenses can replace a number of prime lenses, working only with primes may require carrying 2-3 lenses with different focal lengths. This means more weight to tote around, and more lens swapping.
Weight − There are circumstances where primes can be heavy, e.g. super-fast lenses often require more glass, which makes them heavier than other primes, and telephoto lenses can be larger and heavier than telephoto zoom lenses.
Choosing between a prime and a zoom lens really depends on photographic priorities, i.e. what is needed in a particular situation. Zoom lenses can be hard to use well for the inexperienced photographer − e.g. they often stay in one position, and zoom to capture everything, versus using a prime lens where you are forced to move in order to gain photographic perspective. Every optical design has its strengths and weaknesses, but as a prime lens is optimized for a single focal length in many cases it has a greater capacity for fewer weaknesses and more strengths. This may include characteristics such as: image quality (contrast, sharpness, distortion, flare control), colour aberrations, lens speed, size and weight, focusing ability, focus shift, etc.
Should you buy a camera with an APS-C sensor, or a full-frame?
This argument has been going on for a number of years now, and still divides the photographic community. Is APS-C better than full-frame, or is it sub-optimal? Well, I think it’s all about perspective. APS-C, along with Micro-Four-Thirds are frequently viewed as mere crop-sensors, a designation that only exists because we perpetuate the falsehood that full-frame offers the “standard” sensor size. This stems from the fact that 36×24mm was the standard film size before digital cameras came along. As digital cameras evolved, “full-frame” became the name for the sensor size that matched a 35mm negative.
However we are at the point in time where each sensor size should be considered on its own merits, (and pitfalls) without unnecessary inference that it is a mere “stepping-stone” to a full-frame. Identifying an APS-C sensor, which has a size of 23.6×15.7mm, as “just a crop” sensor does not give the camera the kudos it deserves. The problem lies in every aspect of how these cameras relate to one another, but manifests itself best in lenses.
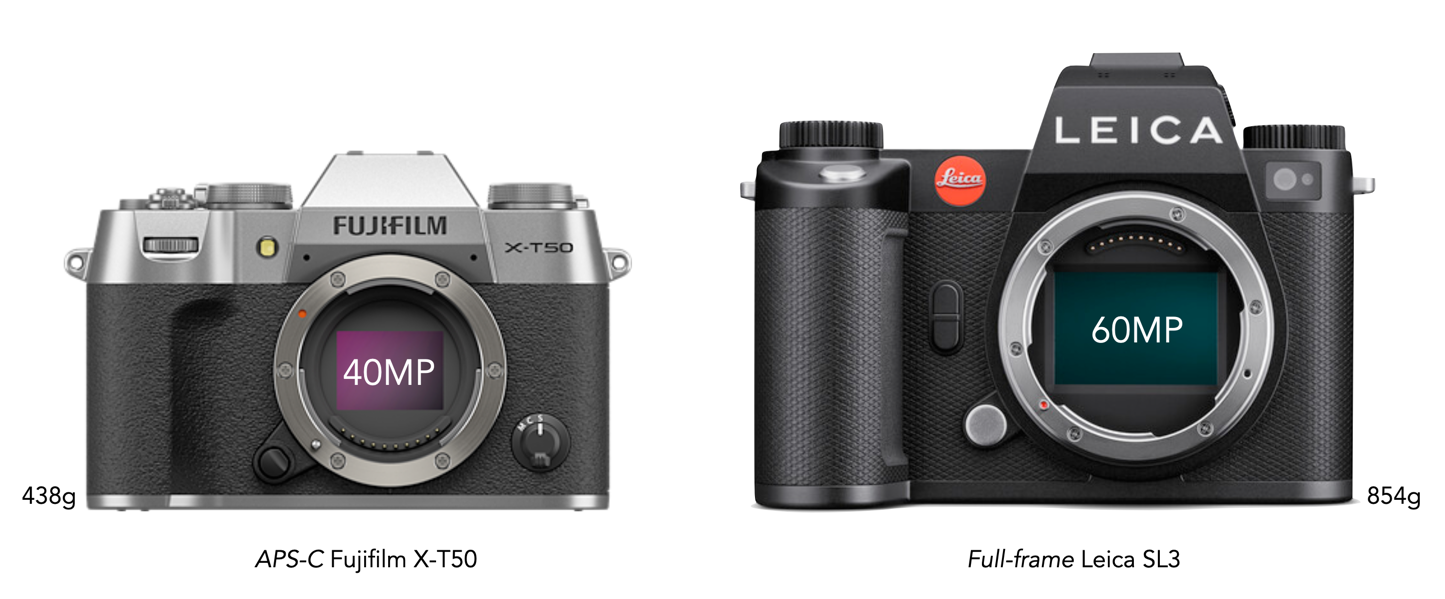
The physical differences between APS-C and full-frame. The full-frame Leica SL3 is nearly twice the weight of the APS-C Fujifilm X-T50, and has a much bigger form factor.
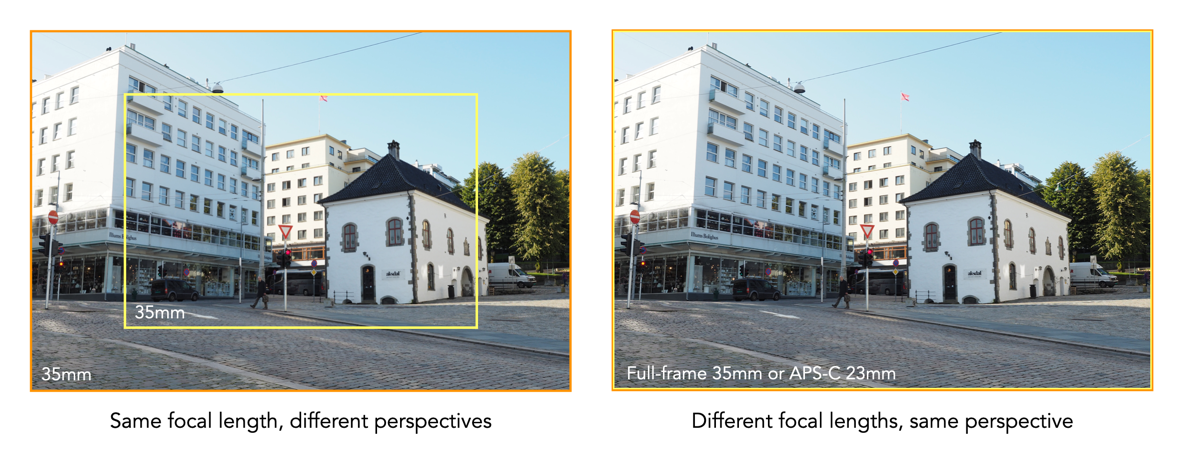
Most APS-C sensors have a crop-factor of 1.5 (except Canon which is 1.6). This means lenses function a little differently than on full-frame lenses. Now a 50mm lens is always 50mm, regardless of the system it is associated with − it’s how that 50mm is interpreted in relation to the sensor that is important. For example a 50mm lens is a “normal” lens for a full-frame camera, while in APS-C land a normal is going to be a lens with a focal length of 33-35mm. A 50mm lens on an APS-C sensor will give a smaller picture than a full-frame, because well obviously the sensor is smaller. So an APS-C 50mm has the same effect as a 75mm lens on a full-frame camera in terms of what is in the picture.
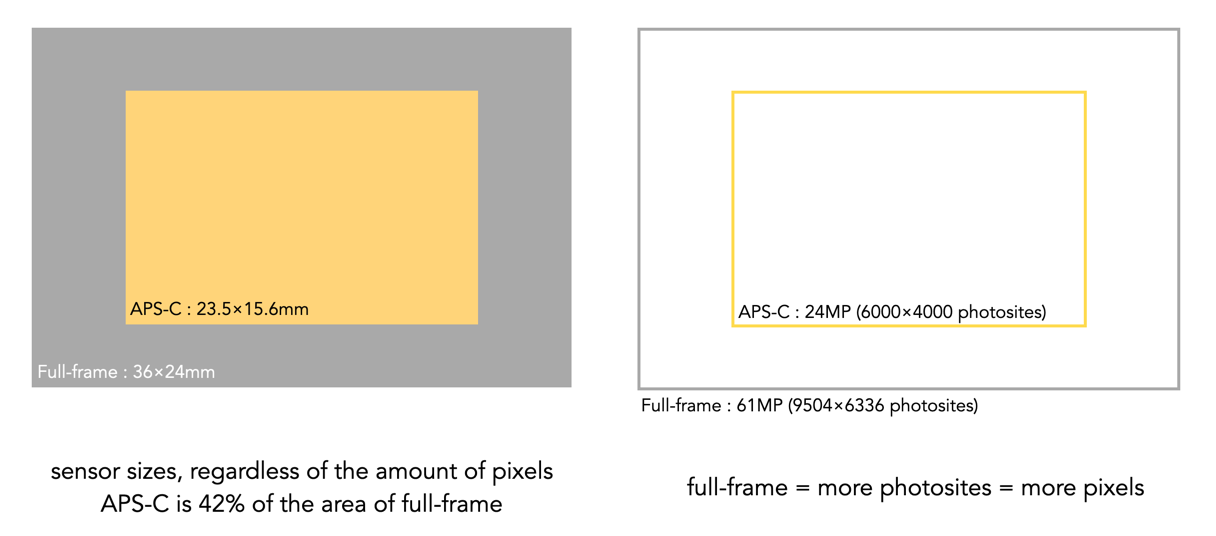
Some basic visual comparisons of APS-C versus full-frame
There are obviously things that full-frame sensors do better, and things that APS-C format cameras do better. Image size is the first, which is purely the result of full-frame cameras having more photosites on their sensors. With the evolution of pixel-shifting technology this may be a mute-point as super-resolution images are already available on some systems. Full-frame cameras also tend to have better dynamic range and low-light performance. This is because photosites are often bigger on full-frame cameras, so they can collect more light and better differentiate between light intensities. This means they work better in low-light situations introducing less noise. But digital cameras rely on software to turn the data from photosites into the pixels in an image, and so as software improves, so too will things like noise suppression algorithms in APS-C.
How lenses function on APS-C and full-frame lenses
But not every full-frame has larger photosites. For example a Fuji X-H1 camera with a 24MP sensor has 6000×4000 photosites, with a photosite pitch of 3.88μm. The Sony a7CR has a 61MP sensor (9504×6336) with a pixel pitch of 3.73μm, which is actually smaller than that of the APS-C sensor. So more pixels, but perhaps a low-light performance that isn’t that much better. And what is anyone going to do with images 60MP in size? Post them on the web? I think not.
feature
APS-C
full-frame
low-light performance
good
excellent
depth of field
deeper
more shallow
lens availability
large selection
good selection, fewer third-party lenses
lens cost
affordable
more expensive
portability
light, easy to carry
heavy, bulky
dynamic range
slightly reduced
wider
applications
street photography, sport, wildlife, travel
low-light, studio, landscapes, portrait
camera body cost
typically affordable
usually expensive
wide angle lenses
18-23mm
28-35mm
normal lenses
26-38mm
40-58mm
A comparison of some of the characteristics of APS-C versus full-frame
Full-frame cameras, just like medium-format cameras are for people who need the things they provide – high resolution, low-light abilities, etc. Many people tend to correlate a full-frame camera with high quality because of its sensor size, but quality isn’t necessarily associated with high-resolution images. Yes, more data captured by a camera means more detail in an image, but that doesn’t automatically mean that APS-C sensors (or even MFT) are inferior.
Most non-professional photographers don’t need huge image sizes, just like they don’t need a Leica. APS-C cameras are considerably lighter, and more compact than their full-frame brethren. APS-C lens are also cheaper to purchase, because they are easier to build, and require less glass. In all likelihood there is also a broader ecosystem of third-party lenses for non-full-frame cameras as well, as they are cheaper to manufacture. Over time as newer sensors evolve, APS-C may be well positioned to take a more prominent role in the camera world.
There is a lot of information about photography on the internet, and honestly for the beginner it can be overwhelming. The task of deciding on a digital camera is hard enough without content creators prattling on about things you probably don’t need. Here are a few pieces of gear to steer clear of – from the pure perspective of the amateur photographer.
① Full-frame cameras − The ubiquitous dSLR, or “digital SLR” is an extension of 35mm film cameras, hence the reference to “full-frame” (sensors are 36×24mm). They have been the mainstay of professional photographers for the past two decades. But they are not something that an amateur photographer should even consider. They are large, heavy, and prohibitively expensive. The size alone makes them inconvenient for things like long-term travel. In an age of mirrorless cameras with good APS-C sensors they honestly just don’t make a lot of sense. Even the big manufacturers such as Nikon have shifted their emphasis away from dSLRs. There are situations where dSLRs are more of an advantage – low light, a larger sensor, wildlife an sports photographer, none of which are really the concern of the amateur photographer.
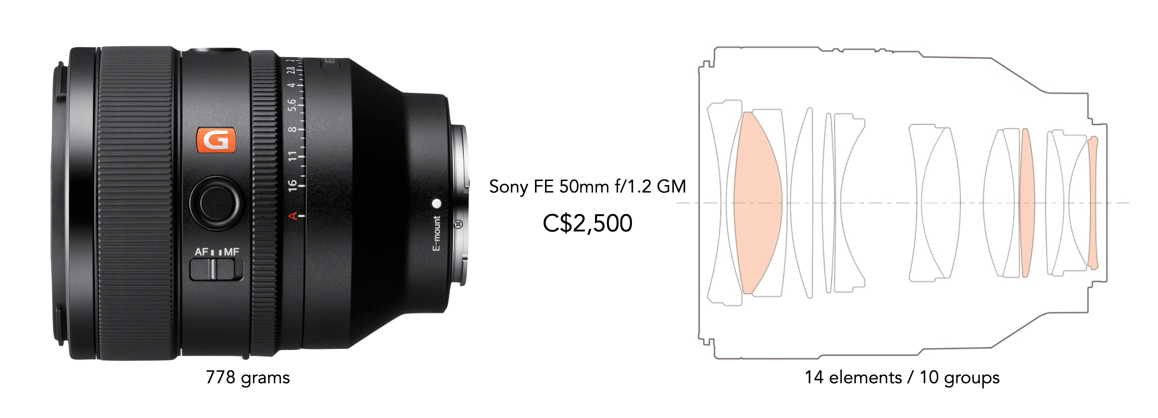
This Sony 50mm lens is fast, but it is too much lens for the beginner
② Fast lenses − What is a fast lens? I would probably categorize it as a lens with a speed faster than f/1.8 up to f/1.2. They contain a lot of glass, are heavy, and expensive. But frankly most people don’t need these lenses. They are perfect for people who shoot a lot at night, or in low-light settings, but slower lenses can also be used in these scenarios. (I wrote a whole post on whether you Should you buy a superfast lens?, and Are modern ultrafast lenses useful?)
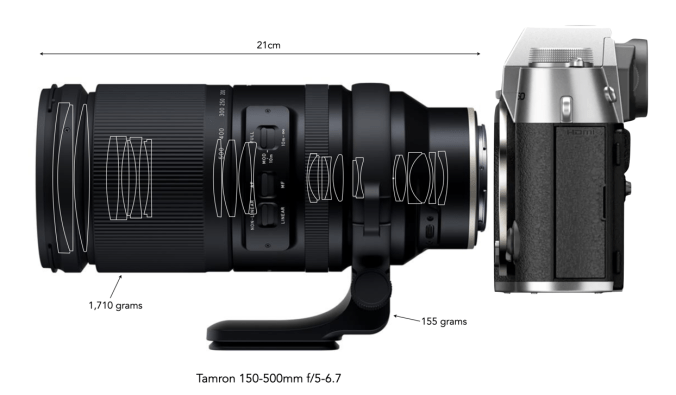
③ Super telephoto zooms − The zooms offer focal lengths like 100-500mm, and are very versatile, just not for the beginner. It’s tempting to consider, but not actually that useful unless you have a specific need, i.e. sports and wildlife photography. In many cases it is just too much zoom. For example landscape photography doesn’t always gel well with focal lengths beyond say 200mm, because there is a tendency to loose perspective, which is the whole point of many landscapes. The other problems are pretty obvious – size and weight. Of course here there is another benefit of mirrorless APS-C cameras, smaller zooms. The Tamron 150-500mm lens for Fuji-X seems amazing (225-750mm eq.), but it contains 25 elements, and weighs 1.71kg – try lugging that around for an extended period!
The Tamron 150-500mm super telephoto zoom – a behemoth for amateurs
④ Filters − There are a lot of really good filters which do things like reduce glare, and unwanted reflections, and correct or enhance colours. For example polarizing filters are useful when shooting landscapes in sunny locales, they darken skies, and make colours stand out more. Neutral density filters reduce light hitting the sensor, but doesn’t affect image colours. But it may be best to focus on taking good photographs, and conquering exposure before adding filters into the fray. P.S. UV filters are basically pointless because most sensors aggressively filter UV light. Save the filters for when you gain a little experience.
⑤ Tripods − Most people do not need a tripod. They are super useful for taking stills at home, or when you need to use a super-slow shutter speed, but otherwise they are a bit of a door-stop. They are not at all useful for travel, and overall just aren’t worth the effort. The only ones that can be somewhat useful are the mini variety such as the Manfrotto PIXI (but honestly avoid the Gorilla-type flexible tripods).
⑥ Camera bodyupgrades − Avoid the trap of upgrading your camera body every 1-2 years. A camera body should last a good amount of years, so there really is no need to consistently upgrade. If you are at the point of considering which camera to buy, save some money and buy an older version of the camera. The reality is that technology has plateaued somewhat in digital cameras, and there isn’t going to be much difference between two or three generations of a camera (except the price). Advanced features aren’t that useful if you are still grappling with the basics.
⑦ A light meter − If you have a film camera, then a light meter might be a must. But in the case of digital cameras, having a dedicated light meter may not be necessary. Good ones are expensive, and take up room. It’s easier to trust the light meter in the camera, or for film cameras use a light meter app such as Light Meter Ultra.
⑧ Lenses you don’t need − It’s hard not to want all the lenses that photographers review online. They look cool, and it would be fun to play with them right? Especially the myriad of inexpensive lenses now on offer. But here’s the thing, most of them you won’t use on a regular basis. Fish-eye lenses are a good example. They are fun and creative because they provide an ultra-wide view of the world. But the caveat is that reasonably priced ones are typically manual focus, and there are very few applications (unless it is a rectilinear fish-eye). There is probably a good reason that manufacturers like Fuji don’t have any fish-eye lenses.
Photography can get to be an expensive hobby, and buying things you don’t need can be a slippery slope. Many of these things I learned the hard way. Buying lenses that I thought I would need, but ended up sitting on a shelf. Think of it this way – every piece of gear that you buy should solve a problem of some sort, but not just a 1-2 instances, a problem you encounter a lot. If you are really interested in a lens, then try and rent the lens before buying to actually see if it is as useful as you think.
Ultimately a new lens or any other gear doesn’t replace the need for knowledge and experience, or frankly will it help you do something if you don’t really know what you are doing.
Experienced photographers and camera manufacturers often talk about weather-sealing. But what is it?
Weather-sealing is a term used to convey that there is a protective layer that helps block out things that are harmful to the electronics of a camera (or the internal workings of a lens) – things like dust, water, snow, and humidity. Whether a camera has weather-sealing or not, and how much weather sealing is dependent on the particular manufacturer. Typically the more expensive a camera, the greater the chance of weather sealing. Weather sealing consists of gaskets, and perhaps a lining made from rubber or silicon. This is particularly important in regions such as the lens mount, and any moving parts.
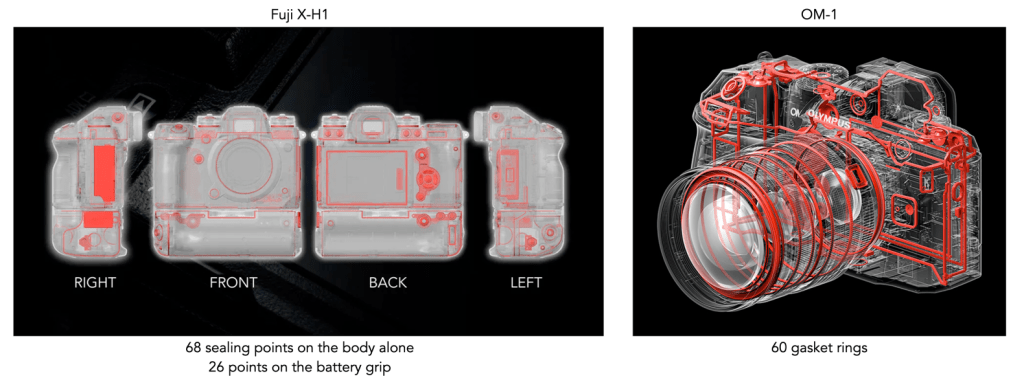
Weather sealing is challenging, partially because there are seams everywhere – between panels on the body and the battery and card compartments, the various controls like switches, push-buttons, rotating knobs and dials. Any break in continuity offers an opportunity for water to seep in. Larger components are the easiest to seal, often achieved using a gasket of some form, e.g. foam, rubber, between adjacent panels. Smaller controls also have foam or rubber gaskets, or O-rings where they interact with the camera body. Consider the Fuji X-H1 as an example (Figure 1). Fuji explained the weather sealing in “X-H1 Development Story #3”. They describe it as having a total of 68 sealing points on the body alone, and additional 26 sealing points for the battery grip. The X-H1 has rubber gaskets all over the body. The memory card door is locked firmly in place with a lock switch and the door has rubber seals to prevent moisture seeping into the compartment. Even the buttons and the joystick have rubber seals around to prevent moisture and dust from getting into the camera.
Fig.1: Weather sealing points on the Fuji X-H1 and Olympus OM-1
But weather-sealing is not the same as being water resistant, or waterproof. Weather sealing means a camera can withstand a few small droplets of moisture, or perhaps foggy environs, but it does not mean it one can sit out in a rainstorm. A waterproof camera on the other hand is one which can be fully submerged. Weather sealing also does not prevent condensation. This could only be prevented by filling the camera (and lens) with some inert gas, and sealing it completely. The sheer act of changing lenses allows air inside, and if moving from a warmer or cooler environment too quickly there is a risk of condensation forming. What does weather-sealing really mean? It’s honestly a bit like the terms used on outdoor gear like raincoats, i.e. somewhat vague. Ads for weather-sealing can be a bit bemusing. For example in the ad for the Olympus OM-D EM-5 Mark III, there is a camera sitting in a rainstorm with water splashing around it (Figure 2) – practical? I think not.
Fig.2: “WEATHERSEALED CONSTRUCTION: When your camera is splashproof, dustproof and freezeproof, you can stop worrying about the weather and focus on shooting.”
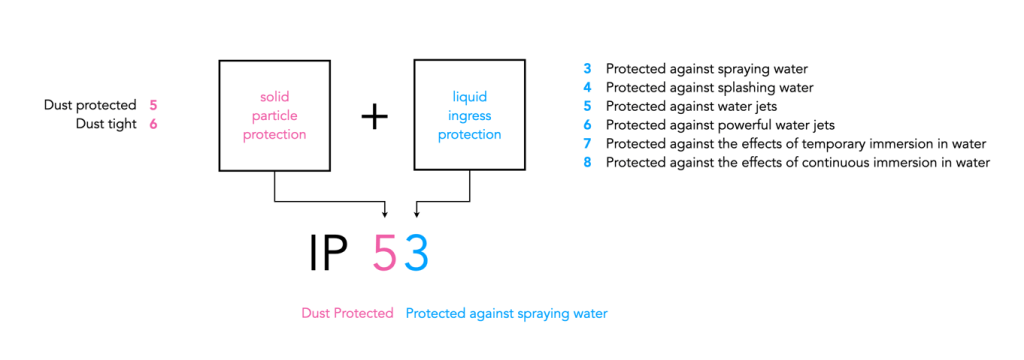
There is no real standardized means of rating weather sealing on cameras, however there is a system known as the IP or “Ingress Protection” rating and it is the standard that rates devices on their sealing properties. The IP rating is commonly used for smartphones, and security cameras. For example many recent iPhone’s have an IP rating of IP68. Notice the two digits, IP68? The first digit “6” indicates indicates the level of resistance and protection to harmful dust. The second digit “8” indicates the level of resistance to water. A rating of “8” means “protected from immersion in water with a depth of more than one meter.” These phones are well protected against dust and are also water-resistant but not fully waterproof.
One of the few digital cameras to get an IP rating, the OM-1 Mark II (formerly Olympus) has a rating of IP-53. This rating provides the second-highest level of dust protection that exists (partial protection against dust that may harm equipment) and certifies that the camera can continue to operate with water falling as a spray onto it at an angle of up to 60°. This means the camera can withstand most weather phenomena, and work in temperatures as low as -10°C. The OM System M.Zuiko 12-40mm f/2.8 Pro II lens (2022) has the same rating. The camera in the rainstorm, the OM-D EM-5 Mark III had an IPX1 rating, meaning it is water resistant to some extent, i.e. protected against vertically falling drops of water (which did not exactly make it splashproof, as IPX1 is the lowest level of protection against liquids). A step above IP-53 is the Leica SL3 with a rating of IP-54 which means the camera is protected from water spray from any direction.
Fig.3: An example of the most common IP constituents used for cameras
The biggest question is does a camera need weather sealing? The answer is based on whether or not a photograph engages in activities where dust and moisture become an issue. This includes travel to places that are susceptible to inclement, or “four seasons in one day” type weather. Weather sealing is somewhat of an insurance policy, but isn’t necessary for most photographers. It is also better at keeping out dust than moisture. The reality is that most camera manufacturers don’t actually designate an IP rating for their cameras – that’s not to say cameras aren’t well protected against the elements. And terms like splashproof, and weather resistance are really not that useful if they aren’t definable (e.g. in terms of IP ratings), otherwise you have to ask – how resistant?
So how does one deal with weather if you are in photographing in places with inclement weather? Firstly, store the camera gear in a waterproof bag. Avoid sand – it is not the same thing as dust. Also avoid salt water, it does not behave in the same way as fresh water – salt is everyone’s enemy. If shooting in a place like Iceland, where rain is always a possibility, use a rain and dust covers. Sleeves like the Op/Tech Rainsleeve are inexpensive and easy to carry (the Original sells for about C$15 for a pack of two). Another option is a shell from Peak Design which sells for about C$65 (medium). Something that is certainly taboo is changing a lens in rainy or windy conditions – it might be one of the worst things that can be done to a camera.
Want to see how weather sealing works? Check out this article by Dave Etchells [6] who delves into the intricacies of weather sealing technology at Olympus. He investigates both cameras and lenses, with photos of the weather sealing inside the camera (from Olympus R&D).He has also tested the Fuji X-T3 [4], the Canon EOS R [7], and Nikon Z6/Z7 [8]. There is also a great article on PetaPixel [9], that explores the various ways OM (formerly Olympus) tests its cameras (arguably one of the best testing environments around).
Have you ever noticed how often camera companies release new camera bodies? There is always a lot of fanfare about the fantastic new things these cameras do – but here’s the thing, nothing much has changed with digital cameras in the past decade. In the era of film companies produced new camera bodies as well, but usually only when they heralded the addition of new technology such as the transition to 35mm SLR, or through-the-lens metering. For the most part, analog cameras are just simply a light box which has a lens attached and is loaded with film. The lens deals with the aperture, the camera controls the shutter, and film deals with the fixed ISO.
Camera manufacturers try and make people believe that they need a new camera by flaunting its bells and whistles, to which there are rarely many new ones. More megapixels? Been there, done that. What else is there? Better processing power, more AI? The reality is the things that matter – aperture, shutter-speed, ISO – don’t really change that much. As I have mentioned before there is a point where more megapixels produced diminishing returns.
What really matters in digital photography is lenses. Good quality optics will make the difference between good and mediocre pictures – and lens technology has vastly improved over the past decade. To the point where maybe lenses are a little too complex, but that’s just my personal opinion. There will likely never be a “perfect” lens, but then again neither should there be – from the sheer perspective of character. But even more important than the lens is the ability of the photographer. So if you have a good digital camera, there is no real need to buy a new one. A 24 megapixel camera will be more than adequate for the foreseeable future. Features are nice, but in all likelihood don’t really contribute a great deal to good pictures.
The Olympus E-1 was introduced in 2003, the first interchangeable lens camera designed specifically from the ground up to be digital. It would provide the beginning for what would become the “E-System”, containing the 4/3″, or “Four Thirds” sensor. The camera contained a 5-megapixel CCD sensor from Kodak. The 4/3″ sensor had a size of 17.3mm×13.0mm. The size of the film was akin to that of 110 film, with an aspect ratio of 3:2, which breaks from the traditional 35mm 4:3 format.
The E-1 had a magnesium-alloy body, which was solid, dense, and built like a proverbial tank. The camera is also weather-sealed, and offered a feature many through was revolutionary – a “Supersonic Wave Filter”, to clean off the dust on the imaging sensor. From a digital perspective, Olympus designed a lens mount that was wide in relation to the sensor or image-circle diagonal. This enabled the design of lenses to be such that they minimized the angle of light-ray incidence into the corners of the frame. Instead of starting from scratch, Canon, Konica-Minolta, Nikon and Pentax just took their film SLR mounts and installed smaller sensors in bodies based on their film models. The lens system was also designed from scratch.
The tank in guise of a camera
The E-1, with its sensor smaller that the APS-C already available had both pros and cons. A smaller sensor meant lenses could be both physically smaller and lighter. A 50mm lens would be about the same size as other 50mm lenses, but with the crop-factor, it would actually be a 100mm lens. 4/3rd’s was an incredibly good system for telephoto’s because they were half the size and shape than their full-frame counterparts.
Although quite an innovative camera, it never really seemed to take off in a professional sense. It didn’t have continuous shooting or even the auto-focus speed needed for genres like sports photography. It also fell short on the megapixel side of things, as the Canon EOS-1Ds with its full-frame 11-magapixel sensor had already appeared in 2002. A year later in 2004, the Olympus E-300 had already bypassed the 5MP with 8MP, making the E-1 somewhat obsolete from a resolution viewpoint. The E-1’s photosite pitch was also smaller than most of its APS-C rivals sporting 6MP sensors.
One characteristic of digital cameras which is more often than not ignored in reviews is their usability. Now usability in this context looks at how easy it is to use a camera. There are two levels of usability in a digital-camera. The first has to do with the usability of the software, i.e. generally how easy is it to navigate through the menu, and find things. The second has to do with physically operating the camera, e.g. how the camera is held, how the physical controls are laid out, etc. In the age of film cameras, the layout of buttons and levers was pretty much consistent for most cameras, often constrained by the physical mechanisms inside the camera. When film cameras started to gain more electronics, usability started to become more of an issue.
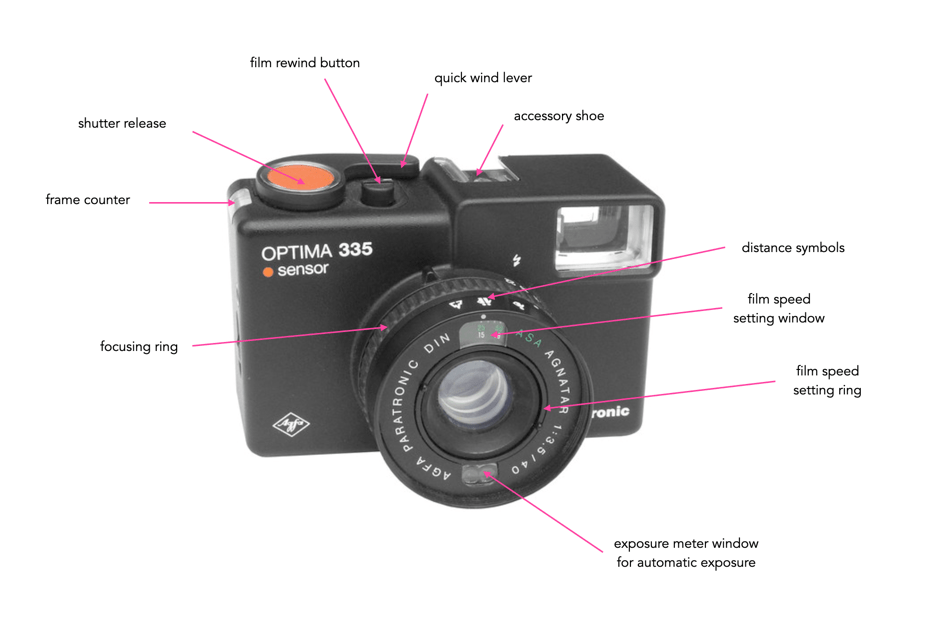
The simplest compact 35mm film cameras were exactly that – simple. As a good example, consider the AGFA Optima 335. It was aesthetically beautiful, and had a minimal number of controls. Using it involved (i) loading the film; (ii) setting the film speed (both done once for each roll); (iii) setting the distance; (vi) pointing the camera at the scene; and (v) pushing the shutter release. Obviously it was an automatic exposure camera, but everything was in the right place.
Fig.1: The AGFA Optima 335 with its simple system
When things started to move away from manual controls, which let’s face it were basically (i) film speed, (ii) shutter speed, (iii) lens aperture, and (iv) lens focusing, things started to gets more challenging from a usability perspective. The more features added, the more physical controls, or electronic menus a camera needed. It’s the reason people tend to like vintage film cameras like the Pentax Spotmatic. There is just so little involved in taking a picture.
Fig.2: Holding the Ricoh GRIII, a small camera with minimalistic usability
Digital cameras may be the worst from a usability perspective. Usability is sometimes ignored because “generic” reviews tend to concentrate on the “fancy” features of a camera, and neglect usability. You need to go to blog-based reviews by photographers who have actually used cameras in real-world settings to get a real idea about a camera’s usability. Note that if you are unsure about a camera, it is really important to go to a store and actually handle it, to get a real feel as to whether or not it is comfortable and intuitive to use. Sometimes it is the little things that make a camera not feel quite right. The awkwardness of a particular button, the ease of deleting an image, signage too small to read, or an annoying viewfinder.
The first issue to consider is physical “usability”, or comfort – basically how the camera “feels” in your hands. Does it require two hands to hold, or is one fine? Is there enough room on the camera to actually grip it? Is the camera the right size from the perspective of your hands? Some people have large sized hands, and find it uncomfortable to hold a small camera with manipulate small controls. Conversely, people with small hands might find it wearisome holding up a heavy full-frame camera with a heavy lens. Is the camera body a “block” or does it have a grip? Grips make it much easier to grasp a camera, particularly a larger one. Some camera manufacturers provide camera grips as accessories, or perhaps there is one made by a third-party if it is a popular camera. Like gloves, one size does not fit all.
Usability also has to do with size, and weight and that’s where sensor size plays a role. Full-frame cameras are the largest of the regular format cameras (i.e. smaller than medium format), and together with their lenses are generally heavy and large. Compact cameras are small and light. Depending on its use, the size and weight of a camera can play a large role in how useable it is. For example travelling with a full-frame camera and all its lens accoutrements by air, and on public transport can be back-breaking, yet travelling with it in a car and using a tripod, maybe not so much. A compact camera can easily be slipped into a pocket and weigh next to nothing. Size and weight issues also translate to lenses. Large full-frame lenses can be heavy, because they require more glass. Although most camera manufacturers provide various choices when it comes to lens sizes, with appropriate tradeoffs in image quality.
Next there are those characteristics of a camera related to its use. Is there a viewfinder, and is it comfortable to press your eye up against? Is the shutter-release button comfortable to use? What is the screen like – does it pivot and tilt? Is the image crisp? Does it provide a reasonably good rendition of the colours in the image? What about the physical controls? Is it easy to delete an image? Is there a macro function with easy accessibility? Are the controls accessible, even when taking a picture?
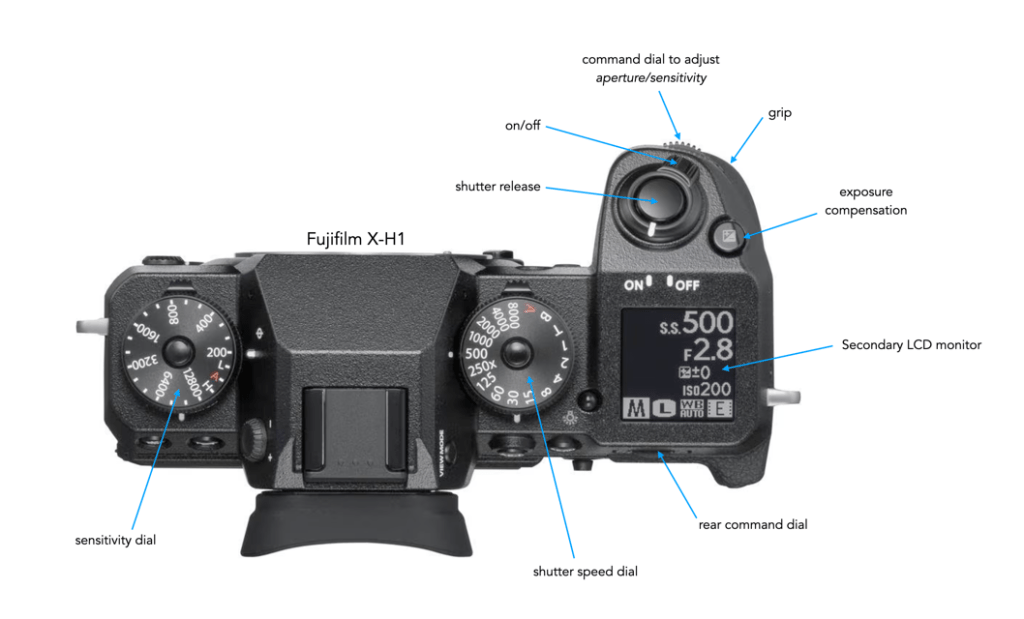
Fig.3: The layout of the top of the Fujifilm X-H1
Consider the layout of the top of a Fujifilm X-H1 shown in Figure 3. The camera body is large, and hence a grip is provided on the right-hand side. The shutter release button is located in an optimal position, surrounding by readily accessible controls, i.e. shutter speed control, etc. The secondary LCD monitor also provides a good summary of current setting on the top of the camera, in addition to the rear screen. The fact that there are physical controls for sensitivity (aka ISO, but a better term because it’s not really the same as film ISO), and shutter speed makes it much easier to adjust them, as opposed to a button, and having to rely on watching a screen.
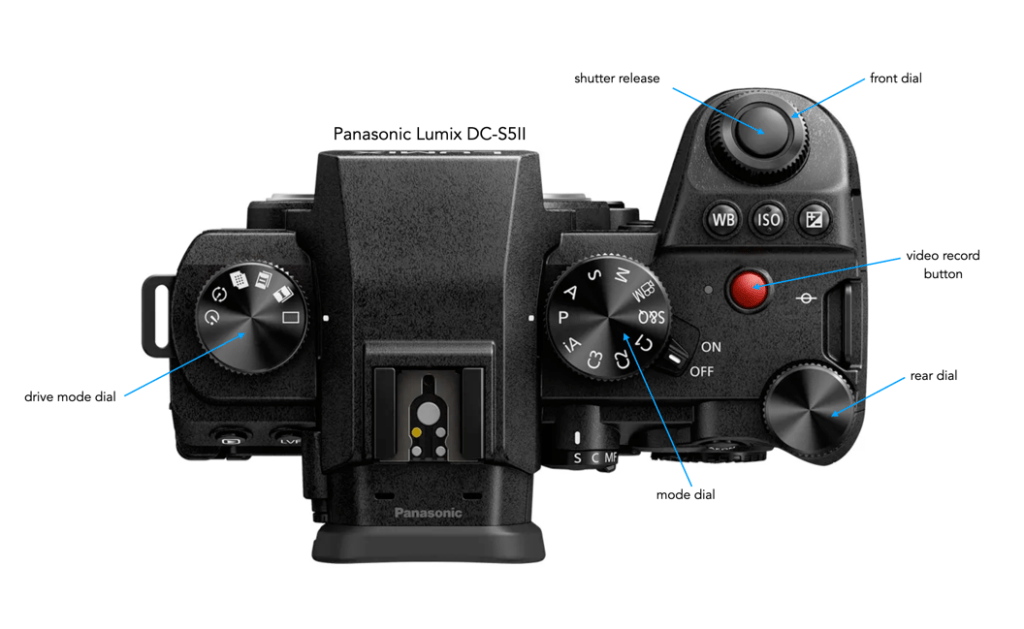
Cameras from other manufacturers often may lack these basic controls, opting instead for a more customizable top configuration, as shown for the Panasonic Lumix DC-S5II in Figure 4. In place of the shutter speed dial, there is mode dial, and a drive mode dial in place of the sensitivity dial. The Fuji requires WB (white balance) to be modified in-menu, whereas the Panasonic provides a dedicated button. The shutter speed and aperture can be modified on the Panasonic based on mode setting, using the front and rear dials. So two different approaches to functional usability – some people may prefer one over the other. From my own perspective, I prefer to have shutter speed and sensitivity readily accessible as marked controls. Changing camera mode or even drive mode is something I don’t do that often (I won’t get into the nitty gritty of specific camera usability).
Fig.4: The layout of the top of the Panasonic Lumix DC-S5II
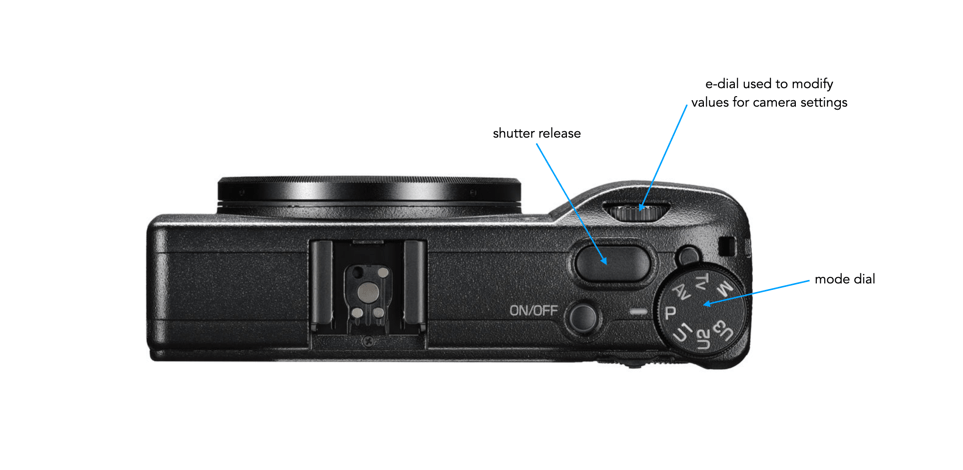
In comparison, a more compact camera, like the Ricoh GR III will have little in the way of external controls on the top, with most changes actuated via the menu or back-buttons (e.g. Macro, WB). These types of cameras are commonly used for street photography where setting may not change that often. It is much more of a minimalist approach to usability.
Fig.5: The layout of the top of the Ricoh GRIII
Usability also extends to the lens. Does the lens have a physical means of switching to manual mode? Is the focusing mechanism smooth (in manual mode). Is it easy to attach filters? How heavy is the lens? Will it be comfortable to lug the lens around all day? Then there is also the camera mount. You may want to attach vintage lenses which have different mounts, and hence need a converter. Is there a converter from camera-X to lens-Y? What about the tripod mount? Is it in the centre of the camera or bias to one side? Then there is maybe the biggest elephant in the room – battery life? Usability of a camera plummets if one battery charge only takes 200 photos. This means you will need to carry more batteries, which means more weight. Is the charger small and easy to pack anywhere?
Last but not least there is the software usability side of things. This really is a category unto itself. Menu screens are usually very small, and can be quite cluttered, even if some care has been taken in designing the actual menu. By what means does one interacts with the screen, i.e. button or touch. What does the screen show, and what does it let you manipulate. Is is customizable? Does changing a simple thing require you to delve into the menu system? Do you need to carry the manual just to access the maze of menus to change something?
There are many different facets to usability, and choosing a digital camera based on its usability characteristics is often ignored with users opting instead for the more “tangible” features of a digital camera, i.e. megapixels, lens selection, brand, cost etc. And while the interaction with a camera is a very individual experience, not every camera will offer a perfect usability experience for every person.
Vintage 35mm film cameras can survive for decades. You can pick up a camera from the 1960s and if its fully mechanical, there is a good chance it will still be fully functional. Vintage cameras that require batteries, e.g. for the exposure meter, or contain electronics are more of a hit and miss situation. The problem is that no one really can ascertain how well electronics age. Some age well, others don’t. Digital cameras are another thing altogether.
Anyone who has used digital cameras for the past 20 years likely has a few of these “zombie” cameras sitting in a cupboard somewhere. Cameras are upgraded, with their predecessors effectively “shelved”. The reality is that for the most part, digital cameras beyond a certain age just don’t hold much value (unless they are from Leica). One problem with vintage digital cameras is that things can just stop working. I have an old Olympus E-PL1 MFT camera. I haven’t used it in a while, and when I tried it today, it displayed a blinking red “IS-1” indicator. This basically means that the image stabilizer has failed (noticeable when the camera is first turned on because the anti-dust mechanism makes a rattling noise). That’s inherently an issue with electronics, things can just stop working, and fixing them on an old camera is often just not financially viable. It’s basically digital junk.
It’s dead Jim!
But the bigger problem is actually the battery. Some manufacturers have decided over the years to change the type of batteries used in their cameras (for many reasons). When a camera becomes legacy, i.e. is no longer supported, there is a good chance that the manufacturer will stop making the associated batteries. The E-PL1 was introduced in 2010, and although the battery in my camera still works, it is not possible to buy Olympus BLS-1 batteries for it anymore. It is also not really possible to determine what the status of existing batteries is – measuring the number of battery cycles is not easy or even possible (unlike laptop batteries). One way is to charge the battery, and take photographs until it drains, but tedious is an understatement. A battery will typically last between 300-500 recharge cycles.
The result is a vintage digital camera that may still work well, but ultimately needs a new battery. You could try the gambit of 3rd party batteries, but there really isn’t any way of knowing what battery will actually work, because they don’t usually come from verifiable battery makers (often resulting in slight fluctuations in the voltage provided to the camera). Yes, you can get replacement batteries from companies like Duracell (via DuracellDirect.com), however this company is not owned by Duracell, but rather PSA Parts Ltd. And these batteries are not exact replacements. For a real analysis, check out this article by Reinhard Wagner who dissects some off-brand Olympus BLN-1 batteries (it’s in German, but is easy to translate).
So what does this mean? Essentially if you want to use a camera long-term, make sure you have a good amount of spare batteries, i.e. anyways purchase at least one spare battery when purchasing a new camera. Also check the date on the batteries, as they made need replacing as they age. In all likelihood, nobody is going to be using vintage digital cameras in 50 years time, but they still might be using film ones.
P.S. The digital “age” of a camera is sometimes counted using the idea of “shutter actuation’s“. This is basically a count of how many photos have been taken. A modern mirrorless camera will have shutters rated at around 100-150K. Most cameras likely won’t come anywhere near that count, so they aren’t really a valid notion, except perhaps to indicate how much a camera has been used.
The first 35mm SLR camera, the Ihagee Kine Exakta, used a horizontal waist-level viewfinder. This was not unusual for the period, as there was no other means to view a picture through the camera at an eye-level (that wasn’t a rangefinder camera). The problem is that the image viewed would be flipped left-to-right. This would be rectified by the introduction of the first production pentaprism camera in 1947, in the guise of the Italian Rectaflex. The technology became more mainstream with the introduction of the Zeiss Ikon Contax S in 1949 (although waist-level viewfinders would still be dominant until the mid-1950s).
Fig.1: Early SLRs did not have a pentaprism, but instead required the photographer to look through a waist-level viewfinder
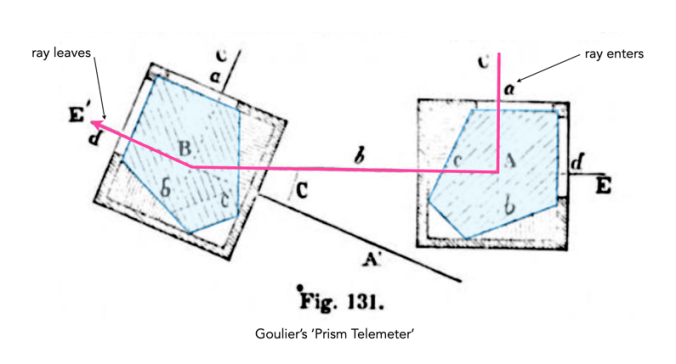
A pentaprism or pentagonal prism is a five-sided glass prism (although technically while the cross-section of a pentaprism is bound by five sides, it actually has seven or eight). Prisms were already being using in the Victorian era to design telescopes and binoculars. The use of a pentaprism in optics stems from an invention by a Captain Charles-Moÿse Goulier (1818–1891) of the French engineer corps in 1864, a “triangulation prism telemeter” [1]. It was a device with twin sighting paddles, connected by wire 40 meters long to establish a fixed baseline. Each paddle contains a five sided prism to give simultaneous orthogonal views. It may have been the first use of pentagonal prism in optics.
Fig.2: The pentaprisms used in Goulier’s 1964 invention (adapted from [1]).
This form of conventional pentaprism, sometimes referred to as a flat-roof or Goulier prism, is characterized by a 90° deviation angle (Fig.3(1)), i.e. it deviates a beam of light by 90°, reflecting the beam inside the prism twice. It is comprised of two reflective faces (Fig.3(1)b,c), arranged at 45° between them and two faces orthogonal to each other (Fig.3(1)a,d). The two surfaces performing the reflections are coated to provide mirror surfaces (e.g. silvered). The two opposite transmitting faces are often coated with an anti-reflective coating. In imaging applications this pentaprism will neither invert nor reverse an image, e.g. Fig.3(1). In the context of an SLR this still holds true, because the image is flipped as it passes through the lens and it is this flipped image that passes through the prism. So in the context of the ‘flippedi image, it is neither inverted or reversed. However, compared to the original object in front of the lens, the image viewed at the eyepiece is reversed left-to-right. Prior to the end of WW2, conventional pentaprisms were commonly used in telescopes, binoculars, and military equipment such as rangefinders.
This is illustrated in Fig.3(3) where the object F passes through the optical system of an SLR. The F is flipped by the lens and this flipped version of the F passes through the prism. The image viewed at the eyepiece is neither inverted nor reversed from that projected on the mirror. However compared to the original F, the image is reversed left to right.
Fig.3: The flat-roofed (conventional) pentaprism: (1) a simple optical path, (2) a breakdown of the angles, and (3) used in the context of an SLR optical system.
The more complex pentaprism found in the majority of SLR cameras is the roof pentaprism which reverses an image from left-to-right. It is similar to a conventional prism, but with the addition of two silvered “roof” surfaces. The concept of a roof prism was created by Italian astronomer Giovanni Battista Amici (1786-1863) in the mid-1800s. His Amici-roof prism, also known as a right-angle roof prism, was capable of reverting and inverting the image of an object while bending the line of sight through a 90° angle (Figure 4). It was used in various types of telescopes.
Fig.4: The Amici-roof prism.
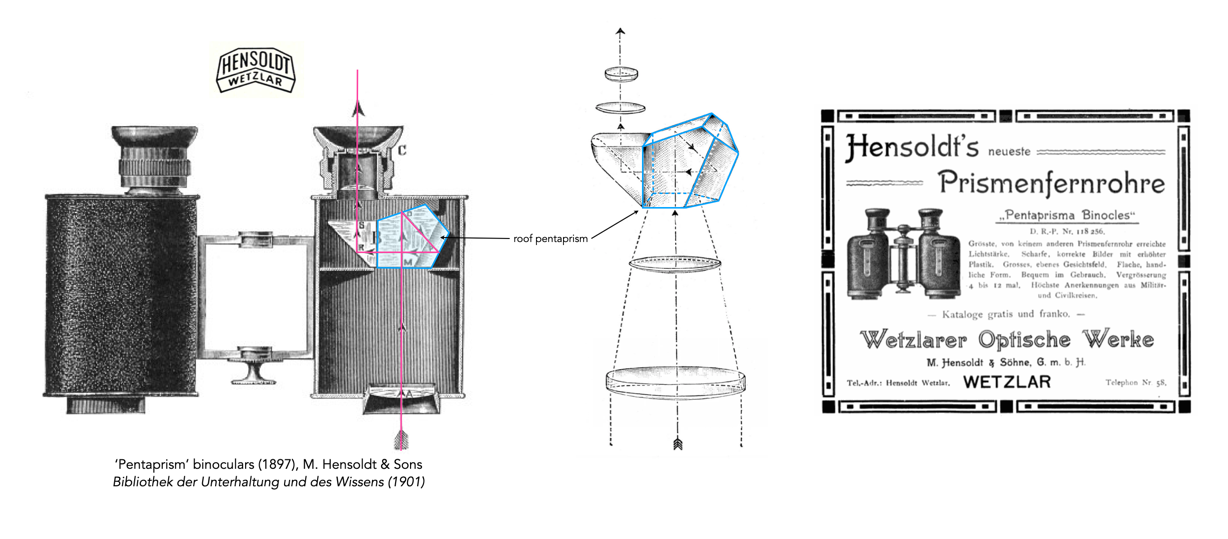
A roof prism is a prism containing a section where two faces meet at a 90° angle, resembling the roof of a building. Reflection from the two 90° faces returns an image that is flipped laterally across the axis where the faces meet. The first large scale use of a roof pentaprism may have been in binoculars, like the Pentaprisma Binocle 7×24 made by Hensoldt & Söhne (Wetzlar) introduced in 1900. An earlier version of the binoculars (1897) used a flat pentaprism attached to a right-angle prism with a roof (like an Amici-roof prism). This arrangement was denied a patent in Germany, due to a conflict with a Zeiss patent (DE77086, which used a Porro-prism), however was granted a patent in Great Britain (GB15806, 1898). The newer version of 1900 had a dialytic (split) optical system where the pentaprism had a roof edge (Figure 5).
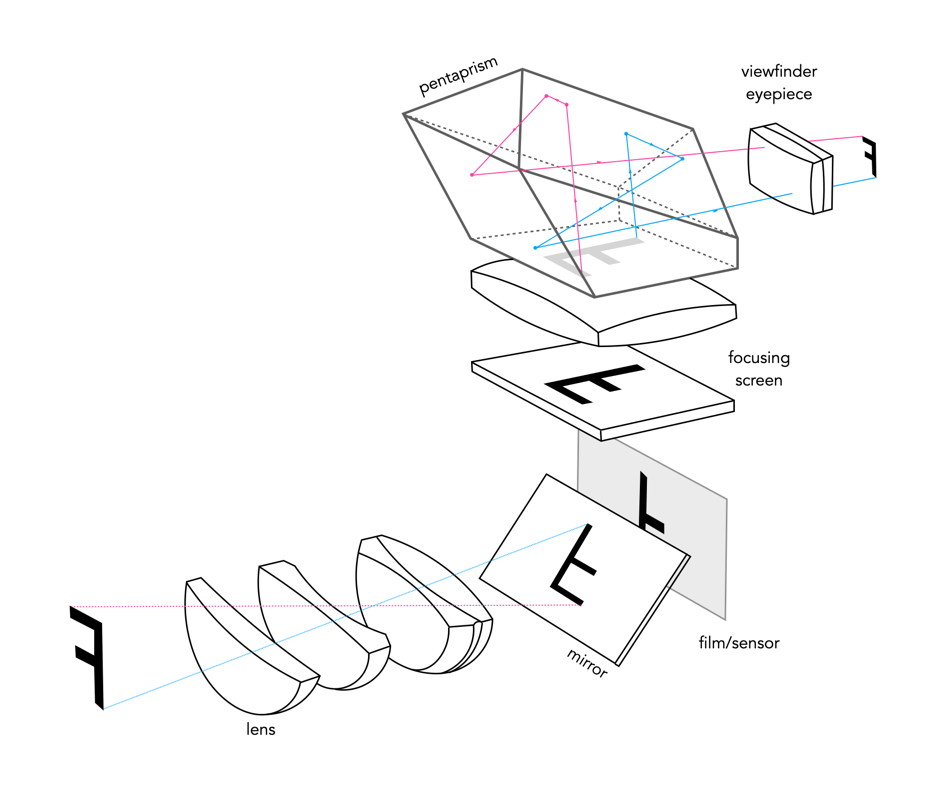
In an eye-level SLR, the roof pentaprism is inserted between the focusing screen and the viewing eyepiece. The roof pentaprism, by introducing extra reflecting surfaces, shows the object both upright and with the right and left sides in their proper place. The bottom surface of the pentaprism may form the focusing screen, or the latter may be positioned directly below the prism. The focusing screen may be of several different kinds, including plain ground glass, to various combinations of clear glass, ground glass, or micro-prism focus finder.
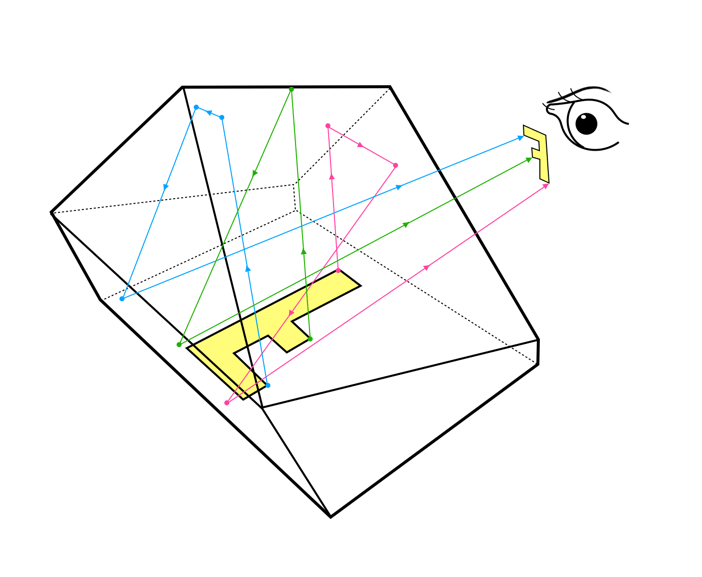
Fig.6: An example of light passing through a roof-pentaprism
The light passing through a roof-pentaprism undergoes three separate reflections in order that the image is seen both right way up and right way round. The image enters the prism right way up, but laterally reversed, so that as the image must be turned again through 90° to allow it to be viewed at eye level, it must be reflected twice to keep it right way up. The third reflection has no effect on the vertical aspect of the image but it merely used to reverse the image laterally so that it is seen right way round.
Fig.7: Image passage through an SLR camera using a roof-pentaprism
The basic history of the pentaprism as it relates to the SLR can be found in a separate post. But a summary is provided below. A timeline of early SLR pentaprisms:
1933 − Kurt Staudinger issued a patent for a reflex device, i.e. a penta-mirror
1937 − Zeiss Ikon (Germany) begins work on the Syntax, a camera with a pentaprism. Patents exist for the concept, but the prototypes, ca. 1944 were destroyed during the war.
1948 (Sept) − First commercially produced SLR with a roofed pentaprism, the Rectaflex (Italy). An earlier 1947 prototype used a flat pentaprism.
1949 (Sept) − Zeiss Ikon (GDR) introduces the Contax S, the second SLR with a pentaprism, essentially recycling the Syntax.
1949 − ALPA introduces the ALPA Prisma Reflex, a pentaprism with a 45° view. ALPA would not introduce a normal perpendicular view until the Model 6c (1960).
1952 (Sept) − Wrayflex receive a patent for an SLR with a “pentagonal prism” which was never produced. The first Wrayflex with a pentaprism was the Wrayflex II (1959).
1955 − The first Japanese SLR with a pentaprism, the Miranda T.
Note that a pentaprism is different to a penta-mirror, which instead of a glass prism uses three mirrors to perform the same task. Using a glass prism has definite benefits over mirrors. Changes in light direction in a prism is based on the notion of total reflection, which means reflectances of close to 100% can be achieved, while silver mirrors lose at least 10% to absorption losses. A glass prism is also better because the refractive index of glass causes a shortening of the light path.
Notes:
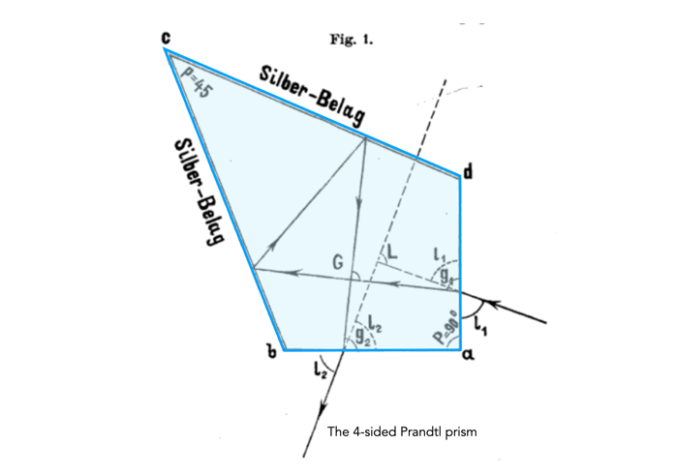
Goulier’s prism is sometimes known as the Prandl prism (or even the Goulier-Prandl prism), and is often cited as such, particularly in German literature. Now a cursory search will find very little, but digging a little deeper finds a paper published in the German journal Zeitschrift für Vermessungswesen (Journal of Surveying) in 1890, by an Alexander Prandtl [2]. Prandtl (1840-1896) was a professor at the Royal Bavarian Central Agricultural School in Weihenstephan specializing in dairy farming. But the paper describes a 4-sided prism, similar to Goulier’s prism except the extra side between the two surfaces meeting at 45° is missing. The other issue is the fact that Goulier’s prism was described 26 years previously. Prandtl’s real claim to fame was developing the first continuously operating milk centrifuge.
Hensoldt & Söhne created their first product, a rangefinder using a roof prism in 1892. The company would go on to develop the Hensoldt roof prism (DE180644, 1905) which required no mirroring, and had no axis offset, allowing for straight binoculars. In 1938 the Carl Zeiss Foundation would take a majority share in Hensoldt. It is entirely possible that this mechanism formed the basis of the work done on the Zeiss Syntax SLR in the late 1930s and early 1940s.
Fig.8: A depiction of the Prandtl prism (adapted from [2]).
Further reading:
Barnard, F.A.P/, “Prism Telemeter”, Report on Machinery and Processes of The Industrial Arts and Apparatus of the Exact Science, p.589-592 (1869)
Prandtl, A., “Ein neues Instrument zum Abstecken von rechten Winkeln” (A new instrument for marking out right angles), Zeitschrift für Vermessungswesen, 19, pp.462-467 (1890)