What is luminance?

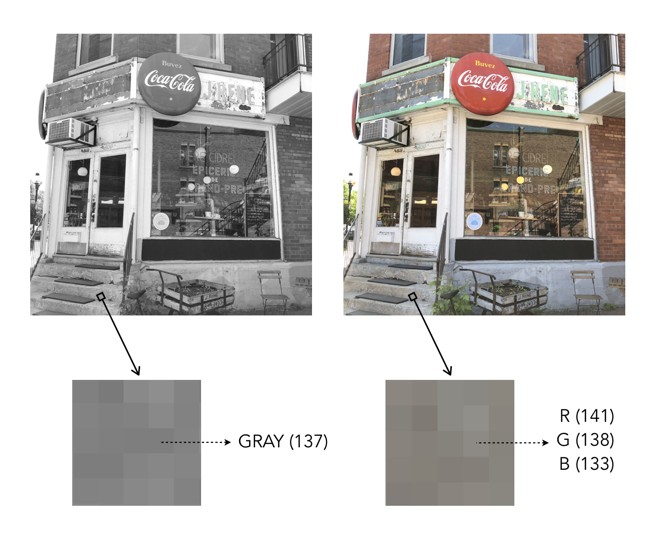
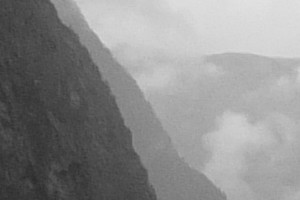
Light is the building block of photographs. Luminance describes how much light comes from an object. In a grayscale image, there is only luminance. In many respects it is what provides the “structure” of an image. If no light were to come from an object, an image would appear black. Luminance is one of the primary cues that make you realize you are looking at a three-dimensional object rather than a flat picture.

The human visual system is designed to detect luminosity (light), and chroma (colour). The photoreceptors in human eyes include the cones which handle the chroma and the rods which handle the luminance. Luminance is perceived as different shades of light in grays while chroma are different hues of colour. Colours have intensity while light has brightness. Artists have known for a very long time that colour and luminance can be treated in an artistic sense quite independently. Picasso said, “Colours are only symbols. Reality is to be found in luminance alone.”

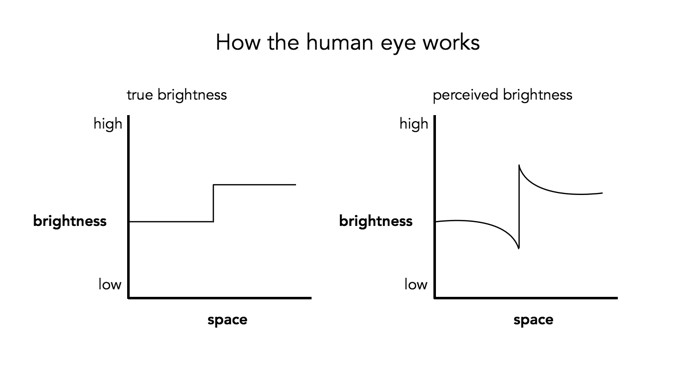
When high-luminance colours such as yellow are placed next to low-luminance colours such as dark blue, they create a strong contrast that the visual system interprets as a change in depth. The center-surround effect is also responsible for the optical illusion that colours look different depending on the colour of their surroundings.

To understand better the interplay of luminance and colour, consider Claude Monet’s 1874 painting, Impression, soleil levant (English Impression, Sunrise), which depicts the the port of Le Havre, France at sunrise.

Monet Impression, Sunrise
Monet’s Impression, Sunrise

It would seem as though the rising Sun is the brightest object on the canvas, however when the image is desaturated by removing the colour component, it is shown that the sun, as well as its reflection have the same luminance as the sky – for all intended purposes, disappears. This can be achieved by converting the colour space to HSL, and extracting the Lightness/Luminance component.

Monet's Impression, Sunrise devoid of colour
Monet’s Impression, Sunrise – devoid of colour

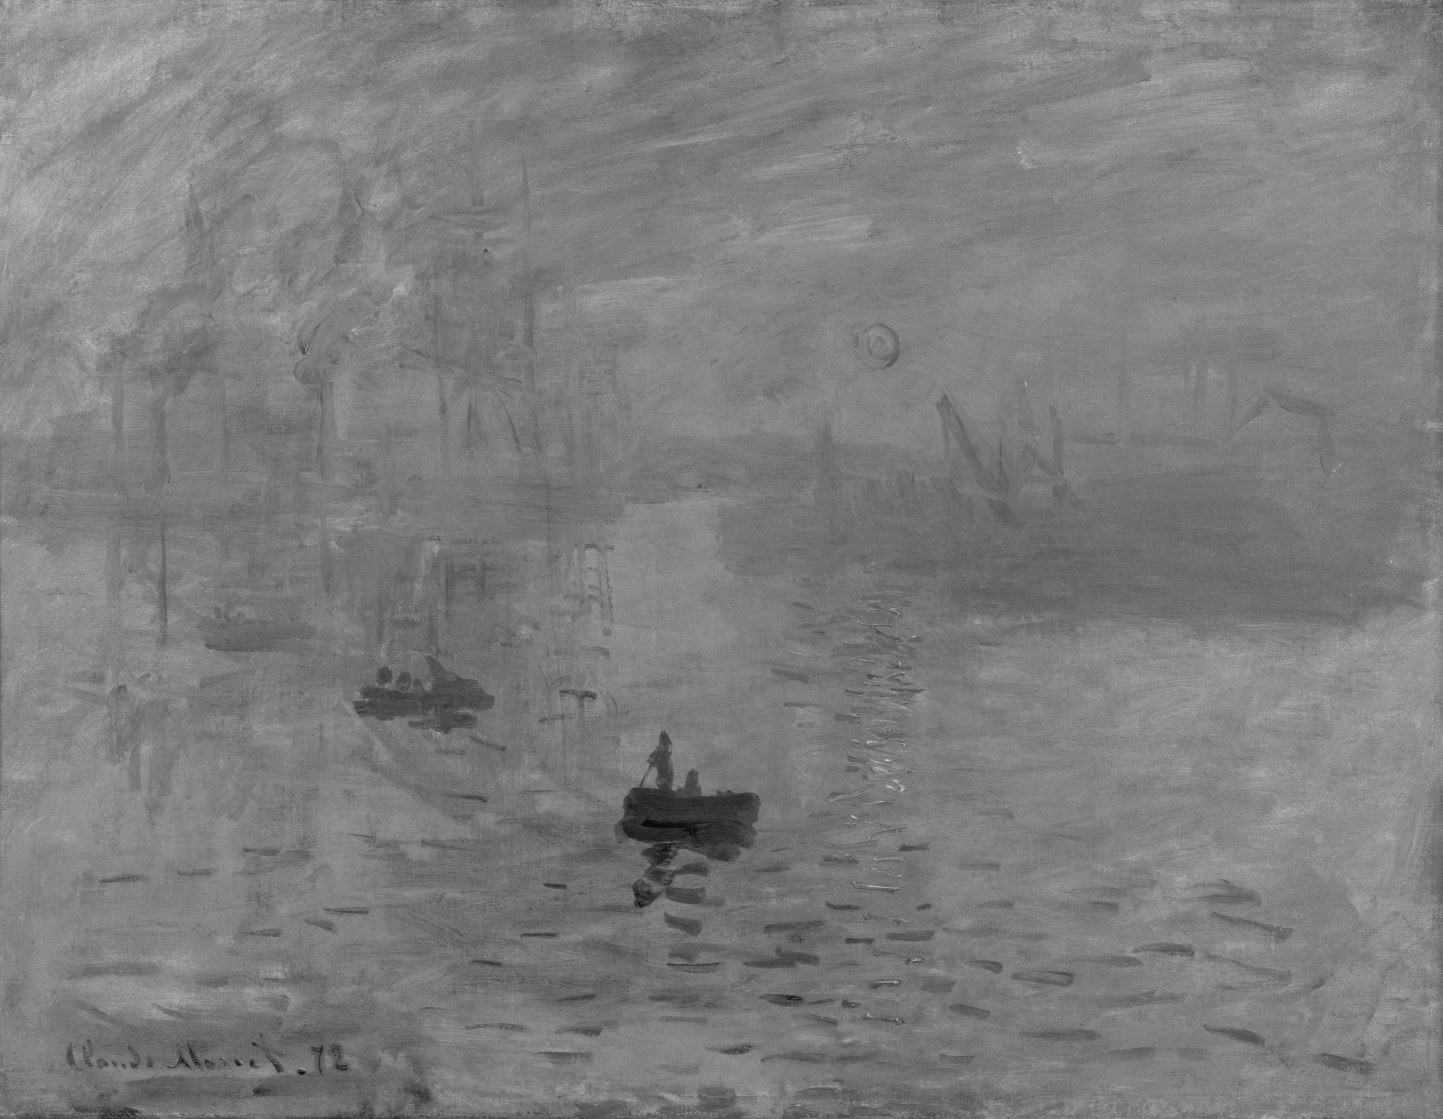
Why? Because Monet used colours which had equal luminance, so the sun blends into the sky. The sun appears brighter because Monet uses a saturated complementary colour to the blue of the sky, so the colours accentuate one another. Without colour, the painting loses some of its meaning. To illustrate this another way, we extracted circles with a diameter of 30 pixels from the sun, and the area adjacent to it. Then the luminance was calculated using the average pixel value found in each extracted region.

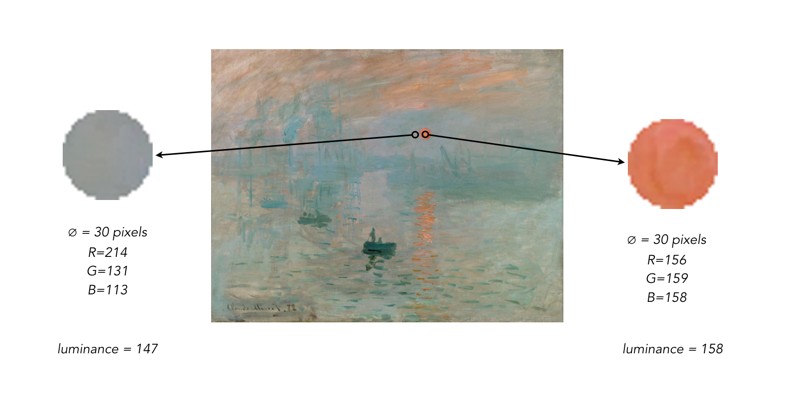
The results? Very similar luminance values.

Why do buildings lean? (the keystone effect)

Some types of photography lend themselves to inherent distortions in the photograph, most notably those related to architectural photography. The most prominent of these is the keystone effect, a form of perspective distortion which is caused by shooting a subject at an extreme angle, which results in converging vertical (and also horizontal) lines. The name is derived from the archetypal shape of the distortion, which is similar to a keystone, the wedge-shaped stone at the apex of a masonry arch.

keystone effect in buildings
Fig.1: The keystone effect

The most common form of keystone effect is a vertical distortion. It is most obvious when photographing man-made objects with straight edges, like buildings. If the object is taller than the photographer, then an attempt will be made to fit the entire object into the frame, typically by tilting the camera. This causes vertical lines that seem parallel to the human visual system to converge at the top of the photograph (vertical convergence). In photographs containing tall linear structures, it appears as though they are “falling” or “leaning” within the picture. The keystone effect becomes very pronounced with wide-angle lenses.

Fig.2: Why the keystone effect occurs

Why does it occur? Lenses are designed to show straight lines, but only if the camera is pointed directly at the object being photographed, such that the object and image plane are parallel. As soon as a camera is tilted, the distance between the image plane and the object is no longer uniform at all points. In Fig.2, two examples are shown. The left example shows a typical scenario where a camera is pointed at an angle towards a building so that the entire building is in the frame. The angle of both the image plane and the lens plane are different to the vertical plane of the building, and so the base of the building appears closer to the image plane than the top, resulting in a skewed building in the resulting image. Conversely the right example shows an image being taken with the image plane parallel to the vertical plane of the building, at the mid-point. This is illustrated further in Fig.3.

Fig.3: Various perspectives of a building

There are a number of ways of alleviating the keystone effect. The first method involves the use of specialized perspective control and tilt-shift lenses. The best way to avoid the keystone effect is to move further back from the subject, with the reduced angle resulting in straighter lines. The effects of this perspective distortion can be removed through a process known as keystone correction, or keystoning. This can be achieved in-camera using the cameras proprietary software, before the shot is taken, or in post processing on mobile devices using apps such as SKRWT. It is also possible to perform the correction with post-processing using software such as Photoshop.

Fig.4: Various keystone effects

Colour versus grayscale pixels

Colour pixels are different from grayscale pixels. Colour pixels are RGB, meaning they have three pieces of information associated with them, namely the Red, Green and Blue components. Grayscale pixels have one component, a gray tone derived from a graduate scale from black to white. A colour pixel is generally 24-bit (3 × 8-bit), and a gray pixel is just 8-bit. This basically means that a colour pixel has a triplet value comprised of 0..255 for each of red, green and blue components, whereas a grayscale pixel has a single values 0..255. The figure below compares a colour and grayscale pixel. The colour pixel has the R-G-B value 61-80-136.The grayscale pixel has the value 92.

It is easy to convert a pixel from colour to grayscale (like applying a monochrome filter in a digital camera). The easiest method is simply averaging the three values of R, G, and B. In the sample above, the grayscale pixel is actually the converted RGB: (61+80+136)/3 = 92.

Now colour images also contain regions that are gray in colour – these are 24-bit “gray” pixels, as opposed to 8-bit grayscale pixels. The example below shows a pixel in a grayscale image, and the corresponding “gray” pixel in the colour image. Grayscale pixels are pure shades of gray. Pure shades of gray in colour images are often represented with RGB all having the same value, e.g. R=137, G=137, B=137.

Pure gray versus RGB gray

Image enhancement (4) : Contrast enhancement

Contrast enhancement is applied to images where there is a lack of “contrast”. Lack of contrast manifests itself as a dull or lacklustre appearance, and can often be identified in image histograms.  Improving contrast, and making an image more visually (or aesthetically) appealing is incredibly challenging. This is in part because the result of contrast enhancement truly is a very subjective thing. This is even more relevant with colour images, as modifications to a colour, can impact different people differently. What ideal colour green should trees be? Here is a brief example grayscale image and its intensity histogram.

A picture of Reykjavik from a vintage postcard

It is clear from the histogram that the intensity values do not span the entire range of values, effectively reducing the contrast in the image. Some parts of the image that could be brighter, are dull, and other parts of the image that could be darker, are lightened. Stretching both ends of the histogram out, effectively improves the contrast in the image.

The picture enhanced by stretching the histogram, and improving the contrast

This is the simplest way of enhancing the contrast of an image, although the level of contrast enhancement applied is always guided by the visual perception of the person performing the enhancement.

Image enhancement (3) : Noise suppression

Noise suppression may be one of the most relevant realms of image enhancement. There are all kinds of noise, and even digital photographs are not immune to it. Usually the algorithms that deal with noise are grouped into two categories: those that deal with spurious noise (often called shot or impulse noise), and those that deal with noise that can envelop a whole image (in the guise of Gaussian-type noise). A good example of the latter is the “film grain” often found in old photographs. Some might think this is not “true” noise, but it does detract from the visual quality of the image, so should be considered as such. In reality noise suppression is not as important in enhancing images from digital cameras because a lot of effort has been placed on in-camera noise suppression.

Below is an example of an image with Gaussian noise. This type of noise can be challenging to suppress because it is “ingrained” in the structure of the image.

Image with Gaussian noise

Here are some different attempts at trying  to suppress the noise in the image using different algorithms (many of these algorithms can be found as plug-ins to the software ImageJ):

  • A Gaussian blurring filter (σ=3)
  • A median filter (radius=3)
  • The Perona-Malik Anisotropic Diffusion filter
  • Selective mean filter
Examples of noise suppressed using various algorithms.

To show the results, we will look at the extracted regions from some of the algorithmic results compared to the original noisy image:

Images: (A) Noisy images, (B) Perona-Malik, (C) Gaussian blur, (D) Median filter

It is clear the best results are from the Perona-Malik Anisotropic Diffusion filter [1], which has suppressed the noise whilst preserving the outlines of the major objects in the image. The median filter has performed second best, although there is some blurring which has occurred in the processed image, which letters in the poster starting to merge together. Lastly, the Gaussian blurring has obviously suppressed the noise, whilst incorporating significant blur into the image.

Suppressing noise in an image is not a trivial task. Sometimes it is a tradeoff between the severity of the noise, and the potential to blur out fine details.

[1] Perona, P.,  Malik, J., “Scale-space and edge detection using anisotropic diffusion”, In: Proceedings of IEEE Computer Society Workshop on Computer Vision,. pp.16–22. (1987)

Image enhancement (2) : the fine details (i.e. sharpening)

More important than most things in photography is acuity – which is really just a fancy word for sharpness, or even image crispness. Photographs can be blurry for a number of reasons, but usually they are all trumped by lack of proper focusing, which adds a softness to an image. Now in a 3000×4000 pixel image, this blurriness may not be that apparent – and will only manifest itself when an enlargement is made of a section of the image. In terms of photographing landscapes, the overall details in the image may be crisp, however small objects may “seem” blurry, because they are small, and lack detail in any case. Sharpening will also fail to fix large blur artifacts – i.e. it’s not going to remove defocus from a photograph which was not properly focused. It is ideal for making fine details crisper.

Photo apps and “image editing” software often contains some means of improving the sharpness of images. Usually by means of the “cheapest” algorithm in existence – “unsharp masking”. It works by subtracting  a “softened” copy of an image from the original. And by softened, I mean blurred. It basically reduces the lower frequency components of the image. But it is no magical panacea. If there is noise in an image, it too will be attenuated. The benefit of sharpening can often be seen best on images containing fine details. Here are examples of three different types of sharpening algorithms on an image with a lot of fine detail.

Sharpening: original (top-L); USM (top-R); CUSM (bot-L); MS (bot-R)

Three filters are shown here are (i) Unsharp masking (USM), (ii) Cubic Unsharp masking (CUSM) and (iii) Morphological sharpening (MS). Each of these techniques has its benefits and drawbacks, and the final image with improved acuity can only really be judged through visual assessment. Some algorithms may be more attune to sharpening large nonuniform regions (MS), whilst others (USM, CUSM) may be more aligned with sharpening fine details.

More on Mach bands

Consider the following photograph, taken on a drizzly day in Norway with a cloudy sky, and the mountains somewhat obscured by mist and clouds.

Now let’s look at the intensity image (the colour image has been converted to 8-bit monochrome):

If we look at a region near the top of the mountain, and extract a circular region, there are three distinct regions along a line. To the human eye, these appear as quite uniform regions, which transition along a crisp border. In the profile of a line through these regions though, there are two “cliffs” (Aand B) that marks the shift from one region to the next. Human eyes don’t perceive these “cliffs”.

The Mach bands is an illusion that suggests edges in an image where in fact the intensity is changing in a smooth manner.

The downside to Mach bands is that they are an artificial phenomena produced by the human visual system. As such, it might actually interfere with visual inspection to determine the sharpness contained in an image.

Mach bands and the perception of images

Photographs, and the results obtained through image processing are at the mercy of the human visual system. A machine cannot interpret how visually appealing an image is, because aesthetic perception is different for everyone. Image sharpening takes advantage of one of the tricks of our visual system. Human eyes see what are termed “Mach bands” at the edges of sharp transitions, which affect how we perceive images. This optical illusion was first explained by Austrian physicist and philosopher Ernst Mach (1838–1916) in 1865. Mach discovered how our eyes leverage the use of contrast to compensate for its inability to resolve fine detail. Consider the image below containing ten squares of differing levels of gray.

Notice how the gray squares appear to scallop, with a lighter band on the left, and a darker band on the right of the squares? This is an optical illusion, in fact the gray squares are all uniform in intensity. To resolve the brain/eyes deficiency in being able to resolve detail, incoming light gets processed in such a manner than the contrast between two different tones is exaggerated. This gives the perception of more detail. The dark and light bands seen on either side of the gradation are the Mach bands. Here is an example of what human eyes see:

What does this have to do with manipulation techniques such as image sharpening? The human brain perceives exaggerated intensity changes near edges – so image sharpening uses this notion to introduce faux Mach bands by amplifying intensity edges. Consider as an example the following  image, which basically shows two mountain sides, one behind the other. Without looking too closely you can see the Mach bands.

Taking a profile perpendicular to the mountain sides provides an indication of the intensity values along the profile, and shows the edges.

The profile shows three plateaus, and two cliffs (the cliffs are ignored by the human eyes). The first plateau is the foreground mountainside, the middle plateau is the mountainside behind that, and the uppermost plateau is some cloud cover. Now we apply an unsharp masking filter to the image, to sharpen the image (radius=10, mask weight=0.4)

Notice how the UM filter has the effect of adding a Mach band to each of the cliff regions.

Why human eyes are so great

Human eyes are made of gel-like material. It is interesting then, that together with a 3-pound brain composed predominantly of fat and water, we are capable of the feat of vision. Yes, we don’t have super-vision, and aren’t capable of zooming in on objects in the distance, but our eyes are magical. Eyes are able to focus instantaneously, and at objects as closer as 10cm, and as far away as infinity. They also automatically adjust for various lighting conditions. Our vision system is quickly able to decide what an object is and perceive 3D scenes.

Computer vision algorithms have made a lot of progress in the past 40 years, but they are by no means perfect, and in reality can be easily fooled. Here is an image of a refrigerator section in a grocery store in Oslo. The context of the content within the image is easily discernible. If we load this image into “Google Reverse Image Search” (GRIS), the program says that it is a picture of a supermarket – which is correct.

Now what happens if we blur the image somewhat? Let’s say a Gaussian blur with a radius of 51 pixels. This is what the resulting image looks like:

The human eye is still able to decipher the content in this image, at least enough to determine it is a series of supermarket shelves. Judging by the shape of the blurry items, one might go so far to say it is a refrigerated shelf. So how does the computer compare? The best it could come up with was “close-up”, because it had nothing to compare against. The Wolfram Language “Image Identification Program“, (IIP) does a better job, identifying the scene as “store”. Generic, but not a total loss. Let’s try a second example. This photo was taken in the train station in Bergen, Norway.

GRIS identifies similar images, and guesses the image is “Bergen”. Now this is true, however the context of the image is more related to railway rolling stock and the Bergen station, than Bergen itself. IIP identifies it as “locomotive engine”, which is right on target. If we add a Gaussian blur with radius = 11, then we get the following blurred image:

Now GRIS thinks this scene is “metro”, identifying similar images containing cars. It is two trains, so this is not a terrible guess. IIP identifies it as a subway train, which is a good result. Now lets try the original with Gaussian blur and a radius of 21.

Now GRIS identifies the scene as “rolling stock”, which is true, however the images it considers similar involve cars doing burn-out or stuck in the snow (or in one case a rockhopper penguin). IIP on the other hand fails this image, identifying it as a “measuring device”.

So as the image gets blurrier, it becomes harder for computer vision systems to identify, whereas the human eye does not have these problems. Even in a worst case scenario, where the Gaussian blur filter has a radius of 51, the human eye is still able to decipher its content. But GRIS thinks it’s a “photograph” (which *is* true, I guess), and IIP says it’s a person.

In image processing, have we have forgotten about aesthetic appeal?

In the golden days of photography, the quality and aesthetic appeal of the photograph was unknown until after the photograph was processed, and the craft of physically processing it played a role in how it turned out. These images were rarely enhanced because it wasn’t as simple as just manipulating it in Photoshop. Enter the digital era. It is now easier to take photographs, from just about any device, anywhere. The internet would not be what it is today without digital media, and yet we have moved from a time when photography was a true art, to one in which photography is a craft. Why a craft? Just like a woodworker crafts a piece of wood into a piece of furniture, so to do photographers  crafting their photographs in the like of Lightroom,or Photoshop.There is nothing wrong with that, although I feel like too much processing takes away from the artistic side of photography.

Ironically the image processing community has spent years developing filters to process images, to make them look more visually appealing – sharpening filters to improve acuity, contrast enhancement filters to enhance features. The problem is that many of these filters were designed to work in an “automated” manner (and many really don’t work well), and the reality is that people prefer to use interactive filters. A sharpening filter may work best when the user can modify its strength, and judge its aesthetic appeal through qualitative means. The only place “automatic” image enhancement algorithms exist are those in-app filters, and in-camera filters. The problem is that it is far too difficult to judge how a generic filter will affect a photograph, and each photograph is different. Consider the following photograph.

Cherries in a wooden bowl, medieval.

A vacation pic.

The photograph was taken using the macro feature on my 12-40mm Olympus m4/3 lens. The focal area is the top-part of the bottom of the wooden bucket. So some of the cherries are in focus, others are not, and there is a distinct soft blur in the remainder of the picture. This is largely because of the low depth of field associated with close-ip photographs… but in this case I don’t consider this a limitation, and would not necessarily want to suppress it through sharpening, although I might selectively enhance the cherries, either through targeted sharpening or colour enhancement. The blur is intrinsic to the aesthetic appeal of the image.

Most filters that have been incredibly successful are usually proprietary, and so the magic exists in a black box. The filters created by academics have never faired that well. Many times they are targeted to a particular application, poorly tested (on Lena perhaps?), or not at all designed from the perspective of aesthetics. It is much easier to manipulate a photograph in Photoshop because the aesthetics can be tailored to the users needs. We in the image processing community have spent far too many years worrying about quantitative methods of determining the viability of algorithms to improve images, but the reality is that aesthetic appeal is all that really matters. Aesthetic appeal matters, and it is not something that is quantifiable. Generic algorithms to improve the quality of images don’t exist, it’s just not possible in the overall scope of the images available. Filters like Instagram’s Larkwork because they are not changing the content of the image really, they are modifying the colour palette, and they do that applying the same look-up table for all images (derived from some curve transformation).

People doing image processing or computer vision research need to move beyond the processing and get out and take photographs. Partially to learn first hand the problems associated with taking photographs, but also to gain an understanding of the intricacies of aesthetic appeal.