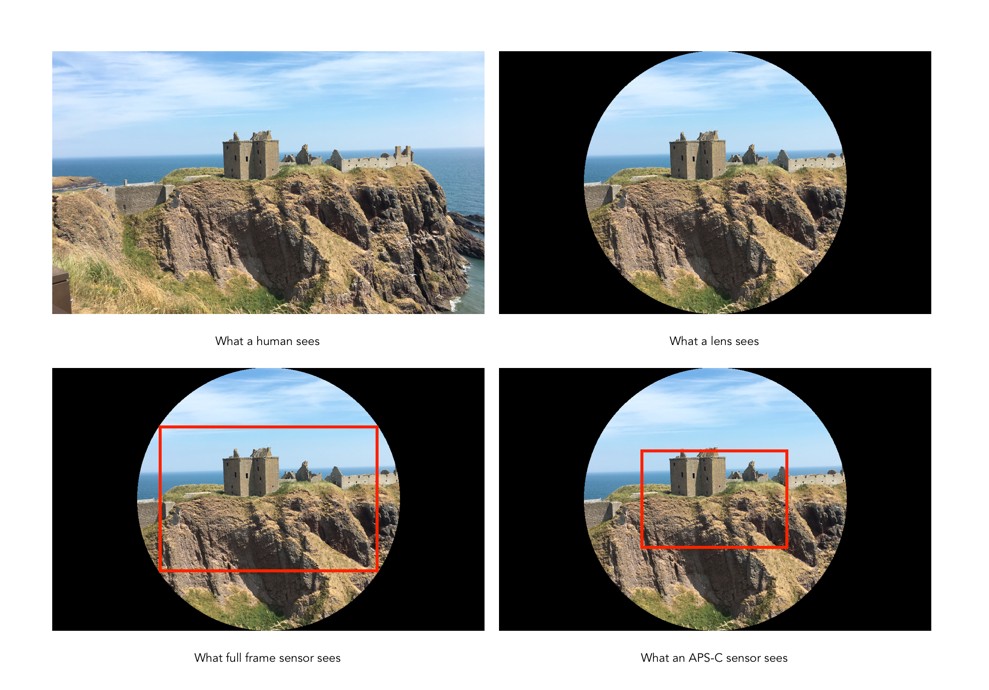
The crop factor of a sensor is the ratio of one camera’s sensor size in relation to another camera’s sensor of a different size. The term is most commonly used to represent the ratio between a 35mm full-frame sensor and a crop sensor. The term was coined to help photographers understand how existing lenses would perform on new digital cameras which had sensors smaller than the 35mm film format.
How to calculate crop factors?
It is easy to calculate a crop factor using the size of a crop-sensor in relation to a full-frame sensor. This is usually determined by comparing diagonals, i.e. full-frame sensor diagonal/cropped sensor diagonal. The diagonals can be calculated using Pythagorean Theorem. Calculate the diagonal of the crop-sensor, and divide this into the diagonal of a full-frame sensor, which is 43.27mm.

Here is an example of deriving the crop factor for a MFT sensor (17.3×13mm):
- The diagonal of a full-frame sensor is √(36²+24²) = 43.27mm
- The diagonal of the MFT sensor is √(17.3²+13²) = 21.64mm
- The crop factor is 43.27/21.64 = 2.0
This means a scene photographed with a MFT sensor will be smaller by a factor or 2 than a FF sensor, i.e. it will have half the physical size in dimensions.
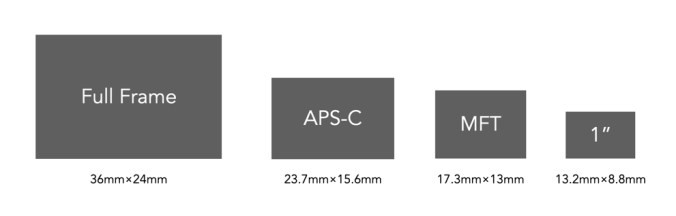
Common crop factors
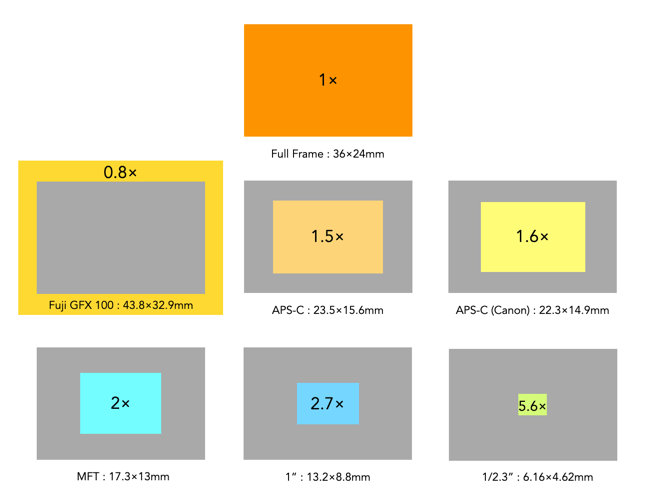
| Type | Crop factor |
|---|---|
| 1/2.3″ | 5.6 |
| 1″ | 2.7 |
| MFT | 2.0 |
| APS-C (Canon) | 1.6 |
| APS-C (Fujifilm Nikon, Ricoh, Sony, Pentax) | 1.5 |
| APS-H (defunct) | 1.35 |
| 35mm full frame | 1.0 |
| Medium format (Fuji GFX) | 0.8 |
Below is a visual depiction of these crop sensors compared to the 1× of the full-frame sensor.
How are crop factors used?
The term crop factor is often called the focal length multiplier. That is because it is often used to calculate the “full-frame equivalent” focal length of a lens on a camera with a cropped sensor. For example, a MFT sensor has a crop factor of 2.0. So taking a MFT 25mm lens, and multiplying it by 2.0 gives 50mm. This means that a 25mm lens on a MFT camera would behave more like a 50mm lens on a FF camera, in terms of AOV, and FOV. If a 50mm mounted on a full-frame camera is placed next to a 25mm mounted on a MFT camera, and both cameras were the same distance from the subject, they would yield photographs with similar FOVs. They would not be identical of course, because they have different focal lengths which modifies characteristics such as perspective and depth-of-field.
Things to remember
- The crop-factor is a value which relates the size of a crop-sensor to a full-frame sensor.
- The crop-factor does not affect the focal length of a lens.
- The crop-factor does not affect the aperture of a lens.