The whole full-frame “equivalence” thing

There is a lot of talk on the internet about the “equivalency” of crop-sensors relative to full-frame sensors – often in an attempt to somehow rationalize things in the context of the ubiquitous 35mm film frame size (36×24mm). Usually equivalence involves the use of the cringe-worthy “crop-factor”, which is just a numeric value which compares the dimensions of one sensor against those of another. For example a camera with an APS-C sensor, e.g. Fuji-X, has a sensor size of 23.5×15.6mm which when compared with a full-frame (FF) sensor gives a crop-factor of approximately 1.5. The crop-factor is calculated by dividing the diagonal of the FF sensor by that of the crop-sensor, in the case of the example 43.42/28.21 = 1.53.

Fig.1: Relative sensor sizes and associated crop-factors.

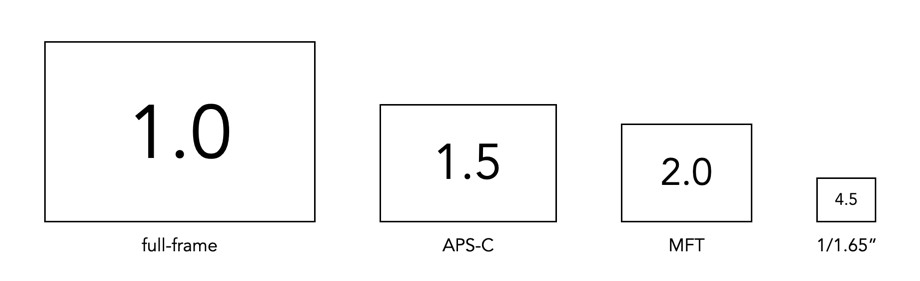
Easy right? But this only really only matters if you want to know what the full-frame equivalent of a crop-sensor lens is. For example a 35mm lens has an angle of view of rough 37° (horizontal). If you want to compare this to a full-frame lens, you can multiply this by the crop-factor for APS-C sensors, so 35×1.5≈52.5mm. So an APS-C 35mm lens has a full-frame equivalency of 52.5mm which can be rounded to 50mm, the closest full-frame equivalent lens. Another reason equivalency might be important is perhaps you want to take similar looking photographs with two different cameras, i.e. two cameras with differing sensor sizes.

But these are the only real contexts where it is important – regardless of the sensor size, if you are not interested in comparing the sensor to that of a full-frame camera, equivalencies don’t matter. But what does equivalence mean? Well it has a number of contexts. Firstly there is the most commonly used situation – focal-length equivalence. This is most commonly used to relate how a lens attached to a crop-sensor camera behaves in terms of a full-frame sensor. It can be derived using the following equation:

Equivalent-FL = focal-length × crop-factor

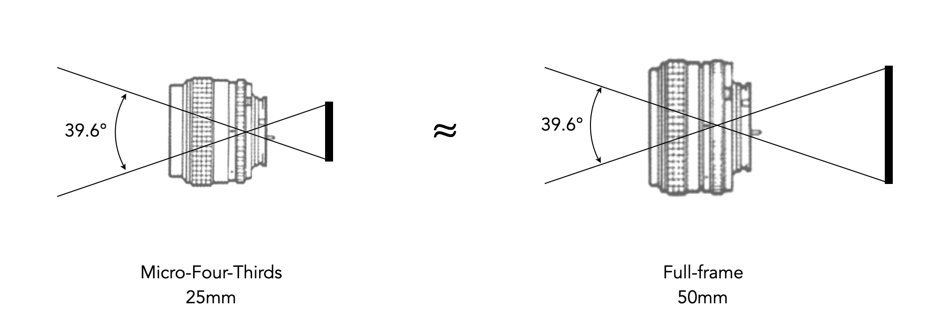
The crop-factor in any case is more of a differential-factor which can be used to compare lenses on different sized sensors. Figure 2 illustrates two different systems with different sensor sizes, with two lenses that have an identical angle of view. To achieve the same angle of view on differently sized sensors, a different focal length is needed. A 25mm lens on a MFT sensor with a crop-factor of 2.0 gives the equivalent angle of view as a 50mm lens on a full-frame sensor.

Fig.2: Focal-length equivalence (AOV) between a Micro-Four-Thirds, and a full-frame sensor.

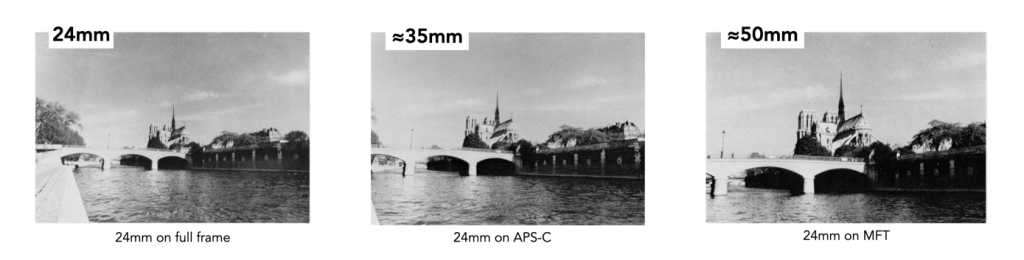
Focal length equivalency really just describes how a lens will behave on different sized sensors, with respect to angle-of-view (AOV). For example the image below illustrates the AOV photograph obtained when using a 24mm lens on three different sensors. A 24mm lens used on an APS-C sensor would produce an image equivalent to a full-frame 35mm lens, and the same lens used on a MFT sensor would produce an image equivalent to a full-frame 50mm lens.

Fig.3: The view of a 24mm lens on three different sensors.

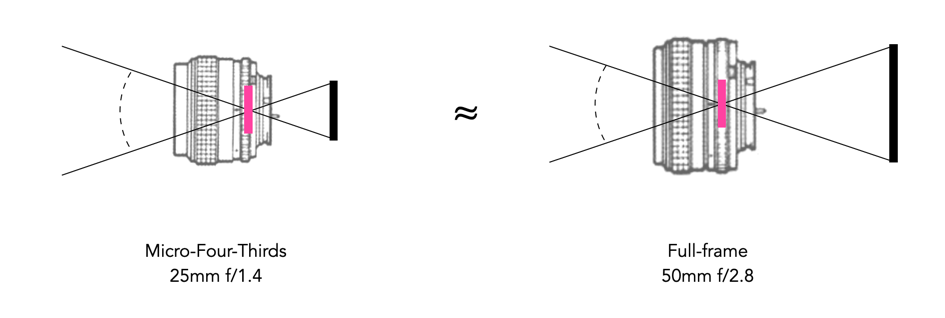
When comparing a crop-sensor camera directly against a FF camera, in the context of reproducing a particular photograph, two other equivalencies come into play. The first is aperture equivalence. An aperture is just the size of the hole in the lens diaphragm that allows light to pass through. For example an aperture of f/1.4 on a 50mm lens means a maximum aperture size of 50mm/1.4 = 35.7mm. A 25mm f/1.8 MFT lens will not be equivalent to a 50mm f/1.8mm FF lens because the hole on the FF lens would be larger. To make the lenses equivalent from the perspective of aperture requires multiplying the aperture value by a crop factor:

Equivalent-Aperture = f-number × crop-factor

Figure 4 illustrates this – a 25mm lens used at f/1.4 on a MFT camera would be equivalent to using a 50mm with an aperture of f/2.8 on a full-frame camera.

Fig.4: Aperture equivalence between a 25mm MFT lens, and a 50mm full-frame lens.

The second is ISO equivalence, with a slightly more complication equation:

Equivalent-ISO = ISO × crop-factor²

Therefore a 35mm APS-C lens at f/5.6 and 800 ISO would be equivalent to a 50mm full frame lens at f/8 and 1800 ISO. Below is a sample set of equivalencies:

           Focal Length / F-stop = Aperture ∅ (ISO)
       MFT (×2.0): 25mm / f/2.8 = 8.9mm (200)
     APS-C (×1.5): 35mm / f/3.9 = 8.9mm (355)
Full-frame (×1.0): 50mm / f/5.6 = 8.9mm (800)
      6×6 (×0.55): 90mm / f/10.0 = 9.0mm (2600)

Confused? Yes, and so are many people. None of this is really that important, except to understand how a lens behaves will be different depending on the size of the sensor in the camera it is used on. Sometimes, focal-length equivalence isn’t even possible. There are full-frame lenses that just don’t have a cropped equivalent. For example a Sigma 14mm f/1.8 would need an APS-C equivalent of 9mm f/1.2, or a MFT equivalent of 7mm f/0.9. The bottom line is that if you only photography using a camera with an APS-C sensor, then how a 50mm lens behaves on that camera should be all that matters.

Things to consider when choosing a digital camera

There is always a lot to think about when on the path to purchasing a new camera. In fact it may be one of the most challenging parts of getting started in photography, apart from choosing which lenses will be in your kit. It was frankly easier when there was less in the way of choices. You could make a list of 100 different things with which to compare cameras, but better to start with a simple series of things to consider.

Some people are likely swayed by fancy advertising, or cool features. Others think only of megapixels. There are of course many things to consider. This post aims to provide a simple insight into the sort of things you should consider when buying a digital camera. It is aimed at the pictorialist, or hobby/travel photographer. The first thing people think about when considering a camera is megapixels. These are important from a marketing perspective, mainly because they are a quantifiable number that can be sold to potential buyers. It is much harder to sell ISO or dynamic range. But megapixels aren’t everything, as I mentioned in a previous post, anywhere from 16-24 megapixels is fine. So if we move beyond the need for megapixels, what should we look for in a camera?

Perhaps the core requirement for a non-professional photographer is an understanding of what the camera is to be used for – landscapes, street photography, macro shooting, travel, blogging, video? This plays a large role in determining the type of camera from the perspective of the sensor. Full frame (FF) cameras are only required by the most dedicated of amateur photographers. For everyday shooting they can be far too bulky and heavy. At the other end of the spectrum is Micro-Four-Thirds (MFT), which is great for travelling because of it is compact size. In the middle are the cameras with APS-C sensors, sometimes often found in mirrorless cameras, and even compact fixed-lens format cameras. If you predominantly make videos, then a camera geared towards maybe less MP and more video features is essential. For street photography, perhaps something compact and unobtrusive. Many people also travel with a back-up camera, so there is that to consider as well.

Next is price, because obviously if I could afford it I would love a Leica… but in the real world it’s hard to justify. As the sensor gets larger, the price goes up accordingly. Large sensors cost more to make, and mechanisms such as image stabilization have to be scaled accordingly. Lenses for FF are also more expensive because they contain larger pieces of glass. It’s all relative – spend what you feel comfortable spending. It’s also about lifespan – how long will you use this camera? It was once about upgrading for more megapixels or fancy new features – it’s less about that now. Good cameras aren’t cheap – nothing in life is, neither are good lenses… but spend more for better quality and buy fewer lenses.

Then there are lenses. You don’t need dozens of them. Look at what lenses there are for what you want to do. You don’t need a macro lens if you are never going to take closeup shots, and fisheye lenses are in reality not very practical. Zoom lenses are the standard lenses supplied with many cameras, but the reality is a 24-80 is practical (although you honestly won’t use the telephoto function that much), anything beyond 80mm is likely not needed. Choose a good quality all round prime lens. There are also a variety of price points with lenses. Cheaper lenses will work fine but may not be as optically nice, have weather proofing or contain plastic instead of metal bodies. You can also go the vintage lens route – lots of inexpensive lenses to play with.

Now we get to the real Pandora’s Box – features. What extra features do you want? Are they features that you will use a lot? Focus stacking perhaps, for well focused macro shots. Manual focus helpers like focus peaking for use with manual lenses. High resolution mode? Image stabilization (IS)? I would definitely recommend IS but lean perhaps towards the in-body rather than the in-lens. In body means any lens will work with IS, even vintage ones. In lens is just too specialized and I favour less tech inside lenses. Features usually come at a price- battery drain, so think carefully about what makes sense for your particular situation.

So what to choose? Ultimately you can read dozens of reviews, watch reviews on YouTube, but you have to make the decision. If you’re unsure, try renting one for a weekend and try it out. There is no definitive guide to buying a digital camera, because there is so much to choose from, and everyone’s needs are so different.

The basics of the X-Trans sensor filter

Many digital cameras use the Bayer filter as a means of capturing colour information at the photosite level. Bayer filters have colour filters which repeat in 2×2 pattern. Some companies, like Fuji use a different type of filter, in Fuji’s case the X-Trans filter. The X-Trans filter appeared in 2012 with the debut of the Fuji X-Pro1.

The problem with regularly repeating patterns of coloured pixels is that they can result in moiré patterns when the photograph contains fine details. This is normally avoided by adding an optical low-pass filter in front of the sensor. This has the affect of applying a controlled blur on the image, so sharp edges and abrupt colour changes and tonal transitions won’t cause problems. This process makes the moiré patterns disappear, but at the expense of some image sharpness. In many modern cameras the sensor resolution often outstrips the resolving power of lenses, so the lens itself acts as a low-pass filter, and so the LP filter has been dispensed with.

Bayer (left) versus X-Trans colour filter arrays

C-Trans uses a more complex array of colour filters. Rather than the 2×2 RGBG Bayer pattern, the X-Trans colour filter uses a larger 6×6 array, comprised of differing 3×3 patterns. Each pattern has 55% green, 22.5% blue and 22.5% red light sensitive photosite elements. The main reason for this pattern was to eliminate the need for a low-pass filter, because this patterning reduces moiré. This theoretically strikes a balance between the presence of moiré patterns, and image sharpness.

The X-Trans filter provides a for better colour production, boosts sharpness, and reduces colour noise at high ISO. On the other hand, more processing power is needed to process the images. Some people say it even has a more pleasing “film-like” grain.

CharacteristicX-TransBayer
Pattern6×6 allows for more organic colour reproduction.2×2 results in more false-colour artifacts.
MoiréPattern makes images less susceptible to moiré.Bayer filters contribute to moiré.
Optical filterNo low-pass filer = higher resolution.Low-pass filter compromises image sharpness.
ProcessingMore complex to process.Less complex to process.
Pros and Cons between X-Trans and Bayer filters.

Further reading:

What is image resolution?

Sometimes a technical term gets used without any thought to its meaning, and before you know it becomes an industry standard. This is the case with the term “image resolution”, which has become the standard means of describing how much detail is portrayed in an image. The problem is that the term resolution can mean different things in photography. In one context it is used in describing the pixel density of devices (in DPI or PPI). For example a screen may have a resolution of 218 ppi (pixels-per-inch), and a smartphone might have a resolution of 460ppi. There is also sensor resolution, which is concerned with photosite density on a sensor based on sensor size. You can see how this can get confusing.

Fig.1: Image resolution is about detail in the image (the image on the right becomes pixelated when enlarged)

The term image resolution really just refers to the number of pixels in an image, i.e. pixel count. It is usually expressed in terms of two numbers for the number of pixel rows and columns in an image, often known as the linear resolution. For example the Ricoh GR III has an APS-C sensor with a sensor resolution of 6051×4007, or about 24.2 million photosites on the physical sensor. The effective number of pixels in an image derived from the sensor is 6000×4000, or a pixel count of 24 million pixels – this is considered the image resolution. Image resolution can be used in the context of describing a camera in broad context, e.g., the Sony A1 has 50 megapixels, or based on dimensions, “8640×5760”. It is often used in the context of comparing images, e.g. the Sony A1 with 50MP has a higher resolution than the Sony ZV-1 with 20MP. The image resolution of two images is shown in Figure 1 – a high resolution image has more detail than an image with lower resolution.

Fig.2: Image resolution and sensor size for 24MP.

Technically when talking about the sensor we are talking about photosites, but image resolution is not about the sensor, it is about the image produced from the sensor. This is because it is challenging to attempt to compare cameras based on photosites, as they all have differing properties, e.g. photosite area. Once the data from the sensor has been transformed into an image, then the photosite data becomes pixels, which are dimensionless entities. Note that the two dimensions representing the image resolution will change depending on the aspect ratio of the sensor. So while a 24MP image on a 3:2 sensor (APS-C) will have dimensions of 6000 and 4000, a full-frame sensor with the same pixel count will have dimensions of roughly 5657×4243.

Fig.3: Changes in image resolution within different sensors.

Increasing image resolution does not always mean increasing the linear resolution, or detail in the same amount. For example a 16MP image from 3:2 ratio sensor would produce an image with resolution of 4899×3266. A 24MP images from the same type of sensor would increase the pixel count by 50%, however the vertical and horizontal dimensions would only increase by 20% – so a much lower change in linear resolution. To double the linear resolution would require an increase in resolution to a 64MP image.

Is image resolution the same as sharpness? Not really, this has more to do with an images spatial resolution (this is where the definition of the word resolution starts to betray itself). Sharpness concerns how clearly defined details within images appear, and is somewhat subjective. It’s possible to have a high resolution image that is not sharp, just like its possible to have a low resolution image that has a good amount of acuity. It really depends on the situation it is being viewed in, i.e. back to device pixel density.

Those weird image sensor sizes

Some sensors sizes are listed as some form of inch, for example a sensor size of 1″ or 2/3”. The diagonal size of this sensor is actually only 0.43” (11mm). Cameras sensors of the “inch” type do not signify the actual diagonal size of the sensor. These sizes are actually based on old video cameras tubes where the inch measurement referred to the out diameter of the video tube. 

The world use to use vacuum tubes for a lot of things, i.e. far beyond just the early computers. Video cameras like those used on NASA’s unmanned deep space probes like Mariner used vacuum tubes as their image sensors. These were known as vidicon tubes, basically a video camera tube design in which the target material is a photoconductor. There were a number of branded versions, e.g. Plumicon (Philips), Trinicon (Sony).

A sample of the 1″ vidicon tube, and its active area.

These video tubes were described using the outside diameter of the overall glass tube, and always expressed in inches. This differed from the area of the actual imaging sensor, which was typically two-thirds of the size. For example, a 1″ sized tube typically had a picture area of about 2/3″ on the diagonal, or roughly 16mm. For example, Toshiba produced Vidicon tubes in sizes of 2/3″, 1″, 1.2″ and 1.5″.

These vacuum tube based sensors are long gone, yet some manufacturers still use this deception to make tiny sensors seem larger than they are. 

Image sensorImage sensor sizeDiagonalSurface Area
1″13.2×8.8mm15.86mm116.16mm2
2/3″8.8×6.6mm11.00mm58.08mm2
1/1.8”7.11×5.33mm8.89mm37.90mm2
1/3”4.8×3.6mm6.00mm17.28mm2
1/3.6″4.0×3.0mm5.00mm12.00mm2
Various weird sensor sizes

For example, a smartphone may have a camera with a sensor size of 1/3.6″. How does it get this? The actual sensor will be approximately 4×3mm in size, with a diagonal of 5mm. This 5mm is multiplied by 3/2 giving 7.5mm (0.295″). 1” sensors are somewhere around 13.2×8.8mm in size with a diagonal of 15.86mm. So 15.86×3/2=23.79mm (0.94″), which is conveniently rounded up to 1″. The phrase “1 inch” makes it seem like the sensor is almost as big as a FF sensor, but in reality they are nowhere near the size. 

Various sensors and their fractional “video tube” dimensions.

Supposedly this is also where MFT gets its 4/3 from. The MFT sensor is 17.3×13mm, with a diagonal of 21.64mm. So 21.64×3/2=32.46mm, or 1.28″, roughly equating to 4/3″. Although other stores say 4/3 is all about the aspect ratio of the sensor, 4:3.

What happens to “extra” photosites on a sensor?

So in a previous post we talked about effective pixels versus total photosites, i.e. the effective number of pixels in a image (active photosites on a sensor) is usually smaller than the total number of photosites on a sensor. That leaves a small number of photosites that don’t contribute to forming an image. These “extra” photosites sit beyond the camera’s image mask, and so are shielded from receiving light. But they are still useful.

These extra photosites receive a signal that tells the sensor how much dark current (unwanted free electrons generated in the CCD due to thermal energy) has built up during an exposure, essentially establishing a reference dark current level. The camera can then use this information to compensate for how the dark current contributes to the effective (active) photosites by adjusting their values (through subtraction). Light leakage may occur at the edge of this band of “extra” photosites, and these are called “isolation” photosites. The figure below shows the establishment of the dark current level.

Creation of dark current reference pixels