Feinmess was founded by Gustav Heyde (1846-1930) in Dresden (1872) as Gustav Heyde – Mathematical-Mechanical Institute & Optical Precision Workshop (Feinmess roughly translates to “fine measurement”). The company produced astronomical and geodetic precision devices: binoculars, domes and refractors for observatories, telescopes, theodolites (land surveying devices), hand-held rangefinders for aerotopography, and actino-photometers (light meters). From 1931 the company was converted to a limited partnership and concentrated on arms production. In 1945 the company operated under the name Gustav Heyde GmbH. After the war the company was expropriated by the state of Saxony operating as Optik, VVB für feinmechanische und optische Geräte. Finally in 1948 it changed its name to Optik – Feinmess Dresden VEB.
In the 1950s, Welta (Freital) requested a lens for their Belfoca 1 and 2, medium format cameras. There was so much demand for lenses that Feinmess accepted the order, never having produced lenses before. The optical design office was set up by Ihagee, and work on the design of the lens was taken over by Claus Lieberwirth is August 1953. From 1954 the Bonotar was created as a 105mm, f/4.5 lens. A second lens, the 105mm f/6.5 Bonar was derived from the Bonotar. Both lenses were simple in construction, and inexpensive. About 20,000 M42 and 4,000 Exakta mount Bonotars were produced. The lens established itself as a cheaper alternative to the popular Meyer Optik Trioplan. In 1960 production of both lenses was halted, and the optics department was eventually merged into VEB Carl Zeiss Jena.
Interestingly, VEB Feinmess was used in the 1950s as “shield” company, especially for patent applications related to VEB Zeiss Ikon, due to the issues with Zeiss-Ikon Stuttgart. This is why camera patents for well known GDR products are the property of VEB Feinmess, until the founding of VEB Kamera-and-Kinowerk in 1959. There are literally hundreds of patents for lenses, viewfinder systems, motor winding systems, and viewfinder cameras (to name but a few) − all products that Feinmess did not manufacture.
The company still exists today, recently renamed from Feinmess Dresden GmbH to Steinmeyer Mechatronik GmbH, and makes various measuring instruments, positioning systems and optical devices. Bonotar 105mm lenses can be found for between €60-90.
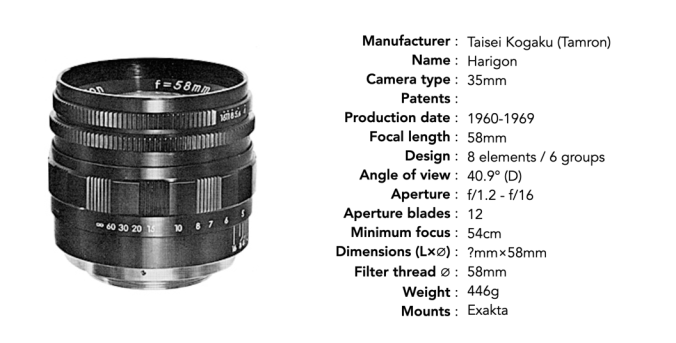
Not all fast lenses came from the lens giants. Other slipped under the radar. A good example is the Harigon 58mm f/1.2. It was made by Taika, which in reality was a export brand of Taisei Kōgaku Kōgyō K.K., the company which would later become Tamron (in all likelihood, Taika was a simpler and easier brand to remember than the company name). It was also sold as a Tamron lens.
The Harigon 58mm f/1.2
The lens was introduced in 1960, for the US market. The design was likely along the lines of the Zunow 5.8mm f/1.2, which is a itself is scarce as hen’s teeth.
Optical Science has produced this all-new Taika Rare Earth Lens, Eight hard coated complex elements of fabulous precision are responsible for its superb color correction and sharpness beyond reproach. The Taika Harigon has a dignified beauty – ebony black with colored engraved scales. A “Rolls Royce” in performance and appearance. You will be proud to own it, proud to show it and proud to exhibit its beautiful pictures.
Apparently it was available in Exakta mount, in addition to Praktica M42, and Miranda. In the early 1960s it was advertised as the standard lens on the Exa II camera for US$198.50 (from Seymour’s, NY). Interestingly the lens itself sold for US$169.50. By the time the Adapt-A-Matic Lenses appeared in the late 1960s, the 58mm lens had disappeared. There seem to be very few on the market today.
There aren’t many Swiss companies that manufacturer lenses apart from Kern, but one lens exists in the form of Volpi AG, a company based in Urdorf near Zurich. The company specialized in higher-end projection systems. In the early 1970s the company produced a lens called the Peri-Apollar 360°.
The Peri-Apollar 360°, nicknamed the “optical bell”, or “Swissorama” lens, does not use the fisheye principle or any of the other well-known panorama methods. It was developed by H. Brachvogel of Volpi AG, allowing the capture of 360° seamlessly in one image. If the camera is pointed with the lens in a vertical position, then the camera and photographer are covered by the centre of the image, which is blocked out. The inner edge of the circular ring is the lower edge of the image, the outer edge is the upper edge of the image.
Fig.1: The Volpi Peri-Apollar lens
The lens came in two focal lengths 25mm f/4, and 40mm f/5.6. The lenses could be adapted to many differing formats, including 16mm, 35mm, and 120 film (and could also be used as a periscope without a camera). The lens covers a complete circular image of 360°, without any gaps. When mounted in vertical position, the field of view has an angle of 60°, i.e. 30° above, and 30° below the horizon. The image is created according to the rules of central projection, where all verticals in the object field converge in a radially symmetric manner in the centre of the image. The lens was not actually intended for taking pictures in the horizontal direction
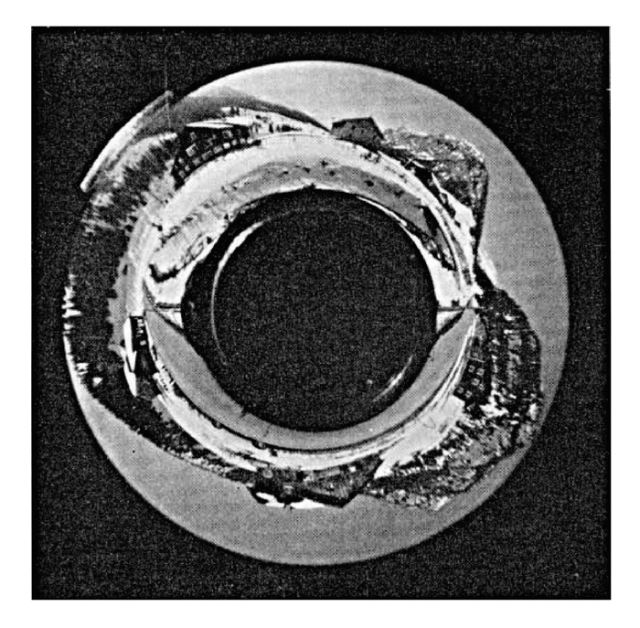
Fig.2: One of the few images available from the lens (somewhere in the Alps) Note that the point from which the image is taken, i.e. the lens itself in the image centre, is blacked out.
The light enters the protruding glass dome (which is an aspherical lens), and is refracted inwards at the transition between air and glass, and then totally reflected at the opposite glass-air interface. In this way the ring-shaped image is created in the front glass body. It then passes through a corrective lens and is projected onto the film by a lens of normal construction. Distance and f/stops can be set as with any normal lens.
Fig.3: A schematic of the lens configuration of the 40mm f/5.6 lens
The marketing material for the lens suggested applications in numerous fields, industrial applications, e.g. remote observation of pipes, police and military applications, recording of traffic intersections, aviation, and internal observation of nuclear reactors. The 25mm f/4 C-mount lens (with an attachable 90° periscope viewfinder sold for US$4,995 (1983); and the ALPA 40mm f/5.6 was US$3,595 (1977). In the US it was marketed by Karl Heitz. The lens is often attributed to Kinoptic because it appeared in their catalogs, however they did not produce the lens.
Lens specifications:
24mm×36mm
16mm film
lens
40mm f/5.6
25mm f/4
focal length of the peri-lens
20mm
15mm
aperture of the peri-lens
f/1
f/1
outer diameter of the image
23mm
11mm
inner diameter of the image
8mm
4mm
degrees, horizontal
360°
360°
degrees, vertical
2×30°
2×30°
number of lens elements
8
4
aperture range
f/5.6 to f/22
f/4 to f/22
close focusing distance
0.1m
0.1m
weight
900g
750g
Acknowledgement: Data for the table, and help with schematics adapted from information in “Fisheye-Objektive und verwandte Abbildungstechniken (IV)”, J. Scheibel in PHOTO-TECHNIK UND WIRTSCHAFT, No.8, pp. 225-227 (1973)
When you look at modern lenses, there isn’t much that sets them apart. They are usually pretty plain black cylinders, partially due to the consistency of modern lens design. The same could not be said of vintage lenses. Maybe this has something to do with the fact that many vintage lenses were made by companies that focused purely on lenses, and as such tried hard to differentiate their lenses from their competitors. For example a company like Meyer Optik Gorlitz manufactured lenses for cameras using the Exakta mount had to compete for the consumer spending with lenses from a myriad of other companies (at least 25-30).
Over time the appearance of lenses naturally changed, as new materials were introduced, often for the purpose of reducing the overall cost of lenses. For example, many early 35mm lenses had a shiny, chrome-like appearance. The earliest, pre-war lenses were often made of chrome-plated brass. As the Second World War progressed, shortages or re-direction of materials like brass led some manufacturers had begun to transition towards aluminum, which was both less expensive, easier to manufacture, and produced a lighter lens. While these early aluminum lenses were aesthetically pleasing there was little that differentiated them in a world where there was an increasing number of 3rd party lens manufacturers.
Fig.1: Evolution of the aluminum design of the Zeiss Jena Biotar 58mm f/2
When it first appeared as a lens material, aluminum was chic. The 1950s was the age of aluminum, which was a symbol of modernism. Many of the largest aluminum producers pursued new markets to absorb their increased wartime production capacity, used in everything from drink cans to kitchenware and Airstream trailers (there was also extra aluminum from scrapping of war surplus aircraft etc.). These aluminum lenses were initially clear-coated to reduce the likelihood of tarnishing, but eventually anodized to provide a robust black coating. Also in the 1950s, lens manufacturers to realize changing trends in lens design – buyers had moved away from the idea of pure practicality, and focused also on design. This wasn’t really surprising considering the broad scope of modernist design during this period – design tended to favour sleek and streamlined silhouettes. It is interesting to note that most of the aesthetically pleasing lenses of the post-1950 period originated from Germany.
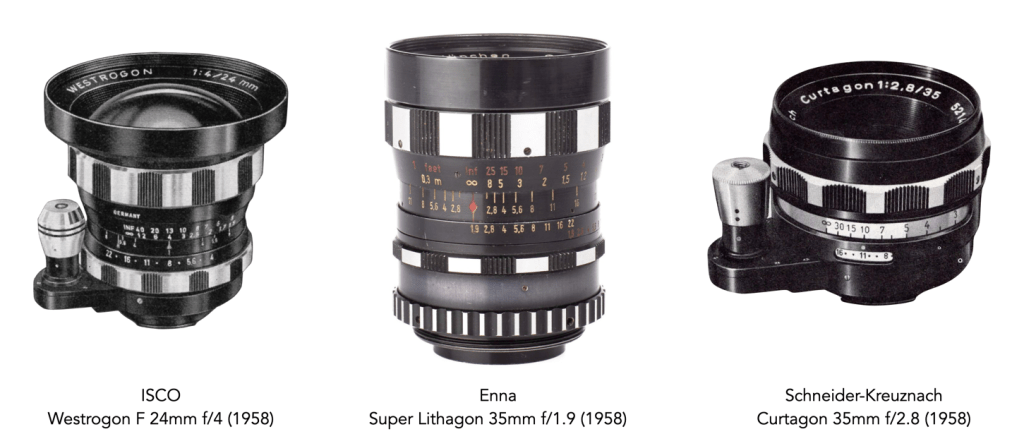
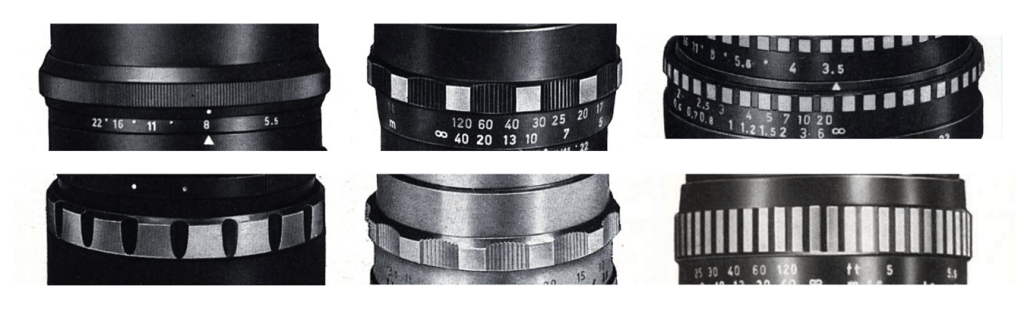
Fig.2: Every lens manufacturer had a different interpretation of both “berg-and-tal”, and the black-and-white “zebra” aesthetic
The first notable change was the gradual move towards what in German manufacturers called the “berg und tal” design, or rather “mountain and valley” design of the grips on a lens – usually knurled depressions milled into the surface of the ring (but also the opposite like the lenses of Steinheil where the depressions are smooth and the mountains are knurled). English-speaking regions often referred to this as a “knurled grip”. Appearing in the early 1950s, it was particularly common for focusing rings, making them more prominent, and likely more ergonomic, i.e. easier to grip. Some lenses started with the focusing ring, and eventually used the same design on the aperture ring. Prior to this most lenses used a simple straight knurl on the adjustment rings.
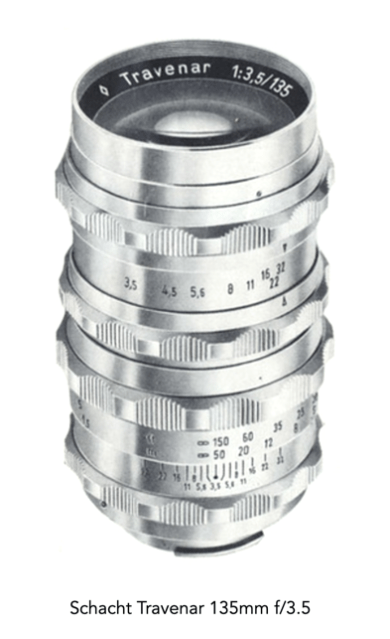
Towards the end of the 1950s, the pure-aluminum design transitioned to a combination of silver and black anodized aluminum. The lens bodies themselves were mostly black, with the “berg und tal” designs alternating between black and silver. This alternating pattern is what is colloquially known as “zebra” design. Many lens manufacturers utilized the zebra aesthetic in one form or another including Schacht, Enna, Steinheil, Schneider-Kreuznach, Meyer Optik, Rodenstock, ISCO etc..
Fig.3: Meyer Optik had an interesting twist on the zebra design. There were very few of these lenses and they are very minimalistic in design.
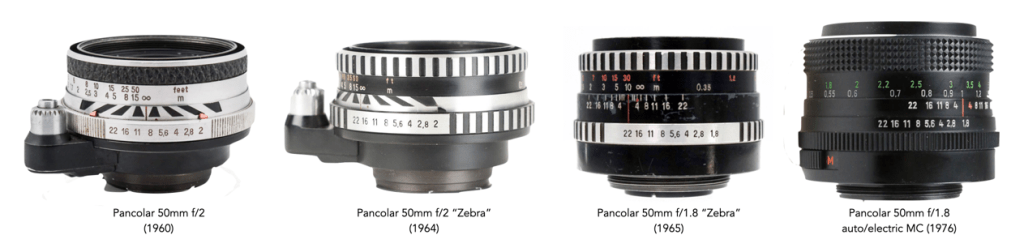
Zeiss probably produced the best known examples of the zebra aesthetic design with the Pancolar and Flektogon series of lenses. Although these lenses did not appear until the early 1960s, they bypassed the more prominent berg-und-tal in favour of a much subdued black-and-white knurled grip (which is also something Meyer Optik did with lenses like the Lydith 30mm). This design for both focusing and aperture rings replaced the rough textured rings of the earlier lenses. Some call these lenses the “Star Wars lens”. The Pancolar 50mm f/2 appeared ca. 1960 in the form of an f/2 lens with dual black-silver body encompassing a “converging-distance” depth of field range indicator, and either a textured or nubbed rubber focusing ring. This evolved a few years later to the classic “zebra” design, shortly before the release of the classic Pancolar 50mm f/1.8, which also sported the zebra design. By the 1970s, the Pancolar 50mm f/1.8 had morphed into a complete black configuration with a large rubber cross knurling focus grip and a finely knurled aperture ring.
Fig.4: Evolution of design aesthetics of the Zeiss Pancolar 50mm lens.
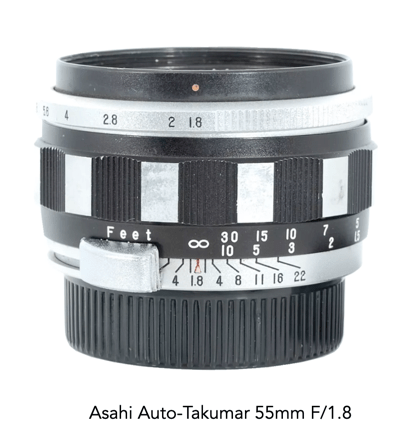
Japanese manufacturers transitioned from aluminum/chrome to black bypassing the zebra design. The one exception seems to be the Asahi Auto-Takumar 55mm F/1.8, which appeared in 1958, but is the sole example of zebra design (at least by Asahi). Japanese manufacturers did however embrace the berg-and-tal design.
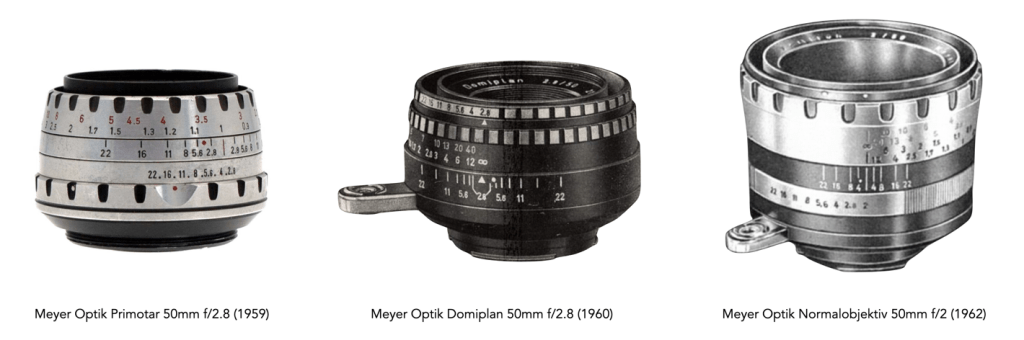
Fig.5: Some lens companies couldn’t settle on a design. Here we have differing focus ring designs from the same Meyer Optik catalog in the 1960s
By the mid-1960s many camera manufacturers were producing their own lenses, particularly in Japan. As such lenses became more consistent, with little need to compete with other lens manufacturers. There were still 3rd party lens manufacturers but their perspective was to concentrate more on the manufacture of inexpensive lenses. Most lenses transitioned to using standardized, nonchalant black aluminum lenses, with the onus being more on the quality of the optics. Grips transitioned from berg-und-tal to a flatter, square-grooved style, still using a in black/chrome contrast (which likely resulted in a cost saving). By the mid-1970s focus rings were provided with a ribbed rubber coating, still common today on some lenses.
Fig.6: Berg-und-tal overkill?
Fig.7: One of the few Japanese zebra lenses.
Today, the sleek aluminum lenses are sought after because of their “retro” appeal, as too are the zebra lenses.
In the 1980s, Fuji ran magazine ads with the headline shown below. It was to proclaim how good their lenses were, in a time when competition among camera manufacturers was high. Does this statement still hold true in the digital age?
A lens that has been stored in an inappropriate environment, i.e. one that is dark and humid, may provide the perfect conditions for the growth of fungus. Fungus takes the form of tendril or web-like structures on the surface of the lens. The fungus secretes an acid that etches a lenses’ multicoating. This sort of damage can be permanent, and hard to remove. Too much fungus will lower contrast, and way too much will give darker, fuzzier images as it blocks light. Fungus is bad news – avoid lenses with it, however small the “infection”.
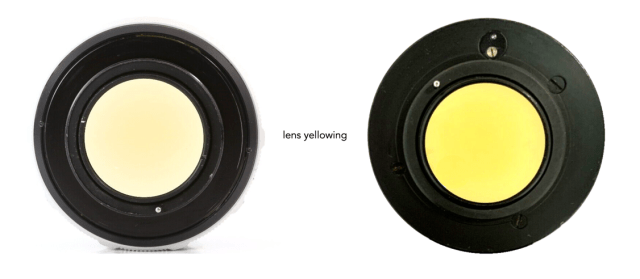
⑥ Yellowing
Coatings on lenses often yellow in time. Glass in general does not yellow, but lens coatings, or at least older ones do. This is also true of glass made with radioactive elements, e.g. Thorium, to reduce refraction.
⑦ Bubbles
Some lenses pre-1970 had defects caused by the optical glass manufacturing process which left a few pin-prick sized air bubbles inside the glass. These bubbles may come from different sources, but in most cases the source is imperfect refining. They look like tiny dust specks when viewed with the naked eye, but if magnified, they are indeed bubbles.
⑧ Separation
Lens groups are most often held together with some type of glue. In modern lenses this is usually a UV-cured epoxy. Vintage lenses typically use epoxy, polyester, and urethane-based adhesives, and some pre-WW2 lenses use Canada balsam (basically a resin from balsam fir trees). The balsam was used because it has a refractive index that is similar to crown glass and is invisible when dry. Unfortunately, Canada balsam is not resistant to temperature extremes or solvents. A degradation of the adhesive will result in the lens delamination. This usually manifests itself as a multicoloured band or blobs around the edge of a lens with coatings, or a white band/blobs on lenses with few or no coatings (but it can also occur in the centre of a lens). A small amount of separation on the edges of a lens will likely have little effect on image quality. A large amount may cause a decrease in contrast, flare and ghosting, softer edges, loss of sharpness, and a difficulty in focusing.
Fixing anomalies
Is it possible to rectify these optical defects? The table below provides a quick guide, and later posts will explore some of these defects in more detail.
Defect
Repairable?
Lens disassembly required?
Notes
scratches
maybe
no
It is hard to remove scratches, especially deep scratches, although fine scratches might be able to be buffed or polished out (some people suggest toothpaste).
haze/fog
yes
yes
It might be possible to use a cleaning solution to reduce or suppress the haze.
dust
yes
yes/no
Dust on external lens surfaces is easy to clean. Internal dust is harder because it requires lens disassembly.
blemishes
no
no
Multicoating damage cannot be repaired.
fungus
maybe
yes
It is possible to repair low levels of fungal infections, but it does require lens disassembly. Heavy fungal infections are not repairable.
yellowing
yes
no
Yellowing caused by the presence of Thorium can be reduced using UV lights.
bubbles
no
no
Intrinsic to the lens glass, consider it a feature of certain older lenses.
separation
no
yes
Separated lens groups are basically not fixable. Fixing these requires lens separation, re-centering and re-cementing.
There are a number of physical anomalies that can be found on the optics of vintage lenses. Regardless of the abnormalities of the lens body, the critical part is the optics. Sometimes people classify lenses as “a little rough”, or “needs some attention”. These can be red flags. Note that when shopping for vintage lenses in person, take an LED flashlight along as it will help peer inside the lens to determine if it is fit for use.
① Scratches
Glass doesn’t scratch that easily, but coatings do. Scratches are easy to detect, because they usually occur on the visible, exposed glass elements. Scratches usually occur on the front or rear element of a lens. They signify obvious signs of wear, or possibly damage. Small scratches will have little effect on an image, but deep scratches will. A few small scratches on the front element will not impair performance significantly – the reason is the depth of field generally works to negate their impact. The exceptions are macro lenses and wide-angle lenses. A large number of tiny scratches may also reduce the contrast of a lens. Scratches on the rear lens will be more problematic (it is best to avoid lenses with scratched rear elements). Because there is less distance between the element and the sensor/film, most scratches will appear on the resulting picture. Deep scratches can be a sign of severe trauma. Also check for pitting. Sometimes lenses have light scratches which are caused by poor lens cleaning/polishing techniques.
② Haze or fog
Haze can be anything that settles out of the air inside the lens onto the inner surfaces of the glass. The lubricants on the aperture mechanism and in the focus threads can vaporize over time and then resettle onto the glass, and with enough time other things (dust, salt-air, fungus) can get in and collect on the glass, to the point that they are dense enough to refract the light themselves and spread it around as a “foggy” look to pictures. Haze actually gets worse with age. This may be an indication that the lens was poorly constructed, or poorly stored.
A smoky haze diffuses light equally over the entire image. This is generally caused by trillions of particles much smaller then the wavelengths of light, smearing the light over all areas equally, simply making blacks gray and reducing the overall contrast. Oily haze on the other hand has tiny droplets larger than the wavelengths of light. Because the oily haze diverts light, the haloes are much stronger and more visible.
③ Dust
Dust particles somehow get into lenses. A small bit of dust will make little or no difference to image quality. Larger specks or clumps of dust should be avoided. Check for dust by shining a light through the lens. Dust may be especially prevalent in vintage zoom lenses where the increased movement can result in dust infiltrating the inner components of the lens. So how does dust get inside the lens? Vintage lenses are not air sealed, i.e. weather sealed, meaning that air moves in and out, and of course it carries dust with it. Zoom lenses with barrels that extend out essentially “pump” air/dust into the core of the lens. In reality, small amounts of dust will impede very little of the light passing through a lens, and its impact on the image quality is minimal. Inexpensive and simple lenses can be easily disassembled and cleaned, however re-assembling the lens may again introduce dust (unless you have a clean room). Large amounts of dust may be indicative of poor long-term storage.
④ Blemishes
Many vintage lenses have lens elements that are coated with layers of some non-reflective optical material. These multicoatings minimize light reflection and the resulting lens flare and ghosting. Blemishes are regions on a lens where material has been smeared or removed by physical damage, a manufacturing defect, use of an incorrect solvent, or even being eaten away by fungus. A small blemish likely won’t affect image quality.
A lens with a super-deep scratch. Being on the rear element, this will effect the image.
The state of a lens can tell a lot about how it was previously treated. There are many different aspects to choosing a vintage lens. One important aspect is physical condition. There are a number of things that cause a lens to lack perfection, some you can overlook, while others could indicate a lens should be avoided. Don’t forget these vintage lenses are anywhere from 30-75 years old, and they will not be in pristine condition (or if they are you will pay a premium). A lens may be pristine from an external viewpoint, but have issues with the aperture or focusing mechanism. Or it may be completely functional, yet be aesthetically distraught.
There are several different levels of lens examination. Obviously in an ideal world you could slot the lens on a camera and take some pictures, however that isn’t always feasible, and deep testing isn’t really an option in a store. Sometimes lenses are only available in online stores, so you have to rely on the quality of the stores vetting processes. The tests described below look at the physical properties of a lens, and does not test the optical characteristics by shooting test pictures. Please note that obviously if you are buying online, you cannot physically check the lens. And therefore must rely on the lenses quality being properly described. If buying online, purchase from a reputable shop. Note the 🕸️ symbol used below refers to hints for online purchasing.
① Lens body defects – scratches and dents
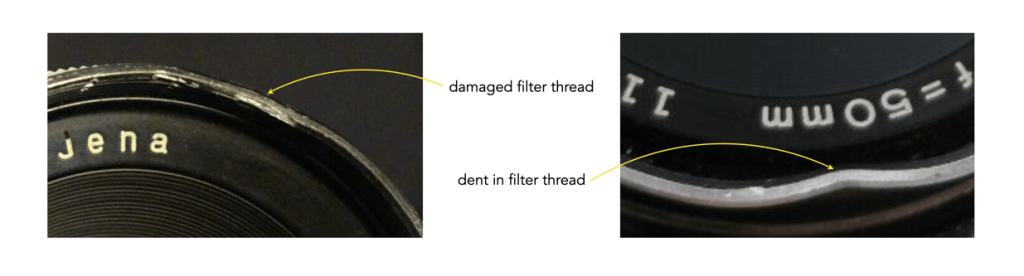
No vintage lens will be in perfect condition, unless it has sat in its box stored away somewhere and never been used (the so-called “new old-stock”). The first thing to check is what the lens looks like externally. Many vintage lens bodies are largely constructed of metal which has a tendency to scratch and dent. Scratches on the lens body are usually not that big a deal, dents are another matter altogether. Usually a dent will typically occur at either end of the lens, and can signify that the lens has been dropped. Some lenses are of course built like tanks, and can withstand a drop better than others. Damage to the lens mount will make it almost impossible to mount the lens. Conversely damage at the thread end will mean an inability to mount a filter (it means either replacing the front component, or for a minor issue using a lens vise to restore the thread).
Fig.1: Various types of physical damage to a lens
A dented filter ring is usually the result of a lens falling and landing on the front edge which could mean the lens elements have been knocked out of alignment. Lens bodies made of plastic will also scratch, however dropping them will likely cause more damage. It is also possible that a lens can lose coating, through abrasion or chipping. This is common in old chrome-plated lenses, as shown in the sample photograph in Figure 2.
Fig.2: More types of physical damage including the loss of coating on a lens body.
🕸️ A series of photos covering all aspects of the camera will help determine the shape it’s in.
② Movement of lens parts
Vintage lenses are composed of several different cylinders that move when the aperture or focus ring is activated. The first thing to do when testing a lens is to check it by gently moving the components, extending the segments, and rocking the whole lens. Basically this helps determine if any of the sections are loose, or if there are any loose components rattling around inside the lens. Next look to see if all the external screws are present, and if the front ring accepts a filter. Visible markings such as stripped screws might be indicative of disassembly/reassembly and internal issues in the past. Loss of some paint or wearing of rubber parts isn’t usually a problem.
③ Lens mount
The mount should be checked, firstly for compatibility, but also for damage. The mount can be checked by mounting it on an appropriate mount converter. It should go on easily, yet firmly, without any looseness. Does the locking pin catch properly? Check that a mount actually exists for converting the lens to a digital camera. For example some lenses such as the E. Ludwig Meritar 50mm f/2.9 were made for Altix cameras which have a breech-lock type mount, which is hard to find adapters for.
🕸️ A snapshot of the rear of the lens helps document the lens mount, which is especially important for less common lens mounts.
④ Aperture mechanism, i.e. diaphragm
Testing the aperture is a necessity, if the aperture on a lens is not performing well, it will feel loose and not well connected. An aperture that is slow to open or close may signify issues with the aperture mechanism. If the aperture mechanism does not move the aperture blades at all, there are serious issues. The number one thing to check is to make sure the aperture actually opens and closes smoothly (sometimes the aperture ring moves, but the diaphragm blades do not). Other things to check depend on the type of mechanism:
Manualmechanism – The simplest mechanism involves the aperture ring turning from the fully open position (smallest f-number) to the closed position (largest f-number).
Aperture pre-set mechanism – The pre-set ring should be set to the closed position, and then the second ring which closes the aperture should be rotated. Also make sure the pre-set ring rotates freely.
Auto-aperture mechanism – This mechanism uses a device that leaves the lens aperture open for as long as possible, and closes the aperture to a set f-stop simultaneously with shooting. In order to check the aperture, depress the pin of the mechanism, then rotate the aperture ring from open wide to closed. The diaphragm should open-close without issue.
⑤ Aperture – iris blades
Apart from the free movement of the diaphragm (iris) blades, the other thing to check for is whether they are dry or oily. Iris blades should be clean and dry – they do not require lubrication. Some aperture blades may appear oily which means it will be hard for them to open and close in a smooth manner. When oil is present on the aperture blades, there is friction from the oil’s viscosity and this impedes the quick closing action during exposure. The aperture takes too long to stop down, and as a result the shutter has already activated, and the photo can become overexposed. Where does the oil come from? An oily aperture is typically caused by exposure to heat. The focus mechanism of a lens uses lubricants, and heat can causes these lubricants break down, and to leak.
Fig.3: Oily iris blades in a Kilfitt Tele-Kilar 300mm
The best way to determine the state of the blades is to view them from the front by flashing an LED flashlight into the lens and look down on the blades. Oil will appear as a circle, or small triangular “wings”. A patterned discolouration is a sure sign of oily blades. Play with the aperture ring to check its “snappiness” – it should open and close easily without resistance or a feel of “sticking”. Dry blades are certainly better, but there are certain lenses (e.g. Helios) that are not greatly impacted by the presence of a small amount of oil. Some aperture blades may also have rust on them, this could be indicative of the lens being stored in a sub-optimal environment, e.g. one that is humid.
⑥ Lens focus mechanism
Rotate the focus ring back and forth a few times from the minimum focusing distance (MDF) position to the opposite (infinity) position. The focusing ring by itself should rotate smoothly, without hesitation or any sticking. A focus that is overly tight can lead to improper focus, whereas a loose focus means the focus can shift with the slightest move. What we are looking for here is whether or not the lens moves smoothly and doesn’t catch or have a gritty sensation. A stiff movement may be indicative of issues with the grease used to lubricate the focusing mechanism. Are there any dull spots where the focus mechanism doesn’t feel as smooth or gets slightly stuck? This might mean degrading grease and could need to be repaired. Make sure the focus doesn’t stick slightly at either extreme. If the focus ring doesn’t move at all, then it is likely the grease lubrication has solidified to the point where it is stopping movement.
⑦ Lens markings
It may seem trivial, but lens markings are important in identifying a lens. This information includes manufacturer, trademark, focal length, maximum aperture, coatings (e.g. multi-coating). See the post on lens markings. 🕸️ A snapshot of the front of the lens often means a serious reseller. A poor or unreadable picture suggests that reseller does not know how to sell the lenses and most likely an amateur.
⑧ Lens body defects – dirt, grime and corrosion
If a lens seems dirty and grimy, it may be indicative of how well the lens wasn’t cared for. Dirt and grime usually appear in textured surfaces which are subject to being hand-manipulated, such as the focus ring. Oil and sweat (from the skin) are deposited when these regions are touched and subsequently attract dirt. Failure to clean a lens will mean a built-up of grime over time. This dirt may eventually migrated to the interior of the lens by means of nearby lens openings. Sometimes vintage chrome-plated lenses appear green, and this is something commonly known as “green corrosion”. This can be the result of corrosion of the brass/copper underneath the chrome (chrome surfaces typically have a underlay). As brass contains copper, the copper reacts with oxygen, forming the greenish-blue layer, copper-oxide.
Fig.4: Dirt, grime and corrosion
If the outside of the lens looks and feels okay, then it is time to investigate the optics.
Wes Anderson’s movies are always somewhat surrealistic. In Asteroid City we are taken to a remote one-café desert town in Nevada, in 1955. The town’s claim to fame is that it is built next to a 3000-year-old meteor crater and adjoining space observatory. The movie follows a writer on his world famous fictional play about a grieving father who travels with his tech-obsessed family to Asteroid City to compete in a junior stargazer’s convention, only to have his world view disrupted forever.
There looks to be a distant atomic explosion, which photographer Augie Steenbeck captures on his camera.
The camera is supposedly a Müller Schmid, “Swiss Mountain Camera”. But of course it isn’t. Does the “Swiss Mountain Camera” have some loose nod to the Swiss camera brand ALPA? Does Müller Schmid signify anyone? The closest association I could find is a Joey Schmid-Muller (1950-), a Swiss/Australian surrealist artist. Sure, Anderson could have pulled the name out of thin air, but I highly doubt it.
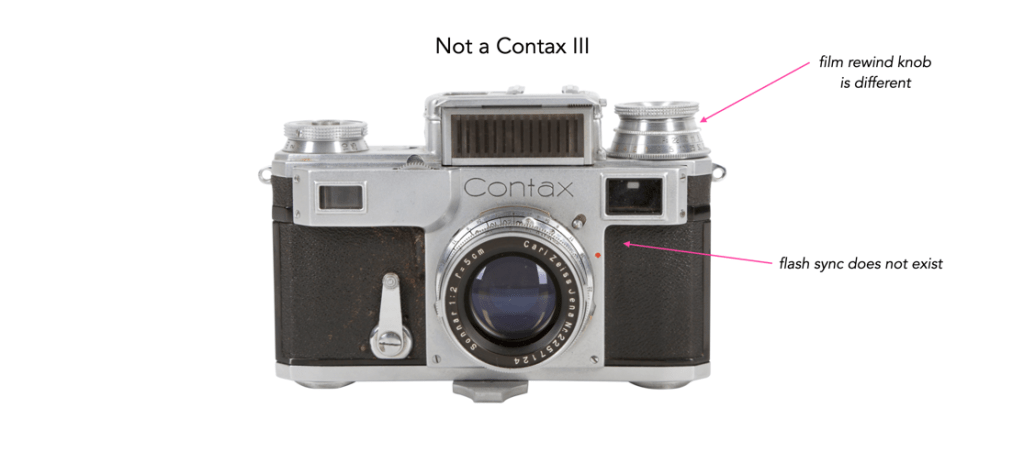
The camera of course may seem familiar to some. It seems like a rangefinder camera that came from Zeiss Ikon – perhaps a Contax? In the 1950s these cameras were produced in West Germany by Zeiss Ikon AG in the form of the Contax IIa and IIIa. Or it could have been a pre-1945 Contax II or III. The Contax III is an obvious contender, because it looks familiar, but there are two issues. Pre-war Contax III’s did not have a flash sync, and the film rewind knob was much taller. So it isn’t a Contax III. Instead we have to look further east, to Ukraine. After WW2, much of the Contax production line was taken as war reparations from the Zeiss-Ikon factories, to the Zavod Arsenal facility in Kiev. Production then started on Contax-döppelganger Kiev brand cameras in 1947 (the early models, Kiev 2, are believed to have been made from original Zeiss Ikon stock).
Why it’s a Kiev 4!
Now the Zavod factory made a bunch of different Kiev cameras, both metered and unmetered. The bump on the top identifies this as a metered Kiev. The most likely candidate is one of the most common Kiev’s, the Kiev-4, produced between 1957-79. All that has been done to this camera to convert it to a Müller Schmid is that three marking plates have been overlaid on the exiting camera – one for “Müller Schmid”, one for “Swiss Mountain Camera” plus a small Swiss flag, and one for “LAND-LOCKED” (is this somehow a nod to the fact that Switzerland is a land-locked country?). They are metal overlays because you can see the open seams in some areas.
What about the lens? It is just marked as “COMBAT LENS”, a 5cm, f/2 lens – again there is no such brand – obviously a node to the fact that Steenbeck is a war photographer. In all likelihood the lens is a Jupiter-8 50mm f/2 lens, which was the standard lens on the Kiev-4 (a copy of the Zeiss Sonnar lens of 1929). Want to buy a Kiev 4? They aren’t that expensive, you can pick one up from between US$100-200, but I would suggest buying one from a reputable source such as Fedka.com.
In a 1956 copy of Popular Photography, there was an article on the German lens maker Kilfitt. In the article, reference was made to a 180mm f/1.9 lens called the Grand-Kilar… there was even a picture. But did this lens actually exist? Well according to vague literature, it appeared in 1955, a 4-element lens, designed by A. Burger. But brochures of the early 1960’s show nothing in the way of 180mm lenses. It does appear in various editions of Arthur Cox’s “Photographic optics” in the 1960s, however searching the net does not seem to yield anything in the way of tangible proof to suggest any exist today. Perhaps very few were actually manufactured. In comparison the to SLR, it seems like a massive lens for the period.