The aesthetic appeal of mid-century vintage lenses

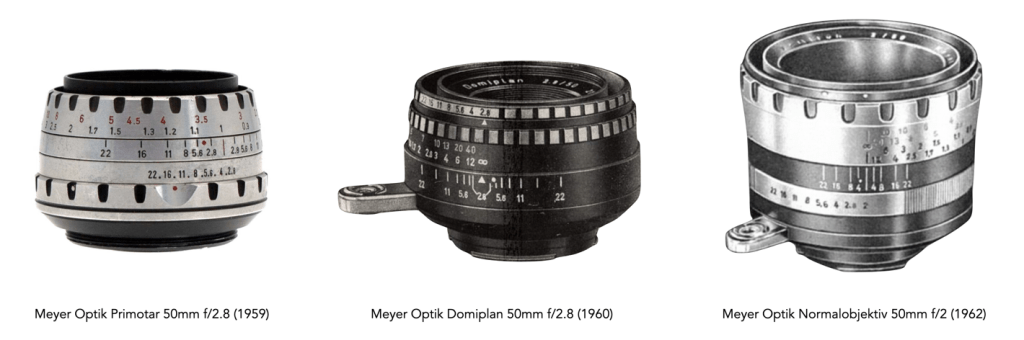
When you look at modern lenses, there isn’t much that sets them apart. They are usually pretty plain black cylinders, partially due to the consistency of modern lens design. The same could not be said of vintage lenses. Maybe this has something to do with the fact that many vintage lenses were made by companies that focused purely on lenses, and as such tried hard to differentiate their lenses from their competitors. For example a company like Meyer Optik Gorlitz manufactured lenses for cameras using the Exakta mount had to compete for the consumer spending with lenses from a myriad of other companies (at least 25-30).

Over time the appearance of lenses naturally changed, as new materials were introduced, often for the purpose of reducing the overall cost of lenses. For example, many early 35mm lenses had a shiny, chrome-like appearance. The earliest, pre-war lenses were often made of chrome-plated brass. As the Second World War progressed, shortages or re-direction of materials like brass led some manufacturers had begun to transition towards aluminum, which was both less expensive, easier to manufacture, and produced a lighter lens. While these early aluminum lenses were aesthetically pleasing there was little that differentiated them in a world where there was an increasing number of 3rd party lens manufacturers.

Fig.1: Evolution of the aluminum design of the Zeiss Jena Biotar 58mm f/2

When it first appeared as a lens material, aluminum was chic. The 1950s was the age of aluminum, which was a symbol of modernism. Many of the largest aluminum producers pursued new markets to absorb their increased wartime production capacity, used in everything from drink cans to kitchenware and Airstream trailers (there was also extra aluminum from scrapping of war surplus aircraft etc.). These aluminum lenses were initially clear-coated to reduce the likelihood of tarnishing, but eventually anodized to provide a robust black coating. Also in the 1950s, lens manufacturers to realize changing trends in lens design – buyers had moved away from the idea of pure practicality, and focused also on design. This wasn’t really surprising considering the broad scope of modernist design during this period – design tended to favour sleek and streamlined silhouettes. It is interesting to note that most of the aesthetically pleasing lenses of the post-1950 period originated from Germany.

Fig.2: Every lens manufacturer had a different interpretation of both “berg-and-tal”, and the black-and-white “zebra” aesthetic

The first notable change was the gradual move towards what in German manufacturers called the “berg und tal” design, or rather “mountain and valley” design of the grips on a lens – usually knurled depressions milled into the surface of the ring (but also the opposite like the lenses of Steinheil where the depressions are smooth and the mountains are knurled). English-speaking regions often referred to this as a “knurled grip”. Appearing in the early 1950s, it was particularly common for focusing rings, making them more prominent, and likely more ergonomic, i.e. easier to grip. Some lenses started with the focusing ring, and eventually used the same design on the aperture ring. Prior to this most lenses used a simple straight knurl on the adjustment rings.

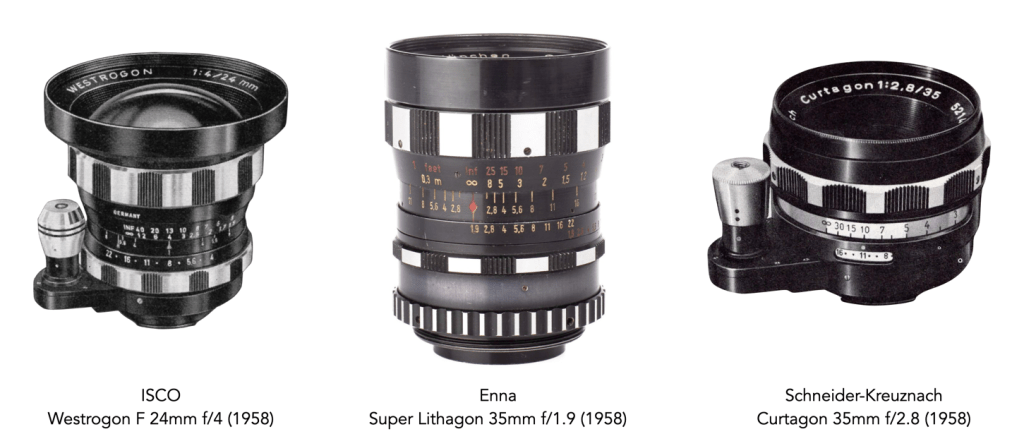
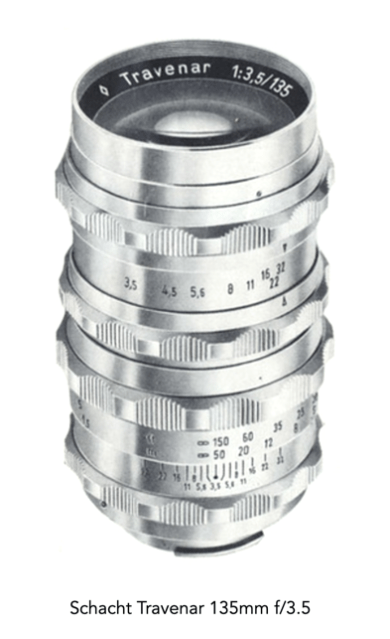
Towards the end of the 1950s, the pure-aluminum design transitioned to a combination of silver and black anodized aluminum. The lens bodies themselves were mostly black, with the “berg und tal” designs alternating between black and silver. This alternating pattern is what is colloquially known as “zebra” design. Many lens manufacturers utilized the zebra aesthetic in one form or another including Schacht, Enna, Steinheil, Schneider-Kreuznach, Meyer Optik, Rodenstock, ISCO etc..

Fig.3: Meyer Optik had an interesting twist on the zebra design. There were very few of these lenses and they are very minimalistic in design.

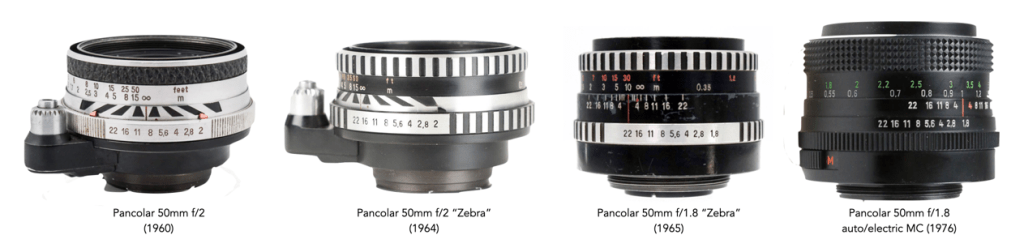
Zeiss probably produced the best known examples of the zebra aesthetic design with the Pancolar and Flektogon series of lenses. Although these lenses did not appear until the early 1960s, they bypassed the more prominent berg-und-tal in favour of a much subdued black-and-white knurled grip (which is also something Meyer Optik did with lenses like the Lydith 30mm). This design for both focusing and aperture rings replaced the rough textured rings of the earlier lenses. Some call these lenses the “Star Wars lens”. The Pancolar 50mm f/2 appeared ca. 1960 in the form of an f/2 lens with dual black-silver body encompassing a “converging-distance” depth of field range indicator, and either a textured or nubbed rubber focusing ring. This evolved a few years later to the classic “zebra” design, shortly before the release of the classic Pancolar 50mm f/1.8, which also sported the zebra design. By the 1970s, the Pancolar 50mm f/1.8 had morphed into a complete black configuration with a large rubber cross knurling focus grip and a finely knurled aperture ring.

Fig.4: Evolution of design aesthetics of the Zeiss Pancolar 50mm lens.

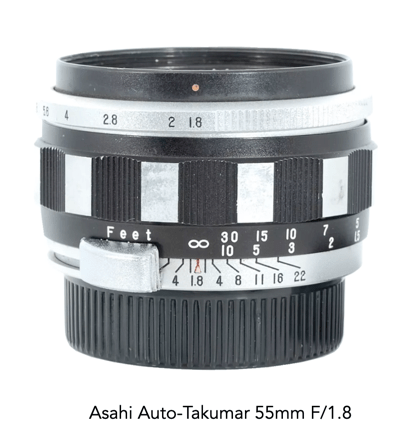
Japanese manufacturers transitioned from aluminum/chrome to black bypassing the zebra design. The one exception seems to be the Asahi Auto-Takumar 55mm F/1.8, which appeared in 1958, but is the sole example of zebra design (at least by Asahi). Japanese manufacturers did however embrace the berg-and-tal design.

Fig.5: Some lens companies couldn’t settle on a design. Here we have differing focus ring designs from the same Meyer Optik catalog in the 1960s

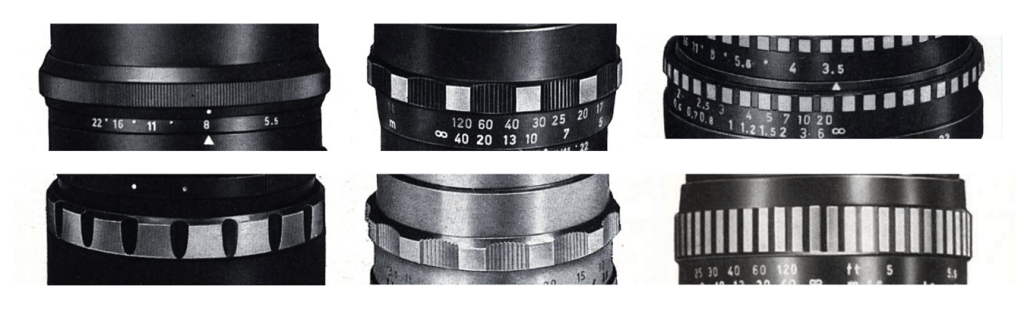
By the mid-1960s many camera manufacturers were producing their own lenses, particularly in Japan. As such lenses became more consistent, with little need to compete with other lens manufacturers. There were still 3rd party lens manufacturers but their perspective was to concentrate more on the manufacture of inexpensive lenses. Most lenses transitioned to using standardized, nonchalant black aluminum lenses, with the onus being more on the quality of the optics. Grips transitioned from berg-und-tal to a flatter, square-grooved style, still using a in black/chrome contrast (which likely resulted in a cost saving). By the mid-1970s focus rings were provided with a ribbed rubber coating, still common today on some lenses.

Fig.6: Berg-und-tal overkill?
Fig.7: One of the few Japanese zebra lenses.

Today, the sleek aluminum lenses are sought after because of their “retro” appeal, as too are the zebra lenses.

A photograph is made to be looked at

That’s pretty obvious right? But the eye sees things a little differently. The process of looking at a photograph is by no means trivial.

The thing is that the human eye does not stand still. Try focusing your eye on an object for a minute or two. After just a few seconds your eyes will begin to tire, and you long to move them onto something new. By the time you reach a minute, if you have even made it that long, you will struggle to continue staring at the object – your eyes are well past being bored. How many times during the day do you suppose you look at anything for more than a few seconds? (the TV doesn’t count because the picture changes) The answer is likely not many. The same can be said of people that look at the photographs we take. After an initial view, their eyes become restless, longing to move on.

In reality, most people will spend less than a minute looking at a photograph, especially if they have seen the subject/object of the picture before. The only person who really spends a great deal of time looking at a photograph is the person who took it. So with such a short viewing time-span it is important for an image to contain an interesting subject, and provide enough distraction to spend longer considering its message. To do this you have to somehow control movement of the viewers eyes through the picture.

The simplest “scene” can be construed in different ways with respect to eye control.

The first step involves grabbing a viewers attention. Therefore there should be something in the image that is outstanding or unusual. In the second phase, the viewer should be made to understand the story of the image. This is all about the flow of the image, with the viewer being lead through the composition. The third step involves maintaining the viewers gaze by getting them interested in the details of the image. Examples are shown in the figure above.

The good, the bad, and the bokeh

The idea of “bokeh” originated in Japan, the western term derived from the the two Japanese Katakana characters bo and ke, “ボケ”, which roughly translates to “to be out of focus”, “to be blurred”, or “out-of-focus blur”. The term made its western debut in 1997 courtesy of Mike Johnston in Photo Techniques magazine. For a long time, there was little or no interest in the concept, but in recent years, and with the use of vintage lenses on digital cameras, it has come to the forefront. Maybe too much so.

All images contain blur in one form or another, typically in the form of out-of-focus (OOF) regions. The blur that separates a subject/object from its surroundings is the result of shallow depth-of-field (it can occur behind or in front of the subject/object). In many cases OOF regions contribute to the overall aesthetic appeal of an image, either by isolating an object/subject or setting a particular mood. Bokeh is often defined as the quality and aesthetic appeal of the OOF regions of an image, as rendered by the camera lens. Sometimes a particular lens will produce exceptional out-of-focus regions, while others will produce harsh OOF in the same scene.

Bokeh is an optical phenomena that occurs naturally. In this photograph it exists as soft blur in the background. No orbs needed!

One of the problems with the term is that it is somewhat imprecise, and often used inappropriately. The Japanese boke is a very subjective, aesthetic quality, so there is no real way to describe it beyond its definition. An article which appeared in the same issue of Photo Techniques, “Notes on the Terminology of Bokeh” by Oren Grad explored many of the Japanese terms used to describe bokeh. For example when a lens diaphragm with six blades is stopped down the iris may become visible in the form of surudoi kado (sharp corners), resulting in ten boke (point bokeh). But there is no indication that this is necessarily “bad bokeh”. Amongst many terms, bokeh could be sofuto (soft) or katai (hard), hanzatsu (complex) or kuzureru (breaking-up). Some of the terms relate purely to out-of-focus highlights, but bokeh is the overall effect as well.

It is true that bo-ke plays a large role in Japanese photographic culture, where it is an aesthetic quality, but bokeh is not just about the optical aesthetics – there is such a number of differing variables at play. Bokeh can even be different within a single lens, changing with a change in aperture or focus, the nature of the subjects/objects in the frame, and lighting conditions. Bokeh, like photography itself is often an enigma of chance. Now it seems like every lens review has to include a lenses ability to produce bokeh. But we are not talking about the bo-ke of Japan, we are talking westernized Bokeh… dreamy, creamy, soapy bubbles. All these pictures with orb-like features in them. Blah! Smooth, or “creamy” blur is desirable, orbs with defined edges are undesirable, or “bad” bokeh.

“Bokeh is not a natural artifact, because humans don’t perceive it outside of photography.”

I mean, I don’t begrudge people for taking these surreal pictures, but real bokeh is not all about these glowing orbs. And what exactly does “buttery” mean? Or creamy? Sorry, these are ridiculous terms. You can’t describe out-of-focus regions as buttery, or creamy. Shortbread biscuits are buttery, but describing bokeh as buttery is weird. Is it meant to signify smoothness? Because butter is only smooth when left at room temperature (and even that is tenuous). The same with using “creamy” as a descriptive word. Mash potatoes can be creamy, as can ice-cream, but not bokeh. Creamy and buttery are not words that describe smooth, they describe mouthfeel and taste.

Most people who use the term bokeh, really don’t know what the term means, and spend too much time trying to create it, rather than letting it occur naturally, usually at the expense of the subject within the image.

How do we define beauty?

It’s funny when someone says a photograph is beautiful, because not everyone will have the same perception. This is because the idea of beauty is a very subjective one. Beauty is a term which cannot truly be quantified in any real manner. What society has done is imprint certain standards of beauty based on a few peoples opinions. If you look at the picture of the pink flower below, you might say it’s beautiful – but why is it beautiful? Is it because most people would say that, or is it because it is colourful. A brown flower would likely be considered not-so-beautiful. Is it because the flower smells nice? (which obviously you cannot tell from a photograph). The second flower below, a Frangipani is simpler, but may be beautiful because of its decadently sweet, floral, fragrance. Could beauty be an amalgam of visual and olfactory senses?

Are pink roses considered more beautiful?
This Frangipani flower is plain, but still beautiful.

For most of human existence, beauty has not really mattered that much (well, except maybe for those who had wealth, I mean gold is shiny, which likely contributes to its allure). Most humans were concerned with survival. That is not to say that aesthetics did not play a role in the things they made, but let’s face it, catching food took precedence over making things look pretty. Beauty may have existed more in the natural world. In fact it may be these natural patterns that exist in nature that has lead to humans being somewhat hardwired to experience beauty.

“Beauty is no quality in things themselves: It exists merely in the mind which contemplates them; and each mind perceives a different beauty. One person may even perceive deformity, where another is sensible of beauty; and every individual ought to acquiesce in his own sentiment, without pretending to regulate those of others.”

Hume, David, “Of the Standard of Taste”, Essays Moral and Political, p.136 (1757)

Beauty has to do with the idea of aesthetics, which is essentially the appreciation of beauty. The term “aesthetics” was introduced in 1750 by German philosopher Alexander Gottlieb Baumgarten who defined taste, in its wider meaning, as the ability to judge according to the senses, instead of according to the intellect. When we say something is beautiful, we are expressing an aesthetic judgment. When you pick a raspberry from a bush, you tend to choose the bright red, firm raspberries, with no apparent visual defects, those that are most beautiful (of course these is nothing to say they will taste good from pure visual assessment alone).

Is there not beauty in the piped twist of a French crullers?
The beauty in a matcha latte lies in the contrast between the green of the matcha and the foamy heart.

Beauty can be objective and universal, as certain things are beautiful to everyone. Perhaps flowers are a good example, or things in the natural world. However beauty in the human-made world is more subjective and individual. It is no different with our other senses. A delicious food to some, may taste repugnant to others. Another good example is art. Some people can find a piece of art beautiful, while others find it loathsome. Beauty truly is in the eye of the beholder. Each person’s perception of beauty is also influenced by their environment. In 1951 artist Robert Rauschenberg produced White Painting, basically white latex house paint applied with a roller and brush on two canvas panels. Some will find beauty in this nothingness, many won’t (well because there is nothing there).

The same is true of photographs, where beauty truly is subjective, mainly because photographs inherently represent the visual perspectives of the photographer, not necessarily those of the viewer. In some cases what is viewed in a photograph may not have the same beauty as the scene in real life, perhaps due to the lack of depth (i.e. flatness), or the misinterpretation of colour. In other cases, the photograph tells a different story of beauty to the real world. For instance colour may not be quintessential to beauty. The absence of colour in B&W images is not to everyone’s taste, yet it helps to tell a story in a way that means the colour does not distract the viewer from the image’s inner beauty, perhaps highlighting the expressions and textures of the scene.

There are many elements to producing a beautiful photograph, but at the end of the day, beauty is very much tied to the perceptions of the viewer. And unlike the physical world where we can harness all out senses to decipher our understanding of beauty, in visual media we have only our eyes.

The Retinex algorithm for beautifying pictures

There are likely thousands of different algorithms out in the ether to “enhance” images. Many are just “improvements” of existing algorithms, and offer a “better” algorithm – better in the eyes of the beholder of course. Few are tested in any extensive manner, for that would require subjective, qualitative experiments. Retinex is a strange little algorithm, and like so many “enhancement” algorithms is often plagued by being described in a too “mathy” manner. The term Retinex was coined by Edwin Land [2] to describe the theoretical need for three independent colour channels to describe colour constancy. The word was a contraction or “retina”, and “cortex”. There is an exceptional article [3] on the colour theory written by McCann which can be found here.

The Retinex theory was introduced by Land and McCann [1] in 1971 and is based on the assumption of a Mondrian world, referring to the paintings by the dutch painter Piet Mondrian. Land and McCann argue that human color sensation appears to be independent of the amount of light, that is the measured intensity, coming from observed surfaces [1]. Therefore, Land and McCann suspect an underlying characteristic guiding human color sensation [1].

There are many differing algorithms for implementing Retinex. The algorithm illustrated here can be found in the image processing software ImageJ. This algorithm for Retinex is based on the multiscale retinex with colour restoration algorithm (MSRCR) – it combines colour constancy with local contrast enhancement. In reality it’s quite a complex little algorithm with four parameters, as shown in Figure 1.

Fig.1: ImageJ Retinex parameters
  • The Level specifies the distribution of the [Gaussian] blurring used in the algorithm.
    • Uniform treats all image intensities similarly.
    • Low enhances dark regions in the image.
    • High enhances bright regions in the image.
  • The Scale specifies the depth of the Retinex effect
    • The minimum value is 16, a value providing gross, unrefined filtering. The maximum value is 250. Optimal and default value is 240.
  • The Scale division specifies the number of iterations of the multiscale filter.
    • The minimum required is 3. Choosing 1 or 2 removes the multiscale characteristic and the algorithm defaults to a single scale Retinex filtering. A value that is too high tends to introduce noise in the image.
  • The Dynamic adjusts the colour of the result, with large valued producing less saturated images.
    • Extremely image dependent, and may require tweaking.

The thing with Retinex, like so many of its enhancement brethren is that the quality of the resulting image is largely dependent on the person viewing it. Consider the following, fairly innocuous picture of some clover blooms in a grassy cliff, with rock outcroppings below (Figure 2). There is a level of one-ness about the picture, i.e. perceptual attention is drawn to the purple flowers, the grass is secondary, and the rock, tertiary. There is very little in the way of contrast in this image.

clover in grass
Fig.2: A picture showing some clover blooms in a grassy meadow.

The algorithm is suppose to be able to do miraculous things, but that does involve a *lot* of tweaking the parameters. The best approach is actually to use the default parameters. Figure 3 shows Figure 2 processed with the default values shown in Figure 1. The image appears to have a lot more contrast in it, and in some cases features in the image have increased their acuity.

Fig.3: Retinex applied with default values.

I don’t find these processed images are all that useful when used by themselves, however averaging the image with the original produces an image with a more subdued contrast (see Figure 4), having features with increased sharpness.

Fig.4: Comparing the original with the averaged (Original and Fig.3)

What about the Low and High versions? Examples are shown below in Figures 5 and 6, for the Low and High settings respectively (with the other parameters used as default). The Low setting produces an image full of contrast in the low intensity regions.

Fig.5: Low
Fig.6: High

Retinex is quite a good algorithm for dealing with suppressing shadows in images, although even here there needs to be some serious post-processing in order to create an aesthetically pleasing. The picture in Figure 7 shows a severe shadow in a inner-city photograph of Bern (Switzerland). Using the Low setting, the shadow is suppressed (Figure 8), but the algorithm processes the whole image, so other details such as the sky are affected. That aside, it has restored the objects hidden in the shadow quite nicely.

Fig.7: Photograph with intense shadow
Fig.8: Shadow suppressed using “Low” setting in Retinex

In reality, Retinex acts like any other filter, and the results are only useful if they invoke some sense of aesthetic appeal. Getting the write aesthetic often involves quite a bit of parameter manipulation.

Further reading:

  1. Land, E.H., McCann, J.J., ” Lightness and retinex theory”, Journal of the Optical Society of America, 61(1), pp. 1-11 (1971).
  2. Land, E., “The Retinex,” American Scientist, 52, pp.247-264 (1964).
  3. McCann, J.J., “Retinex at 50: color theory and spatial algorithms, a review“, Journal of Electronic Imaging, 26(3), 031204 (2017)

The photography of Daidō Moriyama

Daidō Moriyama was born in Ikeda, Osaka, Japan in 1938, and came to photography in the late 1950s. Moriyama studied photography under Takeji Iwamiya before moving to Tokyo in 1961 to work as an assistant to Eikoh Hosoe. In his early 20’s he bought a Canon 4SB and started photographing on the streets on Osaka. Moriyama was the quintessential street photographer focused on the snapshot. Moriyama likened snapshot photography to a cast net – “Your desire compels you to throw it out. You throw the net out, and snag whatever happens to come back – it’s like an ‘accidental moment’” [1]. Moriyama’s advice on street photography was literally “Get outside. It’s all about getting out and walking.” [1]

In the late 1960s Japan was characterized by street demonstrations protesting the Vietnam War and the continuing presence of the US in Japan. Moriyama joined a group of photographers, associated with the short-lived (3-issue) magazine Provoke (1968-69), which really dealt with elements of experimental photography. His most provocative work during the Provoke-era was the are-bure-boke style that illustrates a blazing immediacy. His photographic style is characterized by snapshots which are gritty, grainy black and white, out-of-focus, extreme contrast, Chiaroscuro (dark, harsh spotlighting, mysterious backgrounds). Moriyama is “drawn to black and white because monochrome has stronger elements of abstraction or symbolism, colour is something more vulgar…”.

“My approach is very simple — there is no artistry, I just shoot freely. For example, most of my snapshots I take from a moving car, or while running, without a finder, and in those instances I am taking the pictures more with my body than my eye… My photos are often out of focus, rough, streaky, warped etc. But if you think about I, a normal human being will in one day receive an infinite number of images, and some are focused upon, other are barely seen out of the corners of one’s eye.”

Moriyama is an interesting photographer, because he does not focus on the camera (or its make), instead shoots with anything, a camera is just a tool. He photographs mostly with compact cameras, because with street photography large cameras tend to make people feel uncomfortable. There were a number of cameras which followed the Canon 4SB, including a Nikon S2 with a 25/4, Rolleiflex, Minolta Autocord, Pentax Spotmatic, Minolta SR-2, Minolta SR-T 101 and Olympus Pen W. One of Moriyama’s favourite film camera’s was the Ricoh GR series, using a Ricoh GR1 with a fixed 28mm lens (which appeared in 1996) and sometimes a Ricoh GR21 for a wider field of view (21mm). Recently he was photographing with a Ricoh GR III.

“I’ve always said it doesn’t matter what kind of camera you’re using – a toy camera, a polaroid camera, or whatever – just as long as it does what a camera has to do. So what makes digital cameras any different?”

Yet Moriyama’s photos are made in the post-processing stage. He captures the snapshot on the street and then makes the photo in the darkroom (or in Silver Efex with digital). Post-processing usually involves pushing the blacks and whites, increasing contrast and adding grain. In his modern work it seems as though Moriyama photographs in colour, and converts to B&W in post-processing (see video below). It is no wonder that Moriyama is considered by some to be the godfather of street photography, saying himself that he is “addicted to cities“.

“[My] photos are often out of focus, rough, streaky, warped, etc. But if you think about it, a normal human being will in one day perceive an infinite number of images, and some of them are focused upon, others are barely seen out of the corner of one’s eye.”

For those interested, there are a number of short videos. The one below shows Moriyama in his studio and takes a walk around the atmospheric Shinjuku neighbourhood, his home from home in Tokyo. There is also a longer documentary called Daidō Moriyama: Near Equal, and one which showcases some of his photographs, Daido Moriyama – Godfather of Japanese Street Photography.

Artist Daido Moriyama – In Pictures | Tate (2012)

Further Reading:

Lightning strikes!

Sometimes we tend to forget how exciting first achievements are. You get a good sense of these if you peruse vintage science journals from the late 1800s, many of which are available online as PDFs. When I was looking for an article from La Nature Revue Des Sciences recently from 1884, I came across another interesting article on the photography of lightning strikes by Gaston Tissandier (Vol.12, No.548., pp.118-119), entitled “Les Éclairs, Reproduits par la Photographie Instantanée“, or “The Flashes reproduced by instant photography”. The images show photographic prints of lightning taken by Mr. Robert Haensel of Reichenberg, Bohemia.

Photographs of lightning, taken on July 6th, 1883 at 10pm, when the sky was very dark

These photographs seem very simple, but are like pieces of artwork. They were acquired using silver-bromide gelatin plates, and activated by the lightning flashes themselves. Now the average duration of a flash of lightning is 0.1-0.2 seconds, so it says a lot about the sensitivity of film at the time. Haensel exposed 10 plates, of which four good negatives were produced. The photographs were reproduced for publication using the photogravure process.

This article was also published in The Popular Science Monthly, as, “Photographing a Streak of Lightning”, Vol. 24 pp.752-754 (April 1884). An earlier article appeared in The Photographic News, on January 4th, 1884 (London).