If you know someone who dabbles in photography, and are looking for a Christmas gift, below are some book ideas. Some are new, others can be found on the vintage market, e.g. Abebooks.
Any book by photographer Andreas Feininger. He produced a lot of really good books on photographic knowledge. Good ones include Feininger on Photography (1949), and The Complete Photographer (1965). Theses books are less about technology, and more about technique, much of which is just as relevant today in the age of digital.
Robert Capa’s book, Slightly Out Of Focus: The Legendary Photojournalist’s Illustrated Memoir Of World War II (reprint 2001). A good insight into Hungarian photographer Robert Capa’s experiences during WW2 from the man himself.
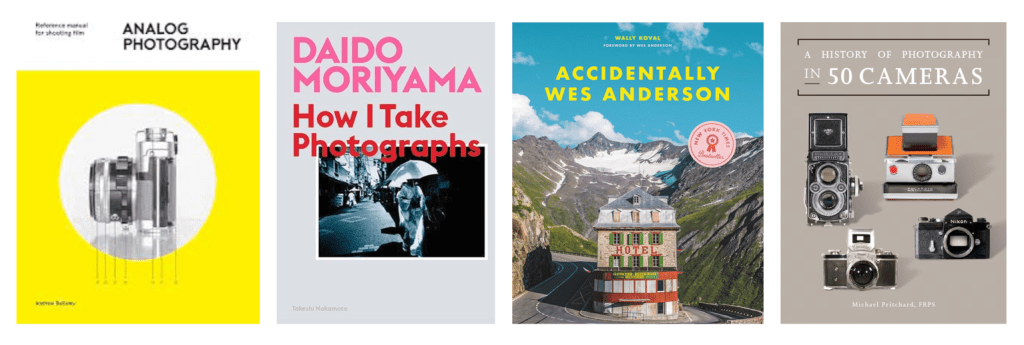
A very minimalistic approach to film photography can be found in Analog Photography: Reference Manual for Shooting, by Andrew Bellamy (2017). It dives into the fundamentals of 35mm film photography.
In Daido Moriyama: How I Take Photographs (2019), Japanese street photographer Daido Moriyama explains his approach to street photography. A great book for anyone interested in getting a real insight into street photographer from one of the icons of the genre.
A great coffee table book is Accidentally Wes Anderson (2020), photographs of real places plucked from the world of his films.
For a vintage camera buff, there is a great little book, A History Of Photography In 50 Cameras (2022), which explores 180 years of photography through 50 iconic cameras.
In contrast to “moving pictures”, every single photograph, even the most violent action shot, is a “still”. Nothing that happens in time and space − a change, a motion − can be photographed instantaneously without stripping it of its most outstanding quality : movement, the element of time . . . . No ordinary action shot can “reproduce” an action, because it reduces change and movement − the basis of all action − to a standstill, freezing it into immobility. . . . In photographing action, more than anywhere else in still photography, we must rely on “symbols” and on “translation”, if we are to capture the essence of that action in a “still”.
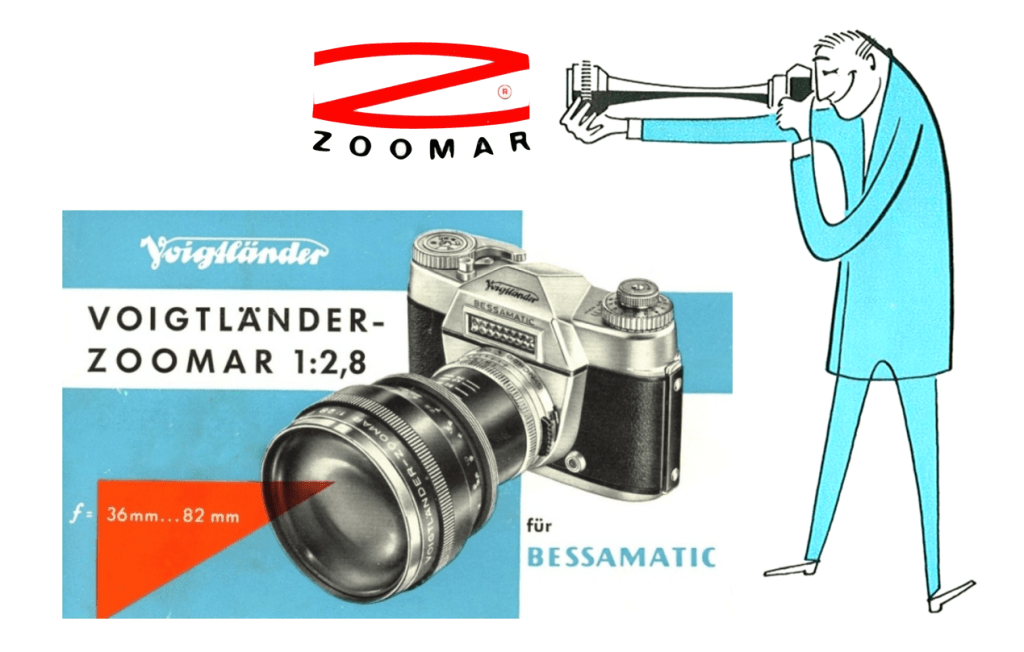
Historical accounts of who actually invented the zoom lens differ. But its adaptation to the SLR is down to one person – Frank Gerhard Back. He designed the first zoom lens for 35mm cameras – the Voightländer Zoomar. Before the Zoomar saw the light of day, designs with adjustable focal lengths were called varifocal lenses or rubber lenses.
“A great number of optical problems have been overcome in this lens. It is a splendid achievement. It zooms – what other still lens does?”
Look! A real zoom lens for your 35mm, Herbert Keppler, Modern Photography (May, 1959)
Back was born in Vienna, Austria in 1902. He attended the Technische Hochschule of Vienna where he received a masters in mechanical engineering in 1925, and a doctorate of science in 1931. From 1929 to 1938 he worked as a consulting engineer during which he was employed by Georg Wolfe, a manufacturer of endoscopes. In July 1939, he emigrated to the United States. After working for various companies in New York City, he started his own company in 1944, Research and Development Laboratory. In 1945 he started Zoomar Inc. where he developed and patented an optically-compensated zoom lens for 16mm television cameras (1948), and one for 35mm SLR cameras by 1959. From the late 1940s through to the 1970s, Back introduced new innovations for television, motion, picture, film photography, astronomical, and numerous other applications. On 25 October 1946, Back presented a new type of variable focal length lens to a convention of the Society of Motion Picture Engineers (SMPE) in Hollywood, California. The lens, sometimes known as the could zoom from 17 to 53mm, and contained 22 lens elements. It was 12” in length, weighed 790 grams and had an aperture range of f/2.9-f/22 [3].
Zoomar lenses disrupted the market for American television camera lenses, and likely were the catalyst in making zoom lenses ubiquitous in the industry. Back’s Zoomar lens had a substantial impact on both the motion picture, and television industries in the years following. It gradually made the “practice of “zooming” a more desirable, acceptable, and practical technique, in turn spurring demand for zoom lenses suitable for feature film use, with higher optical quality and greater zoom ranges. By 1954 a more compacts version of the “Zoomar 16” appeared – 5” in length, and weighing 570g it now had a zoom range of 25-75mm. It is not surprising that the concept would eventually spill over into the still camera industry.
In Back’s design, four of the lens’s 14 elements (the lenses in groups 2, 3, and 6 move linearly together to allow for focal length changes) move from 36mm to 82mm. A ×2.3 range from 36mm to 82mm allowed the lens to retain a reasonable speed of f/2.8, good image sharpness, and optical anomalies kept to a minimum (something earlier varifocal lenses could not achieve). The use of the word “zoom” likely derived from the Zoomar name. The lens used a push/pull mechanism to change focal length, whereby the change of focal length happens when the photographer moves the ring towards the mount or backwards.
Zoomar lens schematics (the lens diagram shows the 36mm and 82mm positions of the moving lens components).
Optically, the Zoomar 36-82 was a great breakthrough, made possible according to Dr. Back by new rare earth element glasses (Lanthanum) and computer aided optical designs. Back filed two patents in 1958 [6,7], one for optical design, and another for mechanics, likely at the same time production was already gearing up. Starting in 1959 the German optics firm Heinz Kilfitt would build the lens, under contract with Voigtländer for their Bessamatic SLR. The Voigtländer Zoomar was presented to the public on February 10, 1959 at the International Camera Show in Philadelphia (the same show that introduced the Nikon F and Canon Canonflex). Back would file another patent relating to an improved optical design in 1959 [8]. This optical design modified the rear lens elements, both in the type of element, and the material from which they were constructed.
Thelens optical design in Patent No. US2902901
By the late-1950s, Zoomar was to have some legal issues regarding its patent, fighting a patent battle with Paillard Products, the US subsidiary of Swiss company Paillard-Bolex, which had been importing French zoom lenses. In 1958 the New York Southern District Court ruled that Back’s patent overreached by appearing to cover all zoom lenses of any design. Zoomar eventually reduced its R&D of new lenses in favour of promoting foreign-made lenses – Back purchased Heinz Kilfitt in 1968 (catalog).
“The Voigtlander-Zoomar is the only Zoomar lens for still cameras. This model, with fully automatic diaphragm, is designed expressly for use with the Bessamatic Camera. A high-precision varifocal lens, in focus at all focal lengths from 36 to 82mm, it enables the photographer to shoot continuously at variable focal lengths without changing camera position.”
Description from the manufacturer.
The lens was produced from 1959-1968, with a total of only 15,000 units being built. Today the Zoomar 36-82 f/2.8 is often associated with the Voigtländer Bessamatic SLR. However the Zoomar was introduced from day one in both the DKL (Voigtländer) and Exakta mounts. Later it was also produced in other mounts, including the ALPA, and an M42 mount for the East German cameras like the Ikon Contax S. By the early 1960’s there were more zoom lens options, mostly in the telephoto zoom realm. None were anything special when compared to prime lenses, as they often had increased distortion and less contrast, but these were often overlooked because of the “newness” of the technology. It is still possible to find these lenses today, with prices in the range of C$700-1200 for lenses in reasonable condition.
✽ The Zoomar actually had a doppelganger – the Russian Zenit-6 camera came standard with a zoom lens called the Rubin-1. It wasn’t exactly the same, the focal length is shorter at 37-80mm and both had different zooming mechanisms.
“Photographers — idiots, of which there are so many — say, ‘Oh, if only I had a Nikon or a Leica, I could make great photographs.”’ That’s the dumbest thing I ever heard in my life. It’s nothing but a matter of seeing, and thinking, and interest. That’s what makes a good photograph.”
Andreas Feininger in an interview with American Society of Media Photography (1990)
Many smartphones are now marketed as having at least one camera with a ridiculous amount of megapixels. The iPhone 14 Pro has 48MP, the Samsung Galaxy S23 has 200MP. Is it just too much? The answers is yes, and some would argue it’s more of a marketing hype than anything else. I mean who doesn’t want to take a 48MP or 200MP image? Well, most people may try it once, but many won’t routinely use it, and the reasons why are varied. First, let’s look at the technology.
Smartphone sensors are no different to any other sensors, they are just usually smaller than many conventional digital camera sensors. The sensors contain a bunch of photosites, so no different there. But there are limits to the size of sensor that can be used inside a smartphone, made more restrictive by the fact that many smartphones now have 2-3 rear-facing cameras. Higher resolution means that more photosites need to be crammed into the sensor’s surface area. The iPhone 14 Pro has a wide angle camera with a 48MP resolution. It uses a 1/1.28” sensor, which is 10×7.5mm in size with a photosite pitch of 1.22µm, which is extremely small. Typically smaller pixels have a harder time getting light than larger ones, leading to some issues in low-light situations. So smartphones typically get around this by creating reduced resolution images with “bigger” pixels that are created by means of photosite binning (or pixel binning if you like).
Fig.1: Pixel binning (2×2) with the iPhone 14 Pro – converting 48MP to 12MP by merging
Photosite binning artificially groups smaller pixels into larger ones, potentially boosting the amount of light that can be gathered. The example in Figure 1 shows part of the quad-Bayer sensor of the iPhone 14 Pro. It illustrates how a 12MP is generated from a 48MP sensor. Here four photosites (2×2) are binned from the sensor, producing a 12 megapixel image, i.e. 48÷4=12. The Samsung Galaxy S22 Ultra takes 108MP images, and also defaults to 12MP, but instead of using a 2×2 binning, it uses what Samsung calls “Nonacell” technology”, merging 3×3 photosites into a super pixel. So the photosites, which have a pitch of 0.8µm, are merged to form a 2.4µm super-pixel. Figure 2 shows how a true 48MP images is create via some sort of remosaicing algorithm (pixel rearrangement algorithm).
Fig.2: The iPhone 14 Pro Quad—48MP bayer sensor to 48MP image via a simple remosaicing algorithm
The 200MP Samsung ISOCELL HP-3 1/1.14” sensor takes it a step further. It uses a new “Tetra2” binning mechanism, with 0.56µm photosites. It can produce 200MP, 50MP, and 12.5MP images (shown in Figure 3). In the first stage 2×2 binning is used on the sensors 0.56µm photosites, producing a 1.12µm “super-photosite”, and a 50MP image. Then another round of 2×2 binning is performed, creating a 2.24µm “super-super-photosite”, and a 12.5MP image.
These high resolution sensors are typically only used at full-resolution in bright scenes, reducing to a lower resolution in dark conditions. The idea of binning is to allow smartphone cameras to become more intelligent, choosing the optimal resolution based on the photographic conditions. Of course the question is, does anyone need 50 or 200MP images? As with all technology, there are drawbacks.
Fig.3: Conversion between the ISOCELL HP-3sensor and 200MP, 50MP, 12MP
Firstly, in the world of digital cameras, 100MP or thereabouts is usually found on a medium format camera with a sensor size of about 44×33mm, e.g. Fujifilm GFX 100S. These cameras are designed to take high resolution images, with sensors containing photosites of a reasonable light-gathering size (e.g. 3.76µm). Now compare the photosite area of this medium format camera, at 14µm2, with that of the Samsung Galaxy S22 at 0.64µm2 – 22 times more light gathering surface area. There is no comparison. Digital cameras also generally use high-quality lenses, with a lot more light gathering potential than those found on smartphones – when it comes to optics, smaller is always marred in compromises.
The process of binning pixels may also introduce artifacts, whether it be a small change in the overall colour of the image, or perhaps blurring artifacts – it really depends on the technology, algorithms, etc. Even remosaicing is a little more challenging, primarily because the different colours are further apart. So there isn’t really 4× more detail in 48MP mode than there is in 12MP mode. Then there is storage. 200MP image files should be large, but due to some sort of compression wizardry, the 12240×16320 images are reduced to files about 30MB in size, which is quite reasonable. Supposedly RAW (DNG) images can take up to 120MB. So storage is an issue. Also, what do you really need a 200MP camera for?
So if the mainstay is a quasi-12 megapixels why do manufacturers waste effort in creating hyper-megapixel smartphones? Perhaps for that one ideal 200MP shot? That perfect sunset while on vacation in Iceland. But what would you do with a 200MP image? Make a print to hang up on the wall? More megapixels does allow for better digital zooming, but the more likely case is that manufacturers know that megapixels matter to consumers, a situation they themselves have hyped up over the past two decades.
“Through absence of color, three-dimensionality and motion, the black-and-white photography is ipso facto ‘unnatural’. It expresses reality symbolically: gray tone values instead of color, two-dimensional projection (perspective) instead of space, blurredness or single-phase instead of constant motion. It is ‘symbolic’ in the same sense that speech and writing are, where sounds (words) are symbols for objects and conceptions, and signs (letters) are symbols for sounds (words). Photography means ‘reproduction’ only in the rare cases where the rendering of a two-dimensional, black-and-white object is the aim; otherwise it must be called a translation.”
Andreas Feininger, Feininger on Photography (1949, pp.195-196)
Zeiss Ikon was a part of the Zeiss empire emerging in Dresden in the 1920s as the conglomeration of six German optical companies. But its origins were likely in 1909 with the creation of the Internationale Camera A.-G. (ICA) in Dresden. It was initiated by Carl Zeiss and resulted in the merging of four companies: Hüttig, Krügener, Carl Zeiss Palmos, and Wünsche. This was likely precipitated by overproduction in the photographic industry in 1908.
Hüttig AG (1862) − One of the larger camera makers of the period. Produced the first single-lens-reflex camera, the Zeus-Spiegel-Kamera.
Krügener − Maker of cameras with magazines.
Wünsche AG (1887) − Camera maker: roll film, sheet film, plate film. Notable cameras included the “Bosco” and “Ada” mirror cameras, and the Mars detective camera
Carl Zeiss Palmos (1902) − Founded in 1900 as an independent camera company, then absorbed by CZJ.
In 1912 the small Swiss camera maker Zulauf joined the group. After rationalization, ICA produced a number of cameras continuing some of the lines of the founding companies. New products were also added. In 1926 Zeiss Ikon was formed. It was comprised of four companies:
ICA – Internationale Camera A.-G. (Dresden, 1909)
Optical Institute CP Goerz A.-G. (Berlin, 1888) − Camera and lens manufacturer
Contessa-Nettel A.-G. (Stuttgart, 1919) − Camera manufacturer created from the merger of Contessa Camerawerke Drexler & Nagel and Nettel Camerawerk.
Ernemann-Werke A.-G. (Dresden, 1889) − Camera maker
The evolution of Zeiss Ikon
To emphasize the focus on photography, the word Ikon was used, the German word for the Greek εἰκών meaning image. The use of Zeiss indicated an affiliation with the parent company in Jena. In 1927/28 two others companies joined the fold:
AG Hahn für Optik und Mechanik (Ihringshausen)
Goerz Photochemisches Werk GmbH (Berlin)
Over the years, a lot of streamlining was done, slimming down the company from 100 basic camera models in 1927 to 14 basic models in 1938. One of the most important products to come out of Zeiss Ikon was the Contax system, which appeared in 1932. This was followed by the Contax II in 1936. There were many cameras in the 1930s – Ikonta folding cameras, Baldur (a box camera), Contaflex (twin-lens reflex). From 1940 the German economy pivoted to a war economy. The end of the war brought damage to many of the factories, and in 1948 the company was expropriated and converted into a state company (using the designation VEB, meaning Volkseigener Betrieb or publicly owned enterprise). In the same year, the new western headquarters of Zeiss Ikon was established in Stuttgart.
Over the next few years Zeiss Ikon in East Germany changed its name quite a lot:
1945 − VEB Zeiss Ikon Dresden
1948 − VEB Mechanik Zeiss Ikon
1951 − VEB Optik Zeiss Ikon
1955 − VEB Zeiss Ikon
1958 − VEB Kinowerke
In 1959 of course, VEB Kinowerke was folded into VEB Kamera-und Kinowerk Dresden, the precursor to VEB Pentacon Dresden.
In West Germany, the company continued to be known as Zeiss Ikon. In 1956 the Carl Zeiss Stifung, (the parent company of Zeiss Ikon), bought Voigtlander. It continued to be operated as a separate company until 1965, when it was merged with Zeiss Ikon to form Zeiss Ikon-Voigtlander. It produced mostly different products to its eastern brethren, although there were similarities. For example both companies made renditions of the Contax camera. In 1972, Zeiss Ikon-Voigtlander ceased production of cameras.
❖ Zeiss Ikon in West Germany was established at the Contessa-Nettel factory in Stuttgart, the only one of Zeiss’s major facilities not under Soviet control.
Vintage 35mm film cameras can survive for decades. You can pick up a camera from the 1960s and if its fully mechanical, there is a good chance it will still be fully functional. Vintage cameras that require batteries, e.g. for the exposure meter, or contain electronics are more of a hit and miss situation. The problem is that no one really can ascertain how well electronics age. Some age well, others don’t. Digital cameras are another thing altogether.
Anyone who has used digital cameras for the past 20 years likely has a few of these “zombie” cameras sitting in a cupboard somewhere. Cameras are upgraded, with their predecessors effectively “shelved”. The reality is that for the most part, digital cameras beyond a certain age just don’t hold much value (unless they are from Leica). One problem with vintage digital cameras is that things can just stop working. I have an old Olympus E-PL1 MFT camera. I haven’t used it in a while, and when I tried it today, it displayed a blinking red “IS-1” indicator. This basically means that the image stabilizer has failed (noticeable when the camera is first turned on because the anti-dust mechanism makes a rattling noise). That’s inherently an issue with electronics, things can just stop working, and fixing them on an old camera is often just not financially viable. It’s basically digital junk.
It’s dead Jim!
But the bigger problem is actually the battery. Some manufacturers have decided over the years to change the type of batteries used in their cameras (for many reasons). When a camera becomes legacy, i.e. is no longer supported, there is a good chance that the manufacturer will stop making the associated batteries. The E-PL1 was introduced in 2010, and although the battery in my camera still works, it is not possible to buy Olympus BLS-1 batteries for it anymore. It is also not really possible to determine what the status of existing batteries is – measuring the number of battery cycles is not easy or even possible (unlike laptop batteries). One way is to charge the battery, and take photographs until it drains, but tedious is an understatement. A battery will typically last between 300-500 recharge cycles.
The result is a vintage digital camera that may still work well, but ultimately needs a new battery. You could try the gambit of 3rd party batteries, but there really isn’t any way of knowing what battery will actually work, because they don’t usually come from verifiable battery makers (often resulting in slight fluctuations in the voltage provided to the camera). Yes, you can get replacement batteries from companies like Duracell (via DuracellDirect.com), however this company is not owned by Duracell, but rather PSA Parts Ltd. And these batteries are not exact replacements. For a real analysis, check out this article by Reinhard Wagner who dissects some off-brand Olympus BLN-1 batteries (it’s in German, but is easy to translate).
So what does this mean? Essentially if you want to use a camera long-term, make sure you have a good amount of spare batteries, i.e. anyways purchase at least one spare battery when purchasing a new camera. Also check the date on the batteries, as they made need replacing as they age. In all likelihood, nobody is going to be using vintage digital cameras in 50 years time, but they still might be using film ones.
P.S. The digital “age” of a camera is sometimes counted using the idea of “shutter actuation’s“. This is basically a count of how many photos have been taken. A modern mirrorless camera will have shutters rated at around 100-150K. Most cameras likely won’t come anywhere near that count, so they aren’t really a valid notion, except perhaps to indicate how much a camera has been used.
Certain vintage cameras can be expensive, but there are sometimes opportunities to buy these cameras in a malfunctioning or “non-working” form for a reasonable price. A good store will tell you what is wrong with the camera, but the problem is that there aren’t exactly a lot of places where you can get film cameras fixed, and of those, they are often focused on a particular brand of camera. Fixes that involve digging into the guts of a camera are inherently marred with problems. A while back I bought an Exakta TL VX1000 camera, because it was cheap, but mostly for the lens. When it arrived it seemed to work, except the film-transport lever had been snapped in half. So I bought a replacement lever, and thought it would be a simple process to fix it. It wasn’t and although I replaced the lever, something else broke (a spring). I should have had a better understanding of the inner workings of Exakta cameras.
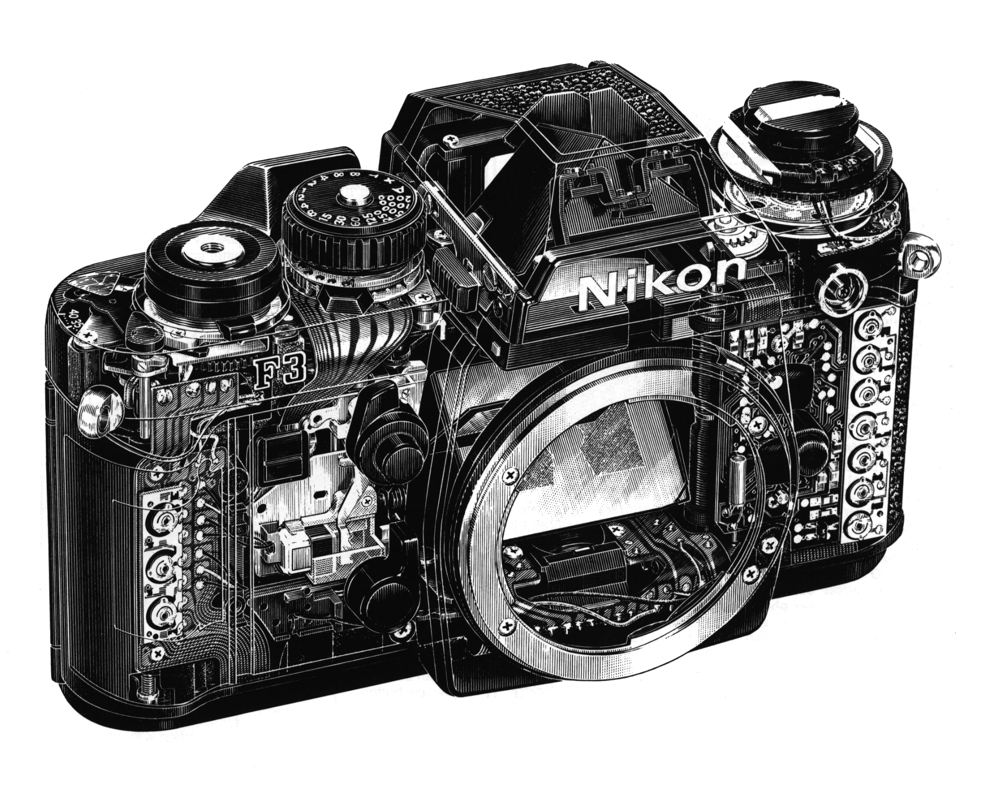
The Nikon F, a fully mechanical camera (and Nikon’s first SLR) has 918 mechanical pieces.
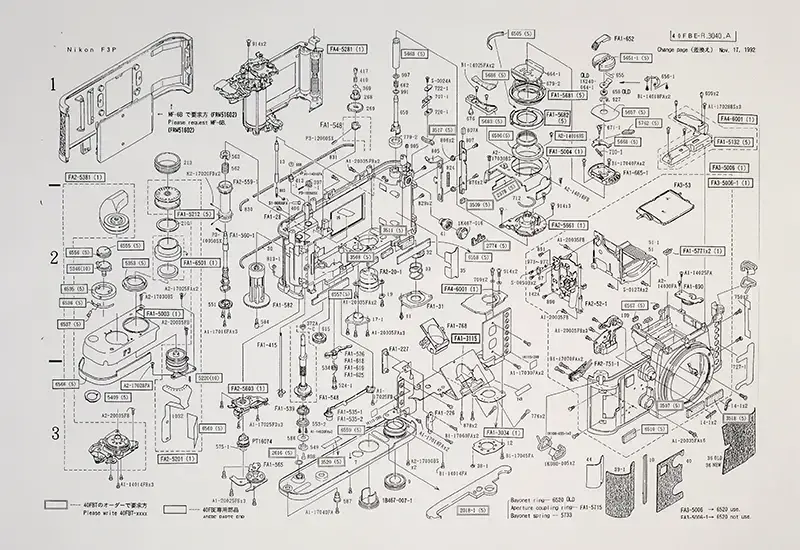
In reality, very few cameras are easy to fix. Fully mechanical cameras are filled with parts, and cameras with electronics are even trickier – i.e. it may be possible to source a donor part, or even 3D print a part, but recreating 50 year-old electronics is another thing altogether. You need the appropriate tools, and access to parts and assembly diagrams, e.g. the Nikon F3-P parts diagram posted on Japan Camera Hunter. The easiest repairs are obviously cosmetic issues – replacement of leatherette, battery covers, etc. or replacing light seals. There is also the issue of cost – fixing a vintage camera can often become expensive, especially as parts often have to be salvaged from a “donor” camera. Even the simplest parts, like springs, can be challenging to find, considering they may be decades old (springs have to be the right size and have the right tension).
The Nikon F3, with semi-automatic exposure control, was not any less complex than film cameras.
If you are really interested in doing your own internal camera repairs, I suggest reading though the information below. For cameras that are rare, I would recommend having them fixed at an experienced repair facility. In Canada, probably one of the best known camera repair spots is Paramount Camera Repair, in Saskatoon. There is also Factory Cameras in Vancouver.
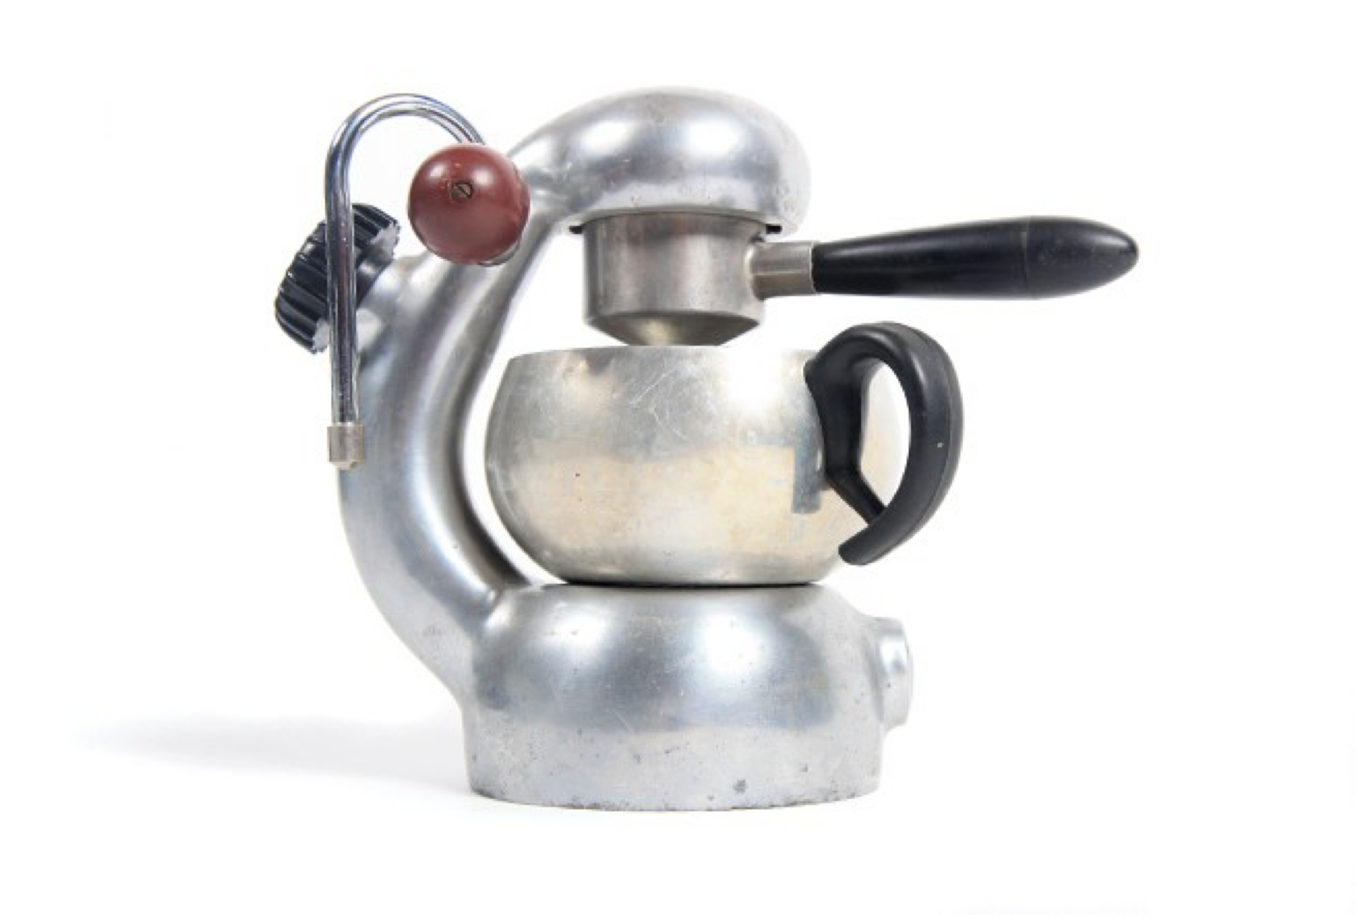
There is a condition known as the aesthetic-usability effect, whereby users perceive objects with more aesthetically pleasing designs to be easier to use than less aesthetically pleasing designs. Humans tend to be drawn towards nicer looking things. Take for example the aesthetic appealing atomic coffee maker. The design is attributed to Italian Giordano Robbiati, and was born in the 1940s. It ozzed aesthetic appeal, and was very popular (and still is). People likely presumed that something that looks nice probably works well. Its curved form likely melded well with the fluidity of coffee.
The atomic espresso maker.
People of course use aesthetics to judge appeal and perceived usability. Something that looks will likely work well. It is no different with cameras. There are cameras that are very aesthetically pleasing, and work extremely well, from the perspective of the layout of controls, or even how easy it is to add/remove a lens.
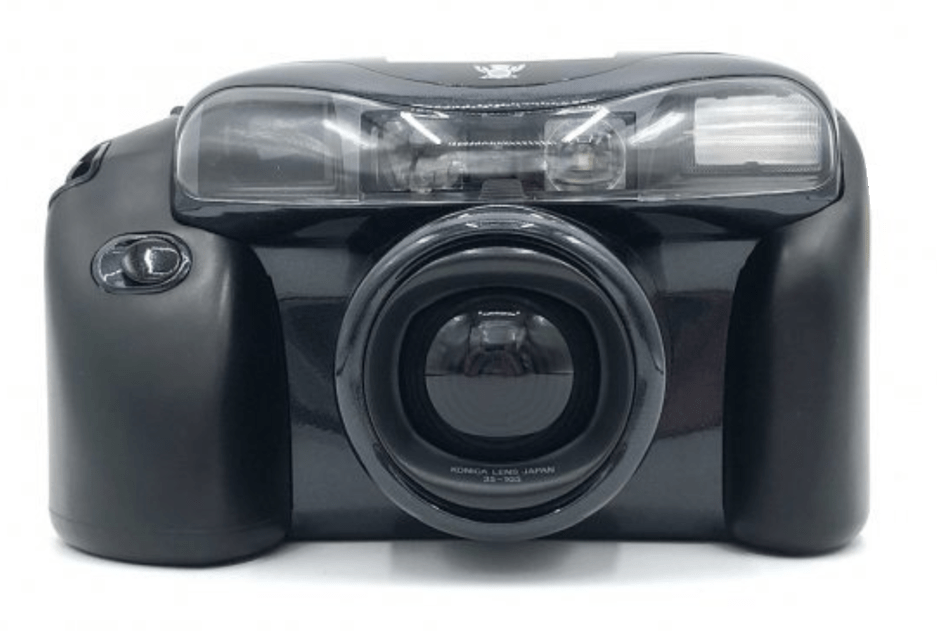
One of the ugliest cameras around appears to be the Konica Aiborg, more often referred to as Darth Vader camera. A 35mm camera which appeared in 1991, its name a blend of AI and cyBORG. It was bulky, had poor ergonomics, and just seemed an odd design from an aesthetic point-of-view. It’s quite possible that curved surfaces just don’t translate well to cameras, the same as they do to espresso makers. In fact all the curved surfaces do is detract from the aesthetic appeal of the camera, and may ultimately affect its usability.
Luke, I am you father (Konica Aiborg)
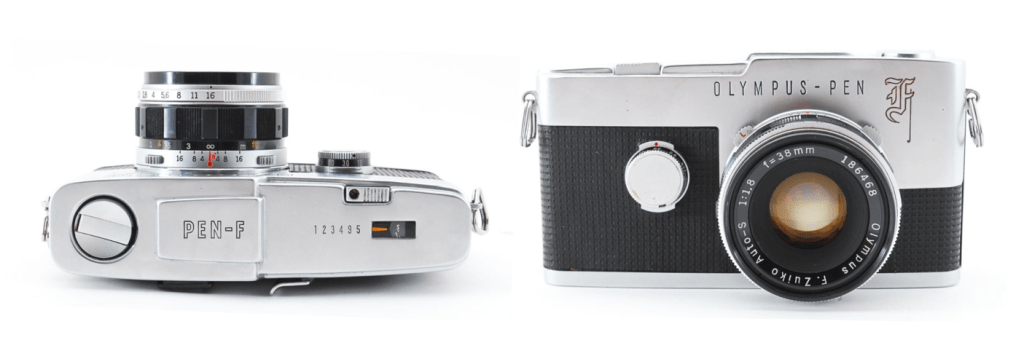
What is the most aesthetically pleasing 35mm camera? Well that likely is in the eye of the beholder… and whereas many people might agree about an ugly camera, beautiful cameras are harder to pin down. With film cameras, I am certainly partial to cameras that have clean lines, but that may result from the fact that the pictures themselves are rectangular in form. I do like the Canon 7s, the Olympus Pen F and just about any Ihagee Exakta Varex camera. With digital cameras I inherently lean towards those that mimic the lines of previous film cameras.
The Olympus Pen-F
In my opinion, one of the nicest 35mm cameras is the Olympus Pen-F half-frame camera. It has beautifully clean lines, lacking the “triangular hat” of a regular 35mm SLR (because it uses a Porro prism), and placing the shutter speed dial on the front of the camera. The camera is small, and compact, ergonomic to use, and almost minimalist.


